
Layouts
P4 on a plank
Perhaps the most important message for someone moving to P4 is - don't be too ambitious in what you set out to start with. It is far more important to get something running, so you can get a feel for what working in these standards is like and what kind of project you, alone or with friends, can sensibly attempt. So the best starting point is likely to be a simple test track on a base, say 1.5 or 2.0 metres long and 300mm wide. While you can learn a lot using a smaller base - a simple plank only 1.0 metres long and 100 or 150mm wide, say - but a little more space will allow you to include some curved track. It can make sense at this stage to try out different types of track construction (eg: flexible track bases, plastic sleepered track using separate components, soldered ply and rivet construction); and you should definitely make sure you include one or two turnouts (points) in whatever you do. Much of what you need to know about track is included elsewhere in this Supplement, though we have not included information on baseboards or wiring and control systems as these are common to other gauges (and even scales).
The track layout is not important, though arranging the test track so you can do some shunting or even run round a short train will add to what you can learn from it. Some test tracks end up with scenery and become more like a proper layout, but really it is best to regard the test track as a proving ground for building and laying track and getting something running. Then, using that experience, you can design and build a proper layout.
A proper layout
 With a better idea of what's involved
and the time and skill needed, your thoughts can turn to a more
complete layout project. Often, this is where the difficulties really
start - there are just too many choices and too much to think about at
once. Choosing a period, railway company, type of railway operation,
geographical location and so on is one part of this. Designing a track
layout that will fit the space you have and have some chance of being
a believable representation of your chosen prototype is when harsh
reality closes in. The fact is, however much space you have, your
imagination can always ensure it is not enough! But see overleaf.
With a better idea of what's involved
and the time and skill needed, your thoughts can turn to a more
complete layout project. Often, this is where the difficulties really
start - there are just too many choices and too much to think about at
once. Choosing a period, railway company, type of railway operation,
geographical location and so on is one part of this. Designing a track
layout that will fit the space you have and have some chance of being
a believable representation of your chosen prototype is when harsh
reality closes in. The fact is, however much space you have, your
imagination can always ensure it is not enough! But see overleaf.
This short section cannot attempt to deal with all the issues involved in designing a layout, and so we concentrate on the particular issues that arise with modelling to P4 standards.
It helps to have a clear idea of the rolling stock you expect to run on the layout as the choice of curve radius and turnout size may limit what you can run. There are no absolute rules as all sorts of tweaks can be applied to help large locomotives round tight curves, although sometimes at the expense of realism.
 In fact, how it looks is often the
best guide to what it is worth attempting to do. For example, a
dockyard or industrial layout with small shunting locomotives and
short wheelbase 4-wheel wagons can look good with curves of 600 -
800mm radius and use A5 turnouts - but bogie wagons, coaches and large
locomotives, even if they can be persuaded to run reliably round such
curves, will never look right.
In fact, how it looks is often the
best guide to what it is worth attempting to do. For example, a
dockyard or industrial layout with small shunting locomotives and
short wheelbase 4-wheel wagons can look good with curves of 600 -
800mm radius and use A5 turnouts - but bogie wagons, coaches and large
locomotives, even if they can be persuaded to run reliably round such
curves, will never look right.
You will find many different views on this, but it may be helpful to give some rough guidelines to work to: For large steam locomotives and main line bogie coaches, aim for a minimum radius of 1200mm (4’0”). For smaller (eg: pre-Grouping) locomotives and coaches, a minimum radius of 1000mm may be acceptable.
Diesel and electric locomotives do not suffer as much from excessive overhangs and long fixed wheelbases as large steam locomotives, so a minimum radius of around 1000mm may be acceptable for even the largest modern rolling stock - but use transition curves and take care with reverse curves (eg in crossovers) to avoid problems with vehicle end throws.
If rolling stock is restricted in wheelbase and overall length, much tighter curves can be used, but care must still be taken to avoid 'buffer locking' caused by excessive end throws.
For running lines, use turnouts with B or C switches. If possible, aim to use nothing tighter than a B7. In yards and sidings, turnouts with A switches save space.
 Some of this may seem very
restrictive if you have until now worked with ready to run rolling
stock. There is no doubt that moving to P4 involves accepting that
less railway will fit in a given space than if, for example, OO gauge
is used. What may be surprising is what can be fitted into a modest
space and this was well illustrated by the Scalefour Society's '18.83
Challenge' - when a large number of very different exhibition layouts
were produced - some by complete beginners in P4 - each occupying an
area no greater than 18.83 square feet.
Some of this may seem very
restrictive if you have until now worked with ready to run rolling
stock. There is no doubt that moving to P4 involves accepting that
less railway will fit in a given space than if, for example, OO gauge
is used. What may be surprising is what can be fitted into a modest
space and this was well illustrated by the Scalefour Society's '18.83
Challenge' - when a large number of very different exhibition layouts
were produced - some by complete beginners in P4 - each occupying an
area no greater than 18.83 square feet.
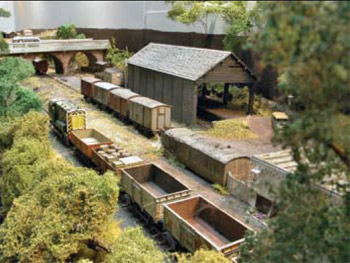
The top picture not only shows the runner-up in the '1883 Challenge' but also the winner of the photography competition at the event. Simon Challis has convincingly captured the Somerset & Dorset Joint at Cheddar in an area of only 18.83 square feet.
(Centre picture) With the help of Colin Brown, Alastair Dickson set about recreating his home territory as he remembered it in the 1960s, with Colinton, above right. A simple plan, bottom, it offers much of interest, and again met the '1883 Challenge'.
(Bottom picture) If you want to go narrow gauge, or broad gauge, P4 can replicate them too, as Tony Miles' Adavoyle shows.