Hi Jim,
Lovely stuff. What does it for me is the green. Just how I renember it. What did you use?
John.
Brettell Road - Back to wagons - and a correction.
-
Lord Colnago

- Posts: 403
- Joined: Tue Aug 11, 2009 8:42 pm
Re: Brettell Road
The second best priest
-
jim s-w

- Posts: 2190
- Joined: Wed Jul 30, 2008 5:56 pm
Re: Brettell Road
Thanks all
John it’s Phoenix p101 br loco green (post 1954)
Hth
Jim
John it’s Phoenix p101 br loco green (post 1954)
Hth
Jim
-
Noel

- Posts: 1983
- Joined: Wed Jun 23, 2010 1:04 pm
Re: Brettell Road
PeteT wrote:Edited to add that other sources say that by 1959 10001 was not black and silver...
https://www.heritagerailway.co.uk/coming-up-in-issue-251-of-hr-the-plan-to-re-create-a-d16-1/ They later had the waist rail painted duck egg blue, and later still gained small yellow panels on the nose. The roofs, incidentally, apparently really were originally primrose yellow in this livery...
Regards
Noel
Noel
-
kelly

- Posts: 529
- Joined: Mon May 30, 2016 1:59 pm
Re: Brettell Road
Excellent work once again Jim.
Pete, 10000/1 and 10201-3 got green iirc between 1955-59 when the southern locos went north in '55 to concentrate the 5 locos on one region.
Pete, 10000/1 and 10201-3 got green iirc between 1955-59 when the southern locos went north in '55 to concentrate the 5 locos on one region.
-
jim s-w
- Posts: 2190
- Joined: Wed Jul 30, 2008 5:56 pm
Re: Brettell Road
Just decided to do a few images, including a view of the canal which I've never gotten round to and a few experiments.
-
David Knight
- Posts: 821
- Joined: Sun Jul 20, 2008 6:02 pm
Re: Brettell Road
You should submit a few of those to the “real atmosphere” file at MRJ especially the last one. 
Cheers,
David
Cheers,
David
-
Phil O
- Posts: 364
- Joined: Sun May 05, 2013 5:23 pm
Re: Brettell Road
Jim
It looks like a damp miserable night at Brettell Road. As noted above some real atmosphere captured there.
Phil
It looks like a damp miserable night at Brettell Road. As noted above some real atmosphere captured there.
Phil
-
jim s-w
- Posts: 2190
- Joined: Wed Jul 30, 2008 5:56 pm
Re: Brettell Road
In September I will be doing a demo at Scaleforum entitled getting the most from older models. Regular readers will know I have a bit of a thing for starting with old models that many will have long ago consigned to the bin. To this end I thought I’d look at a couple of old building kits too. Namely Airfix.
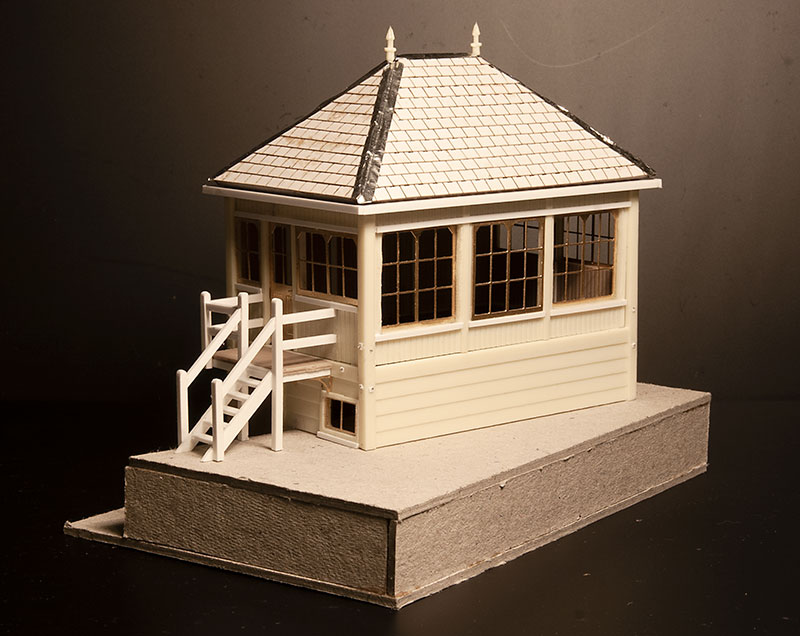
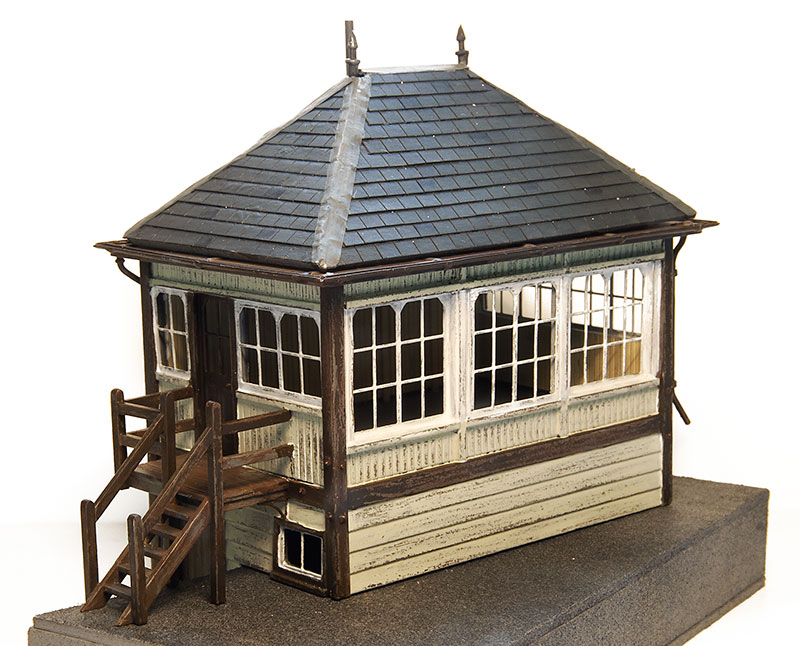
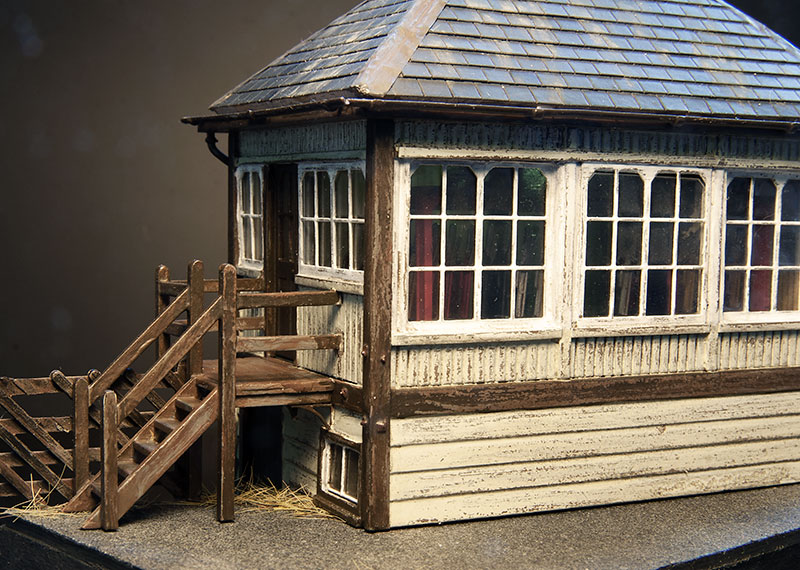
The Airfix Signal box is based on the one at Oakham which is a Midland Railway type 2a box from the early 1900's I liked the look of the platform mounted version at Kings Heath (which is a type 3a) so set to work
The kit, as supplied, is too wide. I used some etched windows from Pheonix models and reduced the ends to fit. I binned the roof and knocked up a new end platform from microstrip. I wanted to use this model to try out a few new (to me) painting ideas.
First step was to paint it in an aged wood colour. The wood effect is pretty easy and quick if you work more like a painter and less like a modeller
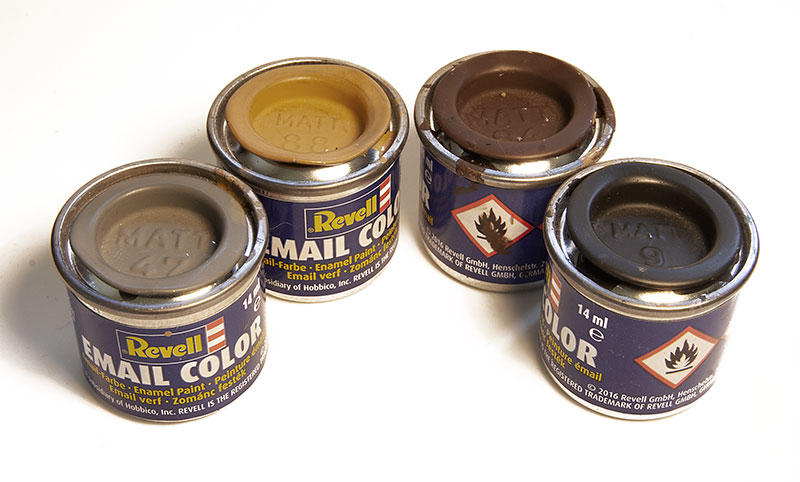
I use these 4 Revell enamel colours as they are nice and matt. They are numbers 47 (mouse grey), 88 (ochre brown) , 84 (leather brown) and 9 (anthracite grey). The actual colours aren't that critical. I use a dunk and dip technique and work on a base of Halfords grey primer. I dunk the brush into the mouse grey and ochre brown and lightly dip the tip into the leather and anthracite. All at the same time so that the brush is loaded with layers of colours. Then is just a simple case of drawing the brush across the model and letting the colours mix themselves. You don't want them to mix too well so try and do one stroke per plank and work in the direction of the wood. The trick is to let the brush do the random work for you and not to fight it too much. My end result was a smidge dark so when dry, I drybrushed more mouse grey lightly over the model.
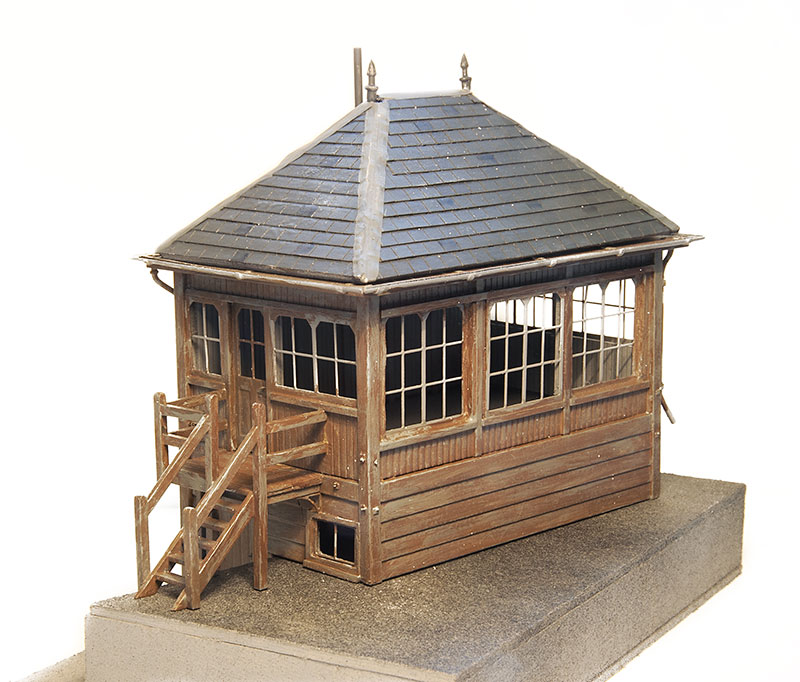
This is what ended up with. I then gave it a couple of coats of matt varnish.
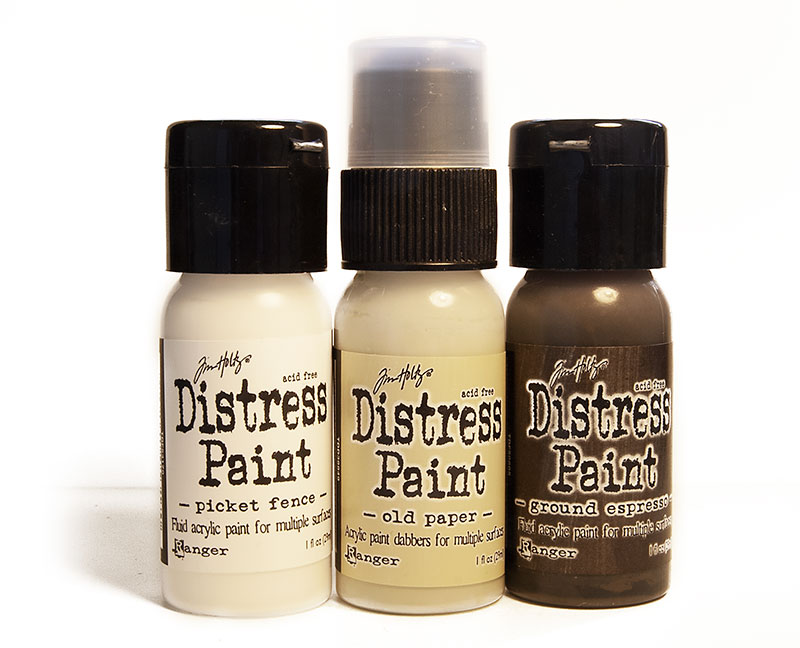
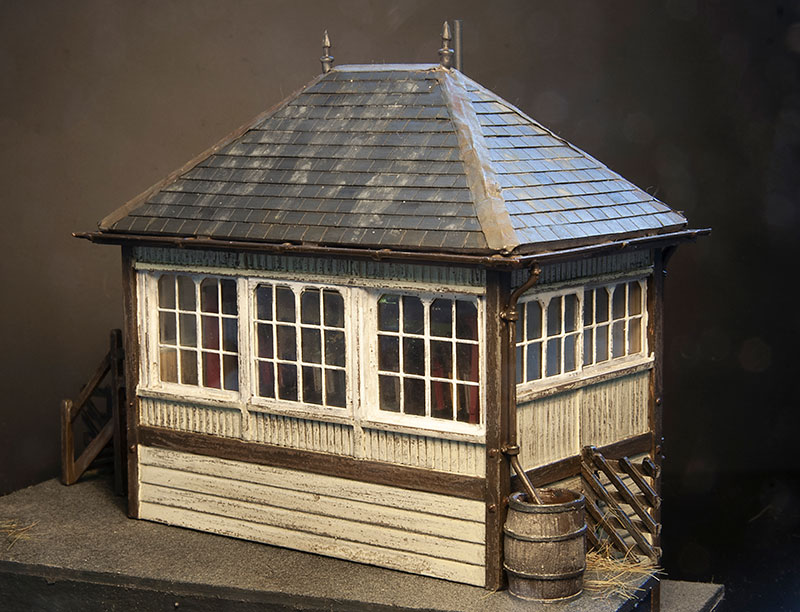
This is the bit thats new so me. Ranger distress paints. The large scale guys have been using these for a while with good results but the method for smaller scales seems a bit different. The paint is intended to be dabbed on quite think and left so that it starts to crackle and flake on it own. For our scale I found it better to brush it on in 2 coats. This doesn't do any 'magic though so the next stage is with a fine sanding stick to give it a little help. Again working in the direction of the wood.
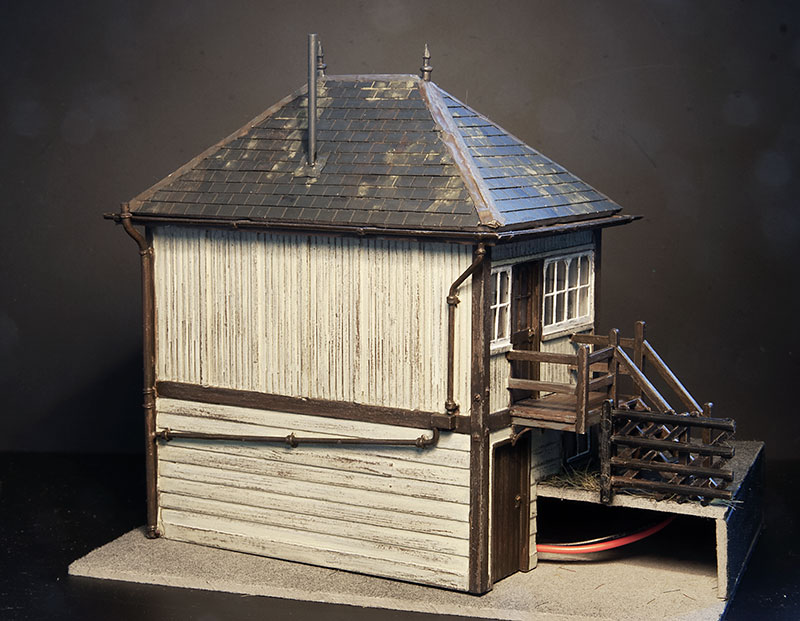
Heres the result. Distressed but not weathered. Another coat of matt varnish and then back to enamels, used this time as a thin wash. I added an interior from Ratio and a signaller from Modelu. The finished result can be seen below

The Airfix Signal box is based on the one at Oakham which is a Midland Railway type 2a box from the early 1900's I liked the look of the platform mounted version at Kings Heath (which is a type 3a) so set to work
The kit, as supplied, is too wide. I used some etched windows from Pheonix models and reduced the ends to fit. I binned the roof and knocked up a new end platform from microstrip. I wanted to use this model to try out a few new (to me) painting ideas.
First step was to paint it in an aged wood colour. The wood effect is pretty easy and quick if you work more like a painter and less like a modeller
I use these 4 Revell enamel colours as they are nice and matt. They are numbers 47 (mouse grey), 88 (ochre brown) , 84 (leather brown) and 9 (anthracite grey). The actual colours aren't that critical. I use a dunk and dip technique and work on a base of Halfords grey primer. I dunk the brush into the mouse grey and ochre brown and lightly dip the tip into the leather and anthracite. All at the same time so that the brush is loaded with layers of colours. Then is just a simple case of drawing the brush across the model and letting the colours mix themselves. You don't want them to mix too well so try and do one stroke per plank and work in the direction of the wood. The trick is to let the brush do the random work for you and not to fight it too much. My end result was a smidge dark so when dry, I drybrushed more mouse grey lightly over the model.
This is what ended up with. I then gave it a couple of coats of matt varnish.
This is the bit thats new so me. Ranger distress paints. The large scale guys have been using these for a while with good results but the method for smaller scales seems a bit different. The paint is intended to be dabbed on quite think and left so that it starts to crackle and flake on it own. For our scale I found it better to brush it on in 2 coats. This doesn't do any 'magic though so the next stage is with a fine sanding stick to give it a little help. Again working in the direction of the wood.
Heres the result. Distressed but not weathered. Another coat of matt varnish and then back to enamels, used this time as a thin wash. I added an interior from Ratio and a signaller from Modelu. The finished result can be seen below
Last edited by jim s-w on Mon Apr 22, 2019 9:06 am, edited 1 time in total.
-
Noel
- Posts: 1983
- Joined: Wed Jun 23, 2010 1:04 pm
Re: Brettell Road
Some interesting techniques, Jim, and looking quite effective, even in 4mm. All you need now is a couple of nameplates, one at each end [which was LMSR practice], to comply with the BoT requirement for working boxes to be identified. Your colour scheme is LMSR, so the nameplates should be black and white; the LMR painted them, like the box itself, in maroon and cream.
Incidentally, "platform mounted" boxes often weren't, the box was built first and the platform then built around it [they 'belonged' to different departments, and that way the box could remain untouched if the platform was removed or altered]. This explains the full height external door to the locking room, which was then reached via a short flight of steps down from the platform.
Incidentally, "platform mounted" boxes often weren't, the box was built first and the platform then built around it [they 'belonged' to different departments, and that way the box could remain untouched if the platform was removed or altered]. This explains the full height external door to the locking room, which was then reached via a short flight of steps down from the platform.
Regards
Noel
Noel
-
jim s-w
- Posts: 2190
- Joined: Wed Jul 30, 2008 5:56 pm
Re: Brettell Road
Thanks Noel. Building the platform around the box makes a lot of sense now you point it out. I might etch some nameboards at some point.
Cheers
Jim
Cheers
Jim
-
Terry Bendall
- Forum Team
- Posts: 2427
- Joined: Sun Jul 27, 2008 7:46 am
Re: Brettell Road
Brilliant!! 
Terry Bendall
Terry Bendall
-
John Palmer
- Posts: 825
- Joined: Fri Jul 15, 2011 11:09 pm
Re: Brettell Road
jim s-w wrote:Thanks Noel. Building the platform around the box makes a lot of sense now you point it out. I might etch some nameboards at some point.
Cheers
Jim
May be worth taking a look at the Ambis Engineering catalogue (http://ambisengineering.co.uk/). Includes 6" etched letters for MR and LMS signal box nameboards, plus other Midland items that may be of interest.
-
jim s-w
- Posts: 2190
- Joined: Wed Jul 30, 2008 5:56 pm
Re: Brettell Road
Thanks John
Will do
Will do
-
jim s-w
- Posts: 2190
- Joined: Wed Jul 30, 2008 5:56 pm
Re: Brettell Road
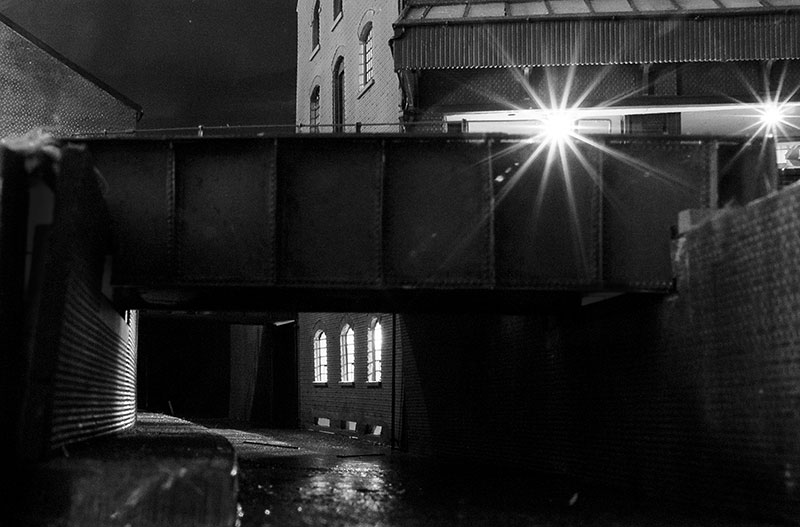
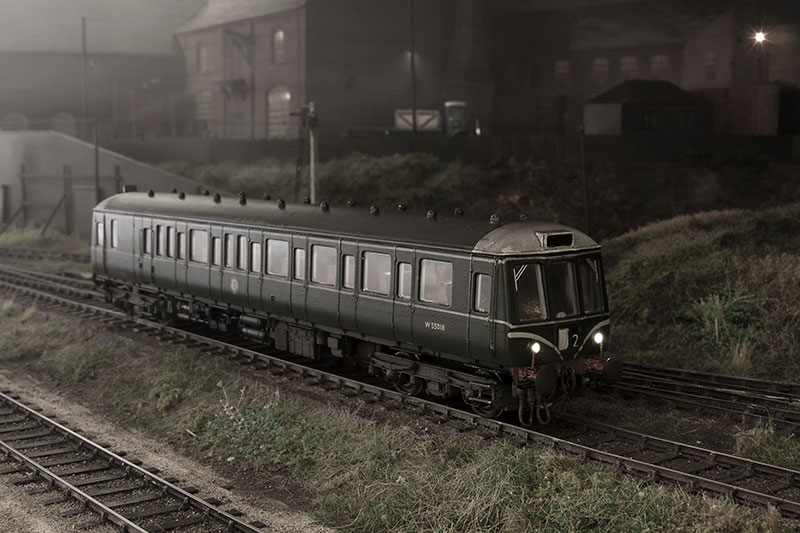
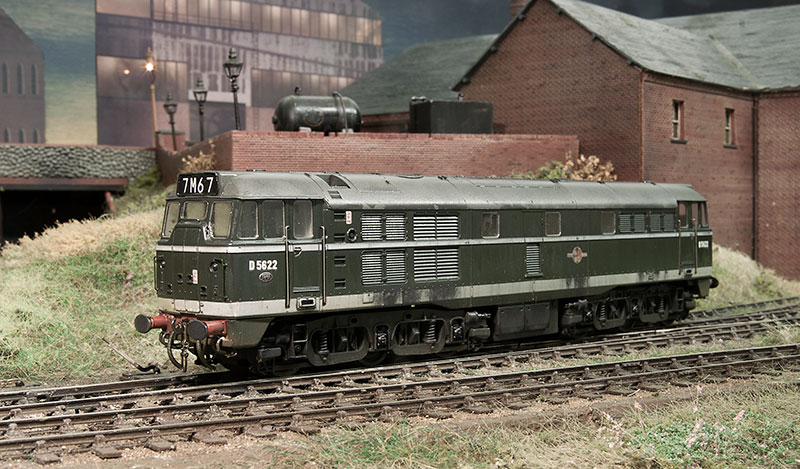
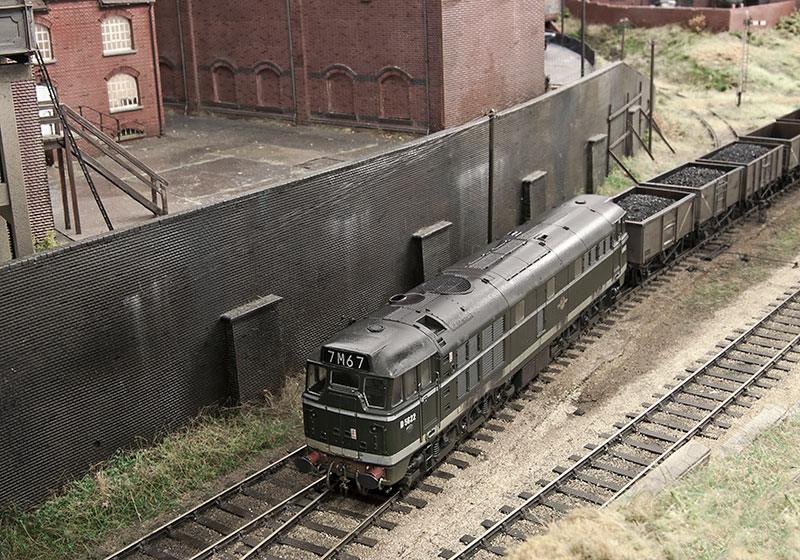
This post has a bit of a common theme about it. Its all about 3's and 0's! With DEMU show coming up at the start of June I plan to show Brettell road with a bit more of a diesel bias than usual. While I have a lot of blue stock I could use I want ot keep it late 50's very early 60's so my blue stuff is a none starter (although I might consider a fully blue show one day). Figuring that a few more green diesels wouldn't go amis I've been busy.
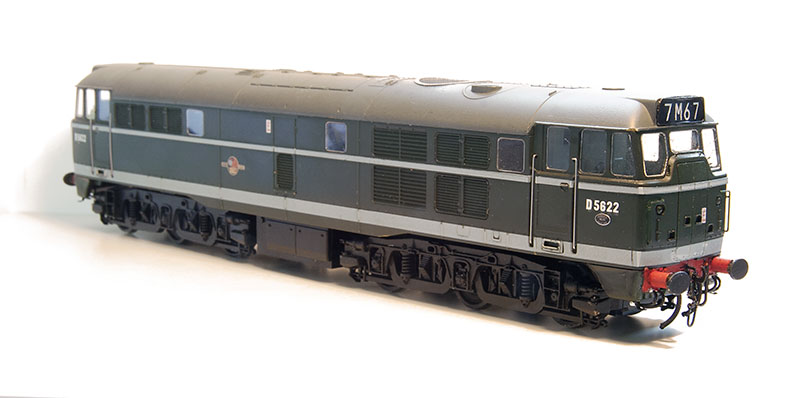
New Street has a lot of class 31's and I've always liked them. In the early days (when they were class 30's) they weren't all that common in the midlands being more of an eastern region machine. However a cheap Lima one was found in green and I set to work on a quickie conversion. As the longest train on Brettell road is less than 4 feet there was really no reason to abandon the lima pancake motor for this one so i just fitted extra pickups and more weight. Incidentally the builders plaque is one of the Railtec 3D transfers and very nice they are too! Just a bit of weathering required.
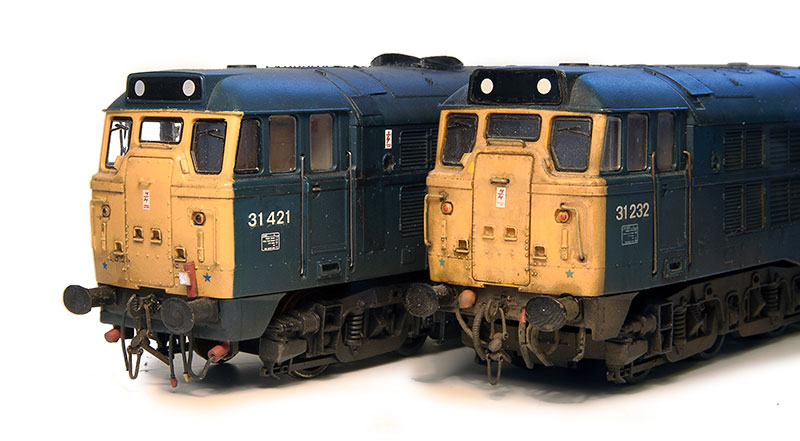
Funny how doing something subtly different leads to moments of realisation! I've never quite thought that the Lima none plated headcode class 31's looked quite right somehow. It wasn't until i looked at the green one that I realised it because its too small. Someone in lima must have realised this as well as the printing for the headcode box is much bigger than the molding. So while i was fixing the headcode on the green one I did the 2 blue ones i have as well (using a rudimentary jig). The original size is on the left and the revised one on the right.
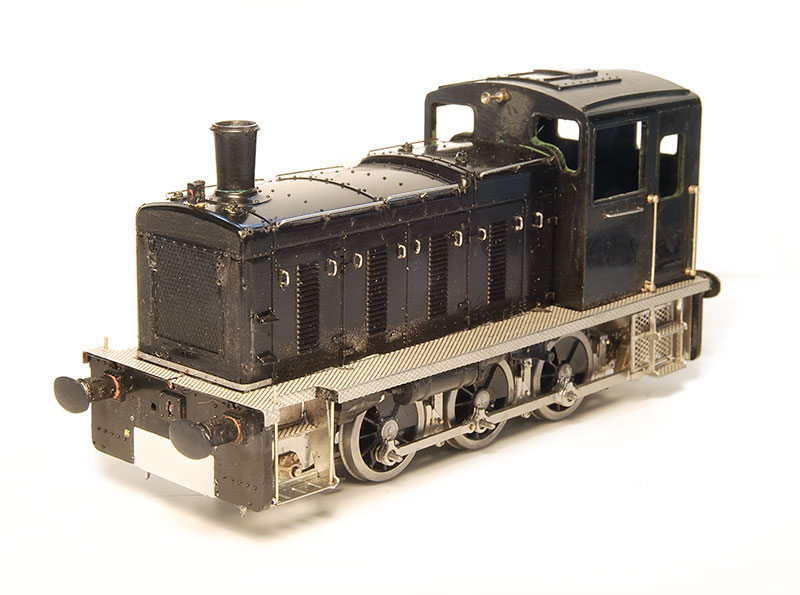
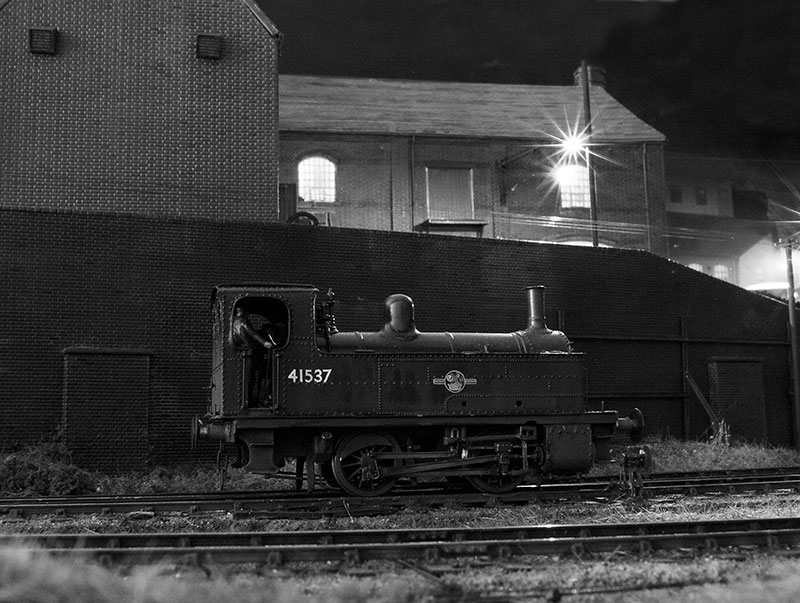
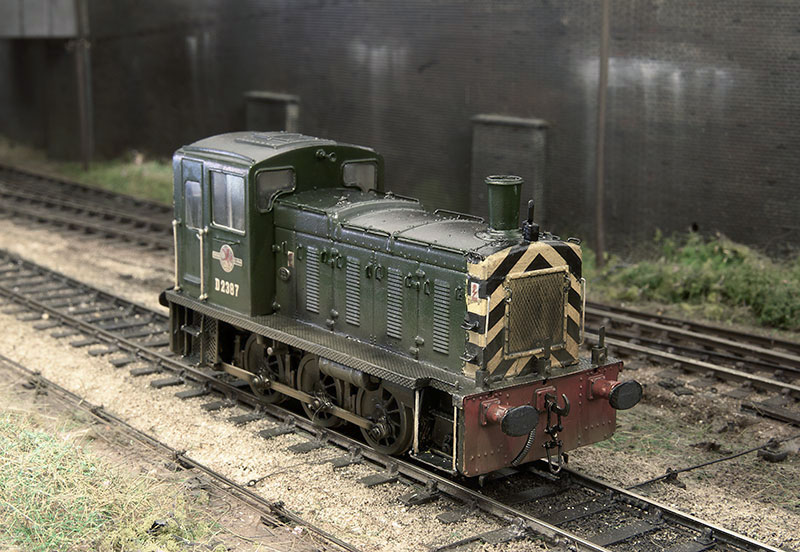
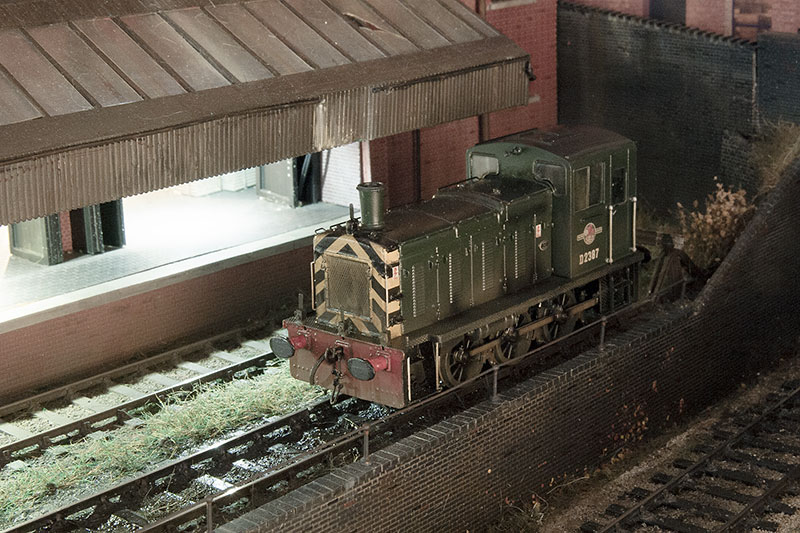
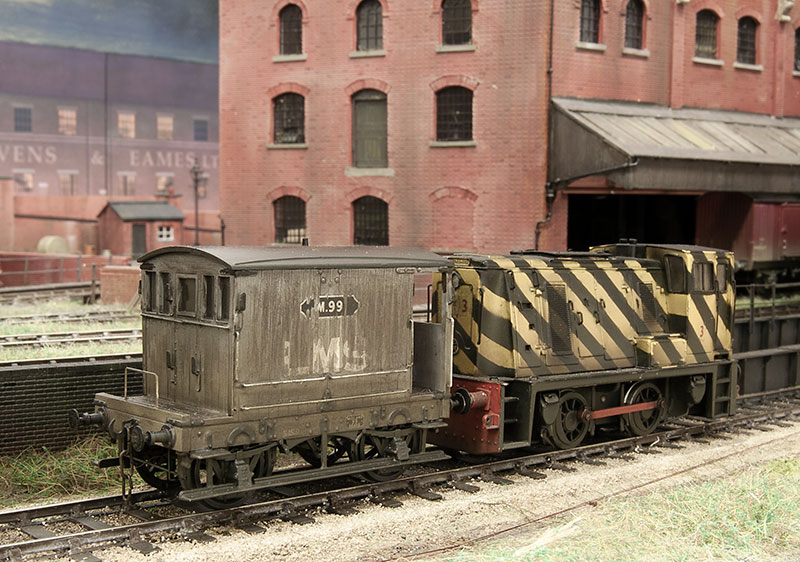
Switching the 3 and 0 around I've also been working on a class 03 shunter using an old mainline body and a high level chassis. As with all High level chassis kits I've tried so far they just work from the box. Everything is worked out already and its all just a bit, well. easy!
This one is going to be D2387 which is one of, I believe, 3 that were allocated to Monument Lane shed and worked as station pilot for New Street as well as occasional forays further afield (Harbourne branch being an example). It was a Doncaster example and didn't last long enough to receive a tops number, being stored in 1972 and scrapped the following year.
New Street has a lot of class 31's and I've always liked them. In the early days (when they were class 30's) they weren't all that common in the midlands being more of an eastern region machine. However a cheap Lima one was found in green and I set to work on a quickie conversion. As the longest train on Brettell road is less than 4 feet there was really no reason to abandon the lima pancake motor for this one so i just fitted extra pickups and more weight. Incidentally the builders plaque is one of the Railtec 3D transfers and very nice they are too! Just a bit of weathering required.
Funny how doing something subtly different leads to moments of realisation! I've never quite thought that the Lima none plated headcode class 31's looked quite right somehow. It wasn't until i looked at the green one that I realised it because its too small. Someone in lima must have realised this as well as the printing for the headcode box is much bigger than the molding. So while i was fixing the headcode on the green one I did the 2 blue ones i have as well (using a rudimentary jig). The original size is on the left and the revised one on the right.
Switching the 3 and 0 around I've also been working on a class 03 shunter using an old mainline body and a high level chassis. As with all High level chassis kits I've tried so far they just work from the box. Everything is worked out already and its all just a bit, well. easy!
This one is going to be D2387 which is one of, I believe, 3 that were allocated to Monument Lane shed and worked as station pilot for New Street as well as occasional forays further afield (Harbourne branch being an example). It was a Doncaster example and didn't last long enough to receive a tops number, being stored in 1972 and scrapped the following year.
-
Noel
- Posts: 1983
- Joined: Wed Jun 23, 2010 1:04 pm
Re: Brettell Road
jim s-w wrote:This one is going to be D2387 which is one of, I believe, 3 that were allocated to Monument Lane shed
The 5/64 Ian Allan Locoshed book gives the Monument Lane (2H) allocation as D2386/7/95/6.
Regards
Noel
Noel
-
jim s-w
- Posts: 2190
- Joined: Wed Jul 30, 2008 5:56 pm
Re: Brettell Road
Thanks Noel
Jim
Jim
-
jim s-w
- Posts: 2190
- Joined: Wed Jul 30, 2008 5:56 pm
Re: Brettell Road
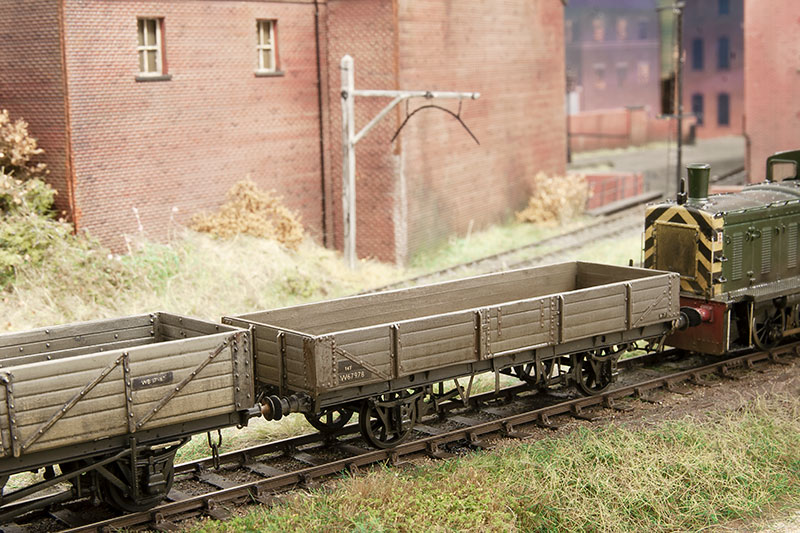
Still working my way through the dregs of my wagon kits for Brettell road
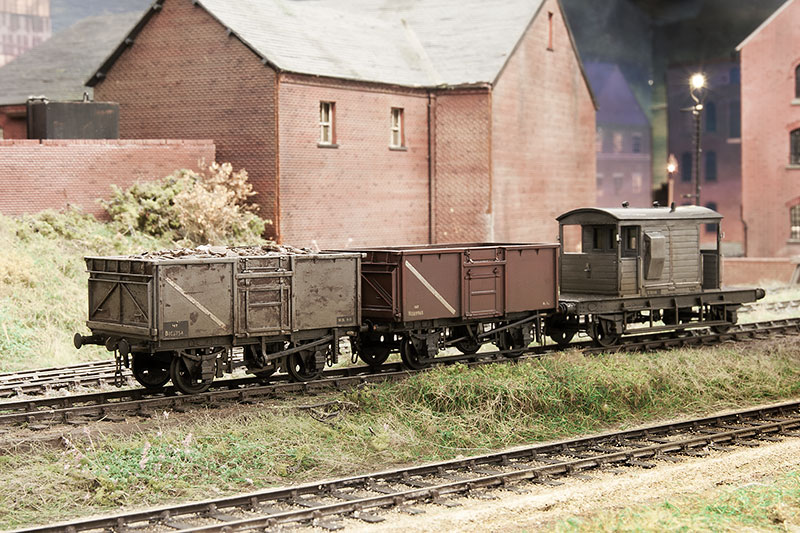
Another couple of mineral wagons. An unfitted one from Airfix and a fitted one from Parkside. It's a bit of a thing to make all mineral wagons rusty so I decided to model the latter in nearly new condition. The SR brake van is an older Cambrian kit and needed a fair bit of modification to look like the real thing. I can take no credit for working out what as its all outlined here (http://www.clag.org.uk/sr-brake.html)
My class 03 and 30 are now done and ready for service. Some pictures follow.
-
Noel
- Posts: 1983
- Joined: Wed Jun 23, 2010 1:04 pm
Re: Brettell Road
jim s-w wrote:Another couple of mineral wagons. An unfitted one from Airfix and a fitted one from Parkside.
The Parkside 16T Minfit was sadly one of Parkside's few mistakes; when first issued it had [quite wrongly] a 10ft wb chassis. This was corrected, but it looks from the photo as if you may have got one of the original version. It's difficult to be sure, given the angle of the photo.
The prototype is a bit of a minefield as well. For comparison purposes BR built 100 each of Vacuum and Westinghouse braked wagons in 1951/2. The VB version were the only 16T built new with 4-shoe Morton brake, and some at least were later altered to 8-shoe clasp; the Westinghouse version was later altered to a unique 8-shoe clasp self adjusting brake (SAB). When BR started ordering new VB wagons in 1957, they all had ordinary 8-shoe clasp brakes. Some indeed, had 8-shoe clasp but lacked the vacuum cylinder, and sometimes other parts, so abruptly did the VB program stop again. It wasn't until 1966 that BR produced more VB wagons with 4-shoe Morton brake, by converting a total of 5000 from unfitted vehicles. This was after the 1962 change to boxed lettering. In the mid-1970s, some redundant Palbrick 10ft wb VB underframes were rebodied as minerals, but these bodies were 17ft 6in oh, unlike all other 16T minerals.
Regards
Noel
Noel
-
jim s-w
- Posts: 2190
- Joined: Wed Jul 30, 2008 5:56 pm
Re: Brettell Road
It still comes with the 10ft chassis but you can get the 9ft chassis on its own. I quite fancy the 9ft clasp braked version which would involve chopping up a red panda chassis kit.
The unfitted parkside version comes with a 9ft chassis
Cheers
Jim
The unfitted parkside version comes with a 9ft chassis
Cheers
Jim
-
Noel
- Posts: 1983
- Joined: Wed Jun 23, 2010 1:04 pm
Re: Brettell Road
jim s-w wrote: I quite fancy the 9ft clasp braked version which would involve chopping up a red panda chassis kit.
Alternatively you could use Rumney Models etched brass chassis. I have one to use for one of the batch which had everything but the vacuum cylinder. It's more complex
Regards
Regards
Noel
Noel
-
jim s-w
- Posts: 2190
- Joined: Wed Jul 30, 2008 5:56 pm
Re: Brettell Road
Thanks Noel
Must try to get in the habit of checking what Justin does
Jim
Must try to get in the habit of checking what Justin does
Jim
-
Paul Hutfield
- Posts: 40
- Joined: Fri Aug 01, 2008 11:34 pm
Re: Brettell Road
Jim,
Quite happy to talk you through the Rumney Model's back catalogue if you're making the journey to Aylesbury this weekend!
Fantastic work as always btw!
Best Wishes
Paul
Quite happy to talk you through the Rumney Model's back catalogue if you're making the journey to Aylesbury this weekend!
Fantastic work as always btw!
Best Wishes
Paul
-
jim s-w
- Posts: 2190
- Joined: Wed Jul 30, 2008 5:56 pm
Re: Brettell Road
Sometimes you can be busy but really not have anything to show. As I'm on the final run in to the DEMU show next weekend I've been looking at a few things that fit into this bracket. Starting with...
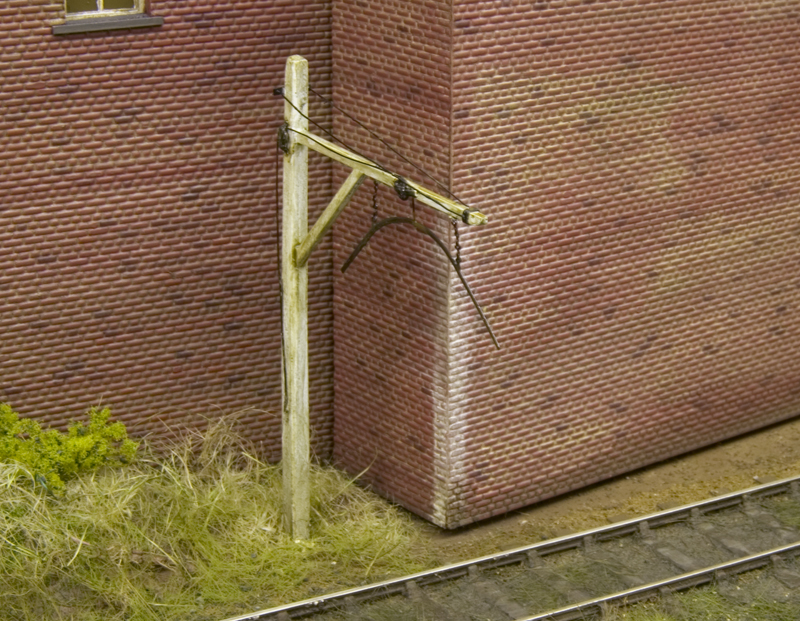
My loading gauge. Originally from the Smiths kit, its white metal construction for the main post was just too susceptible to knocks and getting bent out of shape during an exhibition. I had used brass wire for the wires and after a few times bending it back to shame it was all starting to look a bit of a mess. <
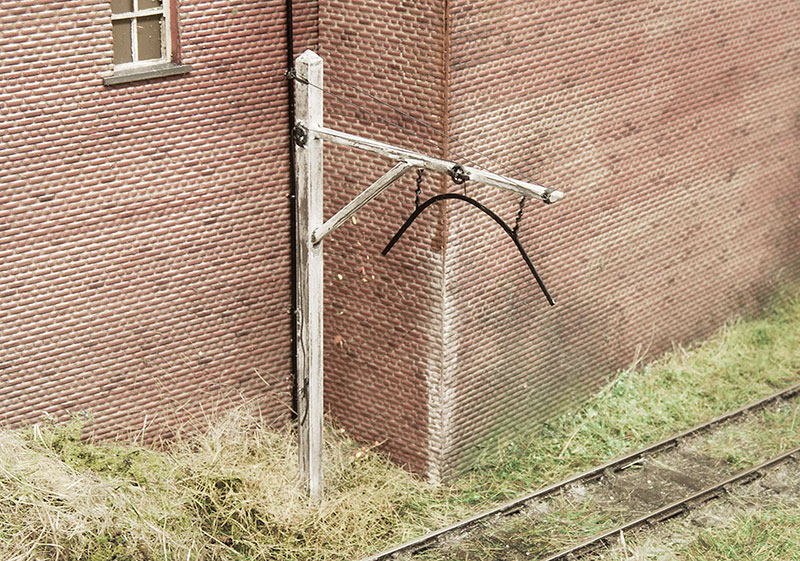
So i rebuilt it from brass instead. The wires this time are easy-line. I did keep the original bow mind you
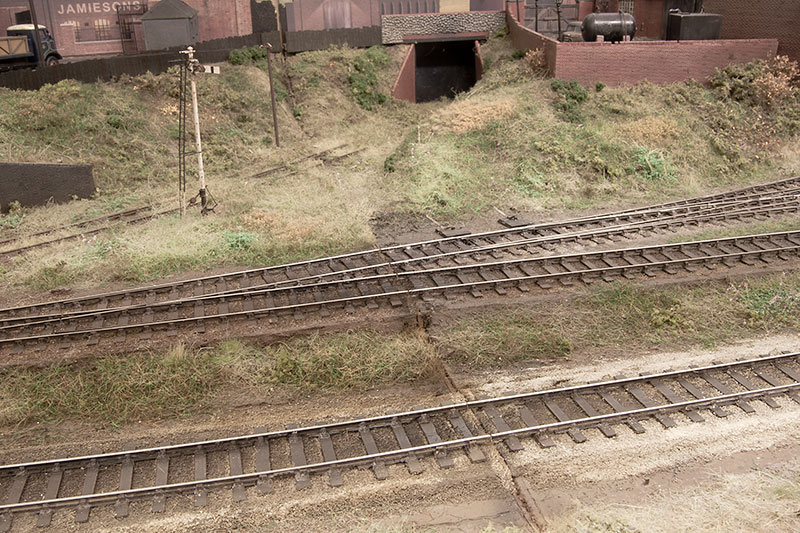
Moving on to, perhaps, a more literal interpretation of the post title
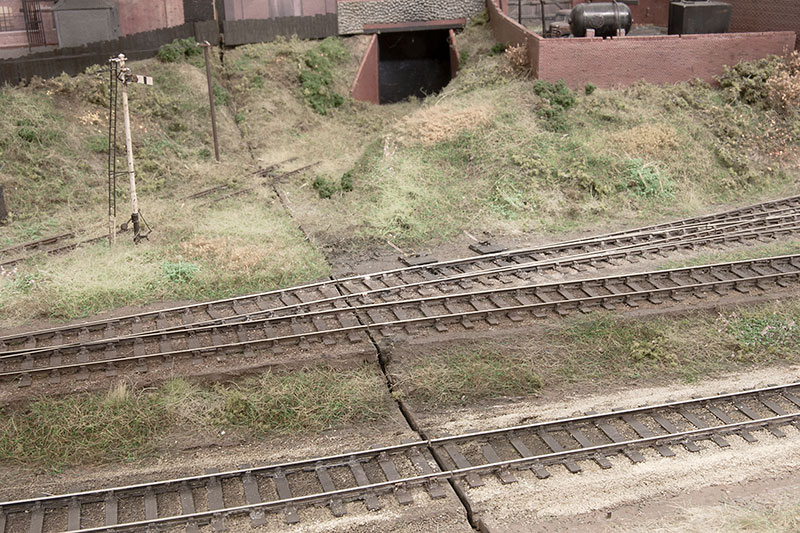
The baseboard join is just a bit too obvious for my liking so I've revisited this too.
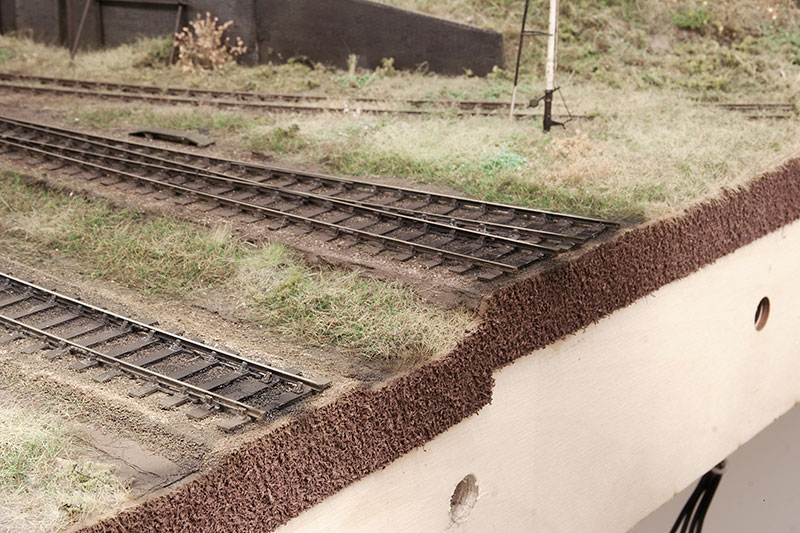
I found some soft rubber sheeting in my local hobbycraft. It's smooth on one side and has this texture on the other. I cut it into strips and blended the top edge into the existing scenery with static grass, ballast and paint. The result can be seen below.
My loading gauge. Originally from the Smiths kit, its white metal construction for the main post was just too susceptible to knocks and getting bent out of shape during an exhibition. I had used brass wire for the wires and after a few times bending it back to shame it was all starting to look a bit of a mess. <
So i rebuilt it from brass instead. The wires this time are easy-line. I did keep the original bow mind you
Moving on to, perhaps, a more literal interpretation of the post title
The baseboard join is just a bit too obvious for my liking so I've revisited this too.
I found some soft rubber sheeting in my local hobbycraft. It's smooth on one side and has this texture on the other. I cut it into strips and blended the top edge into the existing scenery with static grass, ballast and paint. The result can be seen below.
-
dal-t
- Posts: 654
- Joined: Mon Jan 11, 2010 8:06 pm
Re: Brettell Road
It is often the little things that make the difference and you have illustrated that with your usual thoroughness, two definite improvements to add to an already smashing totality. I just hope we're not now going to get into a long debate about 'joggled' baseboard joints ...
David L-T
-
jim s-w
- Posts: 2190
- Joined: Wed Jul 30, 2008 5:56 pm
Re: Brettell Road
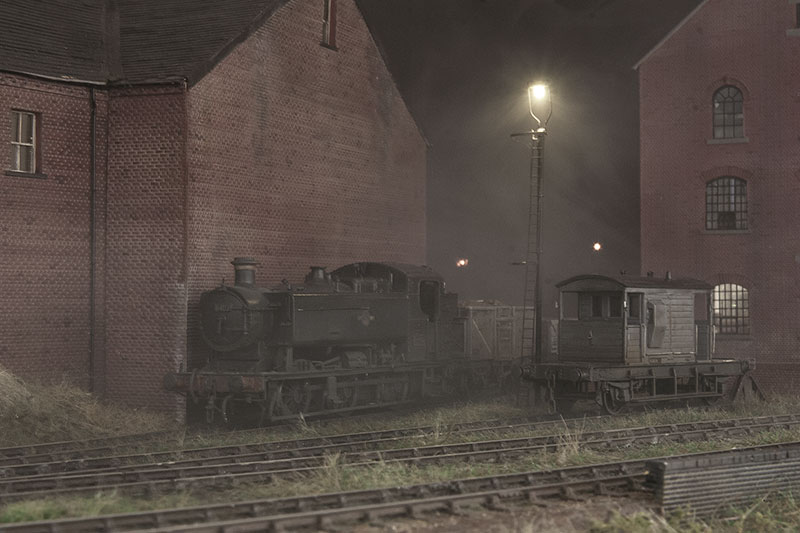
For DEMU I figured that my usual method or the round oak trains appearing on scene - i.e. an open wagon with a shunter look out and an industrial diesel pushing from the back was probably just a bit too archaic. So I figured the guys at Round Oak got themselves and ancient brake van in a somewhat token effort to appear to obey the rules!
So here we have a very tired brake van from the recently re-introduced Slaters kit. I returned to the crackle paints I had used on the signal box for this one.
On the subject of old vehicles, an old ratio kit for a GWR open c. These were a bit odd as they had the sides and underframe as one piece. I separated them and made up new underframes with bits from Bill Bedford, Ambis Engineering and Model Railway developments.
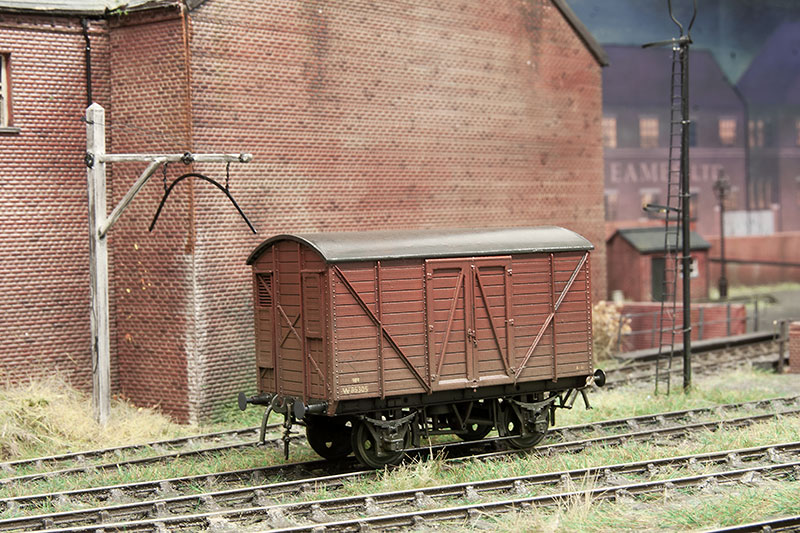
Sticking with the GWR a Mink A to diagram V12. This uses a much more modern kit from Parkside with more Model Railway development parts.
So here we have a very tired brake van from the recently re-introduced Slaters kit. I returned to the crackle paints I had used on the signal box for this one.
On the subject of old vehicles, an old ratio kit for a GWR open c. These were a bit odd as they had the sides and underframe as one piece. I separated them and made up new underframes with bits from Bill Bedford, Ambis Engineering and Model Railway developments.
Sticking with the GWR a Mink A to diagram V12. This uses a much more modern kit from Parkside with more Model Railway development parts.
Who is online
Users browsing this forum: No registered users and 3 guests