Very nice Jim. I especially like the oily look of your sleepers; what method do you use to achieve this?
Cheers
Simon
New Street
-
jim s-w

- Posts: 2189
- Joined: Wed Jul 30, 2008 5:56 pm
Re: New Street progress
Hiya
They are not actually weathered yet! They have just had a quick spray with JLTRT track colour.
Cheers
Jim
They are not actually weathered yet! They have just had a quick spray with JLTRT track colour.
Cheers
Jim
-
jim s-w
- Posts: 2189
- Joined: Wed Jul 30, 2008 5:56 pm
Re: New Street progress
Hi All
At the London end of the station, off the end of platform 1 is a largish hut. As per usual what its for I have no idea I just copy what I see. Its a lot newer than the retaining walls behind it so I used Slaters plasticard for this one. The picture shows the model at the end of the construction phase.

The vent above the door makes use of the louvres from a Hornby class 50 (see never throw anything away) while the phone next to the door is from MSE. The rest of the detail is just bits, bobs and wire from the scrap box!
Cheers
Jim
At the London end of the station, off the end of platform 1 is a largish hut. As per usual what its for I have no idea I just copy what I see. Its a lot newer than the retaining walls behind it so I used Slaters plasticard for this one. The picture shows the model at the end of the construction phase.
The vent above the door makes use of the louvres from a Hornby class 50 (see never throw anything away) while the phone next to the door is from MSE. The rest of the detail is just bits, bobs and wire from the scrap box!
Cheers
Jim
-
Rustyrail
Re: New Street progress
Nice one Jim!
You could start a small model kit business called "The Odd Hut" specialising in all sorts of contemporary, austere and seemingly pointless small railway buildings. Included in the kits would be off cuts from other models and a collection of scrap box specials!
Cheers
Simon
You could start a small model kit business called "The Odd Hut" specialising in all sorts of contemporary, austere and seemingly pointless small railway buildings. Included in the kits would be off cuts from other models and a collection of scrap box specials!
Cheers
Simon
-
jim s-w
- Posts: 2189
- Joined: Wed Jul 30, 2008 5:56 pm
Re: New Street progress
Hi Simon
Turn a hobby to a job? Not for me!
Got a chance to start to bring the scenic work on the London end of the station together. The colours are all a bit vivid at this stage hence the black and white image.
Cheers
Jim

Turn a hobby to a job? Not for me!
Got a chance to start to bring the scenic work on the London end of the station together. The colours are all a bit vivid at this stage hence the black and white image.
Cheers
Jim
-
jim s-w
- Posts: 2189
- Joined: Wed Jul 30, 2008 5:56 pm
Re: New Street progress
Hi All
Been getting busy with paint

Needs a bit more weathering yet though.
Cheers
Jim
Been getting busy with paint
Needs a bit more weathering yet though.
Cheers
Jim
-
jim s-w
- Posts: 2189
- Joined: Wed Jul 30, 2008 5:56 pm
Re: New Street progress
Hi All
Further work on the London end of the station.

This is the view from platform 8

Class 304 emu to give a little perpective on things!
Cheers
Jim
Further work on the London end of the station.
This is the view from platform 8
Class 304 emu to give a little perpective on things!
Cheers
Jim
-
jim s-w
- Posts: 2189
- Joined: Wed Jul 30, 2008 5:56 pm
Re: New Street progress
Hi All
Another milestone! The fiddle yard (in its current 52 foot long guise) is actually made up of 4 9 road yards of 20-25 feet long each. (approx 800ft of storage!) This means we need a set of crossings in the middle.

Tim has put in a sterling effort of late to get these laid which means for the moment the track in the fiddle yard is all down. Phil has been wiring like a good un too. Great stuff chaps.
pic © Tim Horn
Cheers
Jim
Another milestone! The fiddle yard (in its current 52 foot long guise) is actually made up of 4 9 road yards of 20-25 feet long each. (approx 800ft of storage!) This means we need a set of crossings in the middle.
Tim has put in a sterling effort of late to get these laid which means for the moment the track in the fiddle yard is all down. Phil has been wiring like a good un too. Great stuff chaps.
pic © Tim Horn
Cheers
Jim
-
Andy W

- Posts: 884
- Joined: Thu May 21, 2009 8:11 am
Re: New Street progress
Amazing!
Make Worcestershire great again.
Build a wall along the Herefordshire border and make them pay for it.
Build a wall along the Herefordshire border and make them pay for it.
-
jim s-w
- Posts: 2189
- Joined: Wed Jul 30, 2008 5:56 pm
Re: New Street progress

Ok whats all this then? This picture was taken just after 87009 (naturally) became the first loco to run from one end of the station to the other under its own power.
My car port acts like a big soft box so I took a pic of the walls and hut I have been working on recently

Back in August 2008 the layout looked like this
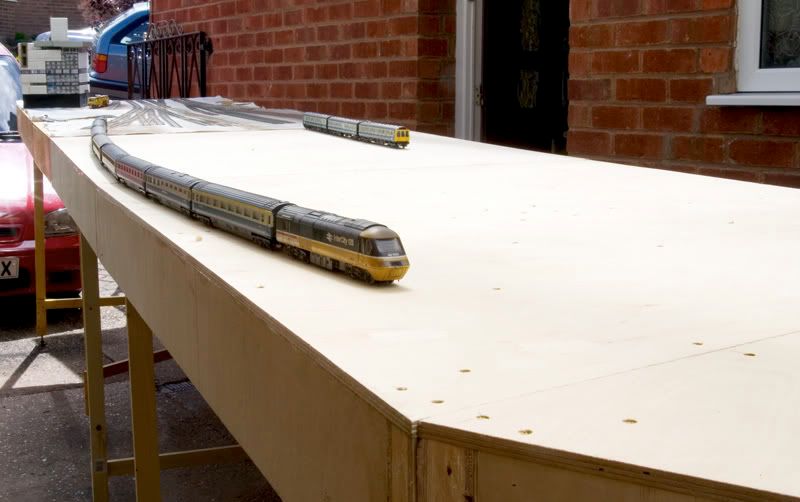
This is how it looks now


Peak and coaches for scale - to save you counting the peak has 12 on.
Cheers
Jim
-
jim s-w
- Posts: 2189
- Joined: Wed Jul 30, 2008 5:56 pm
Re: New Street progress
Hi All
Theres not a huge amount of opportunity to model rough ground on the layout but there is a small patch on top of the wall at the London end. Having never modelled this sort of stuff before the following was sort of winging it and ultimately might not have worked but I thought I would invite you along on the journey to see how I went.
Starting of with some fortunate timing a thread on another forum led to the work of Emannuel Nouailler. I was intrigued by the way he uses foam board for the texture of his buildings and wondered if it was something I could adapt for rough ground.

This picture shows my piece of foamboard cut to shape with the top layer removed. By working fairly roughly and tearing at the surface you get a very uneven texture, rubbish for Emannuel's buildings but great for this application.

A quick coat of 'espresso' emulsion and already I think it has potential - its a bit flat, colourwise, though

By waiting for the emulsion to dry (actually 24 hours) I then wet the surface and worked in black, white and a bit of yellow artists acrylic with a stiff brush to give the surface colour a bit of variety.

Once that was dry I collected some dust from the drive (sweep a clean area) and gave the surface a coat of Klear before sprinkling the dust onto the surface. I also sprinkled on a little bit of fine ballast while I was at it.
A spot of greenery. Woodlands scenics and noch doing the honors

While I quite enjoyed getting agricultural it didn't grabbed me like a good building does. I think theres little danger of me wanting to do a 'pretty' BLT layout.
Cheers
Jim
Theres not a huge amount of opportunity to model rough ground on the layout but there is a small patch on top of the wall at the London end. Having never modelled this sort of stuff before the following was sort of winging it and ultimately might not have worked but I thought I would invite you along on the journey to see how I went.
Starting of with some fortunate timing a thread on another forum led to the work of Emannuel Nouailler. I was intrigued by the way he uses foam board for the texture of his buildings and wondered if it was something I could adapt for rough ground.
This picture shows my piece of foamboard cut to shape with the top layer removed. By working fairly roughly and tearing at the surface you get a very uneven texture, rubbish for Emannuel's buildings but great for this application.
A quick coat of 'espresso' emulsion and already I think it has potential - its a bit flat, colourwise, though
By waiting for the emulsion to dry (actually 24 hours) I then wet the surface and worked in black, white and a bit of yellow artists acrylic with a stiff brush to give the surface colour a bit of variety.
Once that was dry I collected some dust from the drive (sweep a clean area) and gave the surface a coat of Klear before sprinkling the dust onto the surface. I also sprinkled on a little bit of fine ballast while I was at it.
A spot of greenery. Woodlands scenics and noch doing the honors
While I quite enjoyed getting agricultural it didn't grabbed me like a good building does. I think theres little danger of me wanting to do a 'pretty' BLT layout.
Cheers
Jim
-
Stephen F

- Posts: 29
- Joined: Sat May 01, 2010 6:22 pm
Re: New Street progress
City boy 
Full of admiration here. (But where do you keep it? You must have a warehouse, or you sleep on the kitchen floor...)
Full of admiration here. (But where do you keep it? You must have a warehouse, or you sleep on the kitchen floor...)
-
dcockling

- Posts: 807
- Joined: Mon Jun 30, 2008 10:11 am
Re: New Street progress
jim s-w wrote: I think there's little danger of me wanting to do a 'pretty' BLT layout.
Bacon, Lettuce & Tomato?
Great stuff Jim, even the bits you don't like doing are quite superb. I was so sorry I couldn't get to DEMU Showcase last weekend.
All the Best
Danny
-
Andy W
- Posts: 884
- Joined: Thu May 21, 2009 8:11 am
Re: New Street progress
Great stuff Jim. The greenery on top of that wall would be "open country" to a Brummie!
Make Worcestershire great again.
Build a wall along the Herefordshire border and make them pay for it.
Build a wall along the Herefordshire border and make them pay for it.
-
jim s-w
- Posts: 2189
- Joined: Wed Jul 30, 2008 5:56 pm
Re: New Street progress
Hi Danny
Its not that I didnt like doing it it was all just a bit (erm) mindless really. slop glue about and stick stuff on in a random but like the photo kind of way. I am pleased with the result, dont get me wrong) but the feeling of achievement isnt the same as with a building.
Kind of a good job really hu?
Cheers
Jim
-
jim s-w
- Posts: 2189
- Joined: Wed Jul 30, 2008 5:56 pm
Re: New Street progress
Hi All
You may have heard me going on about Plasticote Suede textured paint for representing concrete?
Well, heres how it looks up close.
Its not until you weather it that it starts to come alive.

Cheers
Jim
You may have heard me going on about Plasticote Suede textured paint for representing concrete?
Well, heres how it looks up close.
Its not until you weather it that it starts to come alive.
Cheers
Jim
-
jim s-w
- Posts: 2189
- Joined: Wed Jul 30, 2008 5:56 pm
Re: New Street progress
Hi All
Time for a quickie project - a simple bus stop! Well it started out that way. Most bus stops have been replaced in recent times however Stourbridge bus station is still on the to do list and has the same type as used in the 80's. Armed with a camera and a tape measure a quick survey was done and after an evening with the soldering iron and some scraps of plastic this was the result

Another evening and just a spot of weathering and its done!


Cheers
Jim
Time for a quickie project - a simple bus stop! Well it started out that way. Most bus stops have been replaced in recent times however Stourbridge bus station is still on the to do list and has the same type as used in the 80's. Armed with a camera and a tape measure a quick survey was done and after an evening with the soldering iron and some scraps of plastic this was the result
Another evening and just a spot of weathering and its done!
Cheers
Jim
-
JackBlack

- Posts: 239
- Joined: Tue Jul 22, 2008 1:25 pm
-
jim s-w
- Posts: 2189
- Joined: Wed Jul 30, 2008 5:56 pm
Re: New Street progress
Indeed JackBlack
To draw a line under this one I have now weathered the shelter and painted some of the windows with Revel clear yellow. A simple drinks can on the roof and this one is finished. I must admit its been a great little project!

Cheers
Jim
To draw a line under this one I have now weathered the shelter and painted some of the windows with Revel clear yellow. A simple drinks can on the roof and this one is finished. I must admit its been a great little project!
Cheers
Jim
-
dcockling
- Posts: 807
- Joined: Mon Jun 30, 2008 10:11 am
Re: New Street progress
Hi Jim,
Wonderful as always, you just need some fag buts and chewing gum on your pavement
All the Best
Danny
Wonderful as always, you just need some fag buts and chewing gum on your pavement
All the Best
Danny
-
jim s-w
- Posts: 2189
- Joined: Wed Jul 30, 2008 5:56 pm
Re: New Street progress
dcockling wrote:
you just need some fag buts and chewing gum on your pavement
Yeah but just paint or something more 3d for the fag butts?
Jim
-
jim s-w
- Posts: 2189
- Joined: Wed Jul 30, 2008 5:56 pm
Re: New Street progress
Hi John
The windows are the perspex from a model bus box, I managed to get superglue frosting on some of them so they were coated in Klear floor polish. When this was dry I used revel clear yellow on some of the windows to represent older panes.
HTH
Jim
The windows are the perspex from a model bus box, I managed to get superglue frosting on some of them so they were coated in Klear floor polish. When this was dry I used revel clear yellow on some of the windows to represent older panes.
HTH
Jim
-
LesGros

- Posts: 546
- Joined: Thu Oct 08, 2009 10:05 pm
Re: New Street progress
Very nice work Jim,
An inspiration to us lesser abled mortals.
An inspiration to us lesser abled mortals.
LesG
The man who never made a mistake
never made anything useful
The man who never made a mistake
never made anything useful
Who is online
Users browsing this forum: No registered users and 2 guests