Thanks Keith
I'll tweak it and mention it in the next update.
Out of interest, do you know if there's a pattern behind the symmetrical and asymmetrical vee hangers? There doesn't seem to be.
Cheers
Jim
New Street
-
jim s-w

- Posts: 2190
- Joined: Wed Jul 30, 2008 5:56 pm
-
grovenor-2685

- Forum Team
- Posts: 3923
- Joined: Sun Jun 29, 2008 8:02 pm
Re: New Street progress
'fraid not, maybe something can be discerned that would interfere with the alternative position of the leg, not something I have looked for.
Regards
Keith
Regards
Keith
-
jim s-w
- Posts: 2190
- Joined: Wed Jul 30, 2008 5:56 pm
Re: New Street progress
Hi Keith
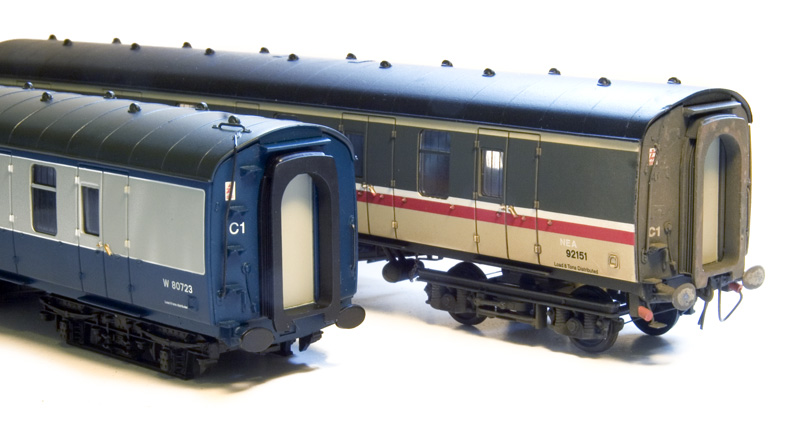
I'm sorry to say that pics do not support your theory. It seems the position of the vac cylinder doesn't relate to the bogie type.
http://80srail.zenfolio.com/p189779447/ ... #h19582310
Shows commonwealth bogies with the vac cylinder to the outside of the vee hanger (outside being vehicle end)
http://80srail.zenfolio.com/p189779447/ ... #h18cac48d
Shows BR1 bogies with the vac cylinder to the outside of the vee hanger
http://80srail.zenfolio.com/p189779447/ ... e#hf5a58de
Shows b4 bogies with the vac cylinder to the outside of the vee hanger
http://80srail.zenfolio.com/p189779447/ ... #h162317e6
Shows BR1 bogies with the vac cylinder to the inside of the vee hanger
Hth
Jim
-
grovenor-2685
- Forum Team
- Posts: 3923
- Joined: Sun Jun 29, 2008 8:02 pm
Re: New Street progress
Vac cylinder outside of the vee hanger requires a high level pull rod, so from those pics it would suggest B1 bogies came with both high and low level pull rods, the low level ones clearly evident in the pic with the inside vac cylinder.
Keep looking
Regards
Keith
Keep looking
Regards
Keith
-
jim s-w
- Posts: 2190
- Joined: Wed Jul 30, 2008 5:56 pm
Re: New Street progress
It would appear so, yes
Thanks for your help on this Keith
Cheers
Jim
Thanks for your help on this Keith
Cheers
Jim
-
jim s-w
- Posts: 2190
- Joined: Wed Jul 30, 2008 5:56 pm
Re: New Street progress
Hi all
I've added some more thoughts on improving the Bachmann mk1s to my website
Jim
I've added some more thoughts on improving the Bachmann mk1s to my website
Jim
-
jim s-w
- Posts: 2190
- Joined: Wed Jul 30, 2008 5:56 pm
Re: New Street progress
Hi all
Prompted by the discussion about bachmann mk2s clattering third rails, on another forum, I have been doing some investigations.
My findings are on my workbench
http://www.p4newstreet.com/category/workbench
Cheers
Jim
Prompted by the discussion about bachmann mk2s clattering third rails, on another forum, I have been doing some investigations.
My findings are on my workbench
http://www.p4newstreet.com/category/workbench
Cheers
Jim
-
jim s-w
- Posts: 2190
- Joined: Wed Jul 30, 2008 5:56 pm
Re: New Street progress
Hi all
I've effectively finished my mk3 buffet project
Quite a bit of work has gone into these and ironically the one far left would have been closest to out of he box if in used a Lima one but I had a Jeouf one handy so I had to tweak the roof.
As an aside did anyone know that the HST version of blue and grey livery was different to the loco hauled version? See my workbench for more.
Cheers
Jim
-
jim s-w
- Posts: 2190
- Joined: Wed Jul 30, 2008 5:56 pm
Re: New Street progress
Hi all
Added some stuff to my workbench
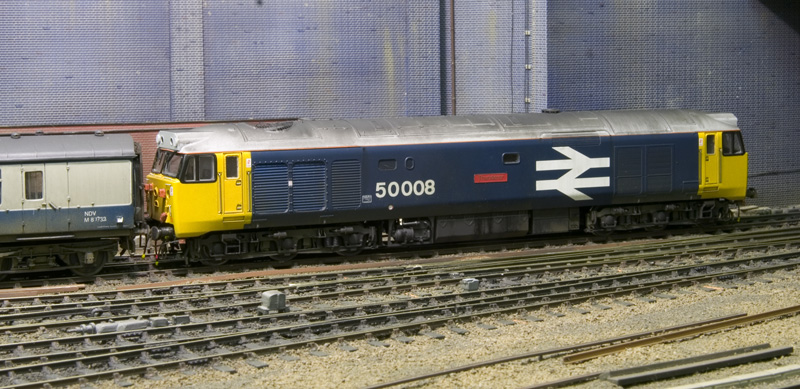
Another class 50!

Some thoughts on the Lima mk2e
http://www.p4newstreet.com/category/workbench
Cheers
Jim
Added some stuff to my workbench
Another class 50!
Some thoughts on the Lima mk2e
http://www.p4newstreet.com/category/workbench
Cheers
Jim
-
jim s-w
- Posts: 2190
- Joined: Wed Jul 30, 2008 5:56 pm
Re: New Street progress
Hi all
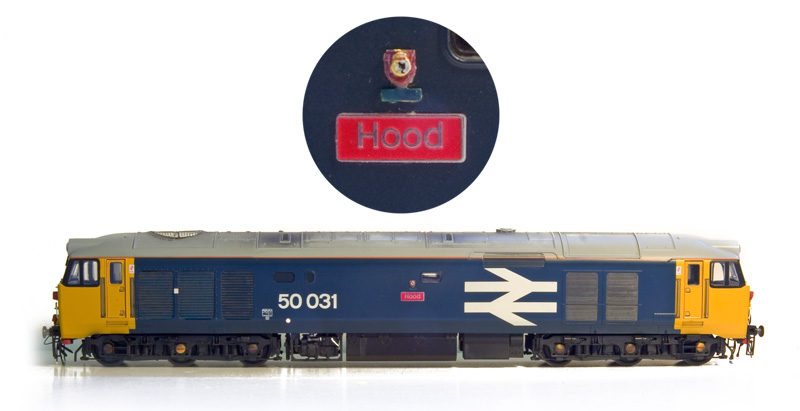
The above example is Hood’s crest, from Extreme Etches! which is a 3 part etch for something only 3.5mm high! (I think i need to buy a magnifying glass if im honest)
Cheers
Jim
The above example is Hood’s crest, from Extreme Etches! which is a 3 part etch for something only 3.5mm high! (I think i need to buy a magnifying glass if im honest)
Cheers
Jim
-
MarkS

- Posts: 296
- Joined: Tue Jul 22, 2008 1:15 am
Re: New Street progress
Is that a self portrait above the nameplate? 
Cheers,
Mark.
"In the end, when all is said and done, more will have been said than done..."
Mark.
"In the end, when all is said and done, more will have been said than done..."
-
jim s-w
- Posts: 2190
- Joined: Wed Jul 30, 2008 5:56 pm
Re: New Street progress
Um, no!
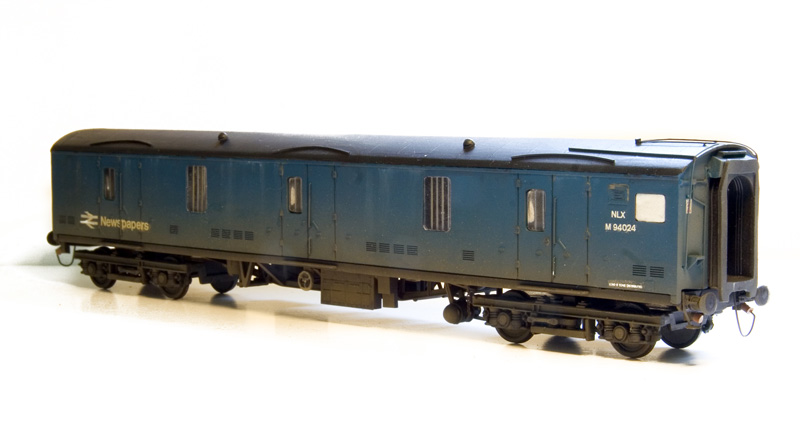
Been busy combining a Lima GUV with a replica BG to create a gangwayed Newspaper van.
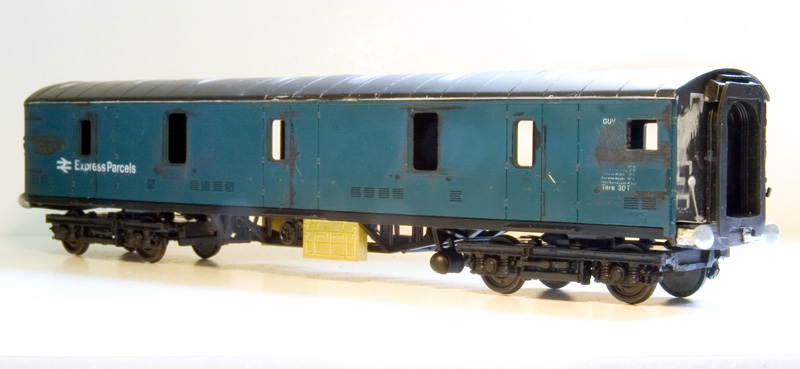
This is progress so far
Cheers
Jim
Been busy combining a Lima GUV with a replica BG to create a gangwayed Newspaper van.
This is progress so far
Cheers
Jim
-
jim s-w
- Posts: 2190
- Joined: Wed Jul 30, 2008 5:56 pm
Re: New Street progress
Hi all
More progress on my gangwayed GUV project
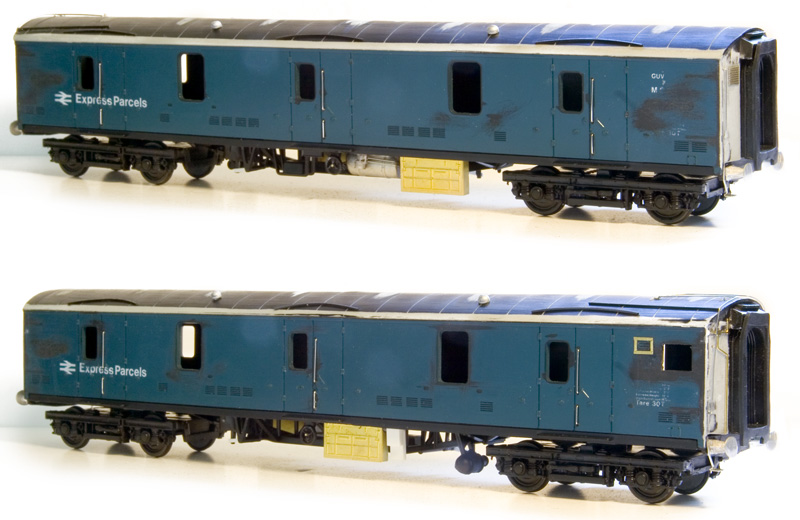
There's a little bit more detailing to do and I want to do another 2. When they are ready I'll paint them all together.
Cheers
Jim
More progress on my gangwayed GUV project
There's a little bit more detailing to do and I want to do another 2. When they are ready I'll paint them all together.
Cheers
Jim
-
jim s-w
- Posts: 2190
- Joined: Wed Jul 30, 2008 5:56 pm
Re: New Street progress
I have decided to revisit a few locos that I have found out a little more about since i did them. The lineup is as
follows.
50033 A few class 50s had some subtle variations from the rest of the fleet. A lot of class 50 fans will know that
50050 didn’t have the horizontal handrails on the nose front but 50033 lacked the vertical ones at the no. 1
end. This will be a quick fix. I have also discovered that 50007 (which I havent done) had a dropped cab at one
end. Anyone fancy cutting a cab off, filing it a smidge and sticking it back on to represent this feature?
25288 Ive never been that happy with this one as subsequent late body 25′s that I did had the Bachmann bodies
mated with the Silver Fox cabs. 288 is all Silver fox so I plan to cut the cabs off and bring it to a consistent
standard to the others. It will also become a 25/9 which fits my period.
25059 A few things to do on this one. The central window is too small and needs to be deepened. I will replace the
roof fan with a Shawplan/EE one and the bodyside grills had hinges on one side only. Also I need to add in the
extra ‘triangle’ that 059 carried on the body side. Finally I will improve the cabside windows. I am hoping I can
avoid a repaint on this one.
-
dave_long
- Posts: 65
- Joined: Mon Feb 02, 2009 9:21 pm
Re: New Street progress
Hi Jim
How much smaller is that central window on the rat and what should it be? I've seen people extend the plated over doors in a few threads/articles but you've never mentioned it on your models, have these people raised the height of the doors to offset a small window etc?
Best regards
Dave
How much smaller is that central window on the rat and what should it be? I've seen people extend the plated over doors in a few threads/articles but you've never mentioned it on your models, have these people raised the height of the doors to offset a small window etc?
Best regards
Dave
-
jim s-w
- Posts: 2190
- Joined: Wed Jul 30, 2008 5:56 pm
Re: New Street progress
Hi Dave
It needs to be opened out to the bottom of the beading. The beading will then need to be re-added underneath.
Cheers
Jim
It needs to be opened out to the bottom of the beading. The beading will then need to be re-added underneath.
Cheers
Jim
-
jim s-w
- Posts: 2190
- Joined: Wed Jul 30, 2008 5:56 pm
Re: New Street progress
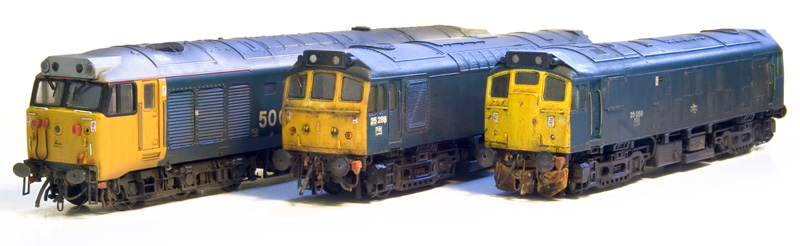
Hi All
My 3 revisited locos mentioned earlier are now complete - Below is a picture of one of the class 25's

You can read more about the work involved here - http://www.p4newstreet.com/category/workbench
I have also finished off my Gangwayed GUV
Cheers
Jim
My 3 revisited locos mentioned earlier are now complete - Below is a picture of one of the class 25's
You can read more about the work involved here - http://www.p4newstreet.com/category/workbench
I have also finished off my Gangwayed GUV
Cheers
Jim
-
jim s-w
- Posts: 2190
- Joined: Wed Jul 30, 2008 5:56 pm
Re: New Street progress
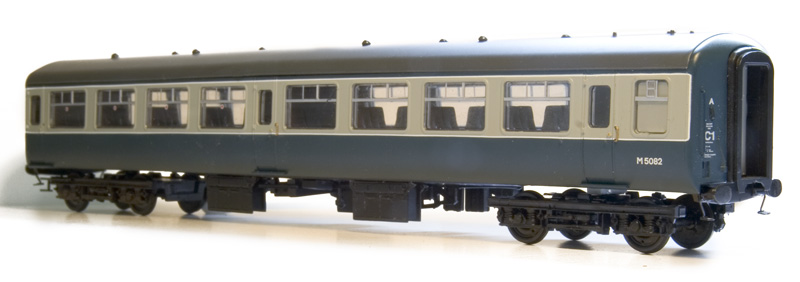
Hi All

Ive added several new class 25 pictures to my site for those who like that sort of thing http://www.p4newstreet.com/class25

Ive also been busy continuing to try to make a very small dent in the coaches that I'm going to need.

This is a detailed Lima Mk2f - you can see more of my coaches here http://www.p4newstreet.com/coaches
Cheers
Jim
Ive added several new class 25 pictures to my site for those who like that sort of thing http://www.p4newstreet.com/class25
Ive also been busy continuing to try to make a very small dent in the coaches that I'm going to need.
This is a detailed Lima Mk2f - you can see more of my coaches here http://www.p4newstreet.com/coaches
Cheers
Jim
-
jim s-w
- Posts: 2190
- Joined: Wed Jul 30, 2008 5:56 pm
Re: New Street progress
Hi all
Added a few thoughts on tarting up the Lima mk3b's to my website

Cheers
Jim
Added a few thoughts on tarting up the Lima mk3b's to my website
Cheers
Jim
-
jim s-w
- Posts: 2190
- Joined: Wed Jul 30, 2008 5:56 pm
Re: New Street progress
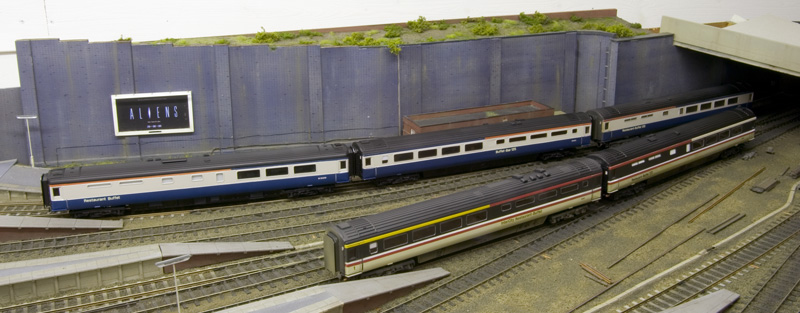
Hi All
finished off the Mk3 Pullman mentioned before.
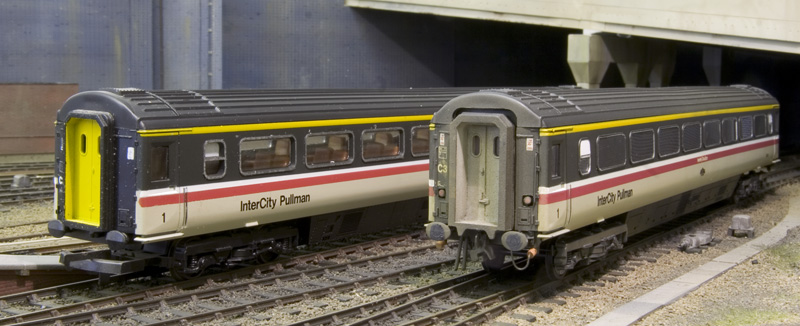
Above is a before and after. Ive added some thoughts on the value of before and after pictures to my website (http://www.p4newstreet.com/category/workbench)
Ive also been continuing to fiddle about with Lima GUV's
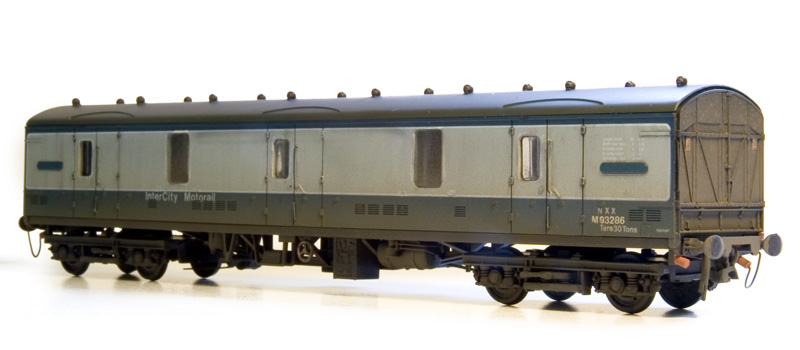
This is a motorail version.
Cheers
Jim
finished off the Mk3 Pullman mentioned before.
Above is a before and after. Ive added some thoughts on the value of before and after pictures to my website (http://www.p4newstreet.com/category/workbench)
Ive also been continuing to fiddle about with Lima GUV's
This is a motorail version.
Cheers
Jim
-
jim s-w
- Posts: 2190
- Joined: Wed Jul 30, 2008 5:56 pm
Re: New Street progress
Hi all
Something that has been on my half started pile for years was this
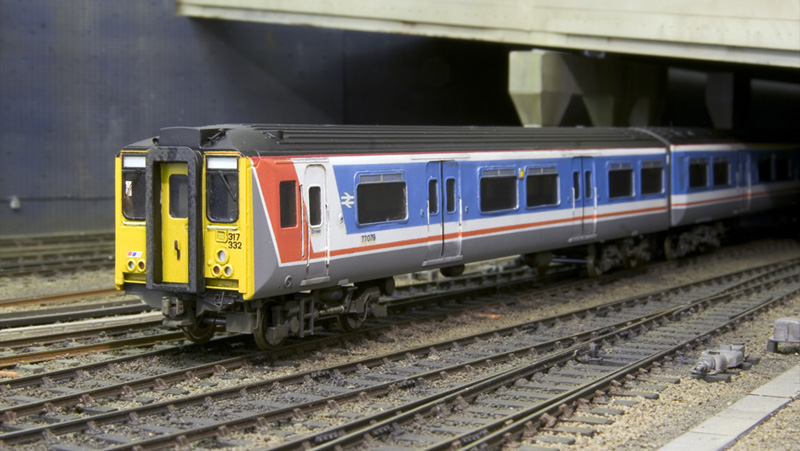
Class 317 emu from 2 different bratchell kits (class 150 and class 321) along with my own etched bits.
For more see http://www.p4newstreet.com/class317
Cheers
Jim
Something that has been on my half started pile for years was this
Class 317 emu from 2 different bratchell kits (class 150 and class 321) along with my own etched bits.
For more see http://www.p4newstreet.com/class317
Cheers
Jim
-
jim s-w
- Posts: 2190
- Joined: Wed Jul 30, 2008 5:56 pm
Re: New Street progress
Hi All
A few more class 86 roll of the workbench.
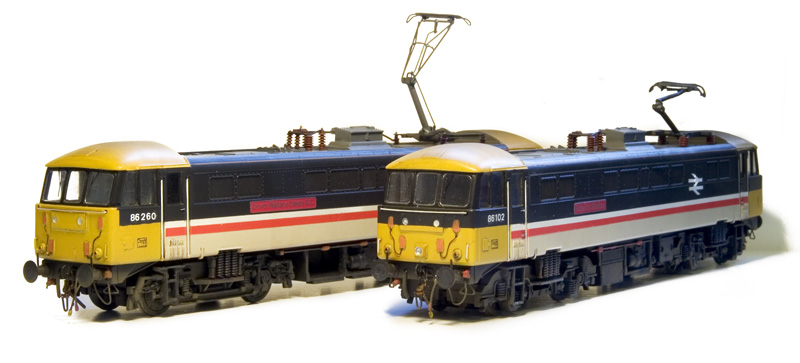
86102 features Hornby class 90 sideframes on the now customary Bachmann warship chassis along with a spare underframe box from a scrap class 87

To read about why i chose to model 86260 Driver Wallace Oakes GC click the link below
http://en.wikipedia.org/wiki/Wally_Oakes
To see more of this pair go to my class 86 page - http://www.p4newstreet.com/class86
Cheers
Jim
A few more class 86 roll of the workbench.
86102 features Hornby class 90 sideframes on the now customary Bachmann warship chassis along with a spare underframe box from a scrap class 87
To read about why i chose to model 86260 Driver Wallace Oakes GC click the link below
http://en.wikipedia.org/wiki/Wally_Oakes
To see more of this pair go to my class 86 page - http://www.p4newstreet.com/class86
Cheers
Jim
-
jim s-w
- Posts: 2190
- Joined: Wed Jul 30, 2008 5:56 pm
Re: New Street progress
Hi all
Planning is good as it saves on materials but every now and then its a good idea to check against what you are
doing (if only to get a different feel for it). That’s what this picture is all about.
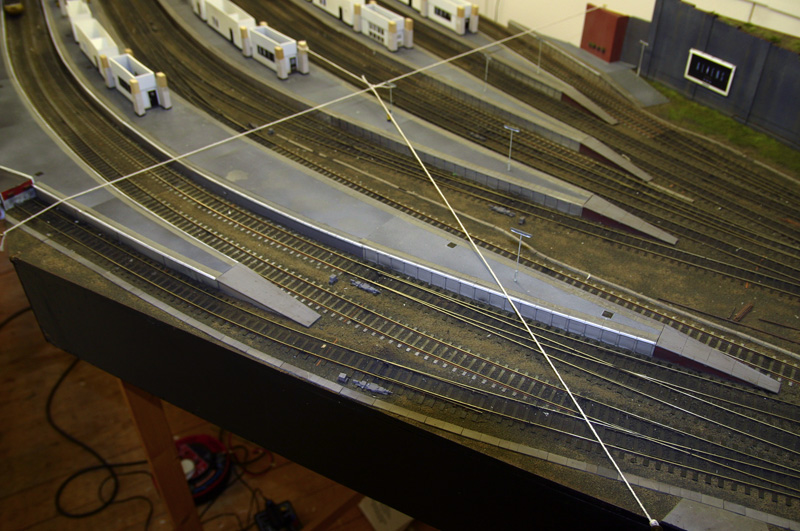
The string mock up shows the raft above the Eastern end of the station. The main string that crosses the
baseboard is the edge of the shopping centre roof while the one that heads towards the bottom right corner
shows the station approach. (the clutter on the track is the result of a few tweaks to the platform edges for
clearance purposes.
Visit http://www.p4newstreet.com/category/workbench for more
Cheers
Jim
Planning is good as it saves on materials but every now and then its a good idea to check against what you are
doing (if only to get a different feel for it). That’s what this picture is all about.
The string mock up shows the raft above the Eastern end of the station. The main string that crosses the
baseboard is the edge of the shopping centre roof while the one that heads towards the bottom right corner
shows the station approach. (the clutter on the track is the result of a few tweaks to the platform edges for
clearance purposes.
Visit http://www.p4newstreet.com/category/workbench for more
Cheers
Jim
Who is online
Users browsing this forum: Amazonbot and 2 guests