Hi All
Bit of a long shot this but P4 talk has come up with the goods before so here goes
Right then . The junction of Navigation Street, Hill Street and John Bright Street. The top drawing shows as it was in 1982. The bottom as it is now. John bright street is closed to traffic now but the question is when did this happen? And were the alterations to the junction made at the same time?
TIA
Jim
Brummie roads
-
jim s-w

- Posts: 2190
- Joined: Wed Jul 30, 2008 5:56 pm
Brummie roads
You do not have the required permissions to view the files attached to this post.
-
Dave K
- Posts: 247
- Joined: Sun Jul 20, 2008 6:11 pm
Re: Brummie roads
You may have already been down this route but here goes.
In a previous existence, i.e. when I worked for a living, I was looking for the date when a hospital gated a road that ran through its site and converted it into a car park, for want of a better word. I was told that this would have been sanctioned by the highways department of the local authority. So it might be worth contacting the City Council’s Highway Department.
In a previous existence, i.e. when I worked for a living, I was looking for the date when a hospital gated a road that ran through its site and converted it into a car park, for want of a better word. I was told that this would have been sanctioned by the highways department of the local authority. So it might be worth contacting the City Council’s Highway Department.
-
jim s-w
- Posts: 2190
- Joined: Wed Jul 30, 2008 5:56 pm
Re: Brummie roads
Hi All
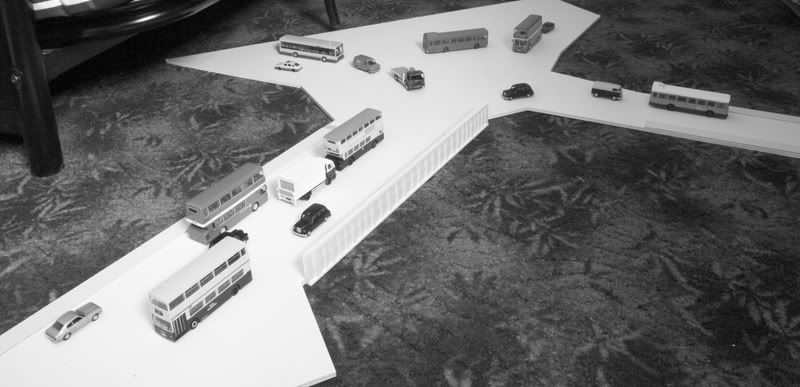
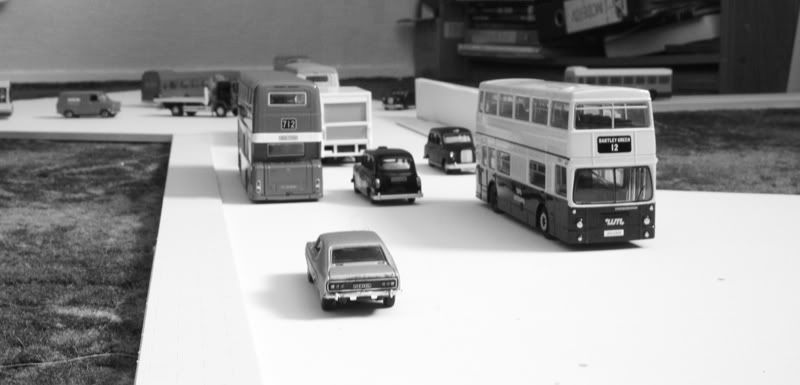
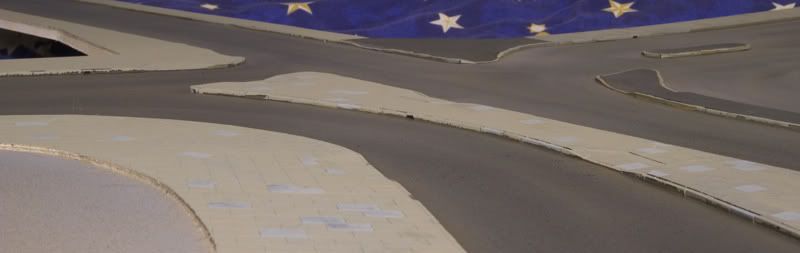
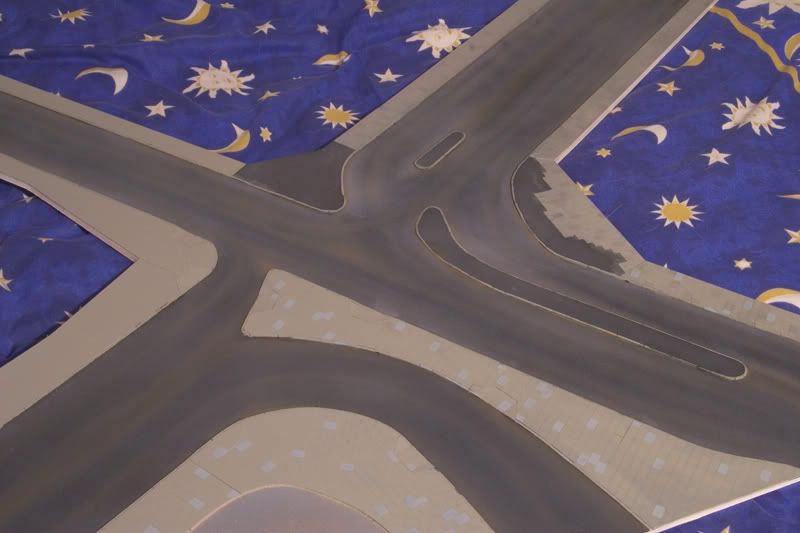
Having confirmed the road layout above the Wolverhapton end of the station, work can progress in this area. I have decided to do the whole area as 1 piece that will fit separately and help hide the baseboard join. These 2 pictures show the early stages with a scattering of road vehicles for scale.
Cheers
Jim
-
johnWM
- Posts: 62
- Joined: Mon Aug 04, 2008 9:33 pm
Re: Brummie roads
Hi
I assume that the scattering of vehicles shows that the road was still open at the date of your model?
As far as I can remember it was still open in the summer of 1983 when I left the area.
My memory of this area of Birmingham was of lots of blue and cream buses but coaches being much more rare.
I was skint at the time so travel in a taxi was out of the question.
John
-
jim s-w
- Posts: 2190
- Joined: Wed Jul 30, 2008 5:56 pm
Re: Brummie roads
Hi John
Indeed it was. Theres a map in the library showing the road still open and the footbridge that was built in 1991. I dont have an exact date for the closing of the road but knowing it lasted into the 90's is good enough for me.
Cheers
Jim
Indeed it was. Theres a map in the library showing the road still open and the footbridge that was built in 1991. I dont have an exact date for the closing of the road but knowing it lasted into the 90's is good enough for me.
Cheers
Jim
-
jim s-w
- Posts: 2190
- Joined: Wed Jul 30, 2008 5:56 pm
Re: Brummie roads
HI all
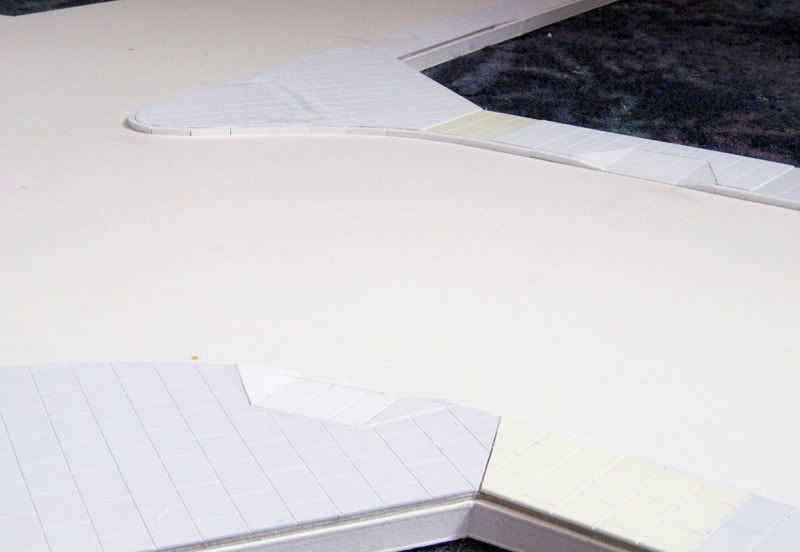
Work progresses on my pavements. The pavement is 1mm card overlayed with 40thou plasticard and scribed, Not having the faintest idea about how to lay slabs some useful diagrams and info was sought out on the internet first. The dropped sections are 20thou plasticard. All of the kerbstones are added individually as I decided it easier to chop 80 x80thou microstrip up rather than scribe it.
Cheers
Jim
-
rich_eason
Re: Brummie roads
Looks good Jim
I do hope you have modeled the obligatory loose/broken paving slab for "Jo Public" to trip and stumble on?
I do hope you have modeled the obligatory loose/broken paving slab for "Jo Public" to trip and stumble on?
-
Rod Cameron

- Posts: 850
- Joined: Fri Jul 25, 2008 12:01 pm
Re: Brummie roads
rich_eason wrote:I do hope you have modeled the obligatory loose/broken paving slab for "Jo Public" to trip and stumble on?
Just the one?
Looking really good Jim, I applaud your attention to detail on all the street infrastructure as well as the railway and its associated buildings. Overall consistency will make this a thing to behold when complete.
Rod
-
jim s-w
- Posts: 2190
- Joined: Wed Jul 30, 2008 5:56 pm
Re: Brummie roads
I Hope so Rod
The pavements are not in any way the most interesting thing I have ever had to model!
Cheers
Jim
The pavements are not in any way the most interesting thing I have ever had to model!
Cheers
Jim
-
dave_long
- Posts: 65
- Joined: Mon Feb 02, 2009 9:21 pm
Re: Brummie roads
rich_eason wrote:Looks good Jim
I do hope you have modeled the obligatory loose/broken paving slab for "Jo Public" to trip and stumble on?
Are, but the good thing about that is, in Jim's time period you wouldn't be able to claim £xxxx's from the city council!
-
jim s-w
- Posts: 2190
- Joined: Wed Jul 30, 2008 5:56 pm
Re: Brummie roads
Hi All
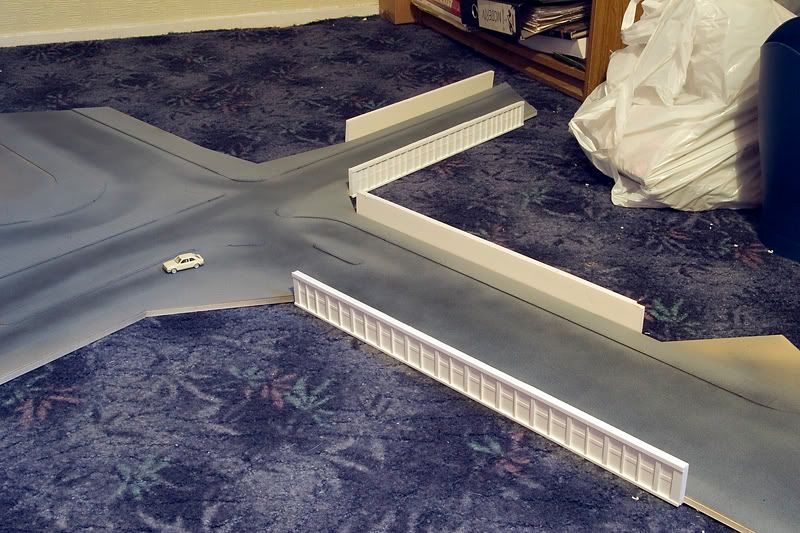
Progress has been slow due to being knocked about by a fever last week. However the pavements are all done and given an initial coat of paint - plasticote suede texture to start followed by blacks and greys. Much more to do yet to get it looking like a real road.
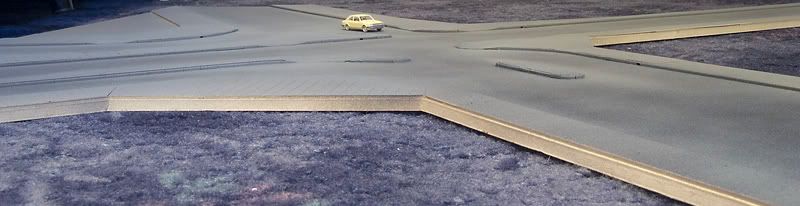
Ford escort for scale!
Also been progressing on the large girders that appear on Navigation Street and Hill Street.
Cheers
Jim
Progress has been slow due to being knocked about by a fever last week. However the pavements are all done and given an initial coat of paint - plasticote suede texture to start followed by blacks and greys. Much more to do yet to get it looking like a real road.
Ford escort for scale!
Also been progressing on the large girders that appear on Navigation Street and Hill Street.
Cheers
Jim
-
jim s-w
- Posts: 2190
- Joined: Wed Jul 30, 2008 5:56 pm
Re: Brummie roads
I havent forgotten the roads though, while I was in a washes mood (see the LNWR thread) I have painted the base colours for the slabs and tarmac on the pavements. Much to do on this one but the washes approach I am using needs a fair bit of drying time between colours. Keeps the teduim at bay though!
Cheers
Jim
Cheers
Jim
-
jim s-w
- Posts: 2190
- Joined: Wed Jul 30, 2008 5:56 pm
Re: Brummie roads
Hi all
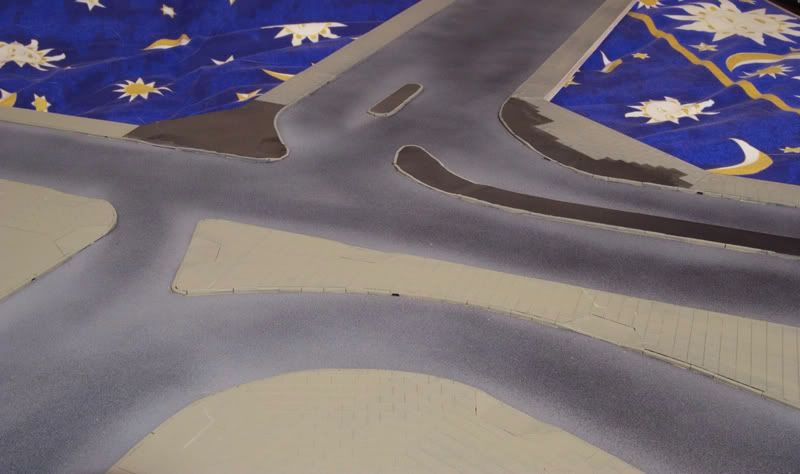
This seems to be turning into a step by step. I hope no one minds! A bit more progress on my road washes. This time the roads themselves. Starting with a thing blackey grey wash I tries to keep the brush strokes in the direction the vehicles will travel. Whilst walking the wolf i have been looking at the colours of the road surfaces and found that the edges, area's between the wheels and the areas between the vehicles (the middle of the road) tend to have a slight beige tint to them (white if the gritters have been about), So wilst my dark wash was still wet i painted lines of humbrol leather onto the surface and blended it all together. Pretty pleased with the result. I have also started picking out a few slabs in different colours, the pavements will have a wash of sludgy black to them too after this stage along with the same leather treatment near the walls. I actually just went headlong into this having not done roads before. It wasn't until after I pondered what I might have done if it hadn't worked!
Cheers
Jim
-
jim s-w
- Posts: 2190
- Joined: Wed Jul 30, 2008 5:56 pm
Re: Brummie roads
Hi All
Never let a good theory get in the way if diving straight in with a mindless sense of optimism! I was going to do a test but thought sod it and went for broke anyway. Luckily it came out as I hoped it would so this is what I did.
First up, cut a card mask for the area to be concreted. (you dont need a pic for this bit). Then

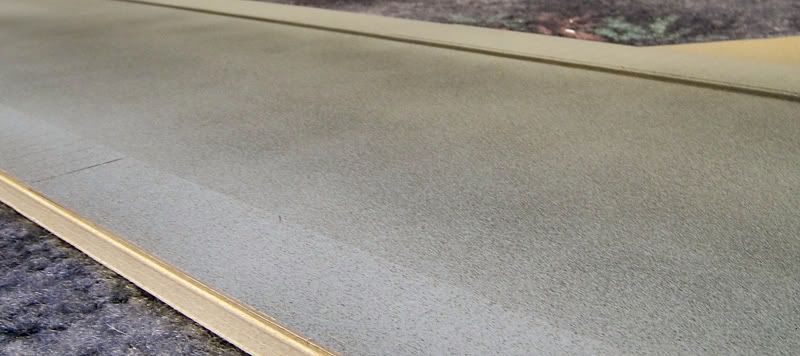
Cover the area in a thin layer of PVA. I then drew a nit comb (had to buy one specially before anyone asks) through the PVA in the direction of the, ermm, grain?
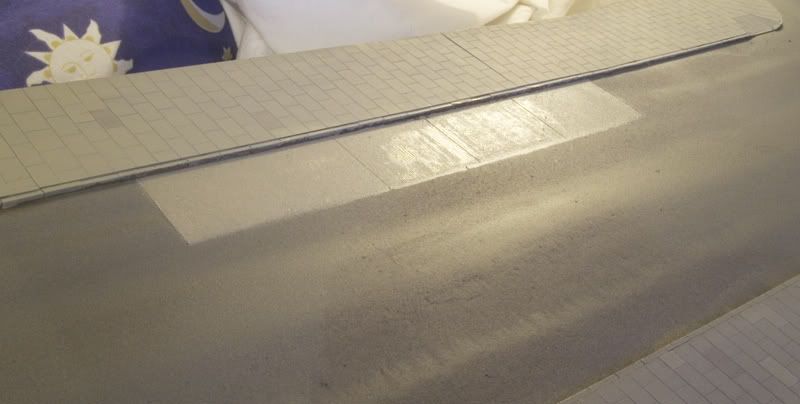
Once dry a quick spray of plasticote suede - more combing and a final coat of paint before scribing sections in with a scalpel . This will be left to dry before back to the washes and weathering.
Cheers
Never let a good theory get in the way if diving straight in with a mindless sense of optimism! I was going to do a test but thought sod it and went for broke anyway. Luckily it came out as I hoped it would so this is what I did.
First up, cut a card mask for the area to be concreted. (you dont need a pic for this bit). Then
Cover the area in a thin layer of PVA. I then drew a nit comb (had to buy one specially
Once dry a quick spray of plasticote suede - more combing and a final coat of paint before scribing sections in with a scalpel . This will be left to dry before back to the washes and weathering.
Cheers
-
jim s-w
- Posts: 2190
- Joined: Wed Jul 30, 2008 5:56 pm
Re: Brummie roads
Hi All
As part of my modelling roads I need Iron work. Seems that no 2 are the same but I have produced a variety of Brummy specific ones based on Photographs at the actual location. Its pushing the camera a bit but they are legible!
Cheers
Jim
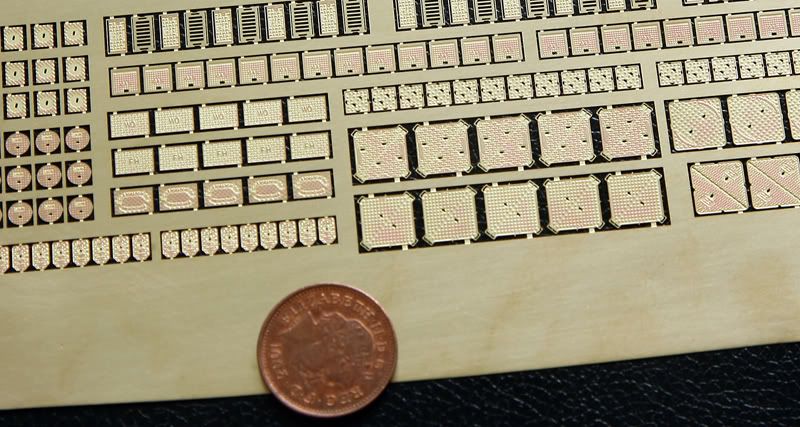
As part of my modelling roads I need Iron work. Seems that no 2 are the same but I have produced a variety of Brummy specific ones based on Photographs at the actual location. Its pushing the camera a bit but they are legible!
Cheers
Jim
-
Paul Willis

- Forum Team
- Posts: 3046
- Joined: Sun Jul 20, 2008 6:00 pm
Re: Brummie roads
jim s-w wrote:Hi All
As part of my modelling roads I need Iron work. Seems that no 2 are the same but I have produced a variety of Brummy specific
Hi Jim,
Those look very nice indeed. Out of interest, what drawing package are you using to prepare the artwork?
Cheers
Paul
Beware of Trains - occasional modelling in progress!
www.5522models.co.uk
www.5522models.co.uk
-
jim s-w
- Posts: 2190
- Joined: Wed Jul 30, 2008 5:56 pm
Re: Brummie roads
Hi Paul
I use Adobe illustrator, as much because I had it and knew it already as any other reason.
Cheers
Jim
I use Adobe illustrator, as much because I had it and knew it already as any other reason.
Cheers
Jim
-
jim s-w
- Posts: 2190
- Joined: Wed Jul 30, 2008 5:56 pm
Re: Brummie roads
Hi All
I can run off extra sheets of the manhole covers - cost will be £10 a sheet. A sheet consists of 15 drains, 43 small covers (3 designs), 15 round covers, 22 square covers (small), 26 gas covers (small), 15 meduim sized covers (3 designs) and 20 large covers (4 designs). Send me a PM if interested
Cheers
Jim

Image ©Tim Maddocks
I can run off extra sheets of the manhole covers - cost will be £10 a sheet. A sheet consists of 15 drains, 43 small covers (3 designs), 15 round covers, 22 square covers (small), 26 gas covers (small), 15 meduim sized covers (3 designs) and 20 large covers (4 designs). Send me a PM if interested
Cheers
Jim
Image ©Tim Maddocks
Return to “Other Buildings and Scenery”
Who is online
Users browsing this forum: No registered users and 1 guest