Here in Canada, it appears to be Manning Wardle season - in my case, a CSP Models - Manning-Wardle "Q" Class 0-6-0ST Ex FY&NR/I.O.W Rlwy/ S.R. No W1.
So far I have been impressed, the etchings are excellent, instructions are understandable, despite being for this kit and the "Warwickshire" version.
This is the current state of play - (The smokebox, chimney and boiler/tank are not soldered on yet.)
After using the High Level jig to locate the CSB fulcrums I solder the chassis halves together and cut out the chassis for hornblocks. This is the one weakness I found, these were not half etched, however, it was short work to sort out.
This shows the problem of sharing pieces for another MW loco, the front springs (which fold up) are not quite in the correct place...
The backhead is under way, but where everything goes is a bit of a challenge, I'm struggling to find photos...
That is one of the new High Level final gears, with a screw fixture
Next up will be soldering in the hornblock assemblies, this is my jig to keep everything in the right place.
I am modelling the loco as it was around 1930, in Southern green livery. The photos I have seen, seem to indicate that the saddle tank was black, with a green panel on the side. The rest of the loco is lined out in typical Southern livery.
This seems wrong, but a green tank with a lined panel doesn't make sense either.
Does anyone have any definitive (or even reasonable conjecture) knowledge/idea of how a Southern saddle tank might have been painted?
Manning Wardle no. W1
-
MarkS

- Posts: 296
- Joined: Tue Jul 22, 2008 1:15 am
Manning Wardle no. W1
You do not have the required permissions to view the files attached to this post.
Cheers,
Mark.
"In the end, when all is said and done, more will have been said than done..."
Mark.
"In the end, when all is said and done, more will have been said than done..."
-
myoxall
- Posts: 46
- Joined: Wed Apr 12, 2017 9:20 pm
Re: Manning Wardle no. W1
Hi there Mark,
Locomotives Illustrated No 149 , page 28 gives a very good representation, an excellent rear view is available on page 48 of MacLeod's Other Island by Terry Hastings and Roger Silsbury. I cannot find a picture of Medina, W1, with a black saddle tank, lined out green is the norm. The Isle of Wight Railways by R J Maycock and R Silsbury gives nice detail about the sizes of lining the Southern Locos on the Isle of Wight in chapter 13.
I have been looking at this Kit for some time now, as it is on my "wants" list. I will follow your thread with interest. Are you able to relocate the front springs easily?
Good to see another IOW modeller on the forum.
Martin
-
Terry Bendall
- Forum Team
- Posts: 2427
- Joined: Sun Jul 27, 2008 7:46 am
Re: Manning Wardle no. W1
MarkS wrote:this is my jig to keep everything in the right place.
This seems a neat and simple solution.
Terry Bendall
-
jon price
- Posts: 641
- Joined: Mon Jun 07, 2010 2:34 pm
Re: Manning Wardle no. W1
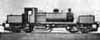
This looks good, and I agree with your assessment of this kit. There was clearly plenty of variation in the Q class. I am using it as the basis for the Wrexham Mold and Connah's Quay Q class, which also has slightly different axle spacing, and as Terry says modifying the chassis turned out (even for a novice) fairly straightforward, even though I only realised I had to do it after I had cut out the wrong hornblock cutouts: I blanked off the hornblock cutout and recut it. I am also finding it difficult to source backhead detail, and so I'm trying to deduce things from similar locos. I havn't completed it yet, but here are a couple of pictures for comparison (hornblocks not yet soldered in place).
You do not have the required permissions to view the files attached to this post.
Connah's Quay Workshop threads: viewforum.php?f=125
-
steve howe

- Posts: 912
- Joined: Sun Feb 01, 2009 10:16 pm
Re: Manning Wardle no. W1
CSP is a new one on me, and I was most impressed with their range of industrials - well worth a look!
Steve
http://cspmodels.com/abante/index.php?rt=product/category&path=65
Steve
http://cspmodels.com/abante/index.php?rt=product/category&path=65
-
MarkS
- Posts: 296
- Joined: Tue Jul 22, 2008 1:15 am
Re: Manning Wardle no. W1
Hey Martin, thanks for the references, but I don't have any of them! 
The photo of 'Medina' in "Isle of Wight Album" by Kitchenside, looks like the panel on the side tank is a different colour than the top of the tank, but then it is a 90 year old B&W photo...
Is this the rear view you refer to? (from the CSP Models site)
This and other photos are part of the instructions, but they are photocopies, so a bit fuzzy.
I'm not unfamiliar with the SR livery (viewtopic.php?f=20&t=749#p4292), and I feel the tank should be green, but how is the side panel delineated?
Is it a green panel surrounded by a white line, and black border on the green tank?
The "usual" livery would have a white line between the green and black.
The other item of note is the front and back of the tank do not appear to be lined in any of the photos I have.
At least I have some time before I get to the painting stage...
You do not have the required permissions to view the files attached to this post.
Cheers,
Mark.
"In the end, when all is said and done, more will have been said than done..."
Mark.
"In the end, when all is said and done, more will have been said than done..."
-
MarkS
- Posts: 296
- Joined: Tue Jul 22, 2008 1:15 am
Re: Manning Wardle no. W1
This seems a neat and simple solution.It would of course have to be adjusted to suit different axle centres but that would not be difficult.
Terry Bendall
Thanks Terry, but since I don't build that many loco's I just drill new holes in the same piece of MDF with my drill press.
Cheers,
Mark.
"In the end, when all is said and done, more will have been said than done..."
Mark.
"In the end, when all is said and done, more will have been said than done..."
-
MarkS
- Posts: 296
- Joined: Tue Jul 22, 2008 1:15 am
Re: Manning Wardle no. W1
Well Jon,
it was the post for your Q that got me to open the box, order needed parts and get started!
Yours is looking very good BTW.
I too am trying to guess what the backhead looks like, today I resorted to youtube!
I haven't found any "learn to drive a loco" videos using 'Charwelton' yet.
I'll make the cab roof removable, just in case!
Cheers,
Mark.
"In the end, when all is said and done, more will have been said than done..."
Mark.
"In the end, when all is said and done, more will have been said than done..."
-
David Knight
- Posts: 821
- Joined: Sun Jul 20, 2008 6:02 pm
Re: Manning Wardle no. W1
Hi Mark,
I found a picture in "Isle of Wight, Railways Remembered" , Peter Paye, OPC. Plate 201, which supports your idea of a green panel on the tank. I can send you a scan if you like.
Cheers,
David
I found a picture in "Isle of Wight, Railways Remembered" , Peter Paye, OPC. Plate 201, which supports your idea of a green panel on the tank. I can send you a scan if you like.
Cheers,
David
-
MarkS
- Posts: 296
- Joined: Tue Jul 22, 2008 1:15 am
Re: Manning Wardle no. W1
Hey Dave,
yes please, a scan would be great!
yes please, a scan would be great!
Cheers,
Mark.
"In the end, when all is said and done, more will have been said than done..."
Mark.
"In the end, when all is said and done, more will have been said than done..."
-
RobM

- Posts: 1091
- Joined: Sun Feb 15, 2009 4:39 pm
Re: Manning Wardle no. W1
MarkS wrote:I too am trying to guess what the backhead looks like....
Mark, not wishing to put a damper on your back head but conventionally the rivets are not quite right...
Rob
-
steamraiser
- Posts: 561
- Joined: Thu Dec 31, 2009 4:49 pm
Re: Manning Wardle no. W1
As Rob M says for future reference there would be a line of rivets around the edge of the back head where it is joined to the fire box wrapper.
There would also be square washout plugs on the bottom and higher up on the corners, as well as a mud hole door below the fire hole door.
Try visiting your local heritage railway on a non running day and asking to see the back head of a shunter and ask some one to explain the various fittings. The fittings varied by make and size of loco. Some locos only had one site glass, with drip taps.
Nice work.
Gordon A
-
Phil O
- Posts: 364
- Joined: Sun May 05, 2013 5:23 pm
Re: Manning Wardle no. W1
The backhead should be lagged and clad, to prevent the crew from touching the hot parts of the firebox only the external fittings being exposed. Glass gauges etc.
Phil
Phil
-
myoxall
- Posts: 46
- Joined: Wed Apr 12, 2017 9:20 pm
Re: Manning Wardle no. W1
Hi Mark,
The photo supplied by CSP models is the same one I referred to as being in MacLeod's Other Island; but the one in the book is a lot clearer, this is probably because the publisher has taken the image from the original and not just copied a copy. The problem with the picture is the way the light shines on the saddle tank. In the book you can just about make out the top black edge of the lining which leads me to the conclusion that the saddle tank was green with the smoke box painted black. Both sides of the saddle tank were Lined out with the standard Southern Livery of the time, Black outside, with thin white inner line framing the standard Southern Green Inner, the same style lining as your 02 Bembridge.
The picture in Locomotives illustrated 149 gives the definitive answer as it clearly shows the lining on the side of the saddle tank with the black and white lining above the handrail, at the bottom of the tank and at the front and rear of the tank. If you are unable to source the magazine please feel free to Private Message me with your email address and I will send a high resolution scan.
I have had a good look through my many books and publications on the Isle of Wight Railways and unfortunately cannot help you with back head detail. Have you tried the National Railway Museum? I have found them helpful in the past.
Martin
-
steamraiser
- Posts: 561
- Joined: Thu Dec 31, 2009 4:49 pm
Re: Manning Wardle no. W1
On the majority of industrial locos I have crewed the back head was not lagged but the firebox wrapper was.
Gordon A
Gordon A
-
MarkS
- Posts: 296
- Joined: Tue Jul 22, 2008 1:15 am
Re: Manning Wardle no. W1
Private Message me with your email address and I will send a high resolution scan.
PM sent - Thanks for your help!
Rob, Gordon, in my defence, I was only following the instructions to emboss rivets!
That said, I can probably smooth (deboss?) the offending ones...
Getting to a heritage railway for me is easier said than done, being 6000 kms from the UK - the nearest UK steam loco to me is a terrier "Waddon" in Montreal... a mere 535 kms. My avatar, "Dominion of Canada" is there too!
Cheers,
Mark.
"In the end, when all is said and done, more will have been said than done..."
Mark.
"In the end, when all is said and done, more will have been said than done..."
-
steamraiser
- Posts: 561
- Joined: Thu Dec 31, 2009 4:49 pm
Re: Manning Wardle no. W1
Fair comment.
Gordon A
Gordon A
-
MarkS
- Posts: 296
- Joined: Tue Jul 22, 2008 1:15 am
Re: Manning Wardle no. W1
I found a photo of the firebox of "Warwickshire" - Pity the bunker is in the way.
Instead of getting on with my soldering iron, I found my colour pencils instead.
Lovely, isn't she?
Instead of getting on with my soldering iron, I found my colour pencils instead.
Lovely, isn't she?
You do not have the required permissions to view the files attached to this post.
Cheers,
Mark.
"In the end, when all is said and done, more will have been said than done..."
Mark.
"In the end, when all is said and done, more will have been said than done..."
-
RobM
- Posts: 1091
- Joined: Sun Feb 15, 2009 4:39 pm
Re: Manning Wardle no. W1
Mark, the photo of the firebox sheds some light.....it shows the back head to be flat and the wrapper has been flanged. Is it an error in the design of the model?
Rob
Rob
-
Phil O
- Posts: 364
- Joined: Sun May 05, 2013 5:23 pm
Re: Manning Wardle no. W1
RobM wrote:Mark, the photo of the firebox sheds some light.....it shows the back head to be flat and the wrapper has been flanged. Is it an error in the design of the model?
Rob
Rob
The wrapper plate has a radius at the rear of the outer firebox and probably at the front as well and the back plate and probably the throat plate are riveted to it. Must have been a real sod to form a wrapper plate like that, as opposed to forming the radius on the back plate and throat plate.
Phil
-
RobM
- Posts: 1091
- Joined: Sun Feb 15, 2009 4:39 pm
Re: Manning Wardle no. W1
Phil O wrote:Rob
The wrapper plate has a radius at the rear of the outer firebox and probably at the front as well and the back plate and probably the throat plate are riveted to it. Must have been a real sod to form a wrapper plate like that, as opposed to forming the radius on the back plate and throat plate.
Phil
Looking at Jon's model the front appears to also have a flange on the outer firebox but not at the back. Not knowing the kit but to me it looks like a design flaw (in respect of the model designer) if Mark's photo is correct. I'd be interested to know if one has to flange the plates, I've flanged copper boiler parts for a 3.5 gauge loco and a 2" scale traction engine but would not fancy doing it in thin brass.
If Mark wishes to make the model more like that in the photo then I would file down the rivets, remove the fire box door plate and regulator fittings, cut a new flat section, add the rivets by half drilling then use a rivet tool, and solder that to the existing back head and add the regulator fittings and firebox door. It just depends on what machine tools that Mark has or really just how much of the back head will be seen.
The simple way out would be to disguise with strategically placed loco crew.
Rob
-
Phil O
- Posts: 364
- Joined: Sun May 05, 2013 5:23 pm
Re: Manning Wardle no. W1
Ah Rob, I see what you mean the model has a plain wrapper and the curved piece on the backplate, but with the rivets are on the backhead piece.
Phil
Phil
-
MarkS
- Posts: 296
- Joined: Tue Jul 22, 2008 1:15 am
Re: Manning Wardle no. W1
If it helps, here is prototype "Warwickshire's" boiler from the front, without the lagging.
https://www.svrwiki.com/2047_Warwickshi ... 160713.jpg
I think Rob is correct, the design of the model backhead is compromised, perhaps a casting would have been a better choice?
As to reworking the backhead,
https://www.svrwiki.com/2047_Warwickshi ... 160713.jpg
I think Rob is correct, the design of the model backhead is compromised, perhaps a casting would have been a better choice?
As to reworking the backhead,
- I'm going with a well fed crew, strategically placed...The simple way out would be to disguise with strategically placed loco crew.
Cheers,
Mark.
"In the end, when all is said and done, more will have been said than done..."
Mark.
"In the end, when all is said and done, more will have been said than done..."
-
RobM
- Posts: 1091
- Joined: Sun Feb 15, 2009 4:39 pm
Re: Manning Wardle no. W1
MarkS wrote:......perhaps a casting would have been a better choice?
I'm going with a well fed crew, strategically placed...
Yes a casting would have been more appropriate.........good luck with feeding the crew....
Rob
-
MarkS
- Posts: 296
- Joined: Tue Jul 22, 2008 1:15 am
Re: Manning Wardle no. W1
Not a lot of progress to report, but some research has allowed me to modify the tank before it was too late.
(Thank you to Martin and David for sending me helpful scans of prototype photos)
If you look at the prototype photo of the left side you might notice that the handrail is cut short at the front end.
This was where the Westinghouse pump was located in FYN and early Southern days, before being moved back closer to the cab. I used a brass pin to fill the hole which matches the prototype. (This form of OCD is known as "Getting it all right")
While I was at it I drilled & installed the handrails on the tank near the filler.
In addition the front springs were detached , moved forward and re-soldered in line with the front horn blocks.
(Horn guides now installed with the aid of the HighLevel jigs)
Still no luck with finding clear photos of a similar backhead, and my personal ignorance of the subject of what should be there doesn't help matters.
So I meander on, doing what I can do, while trying to figure out what I don't know.
You do not have the required permissions to view the files attached to this post.
Cheers,
Mark.
"In the end, when all is said and done, more will have been said than done..."
Mark.
"In the end, when all is said and done, more will have been said than done..."
Who is online
Users browsing this forum: ClaudeBot and 0 guests