Neat Jim, I do like the range of ugly that Judith Edge produce.
For those of us who worry about such things - do you see yourself returning to New Street in the future?
Brettell Road - Back to wagons - and a correction.
-
Andy W

- Posts: 884
- Joined: Thu May 21, 2009 8:11 am
Re: Brettell Road
Make Worcestershire great again.
Build a wall along the Herefordshire border and make them pay for it.
Build a wall along the Herefordshire border and make them pay for it.
-
jim s-w

- Posts: 2189
- Joined: Wed Jul 30, 2008 5:56 pm
Re: Brettell Road
Don't worry, work continues on new street, just nothing interesting that's all. (more coaches etc)
-
jim s-w
- Posts: 2189
- Joined: Wed Jul 30, 2008 5:56 pm
Re: Brettell Road
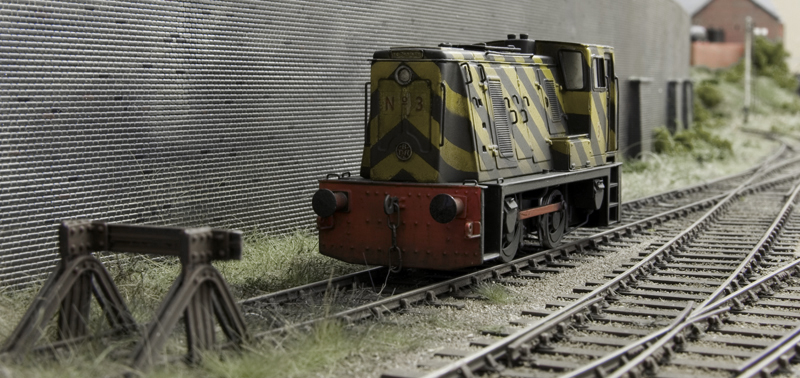
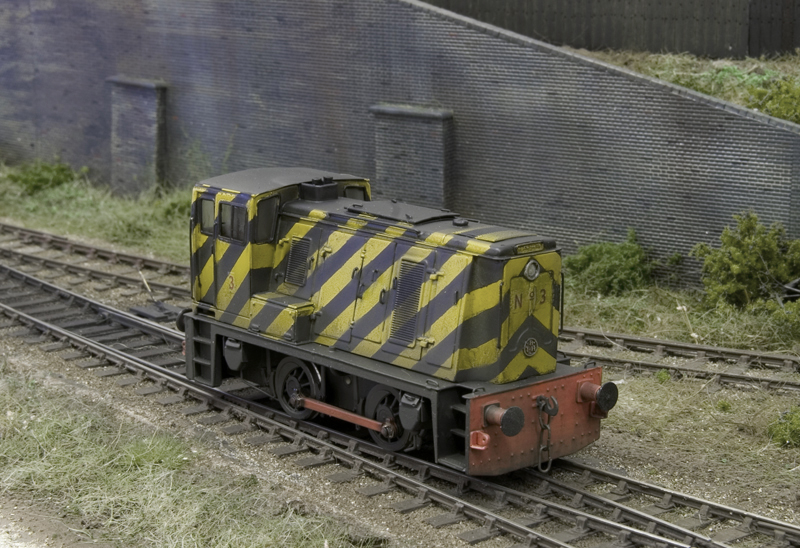
I have to admit I didn't relish the thought of painting this striped livery but by using some 4mm making tape from a company called Jammy Dog it wasn't too bad at all. [url='http://www.jammydog.com']Whiteboard Gridding Tape, 3mm & 1.5mm, £2.99 and Micro Masking Tape[/url]
A few more pictures below.

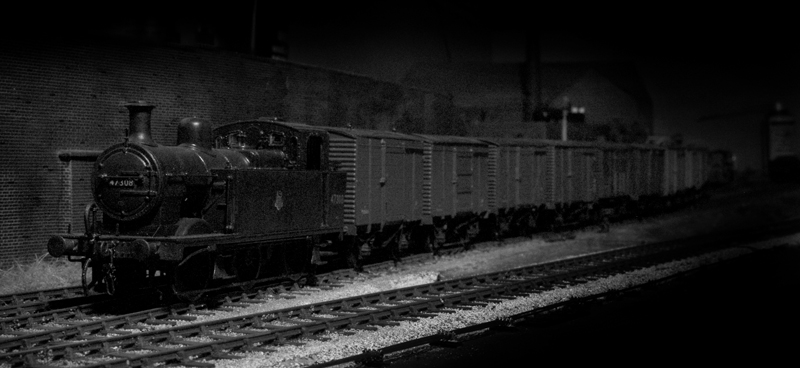
Finally another moody shot of the Jinty heading out of the yard on a train of vans.
Last edited by jim s-w on Mon Dec 21, 2015 10:24 am, edited 2 times in total.
-
jim s-w
- Posts: 2189
- Joined: Wed Jul 30, 2008 5:56 pm
Re: Brettell Road
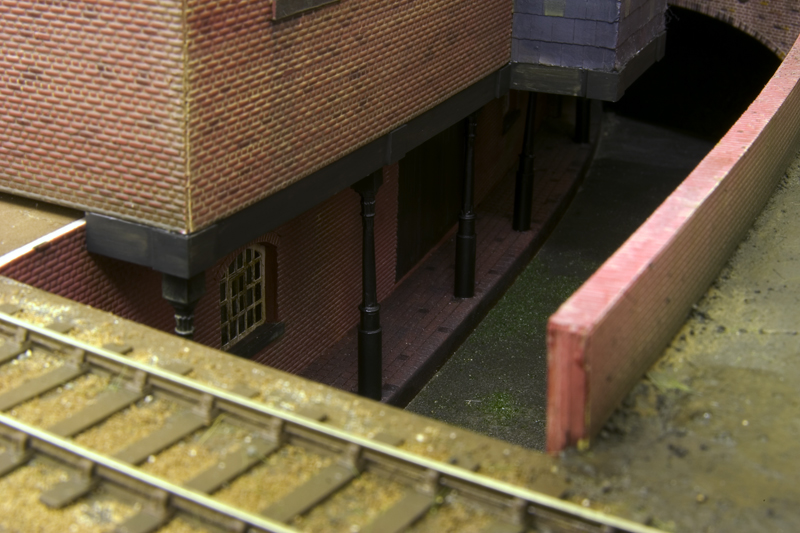
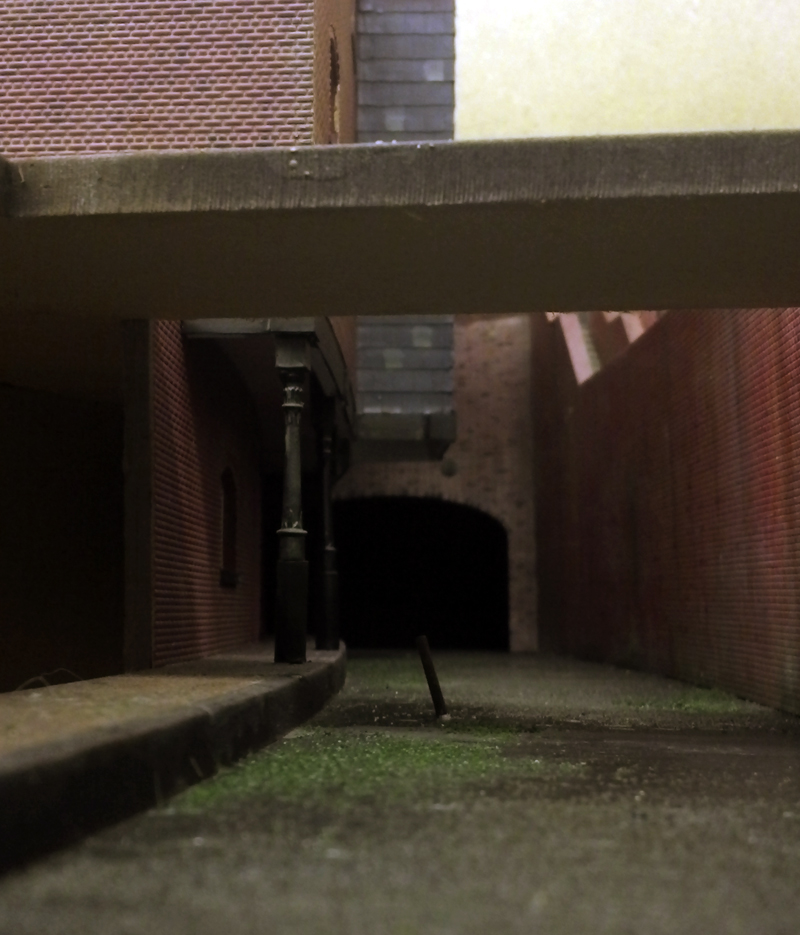
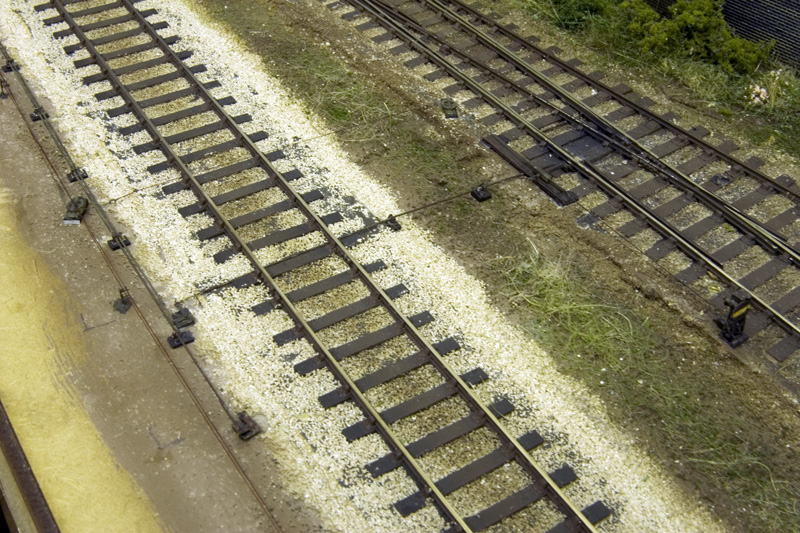
I have added the pillars that support the disused warehouse as well as the lower floor. As its nigh on impossible to see I didnt go too mad on the detailing of the lower floor. The pillars are from Scale Link and because they were intended for a footbridge were too short for what I wanted. I looked a the 7mm scale ones but they were too big so in the end I just added bits of evergreen section to the tops and bottoms to get the height I needed. Below is a view along the canal taken with a mobile phone.
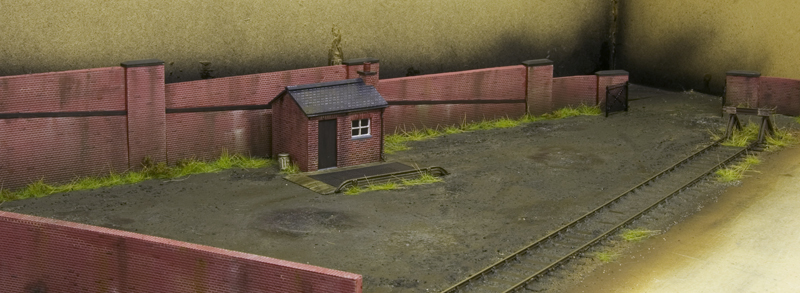
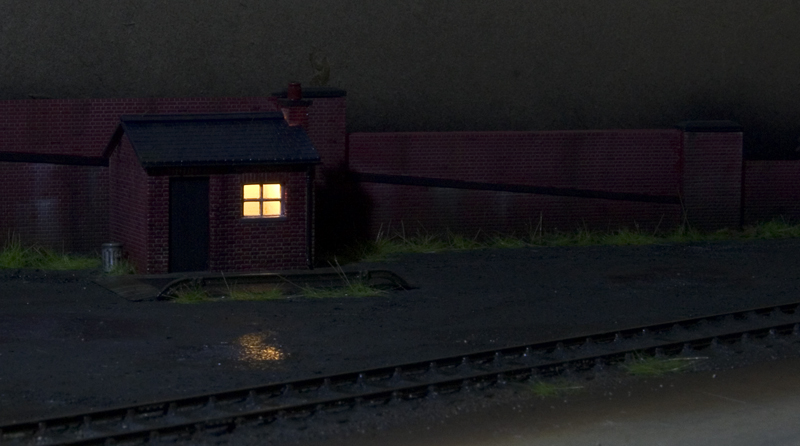
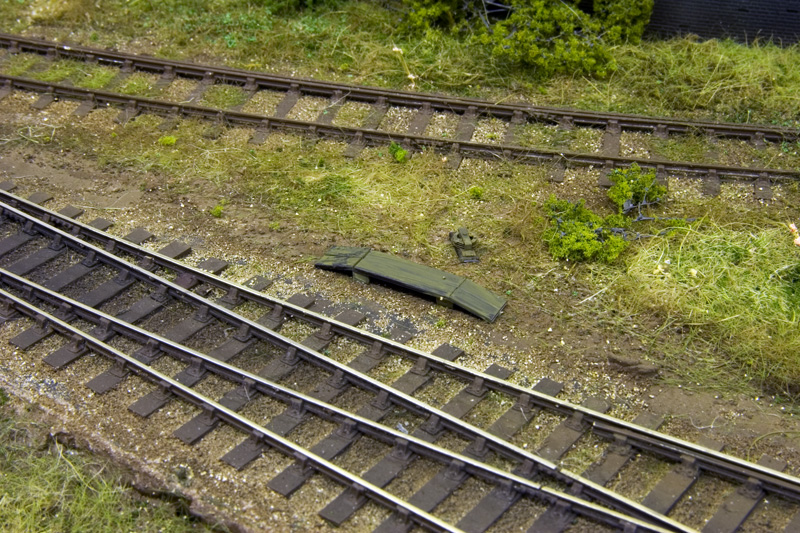
On the other side of the canal I wanted a very basic goods yard. The sort of thing where a lorry could be backed up to a wagon and unloaded by hand, no need for cranes or coal staithes or any of the other stuff you usually see. I did settle for a weighbridge as the most minimum of facilities, the build of which was featured in an earlier post. The floor was more powered paint dusted on dry and a few minutes of 'driving' a Base toys lorry around soon added some interest to the floor before it was sealed with Klear. I then used Tamiya gloss varnish to create puddles and baking soda for the raindrops. The whole scene was sprayed with Halford's gloss lacquer to make it all look wet and tie everything together.
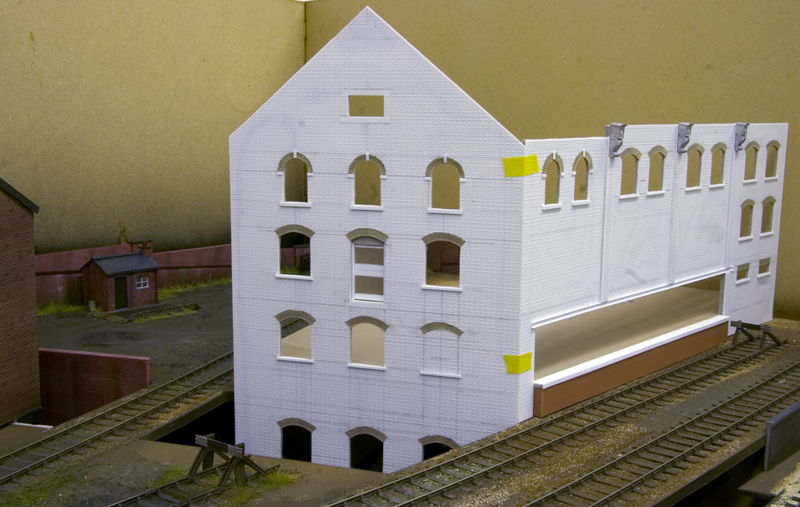
In front of this will be another largish building which is shown here in the early stages of construction. I wanted to deliberately do things backwards as we human being aren't actually very good at random things. We tend to see patterns easily and even if you have never studied art or illustration we have a natural bias towards well composed things. It would have made a better 'picture' if the building was behind the yard but in reality the railway is usually at the back of things not the front, It's usually tucked away not the main feature.
Cheers
Jim
-
Colin Parks
Re: Brettell Road
Hi Jim,
I have just had a look through the latest pictures and am very impressed. The B&W photo of the van train looks really effective and atmospheric - in fact, all the shots fit that description!
All the best,
Colin
I have just had a look through the latest pictures and am very impressed. The B&W photo of the van train looks really effective and atmospheric - in fact, all the shots fit that description!
All the best,
Colin
-
jim s-w
- Posts: 2189
- Joined: Wed Jul 30, 2008 5:56 pm
Re: Brettell Road
Thanks Colin
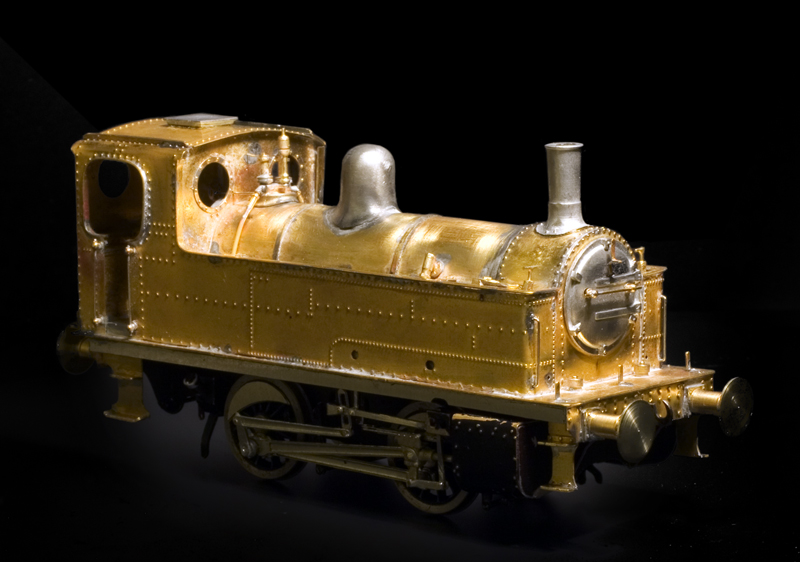
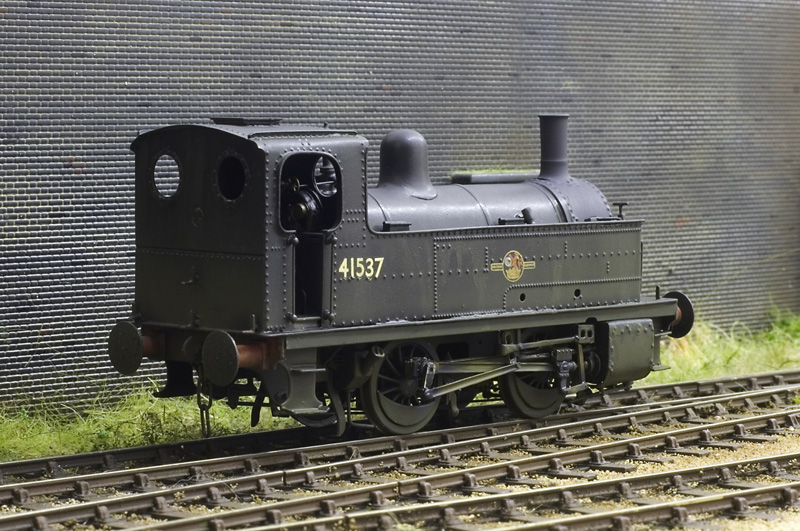
I've been busy fiddling about with more etched kits. This time a Brassmasters kit for the Deeley 0-4-0 tank engine. It's all gone together pretty well with just a few areas that needed a tweak or 2 to get right (if that's down to an error in the kit or my ham fisted effort to bodge it all together ill leave up to you). For the benefit of those who might want to try the same kit i'll share my findings. On the valve gear the connecting links (part A36 in the kit) are too long and needed reducing in length by about 1.5mm. While the eccentric rods (parts A37 and A38) are also too long and needed shortening by about 3mm. I didn't bother using the supplied buffers and new etched heads and replaced them with some A1 models sprung oleos. (part A81) Don't worry as I know the real loco didn't have oleo buffers but the A1 models ones don't look much like real oleos anyway.
I found adding the rear lamp irons to be a bit of a faff and lost some anyway. Its much easier to use a bit of fine strip to form a lamp iron with a long foot so that you have something to hold on to while soldering them in place. I decided to make the roof removable by soldering some scrap etch to the edges so that it can be gently sprung into place under the sides. Brassmaters supply the sides for the earlier flush sided loco as well as this one. I prefered the look of the later ones as it looked more antiquated somehow.
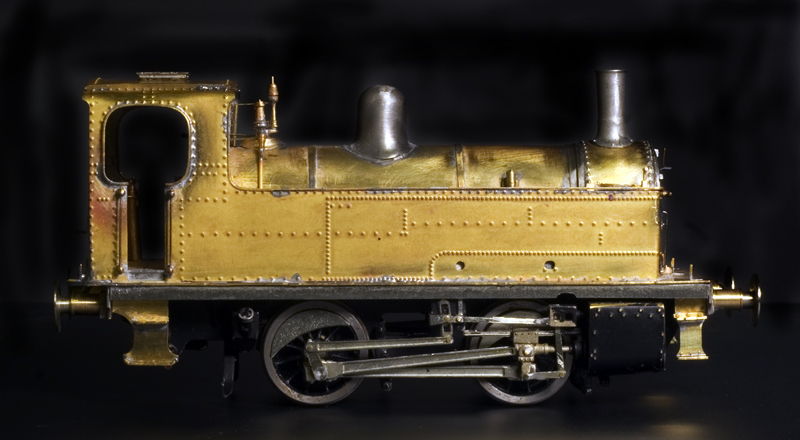
I've never done valve gear before. The instructions say that valve gear rivets make the job easier but I elected to use brass pins with the heads filed down and located out of view. A slip of cigarette paper and a drop of oil means that the whole lot doesn't solder together in one big, rigid lump. I'm pretty pleased with how it came out if I am honest.
I've been busy fiddling about with more etched kits. This time a Brassmasters kit for the Deeley 0-4-0 tank engine. It's all gone together pretty well with just a few areas that needed a tweak or 2 to get right (if that's down to an error in the kit or my ham fisted effort to bodge it all together ill leave up to you). For the benefit of those who might want to try the same kit i'll share my findings. On the valve gear the connecting links (part A36 in the kit) are too long and needed reducing in length by about 1.5mm. While the eccentric rods (parts A37 and A38) are also too long and needed shortening by about 3mm. I didn't bother using the supplied buffers and new etched heads and replaced them with some A1 models sprung oleos. (part A81) Don't worry as I know the real loco didn't have oleo buffers but the A1 models ones don't look much like real oleos anyway.
I found adding the rear lamp irons to be a bit of a faff and lost some anyway. Its much easier to use a bit of fine strip to form a lamp iron with a long foot so that you have something to hold on to while soldering them in place. I decided to make the roof removable by soldering some scrap etch to the edges so that it can be gently sprung into place under the sides. Brassmaters supply the sides for the earlier flush sided loco as well as this one. I prefered the look of the later ones as it looked more antiquated somehow.
I've never done valve gear before. The instructions say that valve gear rivets make the job easier but I elected to use brass pins with the heads filed down and located out of view. A slip of cigarette paper and a drop of oil means that the whole lot doesn't solder together in one big, rigid lump. I'm pretty pleased with how it came out if I am honest.
-
Andy W
- Posts: 884
- Joined: Thu May 21, 2009 8:11 am
Re: Brettell Road
Nice Jim. And timely notes re the valve gear for me as I've been building one as well. I agree that the riveted version has a more antiquated look, but I'm planning to give this one a fully lined livery.
I tackled access to the cab by having a removable back wall - it hasn't just fallen off!
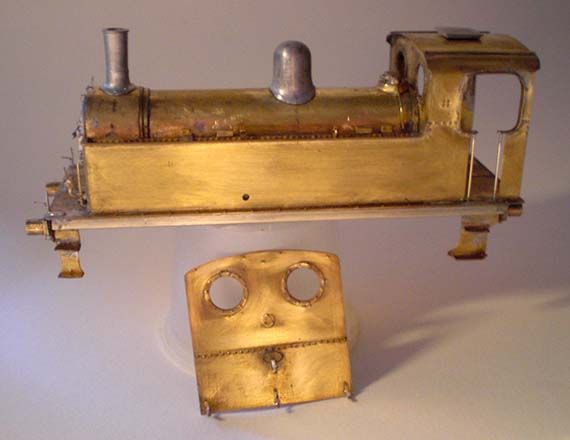
It's split axle so took a bit of head scratching to get everything isolated.
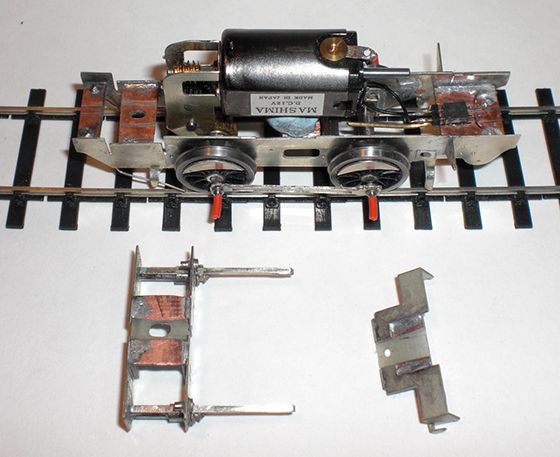
I tackled access to the cab by having a removable back wall - it hasn't just fallen off!

It's split axle so took a bit of head scratching to get everything isolated.

Make Worcestershire great again.
Build a wall along the Herefordshire border and make them pay for it.
Build a wall along the Herefordshire border and make them pay for it.
-
Terry Bendall
- Forum Team
- Posts: 2426
- Joined: Sun Jul 27, 2008 7:46 am
Re: Brettell Road
jim s-w wrote: I'm pretty pleased with how it came out if I am honest.
And no reason not to be pleased Jim. I would be if I achieved that sort of result with my first steam outline kit. Very nice indeed.
Terry Bendall
-
jim s-w
- Posts: 2189
- Joined: Wed Jul 30, 2008 5:56 pm
Re: Brettell Road
Thanks both
Andy, I found also that the brakes don't fit as supplied. On the rear ones I cranked the mounting wire so that they clear the wheels. On the front ones I couldnt see any option other than trim the upper halves off and mount them to the cylinders. With all the valve gear in te way you can't really see them anyway.
How do you attach the rear of the cab? That's an interesting idea
Cheers
Jim
Last edited by jim s-w on Fri Jan 29, 2016 9:52 am, edited 1 time in total.
-
Knuckles

- Posts: 1262
- Joined: Fri Nov 18, 2011 9:15 pm
Re: Brettell Road
Couldn't you solder some scrap etch lengths to the inside of the rear cab sheet and file them to a blade point and on the cab floor at the back some the same size standing next to the cab sides creating a thin gap. Then you could push the cab rear in position and the sharpened scrap etch would ease it into the gap that is a 0.1 or 0.2 of a mill' tight thus fixing by tight friction. Would this work? You could pop the cab rear back out by pushing a tool through the cab sides at an angle.
My mind thinks it would work, it's got to be better than my infamous blue-tak bodge anyway.
My mind thinks it would work, it's got to be better than my infamous blue-tak bodge anyway.
“He who dares not offend cannot be honest.” Thomas Paine
https://www.sparkshotcustomcreations.com/
Mostly 3D Printed Loco kits etc.
SCC Price list (7/4/22)
https://www.sparkshotcustomcreations.co ... e77d42.pdf
https://www.sparkshotcustomcreations.com/
Mostly 3D Printed Loco kits etc.
SCC Price list (7/4/22)
https://www.sparkshotcustomcreations.co ... e77d42.pdf
-
MarkS

- Posts: 296
- Joined: Tue Jul 22, 2008 1:15 am
Re: Brettell Road
Blue-tak - the duct tape of railway modellers... 
Cheers,
Mark.
"In the end, when all is said and done, more will have been said than done..."
Mark.
"In the end, when all is said and done, more will have been said than done..."
-
jim s-w
- Posts: 2189
- Joined: Wed Jul 30, 2008 5:56 pm
Re: Brettell Road
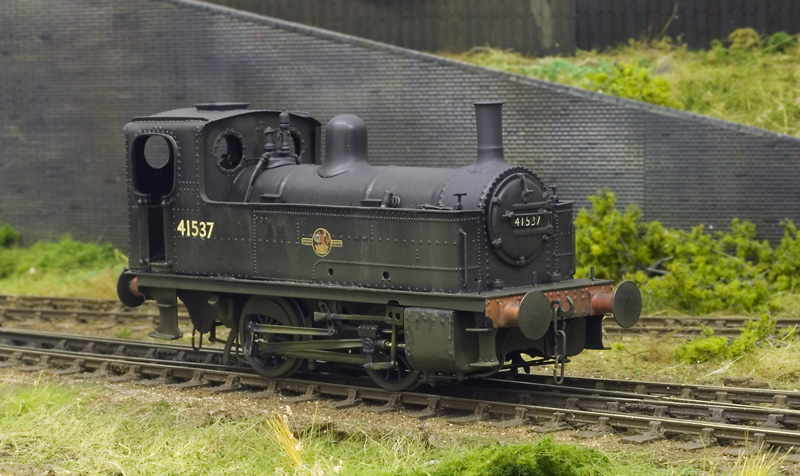
Aside from a few little details, adding a crew and grease on the buffers, The Deeley tank is now complete. Just got to make it look wet now!
-
DougN
- Posts: 1253
- Joined: Wed Sep 01, 2010 9:57 am
Re: Brettell Road
Looks very nice there Jim. What is the weathering colour that has been applied?
I will be interested in how you make it look "wet" as from the last time I saw a steam engine in the rain the smokebox was still dry due to the heat. (rain hit it and evaporated quickly in milliseconds)
I will be interested in how you make it look "wet" as from the last time I saw a steam engine in the rain the smokebox was still dry due to the heat. (rain hit it and evaporated quickly in milliseconds)
Doug
Still not doing enough modelling
Still not doing enough modelling
-
jim s-w
- Posts: 2189
- Joined: Wed Jul 30, 2008 5:56 pm
Re: Brettell Road
Just a mix of humbrol leather, grey and gunmetal.
I spent a while at the Severn valley in the rain looking at how locos behaved in the wet and I didn't see any evaporation. The bodies seemed wet all of the time that the rain was falling. The only steam evaporating of the loco was coming from inside.
Perhaps it depends on how long it's been raining?
Cheers
Jim
-
Knuckles
- Posts: 1262
- Joined: Fri Nov 18, 2011 9:15 pm
Re: Brettell Road
Looks mint. Thinking I might have a go one day. I saw this kit a year or so and fancied one. Something about the complex valve gear on such a small engine appeals - plus for this mini test layout I'm doing it'd be ideal.
Have you decided upon the cab rear fixing method?
Have you decided upon the cab rear fixing method?
“He who dares not offend cannot be honest.” Thomas Paine
https://www.sparkshotcustomcreations.com/
Mostly 3D Printed Loco kits etc.
SCC Price list (7/4/22)
https://www.sparkshotcustomcreations.co ... e77d42.pdf
https://www.sparkshotcustomcreations.com/
Mostly 3D Printed Loco kits etc.
SCC Price list (7/4/22)
https://www.sparkshotcustomcreations.co ... e77d42.pdf
-
jim s-w
- Posts: 2189
- Joined: Wed Jul 30, 2008 5:56 pm
Re: Brettell Road
Thanks
The rear cab idea is something Andy is doing, I was just curious. I went for a removable roof
Cheers
Jim
The rear cab idea is something Andy is doing, I was just curious. I went for a removable roof
Cheers
Jim

-
Andy W
- Posts: 884
- Joined: Thu May 21, 2009 8:11 am
Re: Brettell Road
The engine really looks at home on Brettell Road Jim, marvellous.
Make Worcestershire great again.
Build a wall along the Herefordshire border and make them pay for it.
Build a wall along the Herefordshire border and make them pay for it.
-
Colin Parks
Re: Brettell Road
Hi Jim,
I can only echo the favourable comments of others, but the Deeley loco looks mighty fine!
All the best,
Colin
I can only echo the favourable comments of others, but the Deeley loco looks mighty fine!
All the best,
Colin
-
jim s-w
- Posts: 2189
- Joined: Wed Jul 30, 2008 5:56 pm
Re: Brettell Road
Thanks all
Ive recently been adding the signal wires to the layout. The wheels are from Brassmasters with the majority of the actual wires being from easyline. The posts are made from 1mm strip with 0.7mm brass rod for the pullies.
As with the point rodding I wanted to include some leftovers from the branch line, No wires but some pullies and posts along with a rudimentary walkway over the now long gone wires.
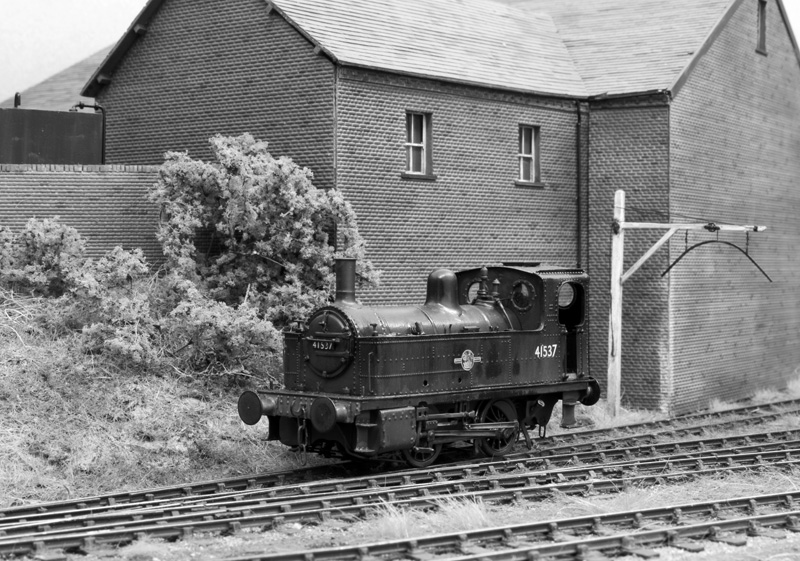
The abandoned building is now fixed in place too, a bit more work needed to bed it in but here's a pic of the Deeley tank simmering away in front of it. Ive done a little video of a spot of shunting that shows all of the Brettell Road loco fleet (so far) the limp you can see on the deeley was caused by one of the rods being a bit too long, now corrected.
YouTube link https://www.youtube.com/embed/YaDYo2M01Y0
Cheers
Jim
Ive recently been adding the signal wires to the layout. The wheels are from Brassmasters with the majority of the actual wires being from easyline. The posts are made from 1mm strip with 0.7mm brass rod for the pullies.
As with the point rodding I wanted to include some leftovers from the branch line, No wires but some pullies and posts along with a rudimentary walkway over the now long gone wires.
The abandoned building is now fixed in place too, a bit more work needed to bed it in but here's a pic of the Deeley tank simmering away in front of it. Ive done a little video of a spot of shunting that shows all of the Brettell Road loco fleet (so far) the limp you can see on the deeley was caused by one of the rods being a bit too long, now corrected.
YouTube link https://www.youtube.com/embed/YaDYo2M01Y0
Cheers
Jim
-
Knuckles
- Posts: 1262
- Joined: Fri Nov 18, 2011 9:15 pm
Re: Brettell Road
Just watched the whole video with much interest. Enjoyed this, thanks. 
Makes me want to edit it and add my own SFX and stuff like before. Has been a while.
Deely looks great in motion and the derelict look you are after works really well. Highly convincing to me.
Makes me want to edit it and add my own SFX and stuff like before. Has been a while.
Deely looks great in motion and the derelict look you are after works really well. Highly convincing to me.
“He who dares not offend cannot be honest.” Thomas Paine
https://www.sparkshotcustomcreations.com/
Mostly 3D Printed Loco kits etc.
SCC Price list (7/4/22)
https://www.sparkshotcustomcreations.co ... e77d42.pdf
https://www.sparkshotcustomcreations.com/
Mostly 3D Printed Loco kits etc.
SCC Price list (7/4/22)
https://www.sparkshotcustomcreations.co ... e77d42.pdf

-
DougN
- Posts: 1253
- Joined: Wed Sep 01, 2010 9:57 am
Re: Brettell Road
Jim that video was great. The running looks to be fantastic. I hope you are enjoying the diversion from New street.
Last edited by DougN on Sat Feb 06, 2016 9:25 pm, edited 1 time in total.
Doug
Still not doing enough modelling
Still not doing enough modelling
-
Will L

- Posts: 2524
- Joined: Sun Jul 20, 2008 3:54 pm
Re: Brettell Road
I don't want to seem too picky, but that open wagon door... It shouldn't be open when the wagon is moved of course but... if it is, it ought to flap. Look at it as a challenge.
-
jim s-w
- Posts: 2189
- Joined: Wed Jul 30, 2008 5:56 pm
Re: Brettell Road
Hi will
This proves the mantra, model what you see not what you think you know. In pretty much all of the prototype pictures I've seen of coal wagons being pushed up the bank I've used for inspiration the wagon door is open. I do need to add a guy standing at the front of the wagon mind you
Cheers
Jim
This proves the mantra, model what you see not what you think you know. In pretty much all of the prototype pictures I've seen of coal wagons being pushed up the bank I've used for inspiration the wagon door is open. I do need to add a guy standing at the front of the wagon mind you
Cheers
Jim
Who is online
Users browsing this forum: No registered users and 2 guests