When we received steel plate, 1/4 inch and above, it was coated in a light to medium grey with its colour code painted on one corner. The colour code identified the type of steel, its been a long time since I had any dealings with steel plate, so I can no longer remember the grades and their related colour codes.
I don't know whether or not the wagon producers received their plate in a similar condition. One thing is for certain any paint would have been removed in areas to be welded, it's a right pain the backside to strike an arc on painted steel.
16T Weathering Experiments
-
Lord Colnago

- Posts: 403
- Joined: Tue Aug 11, 2009 8:42 pm
Re: 16T Weathering Experiments
Hi Paul,
I've been following this with interest and must say that you are making a marvellous job of the weathering, particularly as a first attempt. Its inspiring stuff, so much so that I have dug out a couple of Bachmann 16 tonners so that I can have a play myself, particularly on the insides, something that I have always struggled with. Another area that I always struggle with is the depiction of bare wood. Your photos have given me an idea or two so I'll go away and have a play with that too. Keep up the interesting work, keep posting and get that Rumney chassis finished!!
All the best.
John.
The second best priest
-
Paul Willis

- Forum Team
- Posts: 3045
- Joined: Sun Jul 20, 2008 6:00 pm
Re: 16T Weathering Experiments
Lord Colnago wrote: Another area that I always struggle with is the depiction of bare wood. Your photos have given me an idea or two so I'll go away and have a play with that too.
Hi John,
One of the tutorials that I keep bookmarked is this one on weathered wood: https://www.rmweb.co.uk/community/index.php?/topic/99826-weathered-wood-a-worked-example/
I've tried it and experimented with different levels of colour change in the basecoats, and it works very well, whether you are going for a consistent finish or one picking out many different planks.
Cheers
(Another) Paul
Beware of Trains - occasional modelling in progress!
www.5522models.co.uk
www.5522models.co.uk
-
Terry Bendall
- Forum Team
- Posts: 2427
- Joined: Sun Jul 27, 2008 7:46 am
Re: 16T Weathering Experiments
Phil O wrote:When we received steel plate, 1/4 inch and above, it was coated in a light to medium grey
This was probably the oxide coating left from when the plate was rolled in the steel mill, not paint. The same "finish" was present when I used to order steel sheet when I was teaching. It is the sort of finish that those who model wagons that are designed to carry coils of steel try to emulate.
Phil O wrote: One thing is for certain any paint would have been removed in areas to be welded, it's a right pain the backside to strike an arc on painted steel.
It is, but less of a problem with the oxide coating
Terry Bendall
-
Noel

- Posts: 1981
- Joined: Wed Jun 23, 2010 1:04 pm
Re: 16T Weathering Experiments
Continuous wide strip rolling mills start with a hot steel slab and end with a roll of plate of the required thickness. What happens after that depends on what the customer wants. It can be cold rolled to produce sheet, left as it is or "pickled" in acid to clean it. As mineral wagons used 1/4" plate, it was presumably delivered to the manufacturers as rolls, but whether pickled or untreated (blackplate) I don't know. Given the nature of the process it would seem likely that the steel works would clean the rolls before despatch.
Regards
Noel
Noel
-
Captain Kernow

- Posts: 482
- Joined: Sat Jul 26, 2008 8:08 pm
Re: 16T Weathering Experiments
Paul Hutfield wrote:I did try to replicate was the witness of the load on the interiors. A bit like a tide mark on a dock or river bank. I've highlighted this witness in Bryan's Kingswear image, highlighting my observation with the application of some crudely applied red lines
Have you considered some dry-brushing of the darker colour, Paul, describing a gentle arc, as per the photos?
Also, in general terms, I find that (for a dry wagon interior, as opposed to one that has been sitting out in the rain), you can get wonderfully subtle variations with the judicious use of weathering powders.
This also applies to the external parts of the wagon as well, of course, especially parts of the chassis.
Keep up the good work!
Tim M
Member of the Devon Riviera Area Group.
Member of the Devon Riviera Area Group.
-
Noel
- Posts: 1981
- Joined: Wed Jun 23, 2010 1:04 pm
Re: 16T Weathering Experiments
Another view of the inside of a 16T [undated on the Nuneaton History website, probably late 1960s at a guess] http://www.nuneatonhistory.com/uploads/1/8/6/8/18680466/6503837_orig.jpg, showing the witness marks on the side and end. The wagon doesn't appear to have any replating or rebodying, but has probably acquired a new door and has a reinforcement of the brake lever. It also appears to be devoid of paint on the chassis, although it has been repainted at least once, judging by the tare weight marking.
Thanks to Steamraiser for the link.
Thanks to Steamraiser for the link.
Regards
Noel
Noel
-
David Thorpe
Re: 16T Weathering Experiments
Captain Kernow wrote:Also, in general terms, I find that (for a dry wagon interior, as opposed to one that has been sitting out in the rain), you can get wonderfully subtle variations with the judicious use of weathering powders. This also applies to the external parts of the wagon as well, of course, especially parts of the chassis.
I'd echo that. I've found weathering pigments very useful and have been happy with the effects achieved. I'd recommend the Abteilung range from which I've found Black Smoke, Dark Mud, and Standard Rust give almost all the basic effects I require.
DT
-
andrewnummelin
- Posts: 374
- Joined: Mon Jul 21, 2008 9:43 am
Re: 16T Weathering Experiments
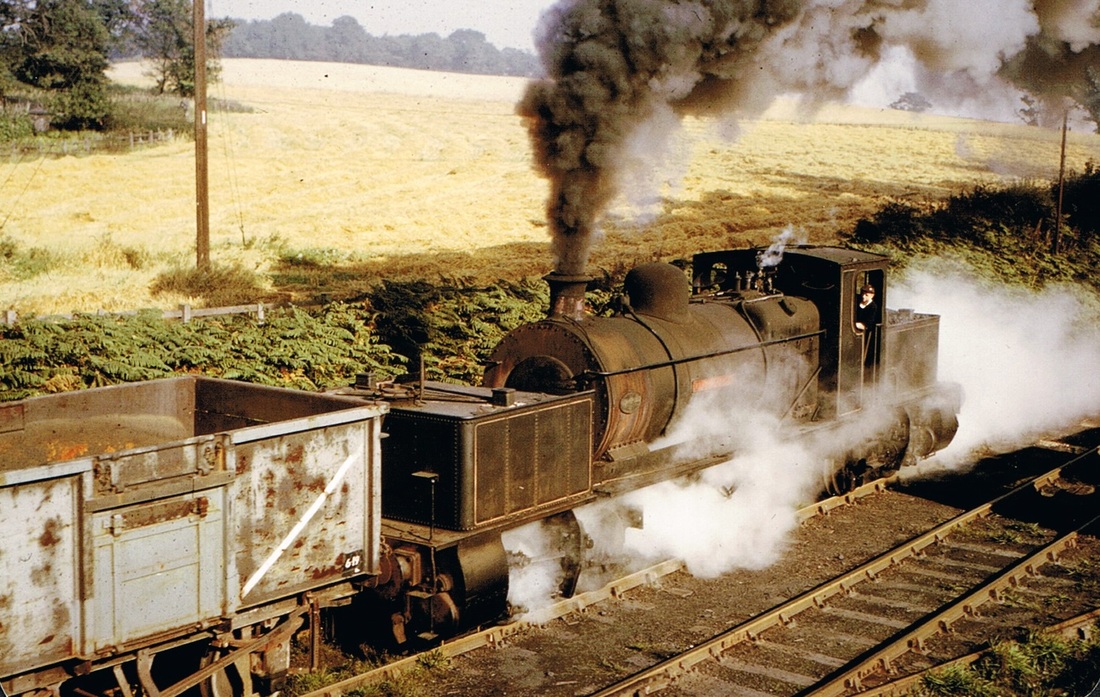
By chance I came across this photo when looking for something else. Not a 16T wagon but it does show on the side an apparent load line that fits with the end. However I can't imagine the normal load being as low as these marks indicate, so the pattern may have a more complex origin.
jpeg version of a tiff scan of a slide I took at Rhymney in 1968.
jpeg version of a tiff scan of a slide I took at Rhymney in 1968.
You do not have the required permissions to view the files attached to this post.
Regards,
Andrew Nummelin
Andrew Nummelin
-
Captain Kernow
- Posts: 482
- Joined: Sat Jul 26, 2008 8:08 pm
Re: 16T Weathering Experiments
David Thorpe wrote:Captain Kernow wrote:Also, in general terms, I find that (for a dry wagon interior, as opposed to one that has been sitting out in the rain), you can get wonderfully subtle variations with the judicious use of weathering powders. This also applies to the external parts of the wagon as well, of course, especially parts of the chassis.
I'd echo that. I've found weathering pigments very useful and have been happy with the effects achieved. I'd recommend the Abteilung range from which I've found Black Smoke, Dark Mud, and Standard Rust give almost all the basic effects I require.
Almost exactly the same shades that I now use, David (recommended to me originally by Mick Bonwick, I believe).
Tim M
Member of the Devon Riviera Area Group.
Member of the Devon Riviera Area Group.
-
Simon Moore
Re: 16T Weathering Experiments
A very interesting topic Paul & i am looking forward to trying these techniques. I have been looking for a good tutorial on how to weather wagons better than my usual route.
I will give it a go when the paint turns up.
I will give it a go when the paint turns up.
-
Terry
Re: 16T Weathering Experiments
Hi Paul,
I am most impressed with your weathering techniques and results shown in this thread. Although I'm new to Railway modelling, I have for many years modelled AFV's and aircraft, and have enjoyed using weathering and other subtle painting techniques to help bring the models to life, especially on AFV's and vehicles. I hope to emulate that on my rolling stock and locomotives as I gain confidence and move forward.
Thanks
Terry
-
Simon Moore
Re: 16T Weathering Experiments
Paul I decided to have a go at weathering the 16t mineral I built a while ago going down the same route as you did. The colour was pheonix so a little green in colour but here is my first attempt using your technique & a bit of my own.
I have still to complete the inner of the wagon but I think I will blow that in with the airbrush to save time.
I opened my wagon kit box & I think the next wagons will be a pair of 21t minerals & of course this time the colour will be painted like yours.
Regards
Simon
I have still to complete the inner of the wagon but I think I will blow that in with the airbrush to save time.
I opened my wagon kit box & I think the next wagons will be a pair of 21t minerals & of course this time the colour will be painted like yours.
Regards
Simon
You do not have the required permissions to view the files attached to this post.
-
Noel
- Posts: 1981
- Joined: Wed Jun 23, 2010 1:04 pm
Re: 16T Weathering Experiments
For future reference, BR 2-shoe Morton brakes always had the brake shoes on the side with the reversing clutch. Also, as you have them, it is impossible to apply the brakes as pushing the levers down takes the shoes away from the wheels.
Officially the white lines were 2½ inches wide, so <1mm on the model, although on wooden 13T minerals it was common to just paint the diagonal strapping. B244920 was a Cambrian built 1/109 rivetted 16T.
Officially the white lines were 2½ inches wide, so <1mm on the model, although on wooden 13T minerals it was common to just paint the diagonal strapping. B244920 was a Cambrian built 1/109 rivetted 16T.
Regards
Noel
Noel
-
Simon Moore
Re: 16T Weathering Experiments
Noel I think you mentioned that when I built the wagon. The next lot I won't be making the same mistakes.
-
Noel
- Posts: 1981
- Joined: Wed Jun 23, 2010 1:04 pm
Re: 16T Weathering Experiments
Sorry, Simon. I think you may well be right; I did check this thread before posting and it's not on here, so must have been in another thread a while ago.
Regards
Noel
Noel
-
Simon Moore
Re: 16T Weathering Experiments
On the numbering side of things its bizarre that Parkside stick a transfer sheet in the wagon kit which is wrong. I just went with what was in the kit.
-
Noel
- Posts: 1981
- Joined: Wed Jun 23, 2010 1:04 pm
Re: 16T Weathering Experiments
Parkside only provided transfers with 7mm kits, never 4mm, and it appears that this policy still applies now they are part of Peco. Modelmaster do transfers intended for Parkside kits; according to the website their PC21 set https://modelmaster.uk/home/24452-mmpc21-16t-mineral-wagon-non-vacuum-fitted.html is for unfitted 1/108, and has 4(!) x B244920 and 2 x B557023, so I guess that is what you have. Interestingly, B557023 is a VB fitted 1/108, although the transfers are supposed to be for unfitted wagons. Being VB it shouldn't have a black patch, in theory, although the VB 1/108 are the sole exception to this rule that I know of, as some did have the numbers on black patches on the bauxite body colour.
I don't have any idea why Modelmaster got it wrong (there is a Parkside 1/109 kit), nor why the white lines are too wide, nor why they included "wb 9-0" markings, as generally only wheelbases of 10ft and over were shown on wagons. It all goes to show, though, that you shouldn't assume that a transfer manufacturer has always got it right, anymore than you would assume with a kit manufacturer that they have got the vehicle right and the instructions right. Some are, of course, much more reliable than others.
I don't have any idea why Modelmaster got it wrong (there is a Parkside 1/109 kit), nor why the white lines are too wide, nor why they included "wb 9-0" markings, as generally only wheelbases of 10ft and over were shown on wagons. It all goes to show, though, that you shouldn't assume that a transfer manufacturer has always got it right, anymore than you would assume with a kit manufacturer that they have got the vehicle right and the instructions right. Some are, of course, much more reliable than others.
Regards
Noel
Noel
-
Noel
- Posts: 1981
- Joined: Wed Jun 23, 2010 1:04 pm
Re: 16T Weathering Experiments
I forgot to add that the bottom door markings are irrelevant for 1/108, as they didn't have any such doors,
Regards
Noel
Noel
-
DaveHarris
- Posts: 211
- Joined: Wed Jan 04, 2012 9:08 pm
Re: 16T Weathering Experiments
Noel,
I have just been reading this post with great interest, especially your last comments .
Can you tell me(and others) where we can get details of wagon numbers and type in order not to fall into the 'trap' set for us by modelmaster?
Regards
Dave Harris
I have just been reading this post with great interest, especially your last comments .
Can you tell me(and others) where we can get details of wagon numbers and type in order not to fall into the 'trap' set for us by modelmaster?
Regards
Dave Harris
-
Terry Bendall
- Forum Team
- Posts: 2427
- Joined: Sun Jul 27, 2008 7:46 am
Re: 16T Weathering Experiments
DaveHarris wrote:Can you tell me(and others) where we can get details of wagon numbers and type in order not to fall into the 'trap' set for us by modelmaster?
Most transfer sheets will include a selection of "loose" numbers and with a bit of careful work with a scalpel it is possible to remove the unwanted numbers and replace them. Fairly easy to do on BR types where usually only the last one or two numbers will need changing. I usually remove the numbers from the backing sheet in water and fix them with clear varnish and then varnish over the whole transfer. Black patches can be achieved by painting on the patch and applying the numbers when dry. If there are no loose numbers then some can be cut some from a made up data panel.
Not difficulty to do but fiddly and sometimes time consuming but it means that whatever wagon you are building can include the chosen running number. One downside is that the size of the loose numbers does not always match the size of those on the made up data panel.
Terry Bendall
-
Noel
- Posts: 1981
- Joined: Wed Jun 23, 2010 1:04 pm
Re: 16T Weathering Experiments
DaveHarris wrote:Can you tell me(and others) where we can get details of wagon numbers and type in order not to fall into the 'trap' set for us by modelmaster?
I should point out that I use a lot of Modelmaster transfers and the example highlighted is a bit unusual; it is possible that the numbers came from Peco. Having said that, I always check to see what a number belongs to and often "mix and match" to get what I want, as Terry mentions, either for variety or to get a number for a type of wagon not covered in the selection I have. I normally remove and replace the last section of the number and apply the parts in the usual way, as I find that easier. It is possible with transfers on a black background to simply overlay part of a second number over the original transfer, once it has dried, rather than create a jigsaw; they are thin enough normally to do this without it being visible when varnished. Which ever way you do it, always use a very sharp new scalpel blade to cut out the individual digits or groups of digits.
So far as numbers are concerned, as a result of my interest in rolling stock, I have collected various books and magazines over the years; for this query I consulted:
"An Illustrated History of BR Wagons Vol.1", P Bartlett, D Larkin, T Mann, R Silsbury & A Ward (Vol. 2 never appeared)
"British Railways Wagons", Don Rowland
"The 16-Ton Steel Mineral Wagon", an article by Peter Fidczuk, in Modellers' BackTrack Vol. 1 Nos. 3-5
"Wagons of the Early British Railways Era" and "Wagons of the Middle British Railways Era", David Larkin
I also have books for the four grouped railways, although in the case of the LNER and SR multi-volume books, only those volumes dealing with the group built wagons, as pre-grouping wagons were uncommon by the period I model. If you model pre-group it gets very much more difficult, especially with those lines which recycled the numbers of withdrawn wagons. Although some blocks were allocated to new wagons from quite soon after grouping, both the LMSR and the LNER sometimes randomly reused numbers in the 1920s as well, for which little information is available apart from a very few photographs.
Regards
Noel
Noel
-
Tony Wilkins
- Posts: 818
- Joined: Tue Mar 20, 2012 3:57 pm
Re: 16T Weathering Experiments
DaveHarris wrote:
Can you tell me(and others) where we can get details of wagon numbers and type in order not to fall into the 'trap' set for us by modelmaster?
Regards
Dave Harris
There are a number of reference books that I find invaluable in this respect.
David Larkin has published numerous books including his Wagons of the British Railways Eras, 3 volumes. Early, Middle and Final.
Don Rowland British Railways Wagons.
An illustrated history of BR Wagons by P. Bartlett, D. Larkin, T. Mann, R, Silsbury and A. Ward of which only volume one was ever published.
Finally for 16T mineral wagons Peter Fidczuk's seminal series in Modellers Backtrack volume 1. 3,4,5 is the ultimate reference work although even so there are some discrepancies with other sources.
The potential pitfalls with 16T minerals are many and varied and I have fallen into several of them. Many years ago, before such information was made available, apart from photos there was little choice but to effectively take a guess at appropriate numbers. I happened to find one that was allocated to a small batch of Aluminium bodied 16T minerals. No photos of this batch have ever come to light and there are doubts as to how long they lasted. I subsequently chose a different, more appropriate number.
Regards
Tony.
P.S. Snap.
Inspiration from the past. Dreams for the future.
-
Noel
- Posts: 1981
- Joined: Wed Jun 23, 2010 1:04 pm
Re: 16T Weathering Experiments
Tony Wilkins wrote:P.S. Snap.
The trap I walked into a long time ago was to look at the numbers of 16T minerals in my then local coal yard in London in the 1970s. The bodies weren't all the same way round; it was much later that I found out that this was because they had been rebodied, not because they had been built that way...
Regards
Noel
Noel
-
tmcsean
- Posts: 94
- Joined: Fri Jul 25, 2008 3:34 pm
Re: 16T Weathering Experiments
Don Rowlands' wonderful British Railway Wagons: The First Half Million (David & Charles, 1985, 0715381830) has an appendix containing a full account of lot numbers and running numbers, Abebooks.co.uk lists several copies for under £20. My original copy is testimony to how useful the whole book is to wagon-builders. Mind you, only you me and about a dozen others actually care about wagon number, and even fewer can read decipher them at normal viewing distance.
Tony
Tony
Who is online
Users browsing this forum: ClaudeBot and 0 guests