I am contemplating the construction of a batch of turnout operating units having some similarities to the Studiolith design. The stretchers will be driven by an escapement mechanism beneath the baseboard, and I plan to connect the switch tongues to the stretchers by means of wire 'droppers' attached to the tongues that engage in lengths of fine tubing embedded in the stretchers. Hypodermic needles appear to be an obvious source of the narrow bore tubing required, since they can be obtained in a range of bore diameters apparently identified by standard wire gauge size (perhaps a medic can confirm?).
I have in mind a 'dropper' diameter of .5 mm, as this should be a close sliding fit in a 21 SWG needle bore. If anyone has good reason to recommend a different size of dropper I should be glad to hear of it.
The biggest difficulty I foresee is in achieving clean cuts of the needle bores. We are talking terms of needles having an o/d of about .82 mm and a finished length of 6 mm, and attempts to cut them using a parting tool in a lathe will, I suspect, end in disaster. What I've got in mind is using an abrasive cutting disk mounted in the lathe's headstock, and some form of holding jig for the hypodermic needle to be cut that is mounted on the cross slide, which can then be advanced so as to bring the needle within the jig into contact with the cutting disk. I imagine that, provided a fairly clean cut can be achieved initially, any residual roughness that would prevent the dropper from rotating in the needle bore can be be cured by stoning the end of the bore.
However, I've absolutely no prior experience of using fine bore tubing such as that used to make hypodermic needles, and welcome any advice that can be offered by those that have.
How do you cut sections of hypodermic needle?
-
John Palmer
- Posts: 825
- Joined: Fri Jul 15, 2011 11:09 pm
-
John Bateson

- Posts: 809
- Joined: Wed Jul 02, 2008 6:39 pm
Re: How do you cut sections of hypodermic needle?
Would any of these be suitable? Maybe not as strong as steel though...
http://www.anticsonline.co.uk/1381_1.html
Albion Alloys Micro Brass Tube 0.5mm x 0.3mm Pack of 2 MBT1M
Albion Alloys Micro Brass Tube 0.8mm x 0.4mm (Pk3) MBT2M
Albion Alloys Micro Brass Tube 0.9mm x 0.45mm (Pk3) MBT3M
A sharp knife rolled on a cutting mat is sufficient to cut these. With the rod inserted it gives a good clean cut.
There was a source mentioned on here some 5 years ago of steel tubing, thought it was Finney & Smith but I can't see it there.
John
Slaving away still on GCR stuff ...
-
John Palmer
- Posts: 825
- Joined: Fri Jul 15, 2011 11:09 pm
Re: How do you cut sections of hypodermic needle?
...and Albion Alloys N/A 0.7mm x 0.5mm Brass Tube MBT07 appears to give me the desired .5 mm internal bore size. That looks very promising; thanks, John. Not sure what is meant by the reference to 'N/A'.
Strength is not going to be an issue, as the tubing is required to impart lateral movement to pivoted switch rails, all target turnouts being of loose heel design.
Having a length of rod inserted in the tube when you cut is a good tip!
Strength is not going to be an issue, as the tubing is required to impart lateral movement to pivoted switch rails, all target turnouts being of loose heel design.
Having a length of rod inserted in the tube when you cut is a good tip!
-
Philip Hall
- Posts: 1956
- Joined: Mon Aug 10, 2009 7:49 pm
Re: How do you cut sections of hypodermic needle?
I have some micro bore brass tube bought a few years ago from, I think, Finney & Smith. The smallest is 0.39mm O/S, no idea of the I/S except that the copper filament from a piece of lighting flex won't go into it and that is 0.19mm!
Philip
Philip
-
Will L

- Posts: 2527
- Joined: Sun Jul 20, 2008 3:54 pm
Re: How do you cut sections of hypodermic needle?
I would have thought that brass tube, lots of sizes from Eleen, would be strong enough, and this too can be cut, as John says, by rolling it between a sharp blade and a cutting mat.
-
Russ Elliott

- Posts: 930
- Joined: Thu Jun 02, 2011 6:38 pm
Re: How do you cut sections of hypodermic needle?
Brass tube is fine. I'm inclined to think 0.5mm dropper is too flexible, but it does depend on how much vertical distance there is between blade and TOU tube, and how flexible you expect that connection to be. 0.7mm works well, and is still supple enough over a 4mm or 5mm gap to keep blades pressured against stock rails.
-
David B

- Posts: 1515
- Joined: Sun Jul 20, 2008 5:30 pm
Re: How do you cut sections of hypodermic needle?
I bought some very fine micro tubing from Phil Atkinson - Hobby Holidays - at Scalefour North. He had tubing with a bore of 0.2mm.
-
Terry Bendall
- Forum Team
- Posts: 2427
- Joined: Sun Jul 27, 2008 7:46 am
Re: How do you cut sections of hypodermic needle?
John Palmer wrote:What I've got in mind is using an abrasive cutting disk mounted in the lathe's headstock, and some form of holding jig for the hypodermic needle to be cut that is mounted on the cross slide
It rather depends on the accuracy that you want to achieve. I would use a cutting disc in a mini drill, with the needle held in a pin chuck. The cut should be sufficiently accurate without the need for a jig.
John Palmer wrote:attempts to cut them using a parting tool in a lathe will, I suspect, end in disaster
Yes it probably will. The needle will be too hard for the parting tool to cut.
Terry Bendall
-
grovenor-2685

- Forum Team
- Posts: 3923
- Joined: Sun Jun 29, 2008 8:02 pm
Re: How do you cut sections of hypodermic needle?
Getting back to the purpose of these droppers and tubes, the original Studiolith TOU used needle tube long enough to reach from the underboard TOU through 12mm ply and 3mm underlay to end up just below the sleepers, the 0.5mm approx nickel silver droppers from the switch blades were of similar length. So the blade was essentially driven by a cantilever around 18mm long made of thin tube with wire inside over most of the length, these do work but they flex significantly so need a tiebar at blade level if it is not going to be apparent that the blades do not move in synch.
I'm not sure how you intend to arrange things with only a 6mm length of tube, if underboard then your cantilever will consist only of the dropper and will be even more flexible, or your boards are very thin. If hidden in the underlay access and maintenance may be a problem. The P4 track Co/Exactoscale recommendation for their version of the TOU is to use 0.9mm droppers and a thick wall brass tube with suitable inside diameter, this combination is much stiffer and I have found easier to set up.
I would not bother with hypodermic tubing.
Regards
Keith
-
John Palmer
- Posts: 825
- Joined: Fri Jul 15, 2011 11:09 pm
Re: How do you cut sections of hypodermic needle?
Many thanks for all your contributions.
Within reason, the tube wall can be as thick as is necessary to obtain the necessary stiffness since it will be out of sight below ground level. If need be I could bore and turn suitable tubes, but was aiming to save time and work by buying in tube of suitable size.
I'm particularly grateful for the observations on dropper thickness, as my only prior experience is of the Studiolith TOU's. .7mm is at the top end of what I would like to use, whilst .9mm strikes me as a bit obtrusive.
I am thinking in terms of a gap in the region of 2mm between bottom of switch tongue and top of tube. This leads me to think that the stretcher/tube/dropper combination is going to be pretty stiff, bearing in mind that stretcher thickness will probably be 2.3mm and the tubes will protrude from the stretchers by about 3.7mm - which is the thickness of the deck on which track will be laid directly. As I mentioned, the switches are all loose heel, and they will be pivoted on a heel plate (simulating NBR practice), so the TOU's will not be called upon overcome the stiffness inherent in the switch blades themselves.
I am also hoping to avoid having to press the switch tongues against the stock rails by over-travel in the stretchers. The cam and escapement design ought to sidestep this since it can be arranged to eliminate lost motion in the end-of-travel positions, and if I get the amount of throw imparted by the cam wrong it's a simple matter to make a fresh cam of increased/decreased eccentricity as necessary. A bigger problem potentially is to get the TOU mounted in precisely the correct position beneath the switch tongues - I'm still working on that one.
Terry has confirmed my initial thought that parting off slices will lead to tears before bedtime, but I still fancy the idea of mounting a tube to be cut by disk in a suitable mounting on the cross slide. More control over feed rate and less likelihood of inadvertently pressing the workpiece against the face of the cutting disk, causing it to shatter.
I'm certainly coming round to use of thicker tubing, but the discussion has been useful anyway as there is a place for hypodermic tubing to form small bearings, e.g. for signal arms, balance levers etc.
-
shipbadger
- Posts: 163
- Joined: Sun Jul 20, 2008 3:00 pm
Re: How do you cut sections of hypodermic needle?
Hi,
I made TOU's following the design published many years ago in MRJ which used hypodermic tubing set into sections created from Swish curtain rail. The tubing came from Cooper's Needle Works in Birmingham, don't know if they are still in business, and they had a minium order. I bought extra tubes that would telescope with the size I wanted to make up the order. As Terry suggested the tube was cut off with an abrasive disc in a hand held drill with the tube gripped in a pin vice.
Tony Comber
-
Will L
- Posts: 2527
- Joined: Sun Jul 20, 2008 3:54 pm
Re: How do you cut sections of hypodermic needle?
John Palmer wrote:,,,I still fancy the idea of mounting a tube to be cut by disk in a suitable mounting on the cross slide. More control over feed rate and less likelihood of inadvertently pressing the workpiece against the face of the cutting disk, causing it to shatter.
Cutting brass tube by rolling it under a sharp knife edge is quick, easy and remarkably accurate. Using machine tools and cutting disks is overkill and probably a waist of good modelling time. Of late I've been producing sub millimetre lengths as part of modelling the fiddle bits of loco plumbing. Once you got the hang of it you wouldn't want to do it any other way.
-
Ian@Exton

- Posts: 88
- Joined: Sun Feb 20, 2011 10:12 pm
Re: How do you cut sections of hypodermic needle?
John,
As you are using loose heel switches how are you going to control the vertical alignment of the switches at the toe? The Great Western used stretcher rods which were extended to pass through a hole in the stock rail. The old Studiolith type TOU didn't fix the vertical alignment of the toe, but of course we were the switch blades were continuous so the soldered rivets controlled the vertical alignment at the toe.
Also, what are you using for the pivot arrangement at the heel?
Ian
-
allanferguson
- Posts: 389
- Joined: Sun Jul 20, 2008 6:27 pm
Re: How do you cut sections of hypodermic needle?
The Studiolith TOU's secured the vertical alignment at the toe very effectively. They did need proper slide chairs to stop the switch rail dropping, and these of course weren't available when Studiolith was around.
The traditional arrangement for pivoting the heel was to solder it to a (slightly) loose rivet, and this can work very effectively if carefully fettled.
Allan F
The traditional arrangement for pivoting the heel was to solder it to a (slightly) loose rivet, and this can work very effectively if carefully fettled.
Allan F
You do not have the required permissions to view the files attached to this post.
-
John Palmer
- Posts: 825
- Joined: Fri Jul 15, 2011 11:09 pm
Re: How do you cut sections of hypodermic needle?
When referring to cutting slices of tube, I was thinking in terms of stainless steel hypodermic tubing. For a short production run of thin-walled brass slices I would be happy to adopt the 'rolling under a knife' technique. But would this work with stainless? For bigger production runs and with thicker walled tube I would still prefer to part slices off in the lathe, using a stop in the tailstock to set a consistent length of tube parted off.
As Allan notes, the Studiolith design neatly controls vertical movement of the switch, and should prevent the tongue rising above the stock rail. I am thinking of adopting this arrangement or something similar for my TOU's.
To pivot the switch, what I have in mind takes advantage of the fact that the North British used a heel plate secured to the two timbers between which was located the joint between the switch and closure rail. Evidently the foot of the rail rests upon the top surface of this heel plate whilst being also held in the jaws of one of the four chairs that form an integral part of the heel plate casting. I think it should be possible to mount a bush in the model version of the heel plate through which can be passed a vertically mounted pivot. This pivot can be formed of wire, and bent through 90 degrees to form a tail that can be soldered into a slot cut into the web of the switch rail at its heel.
To illustrate this, here is a photograph of the North British pattern of heel plate and a drawing of the kind of pivot arrangement I have in mind. The red circles on the plan view show the location of the pivot bush. This arrangement should permit a fairly meaty 0.7mm diameter pivot, and should ensure that the switch is pivoted right on the rail joint, rather than being displaced to the adjacent heel chair. A further potential advantage will be the ability to set up each switch rail/stock rail pair as a unit before they are attached to the rest of the turnout under construction.
Sorry the drawing is so rough.
A further thought: where exactly is a loose heel switch pivoted? Is it at the joint with the closure rail, or is it in the jaw of the chair? Are the holes in the fishplate elongated to accommodate rotation at the joint? Do the fishing surfaces of the joint continue to function as they would in a conventional joint, or is it the purpose of the heel plate on which the foot of the rail resting to keep the switch level with the closure rail?
You do not have the required permissions to view the files attached to this post.
-
grovenor-2685
- Forum Team
- Posts: 3923
- Joined: Sun Jun 29, 2008 8:02 pm
Re: How do you cut sections of hypodermic needle?
I have not seen such a plate under the heel joint before but it looks to be a good design to support the joint, the fishplates between switch and closure have to be left a bit loose (just a little bit) to allow the pivotting action so the fishing surfaces cannot provide full support, this one 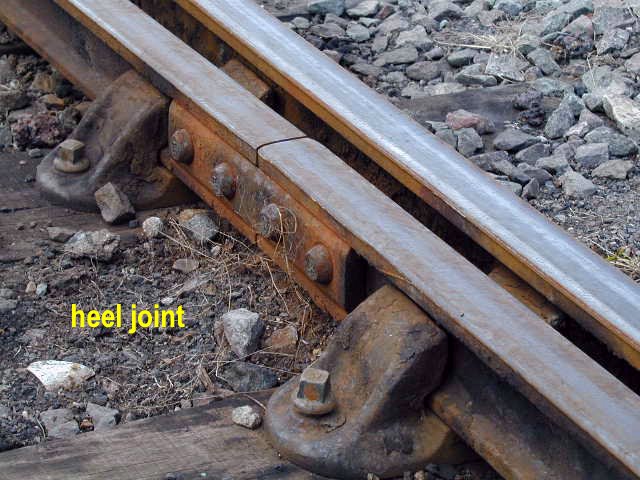
was at Old Oak Common and managed without the support plate. Some more info here on the GW way of doing things. There were probvably nearly as many designs as companies using them, usually there was no pivot as such, either a loose fishplate as illustrated or a special chair to hold the joint.
If you solder a brass fishplate to the closure rail, either a Colin Waite or a Exactoscale version, the switch rail can be slid into place and a little wiggling will make the fishplate loose enough, no need to make finicky pivots.
Regards
Keith
-
John Palmer
- Posts: 825
- Joined: Fri Jul 15, 2011 11:09 pm
Re: How do you cut sections of hypodermic needle?
I can see such an arrangement might be acceptable if the Exactoscale cast fishplate pair is used, but I fear that the thinness of the Colin Waite etched plates might well give trouble in the long run. Another reason I have for proposing a wire pivot for the switch is that it provides an attachment point for the required electrical feed.
Some further research revealed to me that a loose heel switch is pivotted on the rail joint, not in the heel chair. One of the fishplates in the joint is cranked to accommodate the lateral swing of the switch - I think such cranking is just visible in Keith's photograph. This suggests to me that, at any rate on the cranked fishplate, the fishing action is eliminated by the movement of the switch as the fishing surfaces move out of contact with each other. I assume that the heel plate partially compensates for this, but perhaps the primary purpose of the plate is to eliminate the problem with loose heel switches of the tongue rising above the stock rail as the downward pressure a wheel passing over the joint causes the switch to pivot vertically in the heel chair.
Some further research revealed to me that a loose heel switch is pivotted on the rail joint, not in the heel chair. One of the fishplates in the joint is cranked to accommodate the lateral swing of the switch - I think such cranking is just visible in Keith's photograph. This suggests to me that, at any rate on the cranked fishplate, the fishing action is eliminated by the movement of the switch as the fishing surfaces move out of contact with each other. I assume that the heel plate partially compensates for this, but perhaps the primary purpose of the plate is to eliminate the problem with loose heel switches of the tongue rising above the stock rail as the downward pressure a wheel passing over the joint causes the switch to pivot vertically in the heel chair.
-
allanferguson
- Posts: 389
- Joined: Sun Jul 20, 2008 6:27 pm
Re: How do you cut sections of hypodermic needle?
John Palmer wrote:Some further research revealed to me that a loose heel switch is pivotted on the rail joint, not in the heel chair. One of the fishplates in the joint is cranked to accommodate the lateral swing of the switch - I think such cranking is just visible in Keith's photograph. This suggests to me that, at any rate on the cranked fishplate, the fishing action is eliminated by the movement of the switch as the fishing surfaces move out of contact with each other. I assume that the heel plate partially compensates for this, but perhaps the primary purpose of the plate is to eliminate the problem with loose heel switches of the tongue rising above the stock rail as the downward pressure a wheel passing over the joint causes the switch to pivot vertically in the heel chair.
In my recollection -- I wish I'd had the prescience to photograph such things fifty years ago! -- NBR and CR arrangements had the stretcher bar / tiebar extended through the stock rails on each side (I think two stretchers, one extended on each side). I don't recall seeing a heel plate. But I suspect even on one railway different arrangements might be found at different times or in different locations.
In models I used to arrange the pivot on a slightly loose rivet in a ply sleeper; but it's difficult to get it "just so", and it's a wee bit unreliable in the long term, so more recently I've made the switch rail and the closure rail as one, and cut the top of the rail with a razor saw which gives the appearance of a loose heel, and a bit of flexibility. That suited my needs, but may not suit everybody.
Allan F
-
grovenor-2685
- Forum Team
- Posts: 3923
- Joined: Sun Jun 29, 2008 8:02 pm
Re: How do you cut sections of hypodermic needle?
I found a drawing in my archive of North British switches, undated but looks to be significantly older design than your photo. It clearly shows the switch rail joint and hence pivot over a timber in a special chair. On the face of it his arrangement supports the rail end better than the loose fishplate version and it would be interesting to know why it seems much less common with bullhead. It does seem to be normal practice with Flat bottom to support the heel joint on a timber http://www.proto87.com/media/sm2.jpg
Keith
Keith
-
allanferguson
- Posts: 389
- Joined: Sun Jul 20, 2008 6:27 pm
Re: How do you cut sections of hypodermic needle?
"19th Century Railway drawings in 4mm scale" by Alan Prior 1983. It has 90 pages of drawings, including 4 of switch and crossing work from the 1850's to the 1870's. Most of the switches are pivoted in a special chair. There is even an 1865 drawing of a pivot chair, but no indication of which company might have used it.
Allan F
Allan F
-
Phil O
- Posts: 364
- Joined: Sun May 05, 2013 5:23 pm
Re: How do you cut sections of hypodermic needle?
Here's a photo I took of a GW loose heel chair, the joint is a two bolt fishplate.
Phil
Phil
You do not have the required permissions to view the files attached to this post.
-
John Palmer
- Posts: 825
- Joined: Fri Jul 15, 2011 11:09 pm
Re: How do you cut sections of hypodermic needle?
allanferguson wrote:
In my recollection -- I wish I'd had the prescience to photograph such things fifty years ago! -- NBR and CR arrangements had the stretcher bar / tiebar extended through the stock rails on each side (I think two stretchers, one extended on each side). I don't recall seeing a heel plate. But I suspect even on one railway different arrangements might be found at different times or in different locations.
You can imagine my surprise and pleasure at finding so ancient a turnout at Rannoch as late as the mid nineteen-eighties. At the time Chris Longley and I were inbound to Fort William on the sleeper, and we resolved to return to Rannoch the following day to take its full particulars. What looked like its intended replacement was lying on the adjacent bank, so it seemed right to seize the opportunity. My guess is that it was installed during construction of the WHR, so probably dates from about 1894.
I've not come across any evidence of the stretcher being extended through the stock rails, but encountered the heel plate being used elsewhere; see https://www.flickr.com/photos/irishswissernie/13261388253/in/set-72157626762588530 for a clearly visible example on the Wannie.
Here's another shot along the open switch of the Rannoch turnout: This shows well how the open switch lies parallel (or very nearly so) with the stock rail and forms a distinct angle to the closure rail. I'm anxious to reproduce this distinctive characteristic of North British PW practice which gives this form of switch an appearance very different from that of a flexible switch.
I recommend a look at http://www.oldpway.info/index.html, which includes drawings showing (amongst others) various Scottish companies' P&C practice as at 1900. The drawing of North British track refers specifically to the presence of a 'heel chair' and is helpful in giving a dimension for the switch throw of 3.5" .
You do not have the required permissions to view the files attached to this post.
Return to “Tools and Techniques”
Who is online
Users browsing this forum: ClaudeBot and 0 guests