First P4 wagon
First P4 wagon
Hi all,
I thought I would share with you my first attempt at kit building a wagon in P4, it is a Cambrian kits OBA and I have used MRD suspension plates and W irons. It also has smith screw links.
Still in need of paint but I want to test it first and as I am still building my layout it will have to wait unitl the track night at the North London area group on April 18th.
This will be added to my engineers stock I am slowly building, next up is some Parkside Dundas Rudd wagons.
-
- Posts: 247
- Joined: Sun Jul 20, 2008 6:11 pm
Re: First P4 wagon
What type of suspension have you used
Re: First P4 wagon
Hi Dave,
I have used the suspension plates and W irons from Model Railway Developments http://www.emardee.org.uk/. Not having used any other kind I can not say if i prefer them or not but they seem quite simple to put together, the wagon is yet to be tested so I can not comment on how they work.
-
- Posts: 2190
- Joined: Wed Jul 30, 2008 5:56 pm
Re: First P4 wagon
Hi Dave
Can you describe how the suspension works please? Looks a bit fussy compared to a sprung set up.
You might want to swap the buffers (or just the heads) for metal ones such as those from a1 models or MSE. also completely missing from the kit is ank form of brakes and callipers.
Hth
Jim
Can you describe how the suspension works please? Looks a bit fussy compared to a sprung set up.
You might want to swap the buffers (or just the heads) for metal ones such as those from a1 models or MSE. also completely missing from the kit is ank form of brakes and callipers.
Hth
Jim
Re: First P4 wagon
Hi Jim,
the suspension works as follows:
The central rod connects both W irons (there is lot solder as it give the model a bit more weight). The W irons pivot inside the suspension plates, the other 2 rods connect to the suspension plates and are then soldered into the w iron and act in spring like way and ensure the w irons remain level.
I suspose the west way to describe it is like having an anti roll bar on car as the 2 suspension units are connected.
I am open to suggestion when it comes to wagon suspension and compensation as I am new to P4 modeling.
I agree with you about the buffers and they are on the list ot be replaced. I also think the next one I build I will place some very thin plasticard between the cosmetic suspension and the w iron to push it out a little further.
I do need to do something about the brake gear, I seem to remember seeing a thread on RM web by yourself with picture of brake gear you had added to a OBA?
James
-
- Forum Team
- Posts: 3923
- Joined: Sun Jun 29, 2008 8:02 pm
Re: First P4 wagon
I agree with you about the buffers and they are on the list ot be replaced. I also think the next one I build I will place some very thin plasticard between the cosmetic suspension and the w iron to push it out a little further.
Maybe check what the prototype dimensions are supposed to be first, its far more common in P4 to need to slim down the cosmetics to get them far enough in. Traditionally the journal centres were 6'6" apart and the springs would be centred above this. I'm not sure if the OBA and its contemporaries kept to this standard but they would certainly be very close.
Regards
Keith
Re: First P4 wagon
Having done some research it seems the solebars are to far apart on this kit, this is to allow for the articulation on the original running gear that comes with the kit. They should be up against the W Irons, so I am going to rebuild the kit and place the sole bars where they should be, this will then eliminate the gap between the suspension and the sole bar. I am also going to replace the W Irons with the Bill Bedford BR items which are appropriate to the OBA (and the OCA another kit I have to build), that is not criticism of the MRD items they seem to work really well, but they are suited to GWR stock (so I have been told). I have some buffers from Model Signal Engineering to replace the plastic ones and some cosmetic suspension units from S Kits that will go on the W irons.
I have never really done much wagon building before and I am really enjoying it, it has also opened my eyes to the vast array of ‘bits’ that are out there to help with kit building. So far this little project has been very satisfying and I look forward to getting the wagon built and painted and building a load for it.
Re: First P4 wagon
Bit more progress on the kit, I have added metal buffers, which do look a lot better:
I have also built up a second kit, a Cambrian kits OCA this time. This one includes Bill Bedford sprung W irons, 51L buffers, S kits cosmetic springs and axle boxes and a lot led to get to the 25 grams an axle weight.
Re: First P4 wagon
You may want to bulk out those buffer shanks with some brass tube as your prototype has Oleo buffer bodies which have thicker shanks than the heads you have used have. I'm not sure how big you could get away with without having the plastic on the buffer body too thin though.
-
- Posts: 2190
- Joined: Wed Jul 30, 2008 5:56 pm
Re: First P4 wagon
Great stuff Dave
Did you find the BB method easier?
Cheers
Jim
Did you find the BB method easier?
Cheers
Jim
Re: First P4 wagon
jim s-w wrote:Great stuff Dave
Did you find the BB method easier?
Cheers
Jim
Hi Jim,
the Bill Bedford units where easier, also as the movement in the units is vertical it means I could space the solebars correclty as there is no need to account for the sideways movement of the compensated units. The only issue I had was space inside the the axel box, there is very little. I used the Dremel to mill out as much as possible but it is still very tight. I think I am also going to solder the the axel boes and springs to the W iron as the super glue does not hold up to much in the way of movement from the bearings. Good job I treated my self to a temperature control and some 70 degree solder at the York show!
James
Re: First P4 wagon
A Dremel with a dental burr in it is the best way to deal with the zxle boxes but you should only need a small amount removing anyway. Which bearings were you using? I tend to recommend Kean Maygib waisted bearings in packs of 50 (from EMGS stores in my case at EM North) as they are cheap but also consistent in depth for most makes of axle to avoid splaying of the w-irons when fitted.
Note with 70degree solder you need to tin the brass with 'brass' solder first before soldering the wm axleboxes on with the 70degree.
Re: First P4 wagon
craig_whilding wrote:A Dremel with a dental burr in it is the best way to deal with the zxle boxes but you should only need a small amount removing anyway. Which bearings were you using? I tend to recommend Kean Maygib waisted bearings in packs of 50 (from EMGS stores in my case at EM North) as they are cheap but also consistent in depth for most makes of axle to avoid splaying of the w-irons when fitted.
Note with 70degree solder you need to tin the brass with 'brass' solder first before soldering the wm axleboxes on with the 70degree.
Thanks Craig, I am using Alan Gibson waisted bearings. When I was at York I also picked some 145 and 188 degree solder. Is the reason for needing to tin the brass because 70 degrees is not hot enough for solder to bond to brass?
I will also raid my bits box and see if I can find some brass to bulk out the buffer shanks.
James
-
- Posts: 561
- Joined: Thu Dec 31, 2009 4:49 pm
Re: First P4 wagon
I find that the thicker super glue gel works very well where the thinner super glue used to be unreliable.
Gordon A
Bristol.
Gordon A
Bristol.
-
- Forum Team
- Posts: 3048
- Joined: Sun Jul 20, 2008 6:00 pm
Re: First P4 wagon
jhock wrote:Thanks Craig, I am using Alan Gibson waisted bearings. When I was at York I also picked some 145 and 188 degree solder. Is the reason for needing to tin the brass because 70 degrees is not hot enough for solder to bond to brass?
I'm not a metallurgist, but my understanding is that the very different composition of low-melt solder means that it does not bond well to brass or nickel silver, no matter how well you clean them or flux them. The layer of normal solder acts like a paint primer and gives an intermediary surface for the low-melt to fix to. It doesn't have to be thick at all - literally just a wipe to colour the surface with no depth at all to it.
The temperature issue is not relevant, although I have heard that you can "overcook" low-melt solder and cause it to degrade if you use too hot an iron. It also drives off rather nasty metal fumes as well...
There is a wealth of information on soldering, courtesy of the expertise of Brian Lewis to be found at 
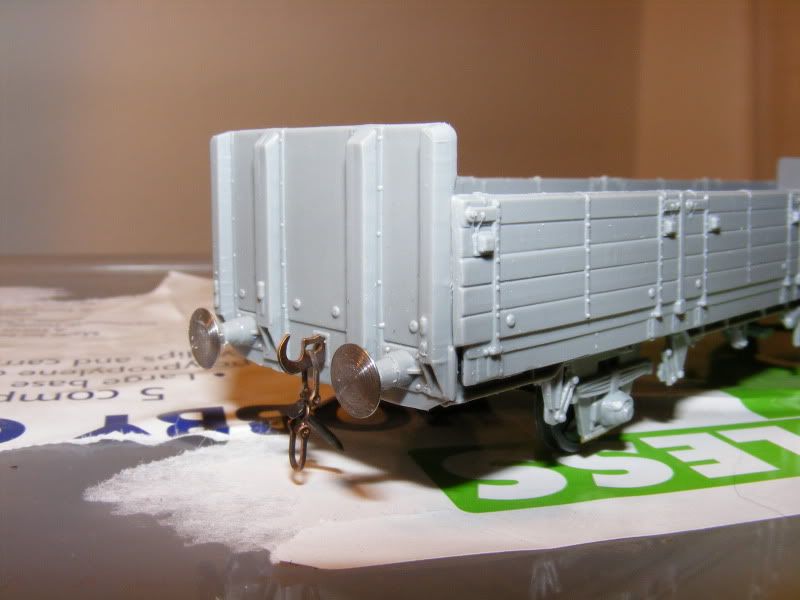
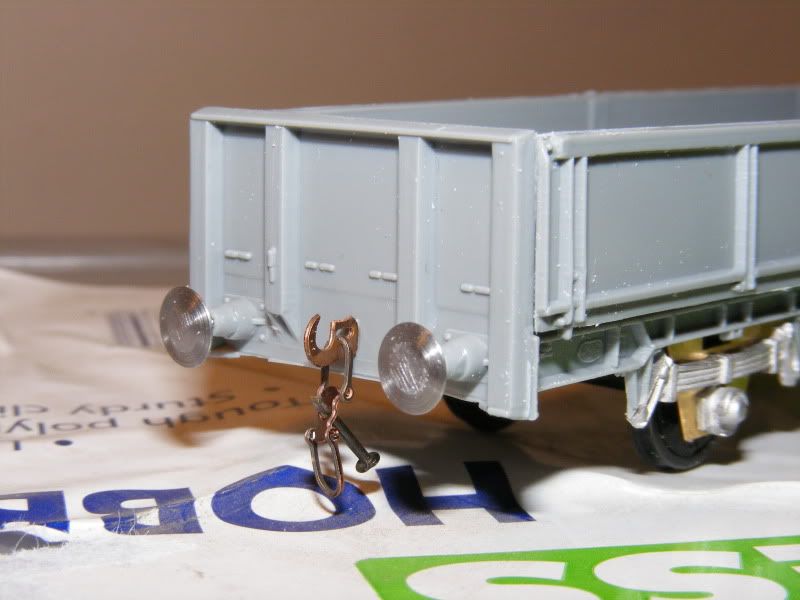
http://www.finescale.org.uk/index.php?option=com_content&view=article&id=27&Itemid=2
jhock wrote:I will also raid my bits box and see if I can find some brass to bulk out the buffer shanks.
Depending on what sizes you want, Derek at Eileen's stocks a large range of very small brass tubing. It's not cheap, per length, but as you'll only be using short lengths you'll get a lot of vehicles out of 12".
I'd suggest finding the right size and sleeving the existing shanks. You cut the tube to length by rolling it gently under the edge of a scalpel blade to score it through.
HTH
Flymo
Beware of Trains - occasional modelling in progress!
www.5522models.co.uk
Who is online
Users browsing this forum: ClaudeBot and 0 guests