
Has anyone had experience of using LED strip for layout lighting? It looks to be a very convenient system which would require a very light-weight fascia
http://www.ledhut.co.uk/led-strip-light ... -roll.html
Presumably 'warm white' would be preferable to the rather blue cool light version.
Steve
LED layout lighting
-
Alan Turner
- Posts: 643
- Joined: Sun Jul 20, 2008 4:24 pm
Re: LED layout lighting
We are in the process of fitting it to our club layout.
There is another type available other than cold white and warm white and that is natural white, which lies between. We got ours from LED lighthouse. (https://www.led-lighthouse.co.uk/led-st ... lights-12v)
We have made provision for fitting two strips in parallel so that if the natural works out too warm or too cold we can add a compensating colour.
regards
Alan
-
garethashenden
- Posts: 406
- Joined: Tue Apr 07, 2015 9:41 pm
Re: LED layout lighting
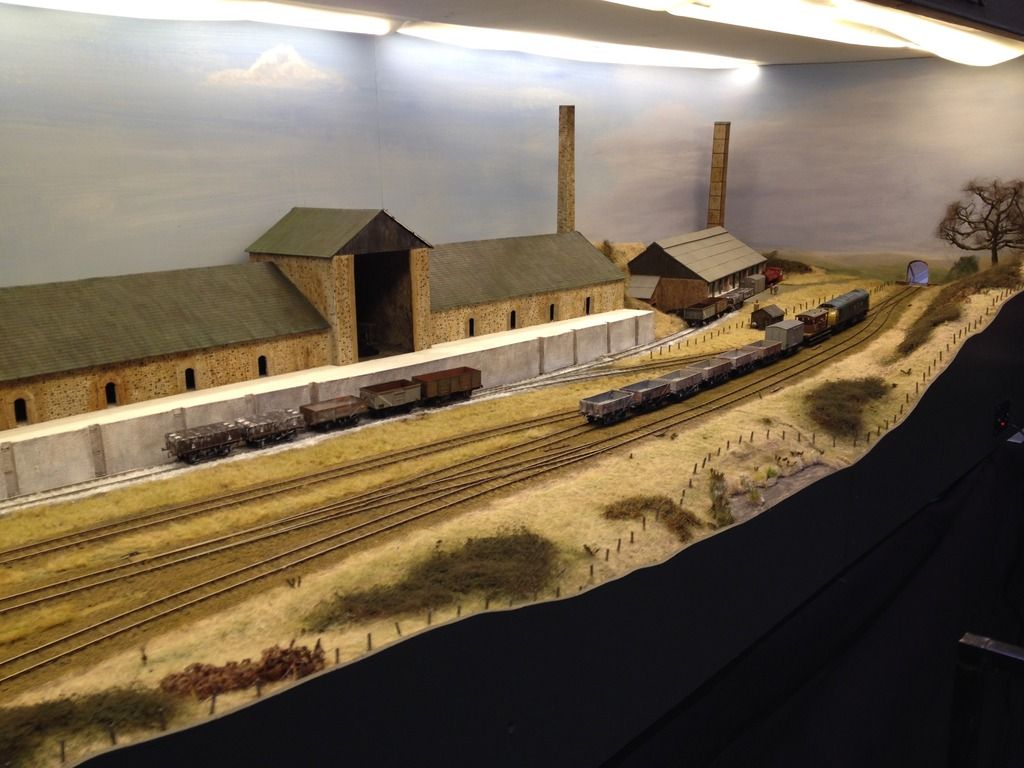
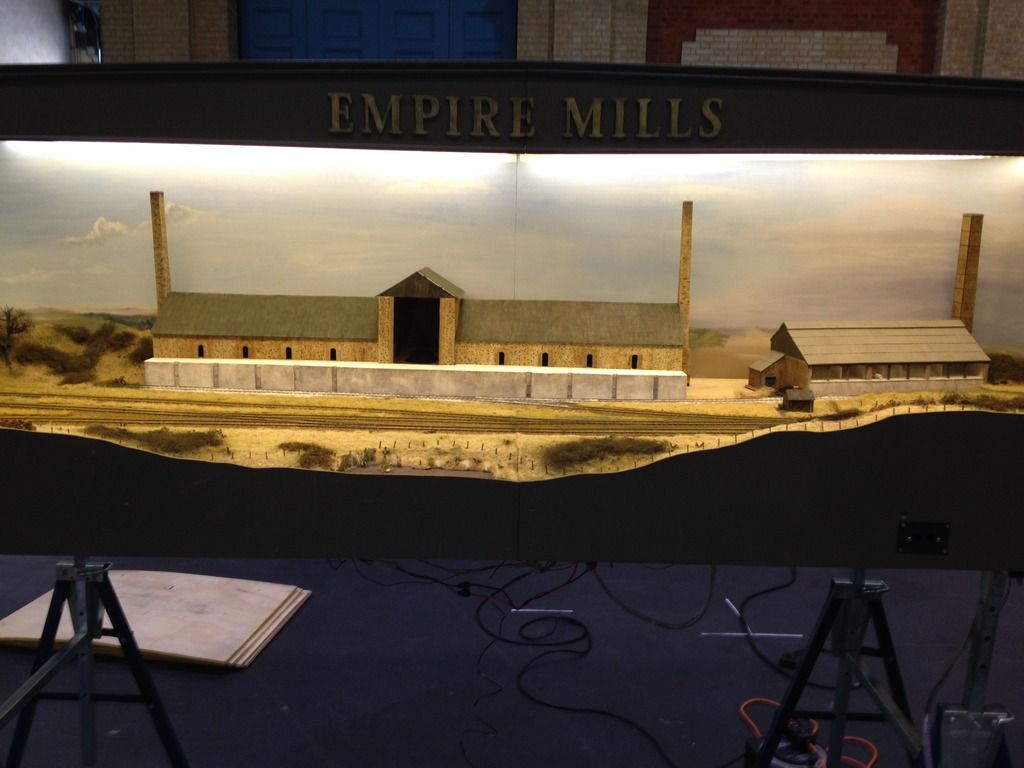
I used warm white LEDs on Empire Mills. As we had a sturdy arch and high backscene, we went with a roof for the layout as a way to mount the lights. One strip of LEDs at the back with three closer to the front. These were then covered with lighting gel obtained for us by a club member who works at a film school. It hangs down a bit as it was done quickly for the exhibition, but gives a good effect. It has the effect of diffusing the light, so it comes from one source rather than hundreds.
-
dal-t
- Posts: 654
- Joined: Mon Jan 11, 2010 8:06 pm
Re: LED layout lighting
A word of warning about the 'cool white', 'warm white', 'natural light' business - you really need to look at the colour temperature, because one maker's 'warm' can be another maker's 'cool', or somewhere in between. I believe part of the move to label light sources in lumens rather than consumption includes a better indication of the colour they put out, but until full compliance with that arrives it remains 'caveat emptor'.
David L-T
-
Guy Rixon

- Posts: 911
- Joined: Sun Mar 27, 2011 6:40 pm
Re: LED layout lighting
The luminous flux - the quantity measured in lumens - tells you how bright the lamp seems, corrected for the colour, and lets you compare the apparent brightness of different coloured lamps; but it doesn't tell you anything about the apparent colour. To get the colour, you need either the colour temperature, as David pointed out, or data on the actual spectrum. Note that colour temperature is a poor measure for lamps that don't emit a black-body spectrum.
-
markdavy
- Posts: 19
- Joined: Tue Jan 22, 2013 7:12 pm
Re: LED layout lighting
Reading Ian Rice’s book ‘Creating Cameo Layouts’ convinced me to use LED strip (or tape) lighting for my layout. However, when searching online I quickly found a bewildering range of light colours, powers and prices. There was also very little advice available about how much light was required for satisfactory illumination.
This post contains the conclusions I reached as a result of my research, and describes my lighting installation. I hope it's useful.
Useful References
Creating Cameo Layouts......................Iain Rice................Wild Swan (2016)
Developments in Layout Lighting...........Peter Kirmond..........MRJ 253 (2017)
Theatre and Model Railways.................Giles Favell.............MRJ 274 (2019)
How to Optimise Your Layout Lighting.....Giles Favell.............BRM Spring 2020
How to Light Your Layout....................Jamie Warne............BRM September 2021
LED Lighthouse website......................http://www.led-lighthouse.co.uk/resources/
Types of LED drivers..........................http://www.ledsupply.com/blog/constant-current-led-drivers-vs-constant-voltage-led-drivers/
Conclusions Reached
Suppliers are not consistent in the descriptions they use for light colour (warm white, cool white, etc). It’s better to use the colour temperature, measured in degrees Kelvin (K). The lower the temperature, the warmer (more yellow) the light appears. The higher the temperature, the colder (more blue) it appears.
The power of LED strip lights varies considerably. The individual LEDs vary in size, efficiency and light output. The strips also vary in the LED spacing. As a result it’s better to gauge the light intensity by the output (measured in lumen), rather than the input power (measured in Watts).
LED lights do not give as wide a colour spectrum as incandescent or halogen lights, which can result in poor colour rendition. The spectrum and rendition can be improved by using a combination of LED strips of different colour temperatures. And if each colour has it’s own dimmer, it’s possible to vary the overall colour balance and light intensity.
Some suppliers do not quote the light temperature or output for their products, and they are probably best avoided. However the better suppliers do, and some even have data sheets showing the output colour spectrum. For example: http://www.led-lighthouse.co.uk/wp-content/uploads/2022/07/SL5-12V-LED-Strip-specification-compressed-tiny.pdf
RGB (red-green-blue) LED strips are not recommended for layout lighting.
It’s best to use a proper LED driver as the power source. There are two types – constant voltage and constant current. LED strip lights require a constant voltage driver. Reputable suppliers will only sell compatible LED strip lights and drivers.
LED drivers do get warm and should not be run at full capacity, especially for extended periods. It is recommended that the driver capacity should be 20 to 50 percent more than the power required for the LED strips.
Dimmers can be used to reduce the light intensity. Inline dimmers fitted between the driver and the LED strips add flexibility without the need for a dimmable driver. All LED strip lights are dimmable.
It’s important to consider the current drawn by the LED strips when choosing the dimmers, wiring and connectors.
LED strip lights do not get very hot, but mounting them on an aluminium profile will provide a useful heatsink. Of greater benefit is if the profile has a translucent diffuser. This will reduce glare and the problem of reflections of individual LEDs on the railheads. Profiles and diffusers are usually supplied in lengths of 1 or 2 metres. The length may make delivery charges expensive.
LED strips can be cut into shorter lengths at the marked cut points. They can also be joined in series into longer lengths, up to a maximum of 5 metres. Additional strips can be joined in parallel.
When wiring up or joining it is important that the polarity is observed, i.e. positive is joined to positive, negative to negative.
When designing a lighting installation, the number of strips required will depend on the layout depth. A strip at the front, preferably set forward of the baseboard edge, is essential. Another at the back can reduce shadows on the backscene. A single high-intensity strip down the middle is not the answer !
A cameo layout with a lid will need more light than a more traditional layout taking advantage of ambient lighting.
Calculations
For each circuit :-
Power required (W) = Strip input power per metre (W/m) x Strip length (m)
Current drawn (A) = Power required (W) / Input voltage (V)
For the LED driver :-
LED driver power capacity (W) = Total of power required for each circuit (W) x (1.2 to 1.5)
The calculations for my lighting are given below.
My LED Strip Lighting
My layout is a cameo style with a removable combined lid and pelmet. The scenic part is 1.65m long and varies from 0.5m to 0.6m deep. The curved pelmet is set 100mm forward of the baseboard edge.
The LED strip lights are 12V 5W/m input, 500 lumen/m output. I bought 3m of 3000K (‘warm white’) and 5m of 5000K (‘pure white’)
The LED driver output is 12V 120W 10A (much larger than necessary, but giving scope for future larger layouts). The single output is split and used to power two parallel circuits, one for each light colour. Each circuit has a dimmer.
The LED strips are used as follows :-
• Two strips at the front (one 3000K and one 5000K) each 1.30m long
• Two strips down the middle (one 3000K and one 5000K) each 1.55m long
• One strip at back (5000K) 1.45m long
The dimmers are used to control the overall light intensity and to change the balance between the two colour temperatures.
The LED strips are attached to aluminium profiles fitted with translucent diffusers. The front profiles are attached to the pelmet and are angled downwards at 45 degrees. The other profiles are attached to the lid and illuminate downwards.
The underside of the combined lid and pelmet. Since the pelmet is curved, the front profiles and LED strips were cut into shorter lengths.
The power box. The LED driver is on the left. The two dimmers are on the shelf.
The layout lit by the 3000K LED strip lights alone.
The layout lit by the 5000K LED strip lights alone.
As you can see, I’m still at the paper template and cardboard mock-up stage !
Calculations for My Lighting
These assume that the dimmers are set to maximum.
For the 3000K circuit :-
Power required = 5W/m x 2.85m = 14.25W
Current drawn = 14.25W / 12V = 1.2A
For the 5000K circuit :-
Power required = 5W/m x 4.3m = 21.5W
Current drawn = 21.5W / 12V = 1.8A
For the LED Driver :-
LED driver power capacity = (14.25W + 21.5W) x (1.2 to 1.5) = 43W to 54W
In total the layout uses 7.15m of strip at 500 lumen/m = 3575 lumen with the dimmers on maximum. That’s nearly 4000 lumen per square metre.
However that’s too bright and the illumination is more comfortable with the dimmers set at 40 to 50%, giving about 1600 to 2000 lumen per square metre.
Equipment Used
.........................Supplier........................Code...........................Suggested Alternative Supplier
LED strip..............LED Lighthouse...............SL5-12V
LED driver.............Amazon........................Mean Well LPV-150-12......LED Lighthouse
Dimmers..............Railroom Electronics.........LD103.........................eBay (search for ‘dimmer 8a’)
Profile/diffuser......TLC Electrical Supplies......SK156800 or SK156810......LED Lighthouse
..........................................................SK156807 or SK156817
Disclaimer : I have no connection with the above suppliers, other an as a satisfied customer.
The Future
LED strip lights continue to evolve, with new designs and more efficient LEDs.
I bought my materials before COVID, so these notes may already be out of date !
A recent innovation is COB (chip on board) LED strip lights. These have a considerably greater number of LEDs per metre, and claim to give a dotless light that may no longer need a diffuser.
Conclusions
LED strip lights are lightweight and straightforward to use.
They use low-voltage power, potentially keeping mains voltages safely away from the layout.
Colour balance is subjective and a personal choice.
A combination of different colour strips and dimmers will improve colour rendition and can be used to experiment with the colour balance and light intensity.
Aluminium profiles are useful for heat dissipation. Translucent diffusers reduce glare and the problem of reflections of individual LEDs on the railhead.
Quality LED strip lights are not cheap and may be expensive for larger layouts. However ‘bargains’ on eBay are probably best avoided.
For a cameo style layout not using ambient light, a target light level of 1600 to 2000 lumen per square metre is suggested.
A more traditional format that takes advantage of ambient light would need considerably less additional lighting. One strip (or a pair) at the front may be sufficient. However ambient light varies considerably, particularly for exhibition layouts. Dimmers would be particularly useful here.
Mark
You do not have the required permissions to view the files attached to this post.
-
Paul Willis

- Forum Team
- Posts: 3045
- Joined: Sun Jul 20, 2008 6:00 pm
Re: LED layout lighting
Mark, that's an excellent and practical explanation of the subject that we all probably think we know something about, but not enough.
I feel that this will gain a permanent place in the Society's reference material...
Thank you,
Paul
I feel that this will gain a permanent place in the Society's reference material...
Thank you,
Paul
Beware of Trains - occasional modelling in progress!
www.5522models.co.uk
www.5522models.co.uk
-
nigelcliffe
- Posts: 750
- Joined: Mon Jul 21, 2008 8:31 am
Re: LED layout lighting
Mark,
What you've written is fine.
Going further... there are fully addressable LED strips, where each LED (or a group of three LEDs) are individually adjustable for colour and intensity. Some of these are RGB and some RGB+W. They typically have three connection wires: +12v, 0v and "data". With those, and some suitable digital electronics to send the data to them*, it's possible to adjust the colour and intensity in different areas of the lighting. A suitably programmed control box can create changes in light as required.
A mixture of addressable strips, plus some warm and cool strips which can be dimmed* can give a lot of control over the light on a layout.
(*) not overly hard stuff, I taught myself how to program Arduino's to implement such lighting in 2019 for Burntisland-1883.
Burntisland-1883 has a lighting system of cool and warm LED strips, each PWM dimmed, and strips of addressable RGB's to change the colour. As well as individually adjusting the strips, it's possible to move the lighting colour through several presets covering "early morning" through "midday" and "cloudy day", etc., with the transition between the presets taking about a minute.
It can't do "full sun" because shadows are really difficult to control in model lighting.
There are four identical lighting control boxes for each section of the layout, which spreads the electrical current around, so nothing is near its maximum rating. On the "todo" list is a plan to bring those together under a single control point.
Can be viewed this weekend in Burntisland Parish Hall, or hopefully at Glasgow show in February.
- Nigel
Nigel Cliffe - Blog of various mostly model making topics
-
Stephan.wintner
- Posts: 109
- Joined: Sun Mar 15, 2020 11:04 pm
Re: LED layout lighting
Mark that's very good info. Thanks. I've been thinking of similar approaches.
May I ask, how have you found you colors, are you tending towards 3000K ? Your comment makes me think you've got the dimmers both set to about 50%, so the 3k/5k balance is 2 to 3 as you installed them? I know that's subjective, asking what seems to suit you.
Also, do you know or did you consider the CRI rating on your setup? Some makers offer high CRI bulbs, which definitely look better to my eye.
Thanks
Stephan
-
Terry Bendall
- Forum Team
- Posts: 2427
- Joined: Sun Jul 27, 2008 7:46 am
Re: LED layout lighting
Paul Willis wrote:Mark, that's an excellent and practical explanation of the subject that we all probably think we know something about, but not enough.
It certainly is and very helpful. The other thing is that Mark has built ther lighting rig before any scenic work has been done which enables the colouirs to be tested under the actual lighing conditions. For may of us, myself included, lighing is somehting that comes last rather thasn early in the process which is hwat should happen.
Terry Bendall
-
Enigma
- Posts: 537
- Joined: Tue Aug 13, 2013 2:49 pm
Re: LED layout lighting
Paul Willis wrote:Mark, that's an excellent and practical explanation of the subject that we all probably think we know something about, but not enough.
I feel that this will gain a permanent place in the Society's reference material...
Thank you,
Paul
And as an article in Scalefour News please. I've fitted LED strips to my 'Braynerts Sidings' layout but it has yet to appear in public with them switched on for any extended length of time. My lights gave from the middle aisle of Aldi as a complete set with driver and light strip. I've no idea if they're 'warm' or 'cold' but they do illuminate the layout!
-
markdavy
- Posts: 19
- Joined: Tue Jan 22, 2013 7:12 pm
Re: LED layout lighting
Paul Willis wrote:
Mark, that's an excellent and practical explanation of the subject that we all probably think we know something about, but not enough.
Thanks for your kind words, however my notes are not definitive. As Nigel’s post shows there are others with more experience and a different perspective.
nigelcliffe wrote:
Going further... there are fully addressable LED strips, where each LED (or a group of three LEDs) are individually adjustable for colour and intensity. Some of these are RGB and some RGB+W. They typically have three connection wires: +12v, 0v and "data". With those, and some suitable digital electronics to send the data to them*, it's possible to adjust the colour and intensity in different areas of the lighting. A suitably programmed control box can create changes in light as required.
A mixture of addressable strips, plus some warm and cool strips which can be dimmed* can give a lot of control over the light on a layout.
Altogether a more sophisticated setup than mine.
Stephan.wintner wrote:
May I ask, how have you found you colors, are you tending towards 3000K ? Your comment makes me think you've got the dimmers both set to about 50%, so the 3k/5k balance is 2 to 3 as you installed them? I know that's subjective, asking what seems to suit you.
It’s too early to say. The lighting at the back has only one strip because I wanted just a gentle wash to remove any shadows, as suggested by Iain Rice in his book. I chose 5000K as distant views tend to have a bluer tint.
Currently the backdrop is only a sheet of sealed MDF. I’m expecting the addition of a printed backscene to change the overall impression considerably. And colouring the existing white baseboard surface will also have an impact.
My aim is something a bit warmer than say, Arun Quay (no criticism intended). However although I enjoy the warm light of a summer’s evening, I’m not sure I want it for my model railway ! That’s why I chose adjustable lighting – I knew I’d never get the balance right first time.
Terry Bendall wrote:
For may of us, myself included, lighting is something that comes last rather than early in the process which is what should happen.
Sorry Terry, but I did the right thing for the wrong reason.
However I agree with your point. I will decide the light balance once the printed backscene is in place, and then build and colour the scenery with that lighting.
I’m currently experimenting with the colouring of plywood sleepers. For these I’ve discovered that the contrast with the ballast and the angle of view probably have a greater influence than the overall lighting.
Mark
-
CDGFife

- Posts: 245
- Joined: Thu Feb 28, 2013 6:37 pm
Re: LED layout lighting
Really good write up Mark.
As Nigel has already posted we light Burntisland with LEDs and I've used then on Cadhay from the beginning. I entirely subscribe to the point about having them installed early to ensure things look right under them, particularly I find greens vary immensely under different "shades" of white. Cadhay has two strips of 12v cool white and 2 strips of 12v warm white (I'd need to go look up the K values) and also uses the more powerful 7.2W/m strips run through four MERG LED dimmers (around £4 each!). Each strip is the full 5.5m scenic length but all four are split into 3 parallel wired sections. I haven't found the need to use diffusers and the lights are mounted roughly 900mm above the track level.
Most importantly I have NEVER exhibited the layout with the same Cool to Warm balance, as every hall ambient lighting has been different (this also often varies with location in any given hall). First set up job is to adjust the dimmers to get the scenery looking right (to my eye!).
If not wedded to 12v then 24v strips are also widely available. Cadhay uses 12v strips as this means the power bricks are all standardised (the layout also has 2 12v DC power busses) so no one (by that I mean me!) can blow one circuit up with the wrong voltage.
Currently playing with RGB and addressable strips tied into the layout timetable to give lighting adjusting for dark, sunrise and sunset but whilst working on my desk jury-rigged, it's a long way from installation. Does show that the only limit is your own imagination though!
Cheers
Chris
Who is online
Users browsing this forum: ClaudeBot and 0 guests