SR 0-6-0 E2's - Latest build complete with Video Operation

User avatar
Knuckles
Posts: 1262
Joined: Fri Nov 18, 2011 9:15 pm

Re: SR 0-6-0 E2 (Extended tank versions)

Postby Knuckles » Sun Jan 20, 2013 4:33 pm

LesGros wrote:Knuckles wrote:
Without wishing to sound rude (although I fear it will be inevitable), could we please leave the blade thing now or move it to another thread. This thread seems like it's changing topic or becoming hijacked somewhat. To argue against myself though, I do wander where that 'line' is, I mean; If we are discussing ideas and sharing advices then things have to move topic to a degree, but how much?


It is your topic, you decide. The "Blade thing" has pretty well run its course, with contributions from members giving their time to offer you enlightenment.
If you do not want too many diversions to the thread, there is always the option to pose your additional questions in a new topic.


Advice is greatly appreciated and often needed, my grattitude is always made known so I'll never say different. If I was to make a new thread it would have to wrarrant enough weight to perpetuate discussion because I don't see point in making threads unless I think they will survive. Plus the aquisition of a peircing saw was not actually my question, but a brilliant suggestion to me/us.

I'm not drawing any lines in the sand because I'm still learning S4 ettiquette, which is why I ask you guys where the line is (not trying to change topic myself!) but I may on accasion ask or suggest a subject be moved on after some time if the topic loses the title. Experience will guide.
Hope that's fair. :|
“He who dares not offend cannot be honest.” Thomas Paine

https://www.sparkshotcustomcreations.com/
Mostly 3D Printed Loco kits etc.

SCC Price list (7/4/22)
https://www.sparkshotcustomcreations.co ... e77d42.pdf

User avatar
Knuckles
Posts: 1262
Joined: Fri Nov 18, 2011 9:15 pm

Re: SR 0-6-0 E2 (Extended tank versions)

Postby Knuckles » Fri Jan 25, 2013 9:13 pm

Before I do much more on the body I want to start the dreaded chassis.

I have already battled to remove the bits that needed to be removed from
the flat etch fret and in the process made a bit of a pigs ear out of it, but thankfully
after the suggestion of getting a good quality peircing saw I might be able to avoid
future problems here.

Mike G' graciously sent me some hornguides/springs and a coupling rod chassis jig,
I had already brought the Alan Gibson hornblocks so I'll use them here but will likely
have a go at the others on the 2nd E2 build. The jig I'm not 100% sure how to use but
I'm guessing the hornblocks need to be a sloppy fit so they can actually be adjusted
using the coupling rod positions as the datum. Is this correct?

Here is the assembly picture/s for anyone who hasn't used them before. My first time.
I don't know yet how well they will perorm but they went together alright and seem to move freely.
I did use Carrs Green flux at first as I often do but I forgot the nut and bolt is steel so it rusted a little!
So for the rest I used my other new favorite DCC Supplies No Clean Flux.
I brought it after my single slip rusted somewhat, and for the electrics, it doesn't flow quite as easily as the green stuff but certainly usable.
I'll probably use it to solder the chassis up to help avoid accidental contamination of axles etc.

Image

Here we have the 1624 Mashima motor, Comet Models GB5 gearbox and a 1/50 drive extender.
My limited experience shows me to be less picky or knowledgable in terms of wise descisions
with drive trains so because I have used Mainly Trains for years and it's quick and easy to order...that's what I did.
I did buy a different gearbox but after another look and measure
decided this might be better so I can give the rear wheel drive and hopefully detail the cab a little.
I think after a little research the 1/50 gear ratio will give good slow running with a little bit of speed, so if i'm correct
might be a good choice for an E2 locomotive, then again I might be completely wrong but I'll find out soon enough.

Image

Easy job
Image

The first gearbox I built was for my 00 gauge James model and I didn't have many problems,
but with this one I spent about an hour and a half at least pidelling about trying to get the initial
worm to mesh with the first cog. It binded up and wouldn't turn. I tried it with the cog grub screw
tightened and free and no difference. I then purposely after a long inspection bent the gearbox
slightly from the top above the screw fixings in the direction that would give more space
between the worm and cog (try your best to interpret that. I can't help anymore :P ).

This helped a little and the instructions said they often don't tight the cog grub screw but use loctite, however this would mean I wouldn't have much adjustment
later and I found that it was working MUCH better with it loose. Problem is it span itself to peices about 3 times and I nearly made some more accidental sacrifices.
I needed to find a way to retain the ... erm, 'mini axle', yeeesh, that'll do. And so, in perfect expectations I concocted one of my famous Knux Bodges; a scrap etch retainer obstruction - looks messy, but so what, it's inside.
I also had to ream out most of the 1/8th holes including those in all the cogs, but this is easy when you have the tool, just be careful not to over do it.

I also fitted a flywheel and am really pleased with this. Always wanted to fit a flywheel to a kit, I really like them. A boon at speed if you hit a dead bit of rail and more realistic control eitherway.

Finished pic. The final gear/cog isn't fitted as I need this on the drive axle so it's stil in the bag shoved in for the picture. I had to file most of the inner bearings off to fit one of these cogs mind. Unsure why but never mind.

Image

And, now what? :shock: After consulting Ian Rice's book I think I need to squarely build the super structure before I put the hornblocks in, so I'm not going to rush things further because I need to be sure I do it properly. I have a bit of 90degree wood block to help and an engineers square.
Image

That's all for now. :)


EDIT: Oh yeah, Ultrascale's 57xx conversion set finally arrived in the post today, after probably half a year. Will save that until later though.
“He who dares not offend cannot be honest.” Thomas Paine

https://www.sparkshotcustomcreations.com/
Mostly 3D Printed Loco kits etc.

SCC Price list (7/4/22)
https://www.sparkshotcustomcreations.co ... e77d42.pdf

User avatar
Knuckles
Posts: 1262
Joined: Fri Nov 18, 2011 9:15 pm

Re: SR 0-6-0 E2 (Extended tank versions)

Postby Knuckles » Tue Jan 29, 2013 2:20 am

Mini heads up, will do full write up later when everything is ok. Chassis assembled and I actually managed to get it square, happy days. It took me about a day and a half trying to find out where a mysterious short circuit was and then once that was sorted to devise some form of picks ups. These two things are sorted. I had a little trouble with the gearbox and with the rods so much so that I've built the second gearbox for a second attempt. The initial gear shrank and so wouldn't mesh anymore, I'm guessing this was because it wasn't ran in long enough before asking it to drive a chassis but I don't know. Will see how it goes, 2 steps forward 1 step back repeatedly.

It is my 2nd ever attempt at a chassis that is supposed to run right so I suppose I can't expect to be a brilliant smooth kit maker over night.
Last edited by Knuckles on Tue Jan 29, 2013 12:19 pm, edited 1 time in total.
“He who dares not offend cannot be honest.” Thomas Paine

https://www.sparkshotcustomcreations.com/
Mostly 3D Printed Loco kits etc.

SCC Price list (7/4/22)
https://www.sparkshotcustomcreations.co ... e77d42.pdf

User avatar
Andy W
Posts: 884
Joined: Thu May 21, 2009 8:11 am

Re: SR 0-6-0 E2 (Extended tank versions)

Postby Andy W » Tue Jan 29, 2013 10:12 am

"I suppose I can't expect to be a.brilliant smooth kit maker over night." That's for sure - no one can. One trick is to check everything at each stage. Check the motor turns smoothly with no gear box (clip a hair grip or similar to the shaft to see it's rotating ok.) Then add the worm - and check. Then add the gears - and check etc. etc. I built my first loco, chassis and all and put it on the track. It didn't work. Doh! By checking as you go you know that when a problem arises it was the last step that caused, or exaggerated, it.
Make Worcestershire great again.
Build a wall along the Herefordshire border and make them pay for it.

User avatar
Knuckles
Posts: 1262
Joined: Fri Nov 18, 2011 9:15 pm

Re: SR 0-6-0 E2 (Extended tank versions)

Postby Knuckles » Tue Jan 29, 2013 12:17 pm

Thanks Ealing. I have been checking the stages and as a result I've had to go back a few stages wasting a day or so. Rather exasperating at times but as long as I manage it in the end I'll be happy. When I had the engine running (rather craply) it didn't derail on my points so that's a good sign of relative squareness. I say relative because it probably won't be perfect but it lies on the plate glass with no rocking so that's good.

With the first gearbox and with this second; although the first didn't run bad there was this clunk on every revolution and it cased a few issues, this second gearbox I've built is a little better but I' have the same problem. After inspection I found it is the first cog that meshes with the worm. The hole where the grub screw is 'kchinks' and sometimes grips it causing a mini bind at slow speeds. I've tried it with the grub screw tight, loose and fully removed but it's the same problem. I've secured the layshaft this time with a small amount of Loctite at one end and I think I'm going to fill the hole and craft my own teeth. :shock:

Styrene rod or metal, any suggestions?
(I think whoever designed the grub location to be within the actual gear teeth had some very strange ideas indeed, can't say I approve)
“He who dares not offend cannot be honest.” Thomas Paine

https://www.sparkshotcustomcreations.com/
Mostly 3D Printed Loco kits etc.

SCC Price list (7/4/22)
https://www.sparkshotcustomcreations.co ... e77d42.pdf

David Knight
Posts: 822
Joined: Sun Jul 20, 2008 6:02 pm

Re: SR 0-6-0 E2 (Extended tank versions)

Postby David Knight » Tue Jan 29, 2013 2:19 pm

Knuckles,

Sounds like the gearbox wants a bit of running in with a mild abrasive like Brasso. Just remember to clean it out well afterwards.

Cheers,

David

User avatar
Will L
Posts: 2529
Joined: Sun Jul 20, 2008 3:54 pm

Re: SR 0-6-0 E2 (Extended tank versions)

Postby Will L » Tue Jan 29, 2013 2:28 pm

Knuckles wrote:With the first gearbox and with this second; although the first didn't run bad there was this clunk on every revolution and it cased a few issues, this second gearbox I've built is a little better but I' have the same problem. After inspection I found it is the first cog that meshes with the worm. The hole where the grub screw is 'kchinks' and sometimes grips it causing a mini bind at slow speeds. I've tried it with the grub screw tight, loose and fully removed but it's the same problem. I've secured the layshaft this time with a small amount of Loctite at one end and I think I'm going to fill the hole and craft my own teeth. :shock:


I'm having trouble visualising this, who's gearbox are you using?

Will

User avatar
Knuckles
Posts: 1262
Joined: Fri Nov 18, 2011 9:15 pm

Re: SR 0-6-0 E2 (Extended tank versions)

Postby Knuckles » Tue Jan 29, 2013 3:35 pm

Comet Models, GB5 with 1/50 drive extender.
“He who dares not offend cannot be honest.” Thomas Paine

https://www.sparkshotcustomcreations.com/
Mostly 3D Printed Loco kits etc.

SCC Price list (7/4/22)
https://www.sparkshotcustomcreations.co ... e77d42.pdf

User avatar
Will L
Posts: 2529
Joined: Sun Jul 20, 2008 3:54 pm

Re: SR 0-6-0 E2 (Extended tank versions)

Postby Will L » Tue Jan 29, 2013 5:19 pm

Knuckles wrote:Comet Models, GB5 with 1/50 drive extender.


Hum. I must admit the idea of fitting a grub screw through the teeth of the worm wheel strikes me as a little odd, particularly as in breaks the teeth just where the worm will bite, and even the instructions suggests that the worm wheel turning on a fixing the lay shaft it better. i.e. no need for a grub screw in the first place..

Presumably these things have worked OK for other people? I'm afraid I stick to high level gear boxes these days.

Running it in with Brasso may help, but fine engineering it isn't

Will

User avatar
Knuckles
Posts: 1262
Joined: Fri Nov 18, 2011 9:15 pm

Re: SR 0-6-0 E2 (Extended tank versions)

Postby Knuckles » Tue Jan 29, 2013 6:38 pm

Rightio Will', lesson learnt I guess, Woll try someone elses next time. I had no trouble with the James build I did but both of these are.a little dodgy, and all because of that hole I rekon. I fixed the layshadt with loctite so the gear spins and finds its own centre as the instructions said (this 2nd one anyway) but it still is a but tight around the hole.

Good news though, things are running okish with all rods on, but unsure if I should comit the rods due.to the gearbox. Scared it'll grind itself to powder. Im still thinking of filling the hole but undecided on material.

Please could someone advise on a nice thick gearbox oil that doesnt go liquid? At moment using Vaseline but is only.tempory.
“He who dares not offend cannot be honest.” Thomas Paine

https://www.sparkshotcustomcreations.com/
Mostly 3D Printed Loco kits etc.

SCC Price list (7/4/22)
https://www.sparkshotcustomcreations.co ... e77d42.pdf

Philip Hall
Posts: 1957
Joined: Mon Aug 10, 2009 7:49 pm

Re: SR 0-6-0 E2 (Extended tank versions)

Postby Philip Hall » Tue Jan 29, 2013 7:44 pm

I use Pronatur engineering grease (with PTFE) which I got some years ago from Branchlines. I have no idea if they still do it, though. The address on the tub is 14A Spindus Road, Speke Hall Industrial Estate, Speke, Liverpool L24 1YA. Again I don't know if this is current.

I use it on all gears, metal or nylon, and also use it to replace or top up the white grease that the RTR manufacturers use in their geartrains. It stays put and doesn't liquify; I am still only a quarter of the way into my tub and since I bought it from Andy Mullins some time before he sold the business you can tell how long I must have had it!

Philip

User avatar
Knuckles
Posts: 1262
Joined: Fri Nov 18, 2011 9:15 pm

Re: SR 0-6-0 E2 (Extended tank versions)

Postby Knuckles » Tue Jan 29, 2013 7:54 pm

Thanks Philip, I'll see if I can get some
The white RTR stuff is what I was visualizing.

I've sorted the hole issue out 50%, Is not perfectly sorted but running much much better.

I got some styrene rod, inserted it into the hole, abused it with the soldering iron at 350c so it melted over the adjacient gears and then smoothed and picked away at it until the worm stopped binding. Loads better, I think I'm about ready to comit the rods
If I.succeed it'll be time for another post and I can finish the body off then.
In hindsight I'm starting to thi k Superdetailing the Hornby E2 might have been a better option because on Hornby's, apart from the running plate curves being a bit OTT and a lack of rivets and the smokebox saddle being iffy I'm starting to think it a better base model and easier, bodywise.
“He who dares not offend cannot be honest.” Thomas Paine

https://www.sparkshotcustomcreations.com/
Mostly 3D Printed Loco kits etc.

SCC Price list (7/4/22)
https://www.sparkshotcustomcreations.co ... e77d42.pdf

User avatar
ianlbsc
Posts: 9
Joined: Sat Jul 26, 2008 3:58 pm

Re: SR 0-6-0 E2 (Extended tank versions)

Postby ianlbsc » Tue Jan 29, 2013 8:48 pm

The buffers.
I think you have the brass bits the wrong way around.
If you solder the small piece in to the end with the flange it goes in almost all the way but still sticks out a little to locate the buffer in a hole in the bufferbeam. The larger diameter ridge is the inner part of the buffer housing, not the outer.
I couldn't work out why you were needing to make extra bits to start with and then realised the body was the wrong way round.
I am refurbishing my room at the moment with everything packed away but should be able to photograph a set this weekend if it helps.
Keep at it, the first one is always a sod!
Can you not get to a local area group?
Cheers
Ian in Blackpool

User avatar
Knuckles
Posts: 1262
Joined: Fri Nov 18, 2011 9:15 pm

Re: SR 0-6-0 E2 (Extended tank versions)

Postby Knuckles » Tue Jan 29, 2013 11:54 pm

D'oh!

I'll have to rework them then. What a fudge. :(

Thanks for pointing that out though. This is my second kit rather than a first, but definetly a first P4 build. :) All I can say with my limited kit building experience is that it is one ruddy hour eating challenge getting good running.
“He who dares not offend cannot be honest.” Thomas Paine

https://www.sparkshotcustomcreations.com/
Mostly 3D Printed Loco kits etc.

SCC Price list (7/4/22)
https://www.sparkshotcustomcreations.co ... e77d42.pdf

User avatar
Andy W
Posts: 884
Joined: Thu May 21, 2009 8:11 am

Re: SR 0-6-0 E2 (Extended tank versions)

Postby Andy W » Thu Jan 31, 2013 1:40 pm

Knuckles, if the buffers work and fit o.k. leave them. Just learn and move on. Yes it's a time consuming thing getting a chassis to run. However when it works it's a joy. Last night I tested a chassis I'm building - a tiny 0-4-0T - no wheels yet, just the split chassis and body. It worked! Dancing in the street here in West London.
Make Worcestershire great again.
Build a wall along the Herefordshire border and make them pay for it.

User avatar
Knuckles
Posts: 1262
Joined: Fri Nov 18, 2011 9:15 pm

Re: SR 0-6-0 E2 (Extended tank versions)

Postby Knuckles » Thu Jan 31, 2013 5:33 pm

Hi Ealing, I'm undecided on the buffers but the springs arn't in yet so it would be fairly quick soldering and swapping things about.
How do you know your chassis works with no wheels!!?? :shock: :o Maybe I got the wrong end of the brake pipe there.


Updatiostini:

Ok, where does this loco building n00b start....

Oh yes.
Firstly I'd like to appeal to those of you who know better and have built a siable bunch of these. Much of what I've written below will probably make you cringe and be a good example of how not to do things! If that is the case then I'll just agree with you and try to learn. If your, like me fairly new to loco kit building then this post might provide some help or interest. :)

I had to have a real good think how to build this chassis becasue I had to literally ignore 90% of the instructions, instead relying on the component and arrow picture. Some of the text was useful but a lot of it wasn't because it only covered fixed axle guys and only had 00 or EM frame spacers. It might seem a sound assumption that only the exacting guys would want suspension and thus don't need instructions because they are so magic- but even they had to start with their first (me! Not my first loco build, but my first P4 locobuild and with springing). Anyway, after having a good look I got my Alan Gibson P4 frame spacers out and had another good look.

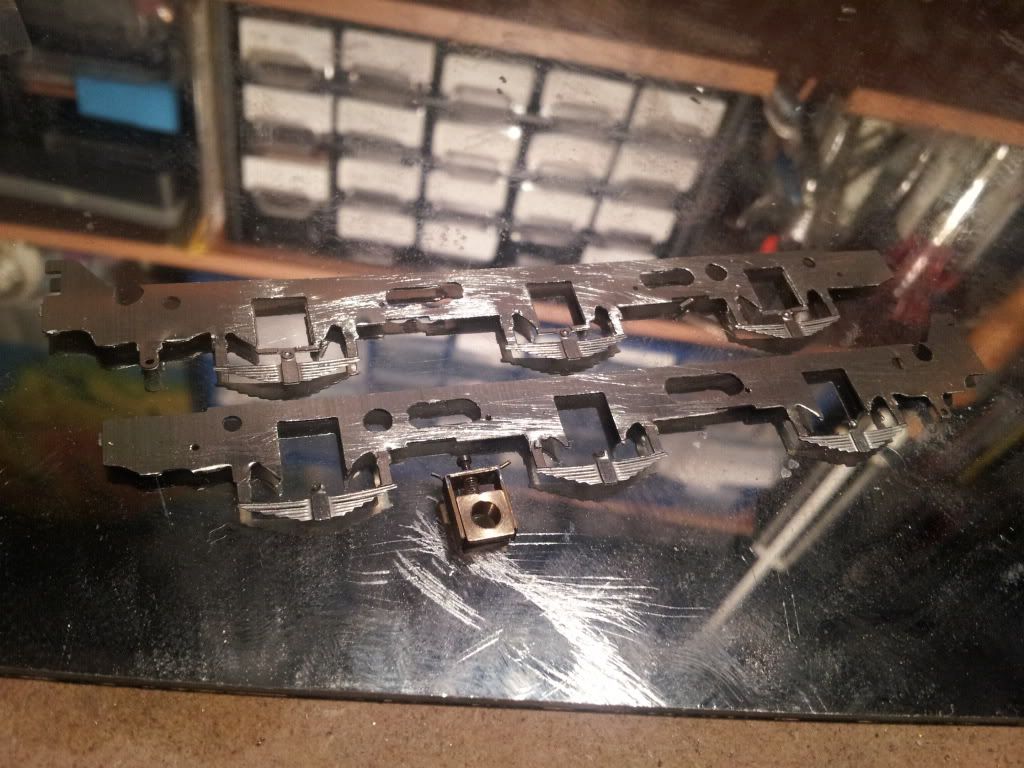
The Loco kit has the usual slot and tab method etched in for the frame spacers and a cylinder at each end that is secured to the frame sides via screw. Being 00 this was useless so I folded one of the '3 way' spaces to make a 'hollow rectangle' spacer. I hope I'm making sence but the pictures will reveal all.

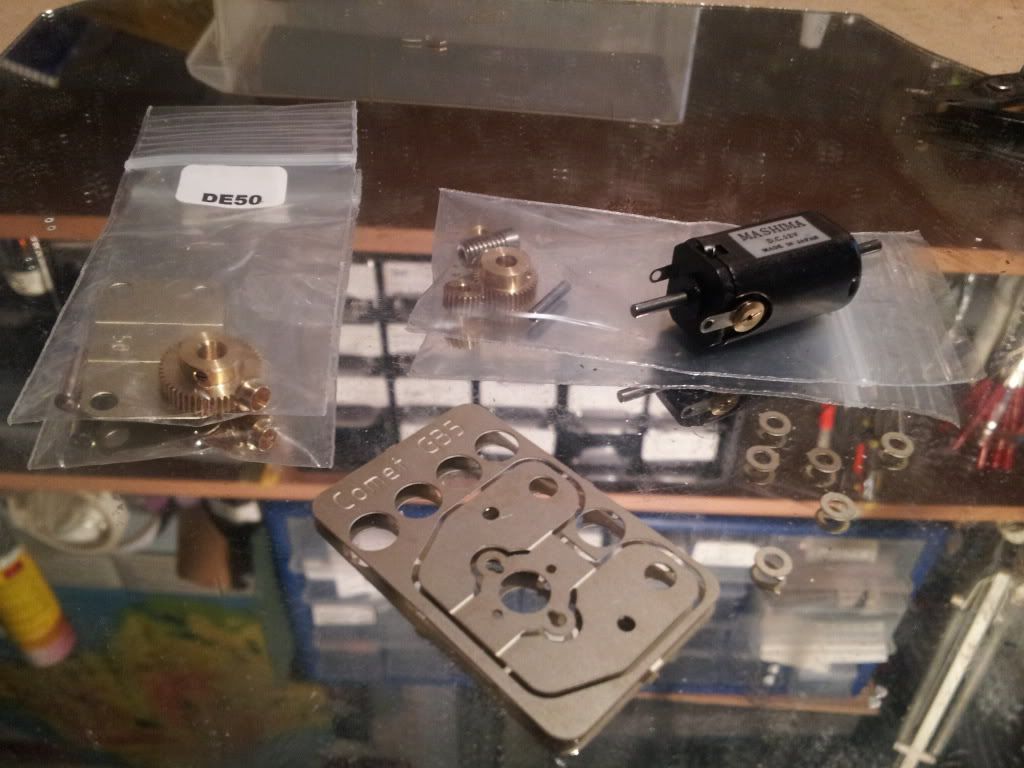
Due to all this, and due to me using a Comet Models GB5 with 1/50 Drive Extender I couldn't put the P4 spacers in exactly the same place as the kit intended the others to go, so again I had to have a good think.

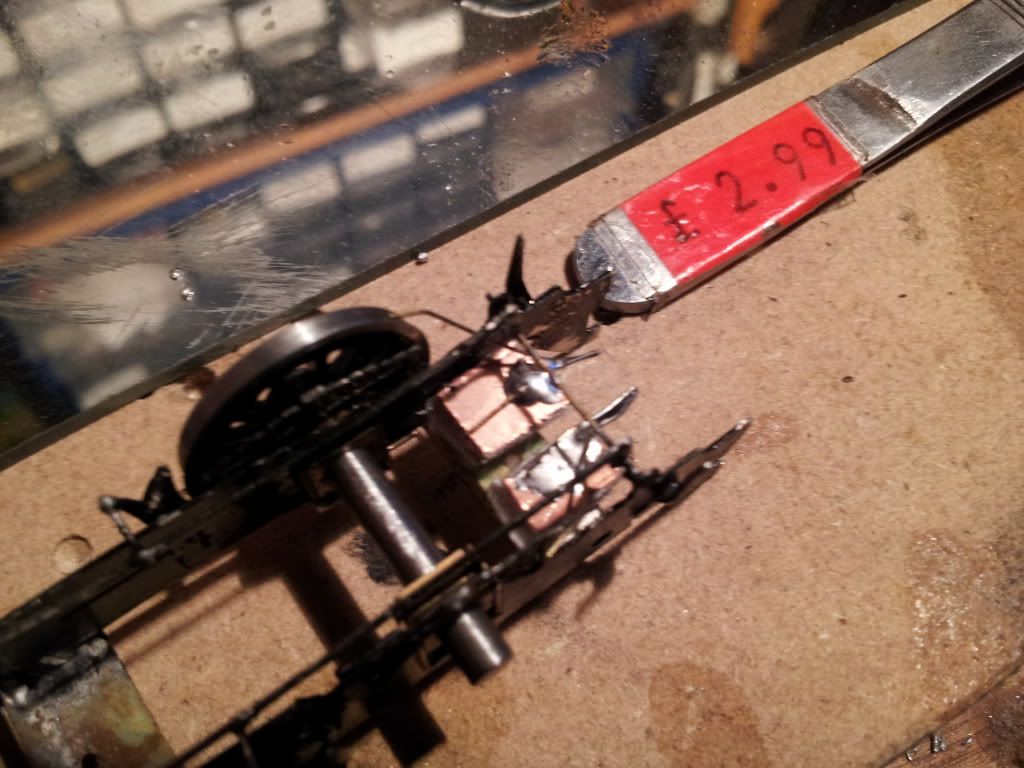
The following picture shows my highly sophisticated method of starting things coupled with a metal engineers square (pictured on top).
Image

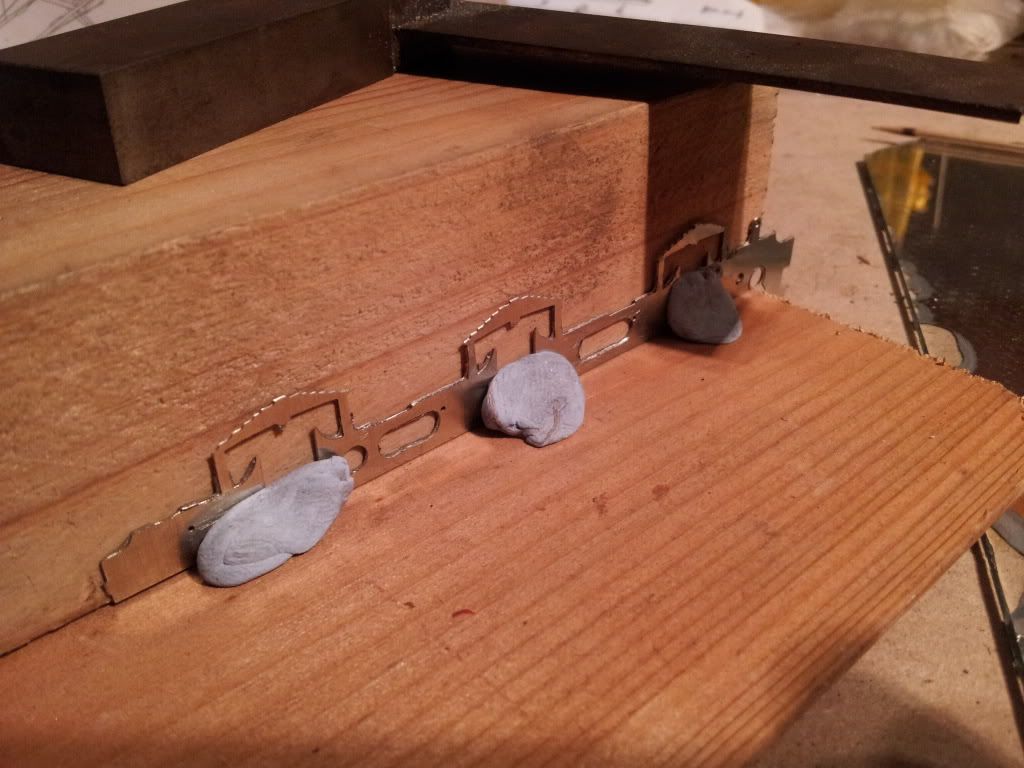
I haven't included any pictures between that an the finished article because it's a bit hard to convey what I did other than what I have wrote above, but suffice to say just keep checking on the plate glass that everything is square and only tack joint for a while becasue just when you think it's fine the metal cools down and it's out again!

Having graciosly recieved some axle/coupling rod jigs in the post from Mike G' I used them as intended by using the coupling rods as a jig, thankfully the kit was etched well and corrisponded with the hornblocks and everything almost lined up. There was about 1mm of difference because I had opened the hornblock holes out too much so getting this in the right place was a bit of a fiddle. The jig ends were too thick and not tapered but this wasn't really a problem because I just put a metal rule to the center of the jig pins and measureed the difference, and holding the coupling rods close. Again, hope that makes sence. I could grind them to a point I guess.

The coupling rods needed to be cut in half and laminated to provide a joint, this was easy but figuring out what to cut took more thinking than I originally envisaged. If I did it wrong I'd be in the sand trap. Fortunetly I did it ok.
Image

This is the chassis. Built bad and roughly in my opinion but that is due to experience lack.
Image

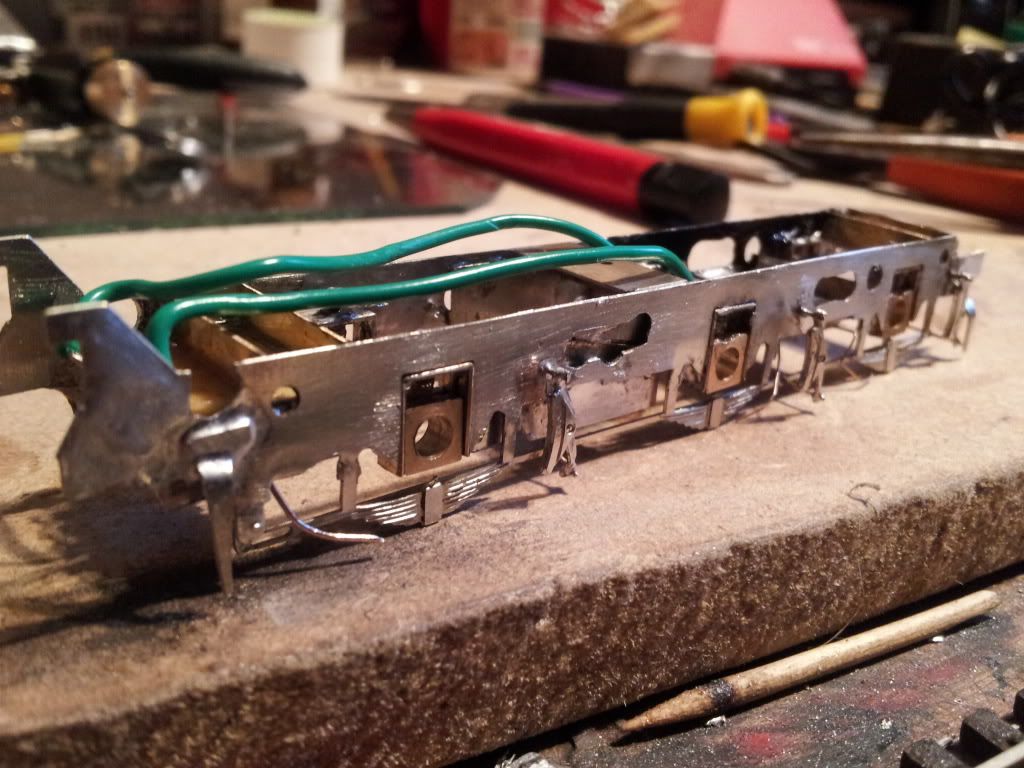
Pick ups are my own design after a long think and consultation of the forums and Ian Rice's book. I've seen some of the methods employed by others and they are much better being less obtrusive and probably better functioning. I'm just hoping that after painting them black and they model finished they won't look too out of place.

I'm probably shaming myself showing this but here goes. The horrid white plastic card is another attempt at reducing short circuits to provide another barrier and also some room for any liquids to run onto, like a collection trap - rather than seep underneith to the chassis. Details in the next paragraph.
Image
Image
Image

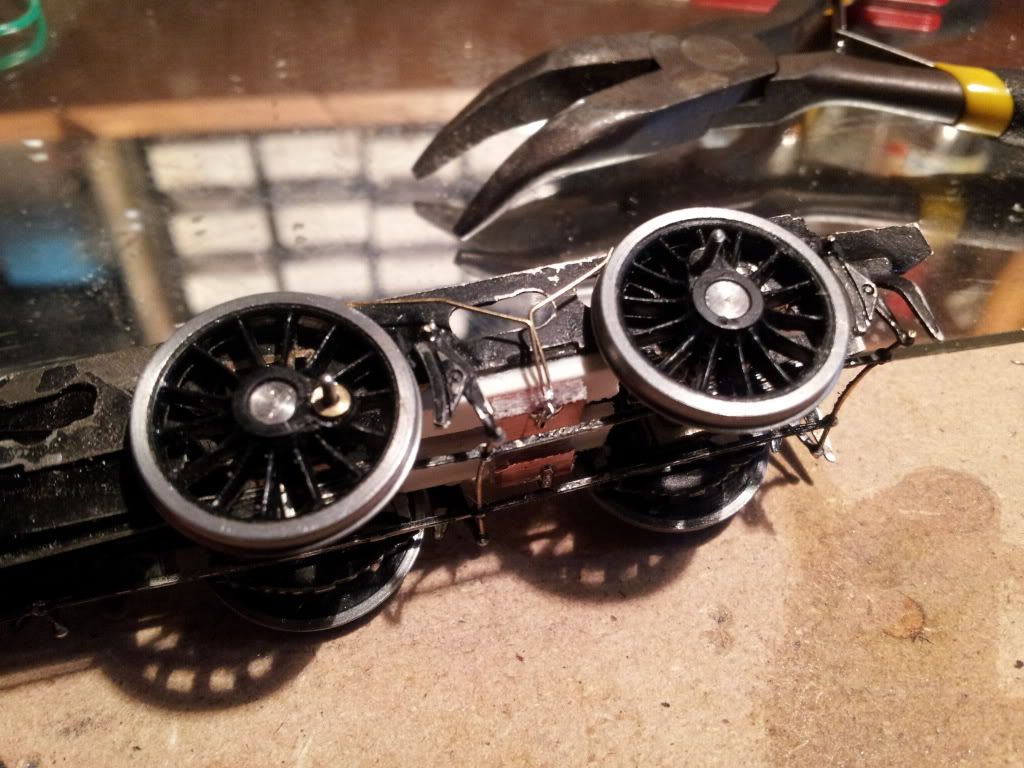
I'd also like to say this is infact my 3rd attempt at doing the pick-ups. I used PCB and the first one was superglued but later came undone buggering everything, plus after a while it kept somehow shorting out. The second one I soldered and was fine initially but after a while also caused mysterious short circuits. I still can't fathom why this is the case becasue I checked repeatedly that nothing was touching and the only conclusion I can come up with is maybe some flux got in the way and tricked between both copper plates of the PCB andd fibreglass middle. I don't know. Suffice to say I then encounterd a really big mistake...

After washing the chassis and drying it, it seemed a little better but the tester needle was still moving half way, so I thought, 'How about using a hair dryer!? That's surely going to evaporate any moisture.' Right, but. :o

Alan Gibson wheels don't like hair dryers and two tyre rims fell off the plastic wheels proper! :evil:

*sigh* Powerbond 806 to the rescue again. I tried to get them on perfectly and I think I have but maybe at a major zoom I haven't, anyway, lesson learnt.

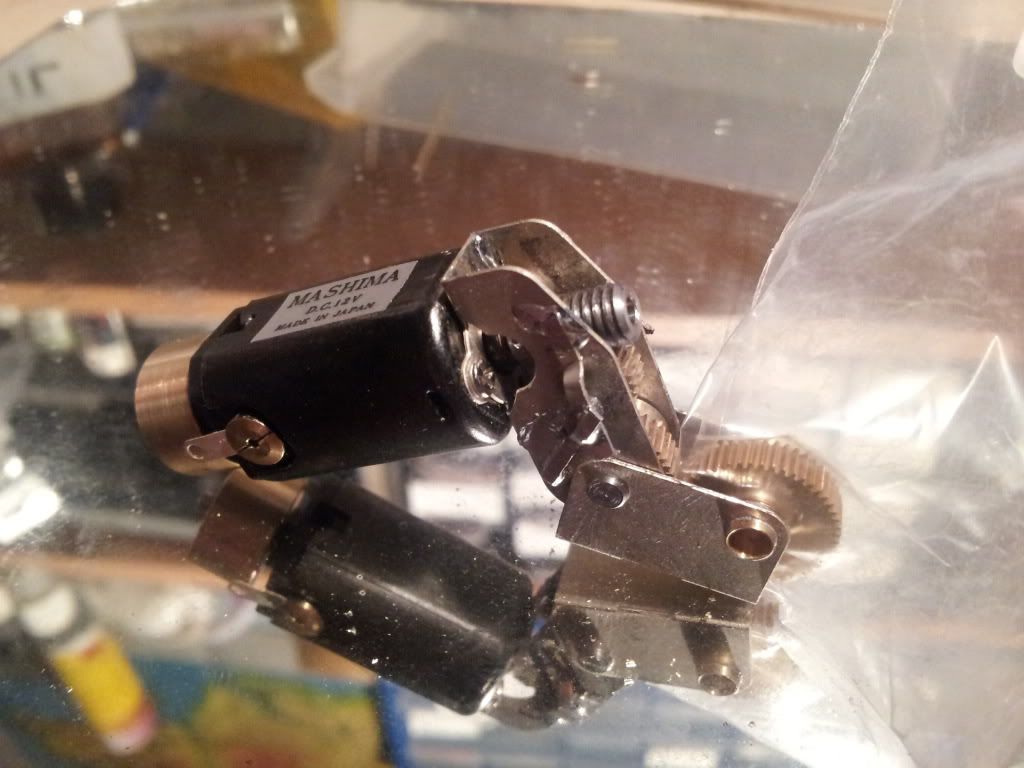
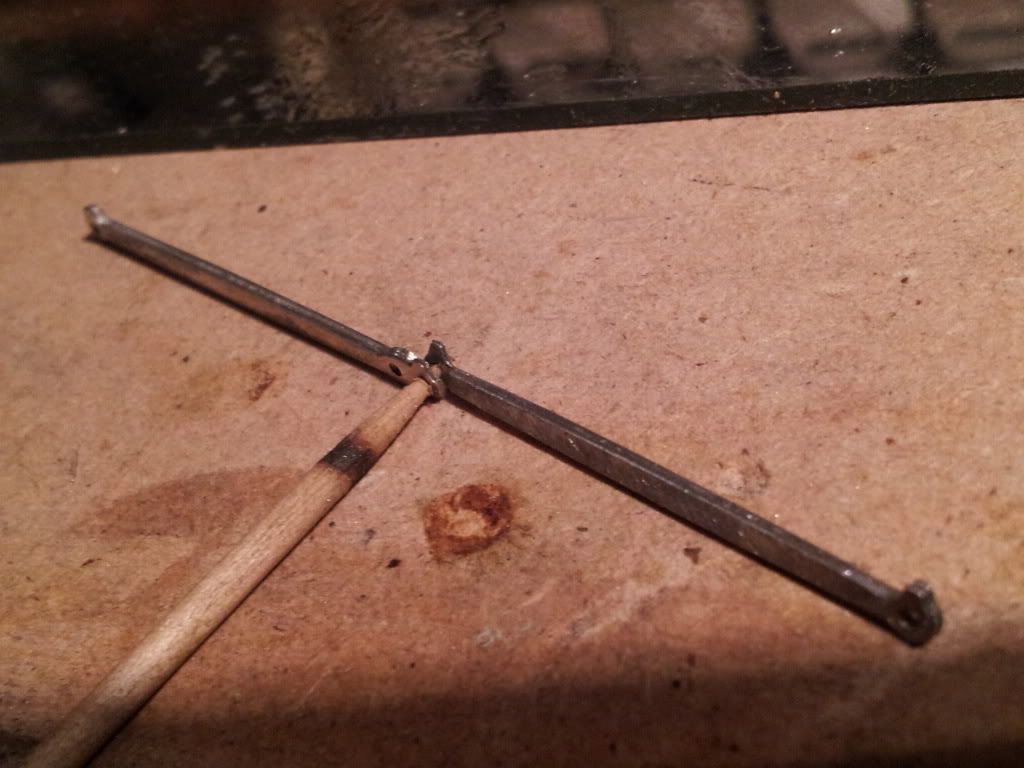
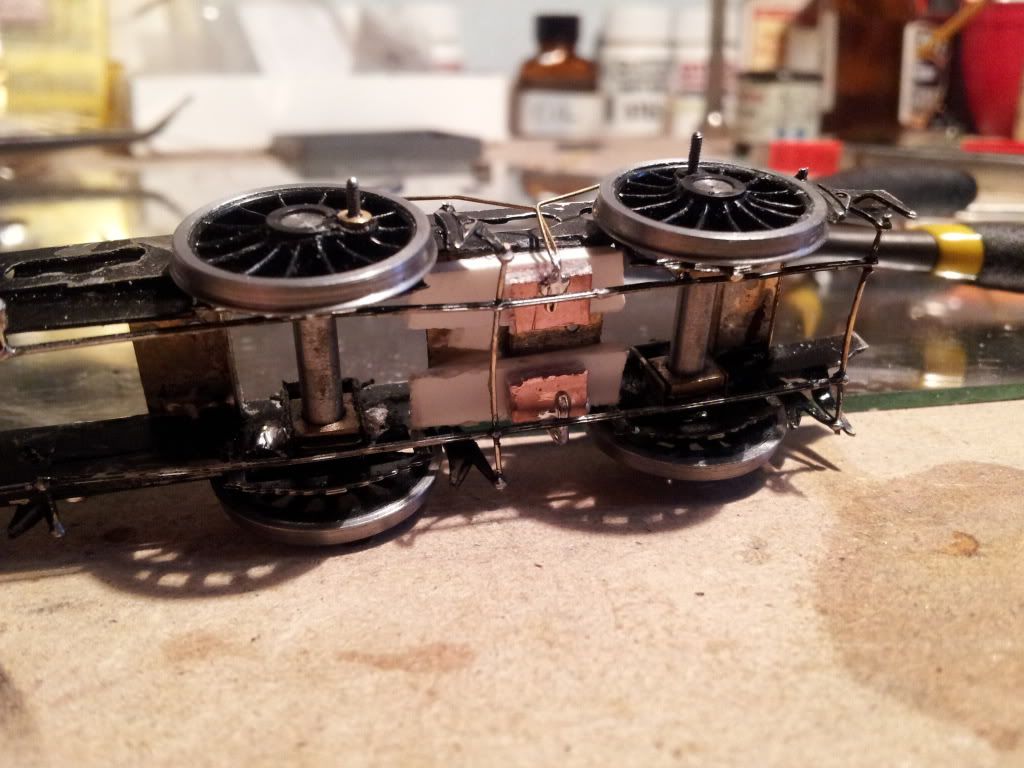
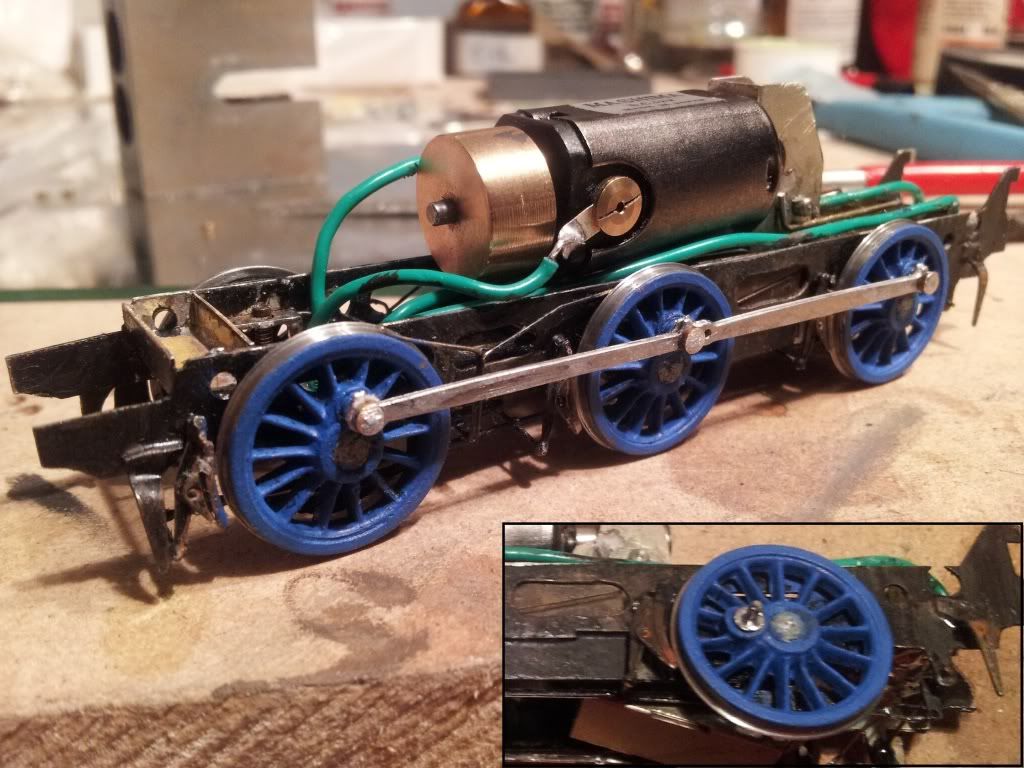
The next picture shows my method of fixing the gearbox to the frames to stop it doing a wiley jig everytime the engine changes direction. Two 0.7mm brass rods bent twice and soldered. Easy, simple, cheap, effective, adjustable, perfect in my opinion.
Image

I had a lot of trouble getting good running and the gearbox in the above picture is my second. It still has the same problem as the first but not so bad, and after another of my infamous bodges it's even better. The cog directly below the motor worm has a hole in it for a grub screw. it doesn't matter weather you use the grub tightened to the layshaft, just sitting there dangelling its legs or removed; the worm struggles to negotiate the obstruction becasue it is IN THE TEETH! Silly design if you ask me. Fine at most speeds, even fairly slow, but for proper slow speeds it doesn't like it. My bodge was to insert some styrene rod into the hole via superglue, clip off the excess and then murder it with 350 degrees of soldering iron so that the remainded melts over the initial teeth. My own idea, that after a lot of detritus clean up, seems to have improved things somewhat. It still isn't perfect mind.

At some point in the build I also had to move a hornblock becasue it hadd about 1mm of horizontal play in it and after tis was sorted (by measuring in relation to other axles) it improved things no end.

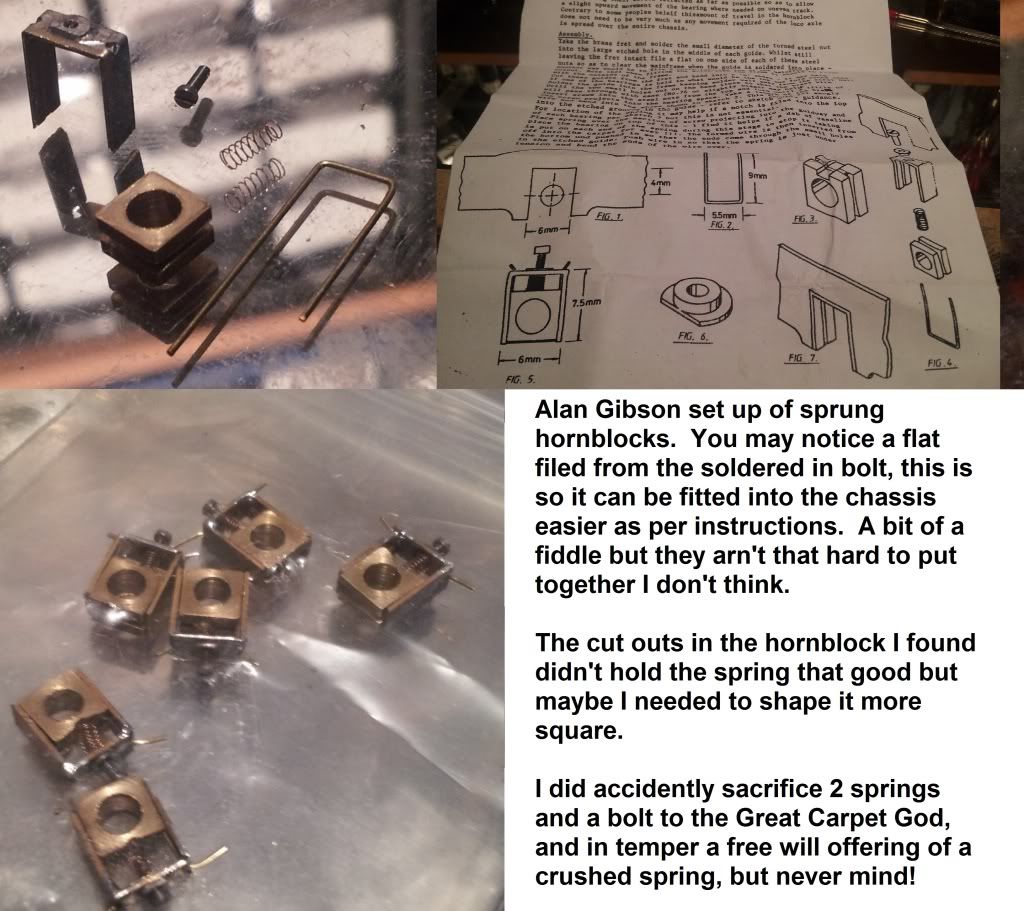
Although I like Alan Gibson's hornblocks, once the axles are in they are only removable if you pull the wheel off, unlike other suspension methods I am interested in. I suppose building them slightly different to the instructions wouldn't be hard but I like the screw adjuster idea. Easy to change. After running the engine though it seems the suspension only works downwards. the weight of the loco' is designed to compress the springs 100% and so the hornblock is riding on the screw adjuster, ergo when the engine is running at a bumpy bit of decending track the springs push the wheel down into it - great, but when you come to a slight bump upwards the engine has to just bump itself up because the springs are already fully compressed. CSB I believe has the compression midway thus solving this but maybe a future build of mine will find out. Anyway, I prefer having hornblocks than non, is still better than a rigid chassis.

I painted the chassis at some point but not properly. I didn't use primer and I didn't spray becasue I didn't want to gum up the hornblocks or springs. Any ideas on the correct way? I just used brush on Humbrol enamel knowing that it sticks fairly well to bare metal and a chassis once assembled wouldn't be touched too much so I should get away with it. The same thing goes for wheels, I'm unsure on the best way.

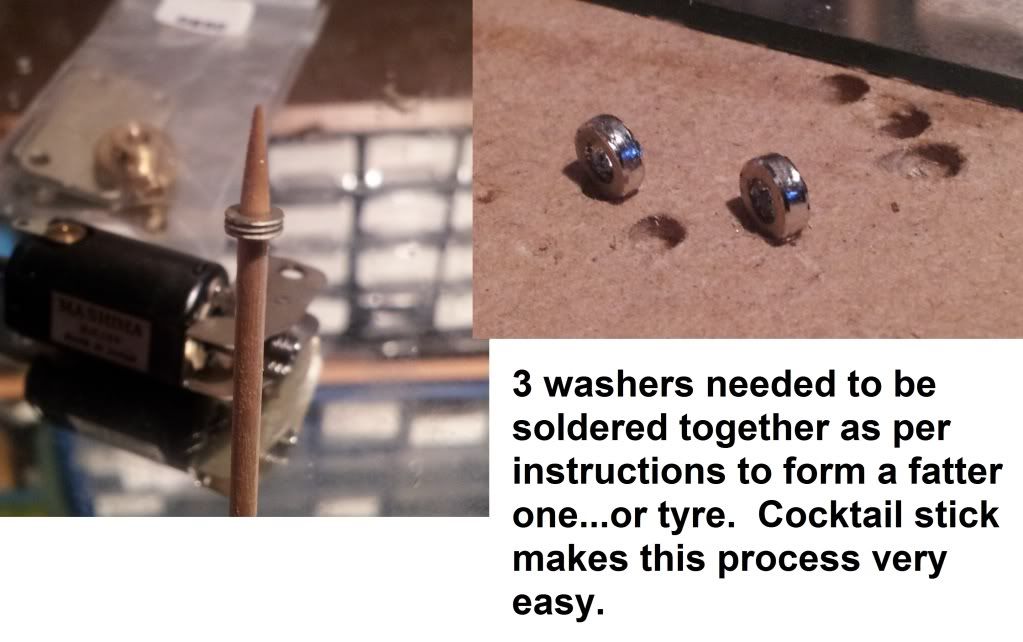
Whilst tweaking the running of the chassis I used bluetack as crank pin screws, supprisingly effective! Alan Gibson's crank pins needed a hole clearing in the coupling rods to 1.6mm's, but this was scaring me because as I reamed them I continued with one and it was getting so thin at the edges I honestly think papr was thicker. Scared of splitting it I crafted (lol) a circular lump from some scrap etch fret that ould fit in the hole, gummed it with solder and drilled a new hole. My method now was to gum up the crankpin threads with solder and just ride on them. Bad practice I know but with such thin rods I had little choice, maybe for an express locomotive there would be more metal to play with. After tweaking the running I just soldered a fat washer as a securing retainer using the paper washer method. Not sophisticated but then, I'm not sophisticated yet. As a loco building n00b I need to place function above other considerations. Because of my alternate method I wanted a washer as a smooth barrier between the wheel and the coupling rod, just like the intended bush would have done. I didn't have any thin enough so I melted them in. Rash, I know but it worked. You just need to be careful not to dwell too long and realign the crankpins slightly after they went drooped. The previous and following picture show the brass washers in a couple of places.

In hindsight I think in future I might use Markits/Romford crankpins intead. They are a little fatter but are smooth with no thread and I have a large supply of them already.

Oh yeah, I also had to re-drill brake hanger holes because I guess they were designed for those bigger older wheels, that or they were just being a milimeter or more cautious. I've set mine fairly close but careful that they don't touch either with or without compression.

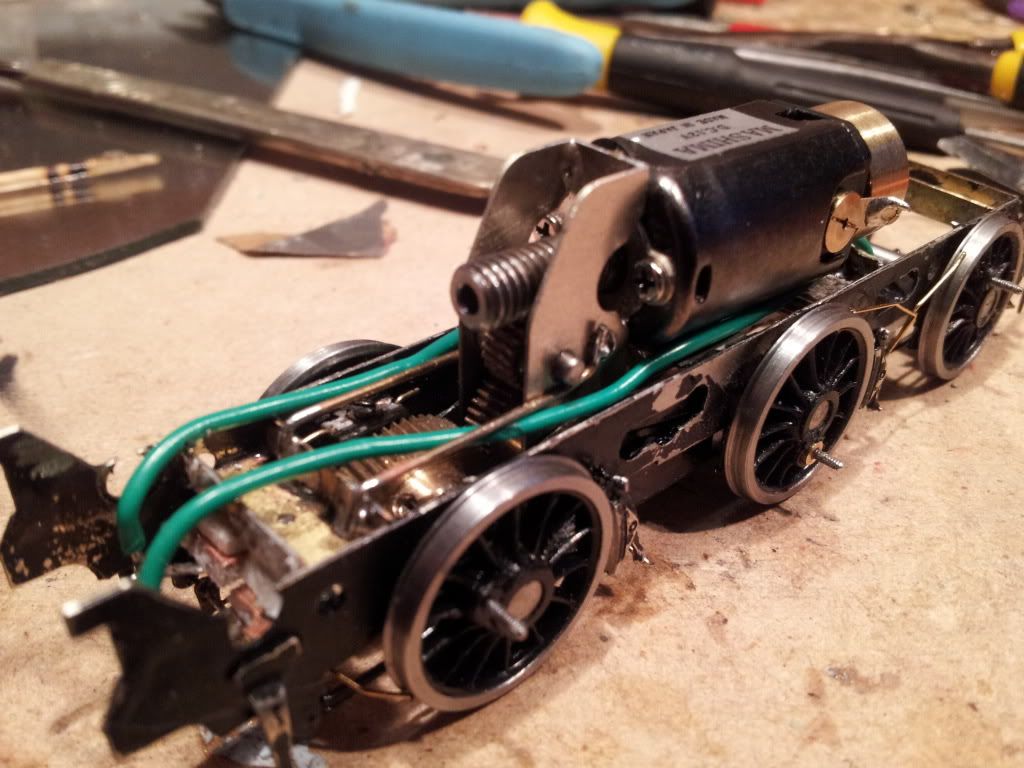
Final picture. I repainted the chassis and added some good old gunk and rust and also the painted the wheels. I do need to touch things up in places and the blue is actually a different shade than what you see here but the unnatural light makes it look wrong.
Image

What you think? Comments good or bad welcome, good critique only helps when implemented. ;)
“He who dares not offend cannot be honest.” Thomas Paine

https://www.sparkshotcustomcreations.com/
Mostly 3D Printed Loco kits etc.

SCC Price list (7/4/22)
https://www.sparkshotcustomcreations.co ... e77d42.pdf

Philip Hall
Posts: 1957
Joined: Mon Aug 10, 2009 7:49 pm

Re: SR 0-6-0 E2 (Extended tank versions)

Postby Philip Hall » Thu Jan 31, 2013 6:09 pm

I too paint chassis by hand to avoid paint getting where it should not be. I assemble the chassis to a complete state including brake hangers but minus brake shoes, pickup mountings but not pickups, then clean it up finally prior to painting. I clean with a wet tissue after every few joints in fact so it doesn't really get very mucky in the first place. Once clean, I take a car of matt black car spray, shaken briefly (doesn't have to be the full two minutes as it doesn't matter if the paint's a bit thin) spray a little into the lid and brush it on. The paint will thicken in the lid as you go so I just add a brushful of cellulose thinners to thin it down again. I only paint where you will be able to see things when it's on the track, there's no need for anything more. The car spray sticks very well to the metal. If the engine is to be heavily weathered I will then give it a thin mix of Humbrol acrylic gunmetal, leather and black.

The wheels will have had the rims chemically blackened, balance weights installed and spray painted - Humbrol acrylic gunmetal in a can usually - away from the chassis before I install the crankpins. After that I assemble wheels and gearbox etc. to what is effectively a completely clean chassis with no soldering detritus or filings around. I try to keep it that way when adding the brakes (which are often chemically blackened apart from the points top and bottom where the hangers and rodding will go) and pickup wires, cleaning up after every joint as above. Once the brake rodding is on it can be painted with the same car spray/brush method. Final weathering is with a brush and Humbrol acrylics once it's tested and finished.

You'll see that I have - mostly - a set of completed components which are finally assembled. I rarely take a chassis apart after it's been built unless I've really done something wrong. Now I appreciate that I have arrived at this approach after many years and which indulges my own preferences for keeping a chassis (and my assembly bench) free from muck and filings, and I can therefore be reasonably confident that it will work. So this might not be an ideal approach as you find your way in this game. But it's one way to go.

Using blocks of wood to assemble a set of frames is perfectly sound. I don't have a chassis jig and so far cannot justify the expense!

Philip
Last edited by Philip Hall on Thu Jan 31, 2013 8:37 pm, edited 2 times in total.

Armchair Modeller

Re: SR 0-6-0 E2 (Extended tank versions)

Postby Armchair Modeller » Thu Jan 31, 2013 6:11 pm

Well done Knuckles - you were very brave to try this as your first P4 loco. It must be very satisfying to see it running, despite the problems. It sounds like you are learning from the experience, so the next one ought to be easier. :thumb

I can't offer you any advice, as I am only just starting my first steam loco chassis, but your efforts ought to be an inspiration to all.

The message I have got from all this is - don't be frightened - have a go!

User avatar
Paul Willis
Forum Team
Posts: 3048
Joined: Sun Jul 20, 2008 6:00 pm

Re: SR 0-6-0 E2 (Extended tank versions)

Postby Paul Willis » Thu Jan 31, 2013 6:54 pm

Armchair Modeller wrote:Well done Knuckles - you were very brave to try this as your first P4 loco.
...
The message I have got from all this is - don't be frightened - have a go!


Hear hear!

You can't say it better than that. Some of the solutions that you have used, like the shape of the pickups look really well engineered, and the safety-first aspect of plasticard to avoid shorts is also very sound.

Above all, you've rolled your sleeves up, got on with it, and actually proved that you can build something in P4. Well done!

Flymo
Beware of Trains - occasional modelling in progress!
www.5522models.co.uk

User avatar
Knuckles
Posts: 1262
Joined: Fri Nov 18, 2011 9:15 pm

Re: SR 0-6-0 E2 (Extended tank versions)

Postby Knuckles » Fri Feb 01, 2013 1:35 am

Thanks guys. The advice on the painting is really good and thorough.

Glad I've inspired some andmany thanks for your kind words. I wouldn't say the pick ups are well engineered mind, just bent 0.3mm brass. Out of the different copper pick up strip shapes I had this instead worked out better.

I have gone a stage back though. The gearbox deteriorated the cog more and flattened out my bodgy repair so much so that AGAIN, like the first gearbox the worm won't mesh anymore. I've just spent an hour bodging the filling with solder and supprise supprise scratch building your own teeth doesn't work well.

At £10-15 or so a shot I really do not want to buy yet a 3rd gearbox, especially while I'm sadly a reluctant Dole Dosser.

Does anyone know where I can just buy a replacement cog with no stupid grub screw or hole IN the teeth? As well as the extra expence I'm not looking forward to dismantling the chassis and ruining the quartering and increasing risk of accidentially totalling everything. If not, any suggestions for an equivalent set up from a different company so I can use drive extender thus avoiding the motor in the cab. It's 1/50 at the mo but I can change ratio a bit if nessasary. Its an E2 loco so nice slow running with a reasonable scale max of 40mph I'm guessing is reasonable. The High Level + seems similar, the '+' example on the sheet suggests a mini drive extender.

:(
“He who dares not offend cannot be honest.” Thomas Paine

https://www.sparkshotcustomcreations.com/
Mostly 3D Printed Loco kits etc.

SCC Price list (7/4/22)
https://www.sparkshotcustomcreations.co ... e77d42.pdf

User avatar
Andy W
Posts: 884
Joined: Thu May 21, 2009 8:11 am

Re: SR 0-6-0 E2 (Extended tank versions)

Postby Andy W » Fri Feb 01, 2013 9:48 am

"How do you know your chassis works with no wheels!!??" I don't bother with wheels. They're over-rated. ;)

No, seriously though, the 0-4-0T chassis is very tight with CSBs; split axles and no room to store a ciggie paper. So I just tested for shirts etc by touching the power leads to the chassis and then the ends of the axles. I was expecting shorting and/or no movement - but the motor ran. I've taken photos which I'm intending to post as a blog soon.

Of course there are still hurdles to clear on my build, namely shorting wheels; quartering; making sure there's clearance between wheels and hornblocks etc etc. But if the motor does't run well before you add the wheels it certainly won't when you do.

It's interesting to read Philip's approach to painting the chassis - when and how you do that is always a worry, even if you've built a few.

I can't help worry about this grub screw in the worm teeth though. I've never come across this. It sounds a very dodgy way to go. I'd suggest High Level gears are the way to go. Build the box first and check at each step all runs well. One step at a time is the way to go.

Well done Knuckles - keep going.
Last edited by Andy W on Fri Feb 01, 2013 1:34 pm, edited 2 times in total.
Make Worcestershire great again.
Build a wall along the Herefordshire border and make them pay for it.

David Thorpe

Re: SR 0-6-0 E2 (Extended tank versions)

Postby David Thorpe » Fri Feb 01, 2013 9:59 am

I (and I think most people here) would echo Ealing's recommendation of High Level gearboxes. There's a very useful gearbox planner on High Level's website which enables you to print out profiles of all the High Level gearboxes. You can then cut them out and see which one will suit. I'd have thought that a RoadRunner+, or possibly a RoadRunner+ with Drive Stretcher, would suit you. You'll also find that Chris Gibbon of High level is extremely helpful if you give him a ring.

DT

User avatar
grovenor-2685
Forum Team
Posts: 3923
Joined: Sun Jun 29, 2008 8:02 pm

Re: SR 0-6-0 E2 (Extended tank versions)

Postby grovenor-2685 » Fri Feb 01, 2013 12:08 pm

But seeing as you have already bought 2 gearboxes from Comet and they supplied these dodgy gears that are not fit for purpose. I would start by asking them for a couple of replacement gears that do not have this offending grubscrew arrangement.
Keith
Regards
Keith
Grovenor Sidings

User avatar
Knuckles
Posts: 1262
Joined: Fri Nov 18, 2011 9:15 pm

Re: SR 0-6-0 E2 (Extended tank versions)

Postby Knuckles » Fri Feb 01, 2013 1:00 pm

Thanks for your replies guys, I've took Keith's advice and just sent an email detailing the problem and requesting new gears that don't have a grub / hole. I doubt they exist but you never know. I think if that doesn't work out I'll jump on the High Level bandwagon. Seems to be a 90% collective opinion rate on that.
“He who dares not offend cannot be honest.” Thomas Paine

https://www.sparkshotcustomcreations.com/
Mostly 3D Printed Loco kits etc.

SCC Price list (7/4/22)
https://www.sparkshotcustomcreations.co ... e77d42.pdf

User avatar
Paul Willis
Forum Team
Posts: 3048
Joined: Sun Jul 20, 2008 6:00 pm

Re: SR 0-6-0 E2 (Extended tank versions)

Postby Paul Willis » Fri Feb 01, 2013 1:25 pm

DaveyTee wrote:I (and I think most people here) would echo Ealing's recommendation of High Level gearboxes. There's a very useful gearbox planner on High Level's website which enables you to print out profiles of all the High Level gearboxes. You can then cut them out and see which one will suit. I'd have thought that a RoadRunner+, or possibly a RoadRunner+ with Drive Stretcher, would suit you. You'll also find that Chris Gibbon of High level is extremely helpful if you give him a ring.

DT

A small but important point to mention is that any of the + ("plus") marked gearboxes have a swinging final drive, mounted in a cradle.

This is enormously useful in getting an effective and concealed fitting. For a very small cost more - a quid over the fixed versions I think - it is many, many times more valuable.

HTH
Flymo
Beware of Trains - occasional modelling in progress!
www.5522models.co.uk


Return to “Steam Locomotives”

Who is online

Users browsing this forum: ClaudeBot and 1 guest