SR 0-6-0 E2's - Latest build complete with Video Operation

User avatar
Knuckles
Posts: 1262
Joined: Fri Nov 18, 2011 9:15 pm

SR 0-6-0 E2's - Latest build complete with Video Operation

Postby Knuckles » Mon Jan 14, 2013 11:36 am

As some of you may know, I'm going to try to build two LBSCR E2 locomotives, the first one as a straight E2, and the second as a slight kitbash. Both are going to be an enathema to some of you as I'm basing them on 'Thomas', but hopefully in a way more realistic than may have been seen before.
I've only built one working locomotive before and that was a fixed axle 0-6-0 in 00. It ran but not brilliantly, it sometimes derailed on the straights and was sometimes jerky at slow speeds, ergo, I have next to no experience. I'm comfortable soldering and bashing things, but getting a chassis to run well is something I fear greatly, especially when one consideres the cost of kits and components; not great if you make a boo boo of it all. Any advice I greatly welcome, and as usual I'll be documenting the progress in this thread. This time I'm going to try to do it with hornblocks.
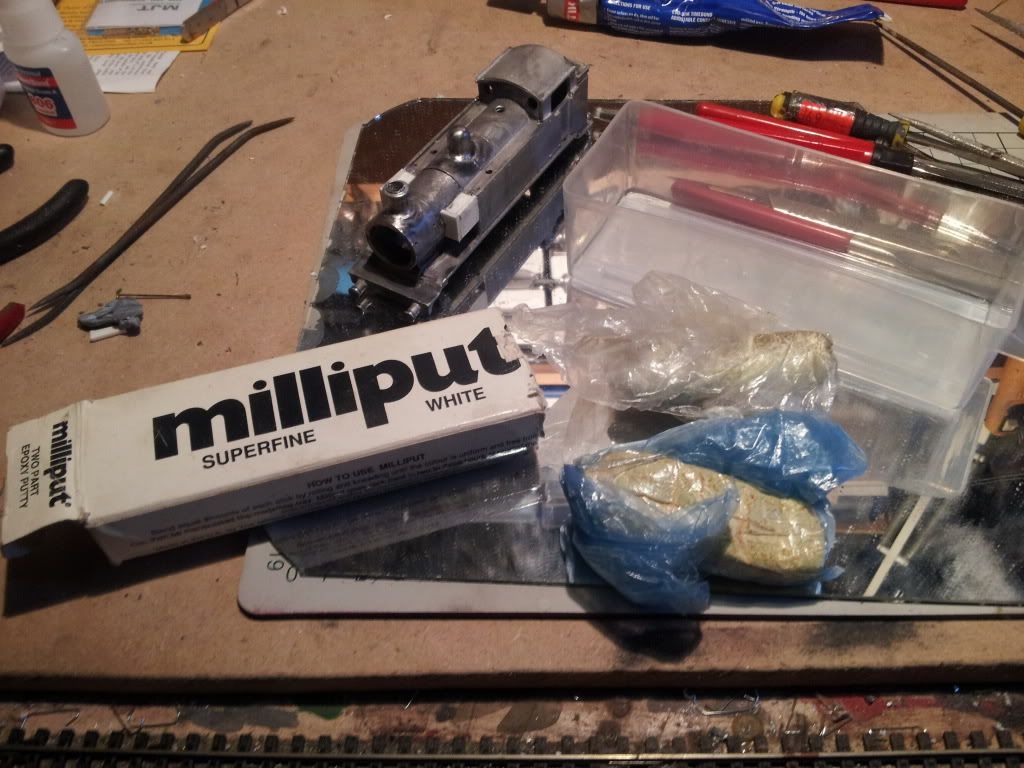
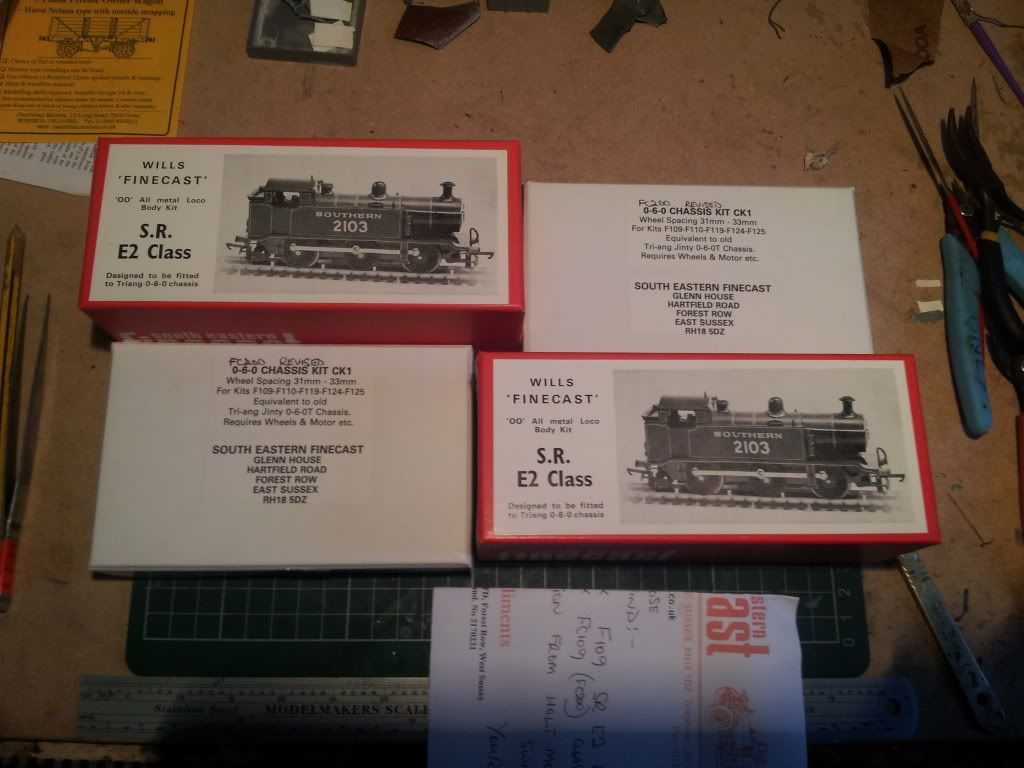
Kits arrived today, proof....

Image

After haveing a quick look through it seems I need to make my own tank extensions. Not happy about that at all, I was hoping not to have to kit bash until the 2nd model. Considering there were only 10 Real E2's and half of them had bigger tanks you would have thought they would be supplied in the kit as optional parts, but no.

The chassis needs little bits removed for the E2, just a warning.

Also I need to buy is motors and gearboxes for both of them but that's why I waited so I can now asses what to buy, suggestions welcome.

Wheels, axles, crankpins, P4 spacers, better buffers etc I already have recieved in post.
Last edited by Knuckles on Sat Mar 17, 2018 3:22 pm, edited 2 times in total.
“He who dares not offend cannot be honest.” Thomas Paine

https://www.sparkshotcustomcreations.com/
Mostly 3D Printed Loco kits etc.

SCC Price list (7/4/22)
https://www.sparkshotcustomcreations.co ... e77d42.pdf

Armchair Modeller

Re: SR 0-6-0 E2 (Extended tank versions)

Postby Armchair Modeller » Mon Jan 14, 2013 12:02 pm

Good luck, Knuckles! I can't really offer any reliable advice, but the chassis seems to be the main challenge.

I see lots of advice on the horizon telling you to buy numerous elaborate jigs, expensive components and other equipment, or you will never get it to work. ;)

I do hope you resist strongly - it ought to be possible to do this without spending the equivalent cost of a new car. ;)

User avatar
Knuckles
Posts: 1262
Joined: Fri Nov 18, 2011 9:15 pm

Re: SR 0-6-0 E2 (Extended tank versions)

Postby Knuckles » Mon Jan 14, 2013 1:52 pm

Well, I've thought of buying one of those jigs, two come to mind that seem popular, but I signed on to jobseekers today and am rapidly loosing money. I also just before posting this spent a while measuring with the rule and comet gearbox acetate planner. Just over £75 from Mainlytrrains.com on 2 motors, 2 gearboxes and 2 flywheels. :P :( That's not counting everything else like the kits, chassis, wheels etc etc that I already got. You know how it is.

Not a cheap hobby is it? :shock: :?

But, I'm just going to take it real slow and hopefully, hopefully hopefully not make a royal mess of it all.

I'm debating weather I should build the body now or later. ?
“He who dares not offend cannot be honest.” Thomas Paine

https://www.sparkshotcustomcreations.com/
Mostly 3D Printed Loco kits etc.

SCC Price list (7/4/22)
https://www.sparkshotcustomcreations.co ... e77d42.pdf

Philip Hall
Posts: 1954
Joined: Mon Aug 10, 2009 7:49 pm

Re: SR 0-6-0 E2 (Extended tank versions)

Postby Philip Hall » Mon Jan 14, 2013 2:56 pm

I would always build the chassis first, checking the fit of the footplate casting on the assembled frames as you go. It is not fun hacking lumps out of a body to try and get it to fit the frames. However, as it's SE Finecast, it should go together OK, even if the chassis is designed for different engines.

I agree about the chassis jig, have a go first and get the feel for the work before spending that kind of money.

Philip

Armchair Modeller

Re: SR 0-6-0 E2 (Extended tank versions)

Postby Armchair Modeller » Mon Jan 14, 2013 3:36 pm

Sorry to hear about you having to sign on, Knuckles. You are right that it can quickly become a very expensive hobby. Take a long-term view though and I reckon it is very good value for money, for the time it fills and the pleasure it gives.

If it helps, you really can sometimes pick up bargains on Ebay. I got a Comet gearbox for my J72 chassis for under 3 quid a few months ago.

I reckon the main thing with my first loco or two is just to get it working reasonably well - you can worry about refinements to make future ones go even better when you have a bit of experience. Even if you mess up the first chassis, it would not be too expensive to buy another.

I am about to start work on my J72 chassis and have the Wantage manning Wardle to do too. The J72 is already designed with a sprung chassis in mind, so is unlikely to compare with what you have to do with your 2 locos. The Manning Wardle will be similar to what you have to do though - I will have to buy and fit hornblocks etc. Maybe if I get a move on with the J72, I could have a go at my Manning Wardle in parallel with you doing your locos. We could then compare notes and ideas as we go along - if you have the patience to wait a few weeks, that is ;)

User avatar
Knuckles
Posts: 1262
Joined: Fri Nov 18, 2011 9:15 pm

Re: SR 0-6-0 E2 (Extended tank versions)

Postby Knuckles » Tue Jan 15, 2013 2:01 am

I haven't ignored your posts you two, but I started before I seen them, so I started on the body. Just hope it doesn't bite me in the bum. :?
Erm, you said the Finecast kit should go together fine...I wish it did.

First off, lets just say you need to be prepared to do ALOT of remedial work, and I don't mean just the flash. The kits has loads of flash, but I'm about 70% through building the body and NO components fit without severe filing, and I do mean severe. Ive been on it 6 or 8 hours today and I'm convinced that I could have done it in 2 hours if the peices actually fit together properly...we are talking a full 1mm too much casting in some areas I kid you not. I battle on and pick up experience along the way.
To be fair, the kit is very old and maybe the tooling could do with being updated or something, I don't think it'd badly designed or anything but it isn't impressing me much in the buildability department, gimmi etches anyday. I don't know if this is normal for white metal kits as my only experience with them is detailing parts, but whatever, I'm determined not to let it win. Oh yeah, the hand rail pillars have been drilled out on the half indented guide holes...but they don't all register, neither are the dome and chimney holes central. :shock: So how can I say the kit is accurate? I don't want to slate it but I'm finding it hard not to.

The instructions keep talking about glue but I decided to ignore that and just get my 70 degree solder out. My iron is variable from 200-450c, so I set it to 200. So far I've found it to be perfect, melts the solder, Carrs Green flux to flow and so far no holes in the castings or self formed sculptures, and I have diddled around with the tip a bit. Maybe I'm just lucky.

1st picture. Like a deranged eliphant I took this picture thinking how successful I was....then noticed I put the bufferbeam on the wrong end. :x Tit.
Image

Sorted.
Image

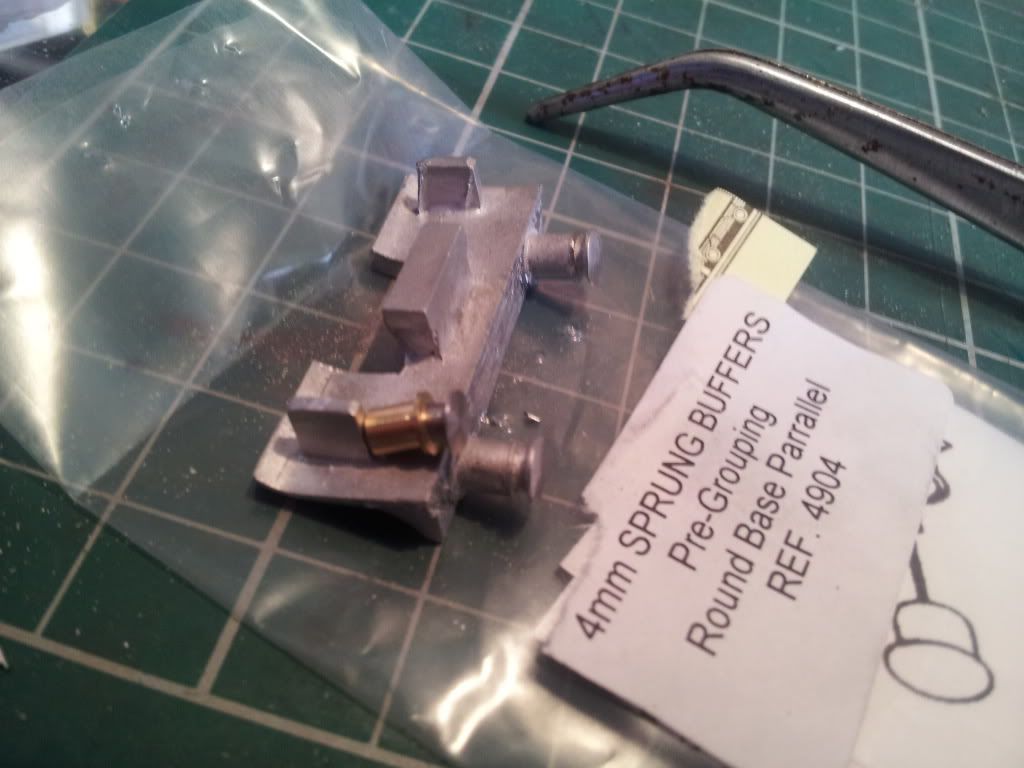
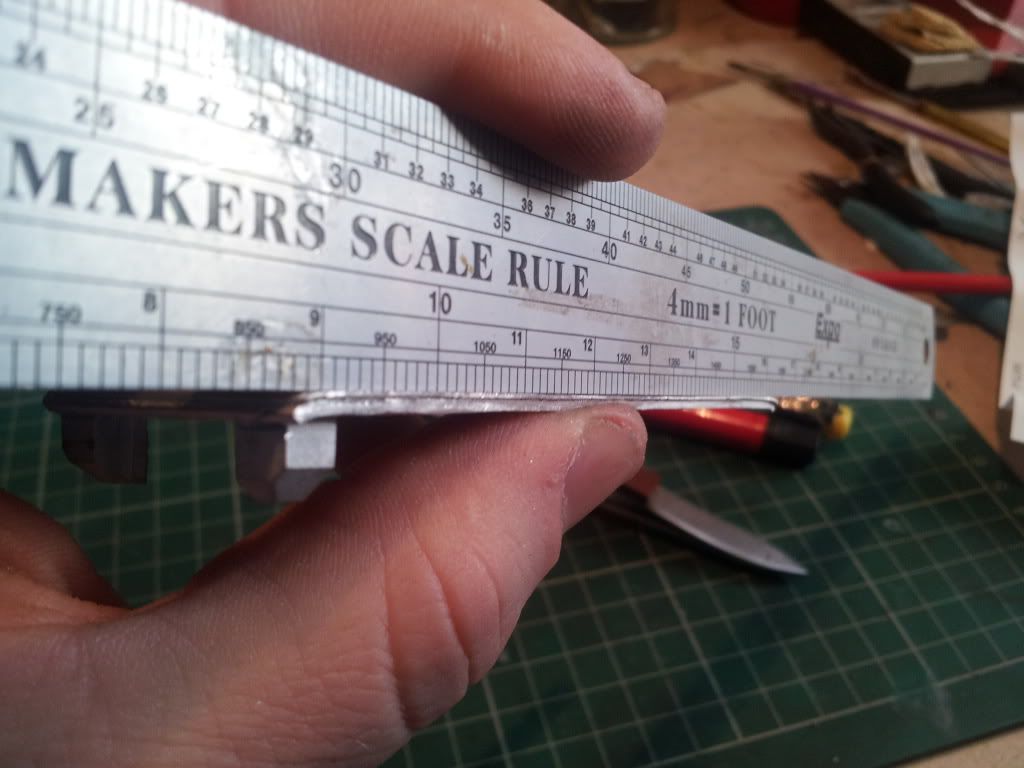
I ordered some sprung buffers from Alan Gibson but wern't sure if they were the right ones or not. They look smaller here in this pic and I was going to ask your opinion, but since looking at prototype E2 photographs they indeed are smaller than the height of the bufferbeam, whereas the caseted buffers are as deep as the buffer beam, ergo, the casted one are likely a shade too big, plus one buffer on each beam is casted at a funny angle. :? Think I'll replace them with these brass efforts.
Image

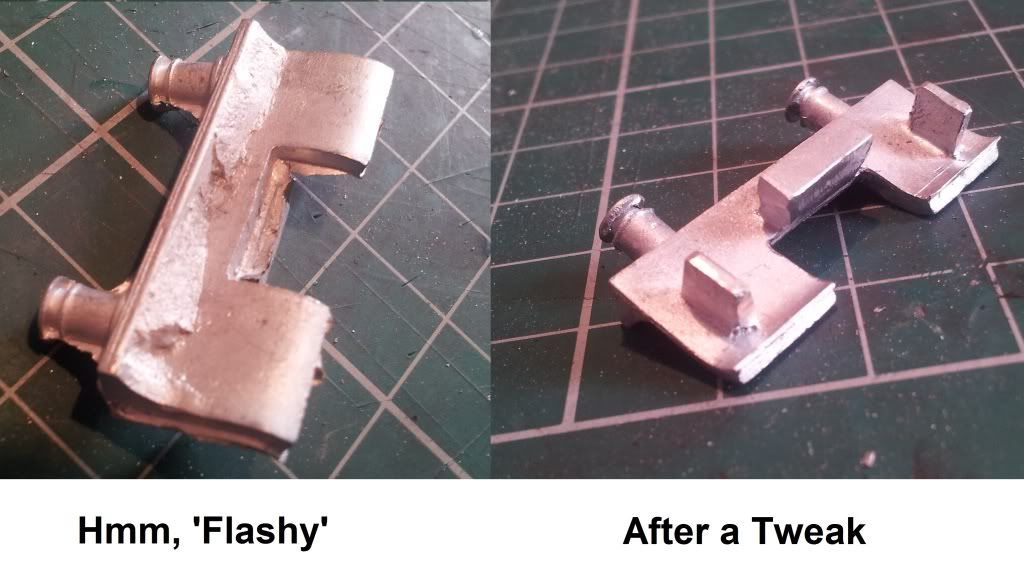
The running plate looked more like a bananna. I had to bend it alot. Stil isn't 100% perfect now but I've done the best I can.
Image

An idea of the flash level
Image

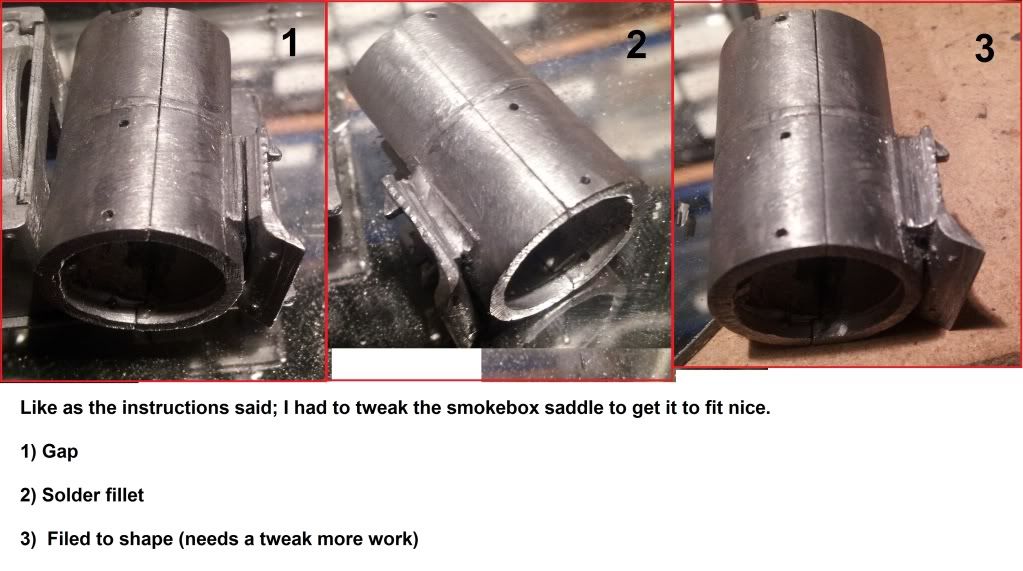
The smokebox wouldn't fit on properly and I think I' spent at least 2 hours pidelling with it. The saddle needed bashing and the instructions said this too. So the pictures tell the story. It still isn't perfect in my opinion but again, I've done the best I can. The gap I will have to fill.
Image

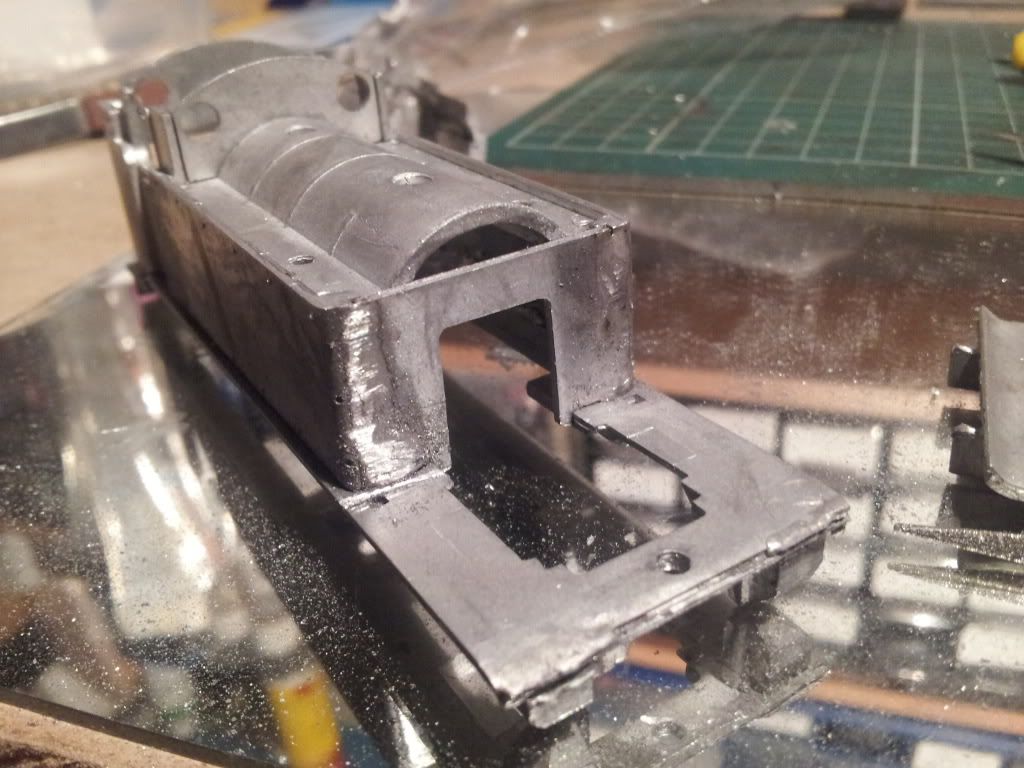
Tank fronts. I filled the gap with solder then this picture shows it half way to being filed smooth.
Image

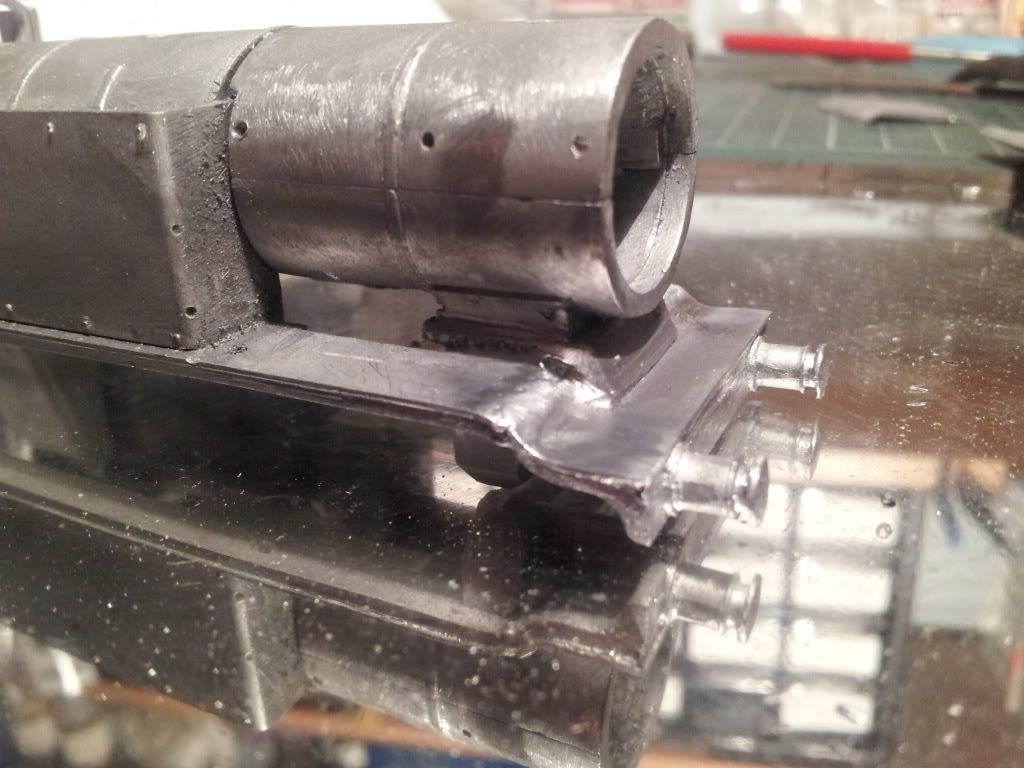
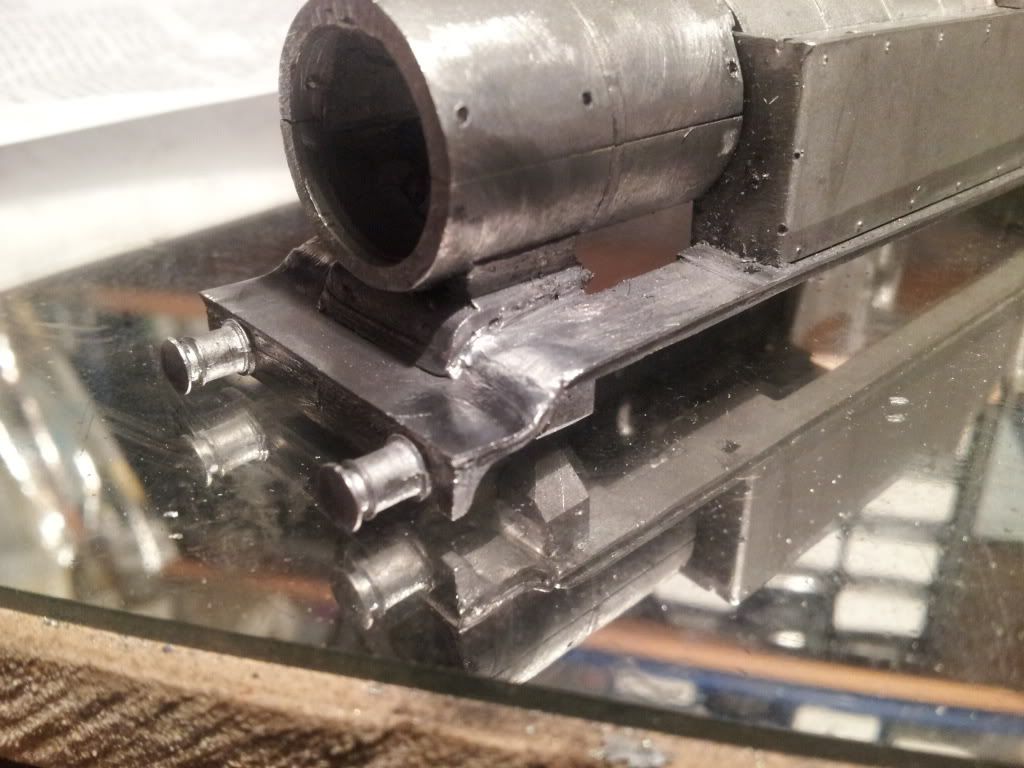
Every E2 kit I've seen has a join mark at the front curve. I'm trying not to follow suit. The last two pics show the same method. Solder fillet and shaped afterwards, although it needs a little bit more work still. Massive gap as it joins the tank covers needs filling - this was due to me having 2 or so hours trying to get it to fit properly.
Image
Image

Ok, that's it for now. Comments welcome. :)
“He who dares not offend cannot be honest.” Thomas Paine

https://www.sparkshotcustomcreations.com/
Mostly 3D Printed Loco kits etc.

SCC Price list (7/4/22)
https://www.sparkshotcustomcreations.co ... e77d42.pdf

Armchair Modeller

Re: SR 0-6-0 E2 (Extended tank versions)

Postby Armchair Modeller » Tue Jan 15, 2013 10:05 am

Well done for starting so enthusiastically! There must have been something in the air yesterday, as I got some bridge parts in the post and just couldn't resist having a go as soon as I could too ;)

The body looks like it will need a lot of remedial work to get it looking really good - gaps to fill, thinning over-thick parts and unwanted bits to remove. That is what will probably make the difference between a toy-like appearance and a quality model - well worth taking your time over and carefully studying photographs.

Good luck!

User avatar
Andy W
Posts: 884
Joined: Thu May 21, 2009 8:11 am

Re: SR 0-6-0 E2 (Extended tank versions)

Postby Andy W » Tue Jan 15, 2013 3:04 pm

I'm not sure how many of the components you've glued/soldered together yet, but I'd echo Philip's earlier post. Get your chassis built first. Rather than splash out on an expensive jig, get some simple hornblock jigs (I think London Road Models do them via the S4 site). It's a pig to find where a body is fouling the wheels once it's built - especially a white metal one.
Make Worcestershire great again.
Build a wall along the Herefordshire border and make them pay for it.

User avatar
Knuckles
Posts: 1262
Joined: Fri Nov 18, 2011 9:15 pm

Re: SR 0-6-0 E2 (Extended tank versions)

Postby Knuckles » Tue Jan 15, 2013 11:21 pm

Thing is I already started the superstructure as seen by above post.. :? So I can't really undo starting it.

I've had to do hours and hours of remidial filing anyway so if I do get trouble and have to tweak it will be normal.

What are these jigs u speak of? What do they do. I'm interested definetly. :) Don't think I have heard of those before.
“He who dares not offend cannot be honest.” Thomas Paine

https://www.sparkshotcustomcreations.com/
Mostly 3D Printed Loco kits etc.

SCC Price list (7/4/22)
https://www.sparkshotcustomcreations.co ... e77d42.pdf

User avatar
Horsetan
Posts: 1384
Joined: Tue Jul 29, 2008 9:24 am

Re: SR 0-6-0 E2 (Extended tank versions)

Postby Horsetan » Tue Jan 15, 2013 11:37 pm

Knuckles wrote:Thing is I already started the superstructure as seen by above post.. :? So I can't really undo starting it.....


Build first. Ask questions later. ;)
That would be an ecumenical matter.

User avatar
grovenor-2685
Forum Team
Posts: 3923
Joined: Sun Jun 29, 2008 8:02 pm

Re: SR 0-6-0 E2 (Extended tank versions)

Postby grovenor-2685 » Tue Jan 15, 2013 11:48 pm

What are these jigs u speak of? What do they do. I'm interested definetly.

http://scalefour.org/LondonRoadModels/images/alignmentjig.jpg
Allows you to set up your frames and coupling rods to match.
Regards
Keith.
Regards
Keith
Grovenor Sidings

User avatar
Knuckles
Posts: 1262
Joined: Fri Nov 18, 2011 9:15 pm

Re: SR 0-6-0 E2 (Extended tank versions)

Postby Knuckles » Wed Jan 16, 2013 12:27 am

Ahh, those. Yes I'd very much like some. Could you point me in the right direction please. I looked at the S4 stores as is suggested but didn't see them.

Edit: Have found LRM's website. Didn't know they had a new one. I haven't seen what you shown on their product list though.
“He who dares not offend cannot be honest.” Thomas Paine

https://www.sparkshotcustomcreations.com/
Mostly 3D Printed Loco kits etc.

SCC Price list (7/4/22)
https://www.sparkshotcustomcreations.co ... e77d42.pdf

User avatar
RobM
Posts: 1091
Joined: Sun Feb 15, 2009 4:39 pm

Re: SR 0-6-0 E2 (Extended tank versions)

Postby RobM » Wed Jan 16, 2013 6:55 am


User avatar
Mike Garwood
Posts: 618
Joined: Sun Aug 03, 2008 4:51 pm

Re: SR 0-6-0 E2 (Extended tank versions)

Postby Mike Garwood » Wed Jan 16, 2013 1:31 pm

WOW, what a job that kit is!! Well done on 2 fronts, sticking with the task at hand and secondly making such a good job of getting it together! Seeing you making the most out of an old kit is quite inspirational, reminds me of the Falcon Brass County I've built, there isn't much of the falcon brass kit left once I'd started it. But old kits such as these stand us in good stead to acquire skills needed. It also makes me appreciate today's kit designers...Mr Mitchell, Mr Finney, Mr Geen and Mr Higgs, to name but a few.
Crack on mate, crack on. Excellent stuff.

Mike

User avatar
Knuckles
Posts: 1262
Joined: Fri Nov 18, 2011 9:15 pm

Re: SR 0-6-0 E2 (Extended tank versions)

Postby Knuckles » Wed Jan 16, 2013 5:57 pm

Thanks RobM, will be ordering tomorrow I think. :)

And thanks Mike. :) Indeed I'm trying to keep the same attitude that it will only help me aquire more skill. When I was in the Army we had a motto; Train Hard Fight Easy, and I guess it's the same with anything really. I did consider the kit is I think 40+ years old? I don't think it's badly designed but I am thinking that maybe the tooling or castings need redoing...or something. Almost nothing fits without serious work, and as a result getting everything square is hard, some places look abit...'off' :( Is this how most old ones are then? Seems i've brought nostalgia to you. :D My turn to learn the hard ones I guess.

Ok then, an update...

I added the chimney and dome. This wasn't the easiest thing do do becasue the pre drilled holes on the boiler were not in the right place, and the pip in the castings wern't in the center either. I did try aligning them ofset but it didn't work so I cut and smoothed the pips off. On the dome before I even deflashed it, there was a small chunk missing and when I tryed to sort that the metal was so thin it flacked away leaving a nice gap. Brilliant.

The chimney I couldn't put on perfectly straight becasue it looked a tad odd due to my skill lack with the rest of the kit (or the kit itself? LOADS of remidial shaping and pidelling nessasary), so I purposely put the chimney on at the slightest angle because this looks more acceptable at most angles; if that even makes sence, can always resolder and position it if nessasary anyway. Brilliant 2. :?

I soldered them both on, and where the dome had a chunk missing a blob of solder then sculpted procured the cure.
I also added the cab - this went on perfectly with next to no cleaning up, even the thinest beading strip around the cab opening lined up properly. Why couldn't the whole kit?

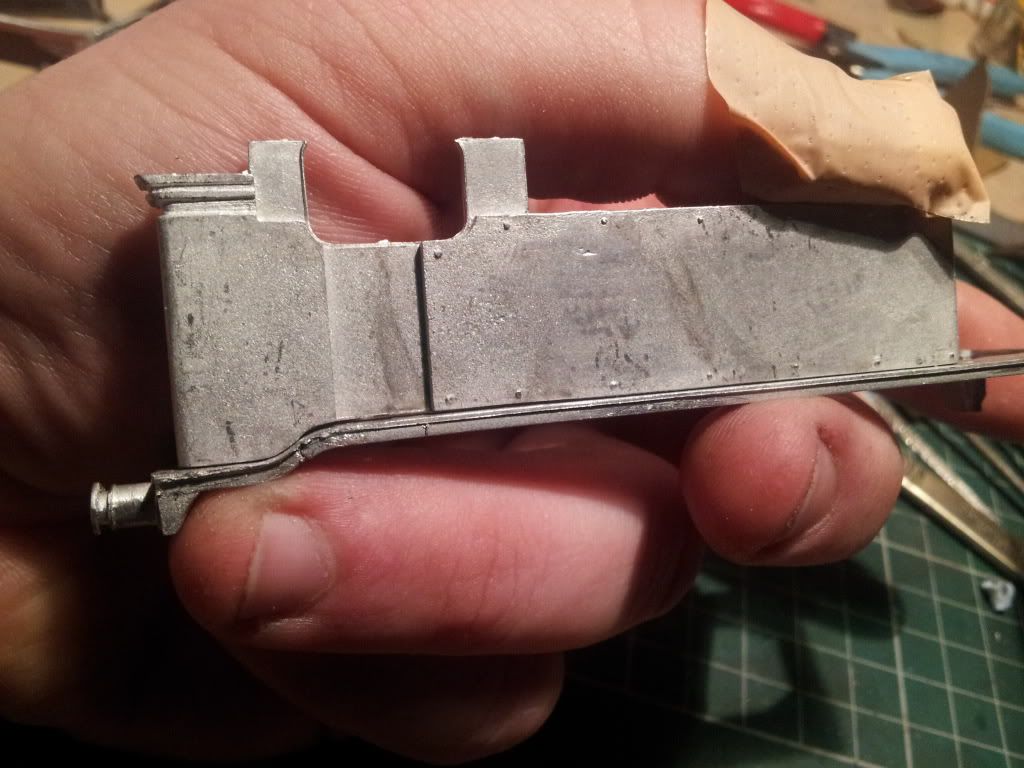
I picture I forgot to show you on previous post. This shows a massive gap, and this is after an hour or so of fettleing, so it was much worse.
Image

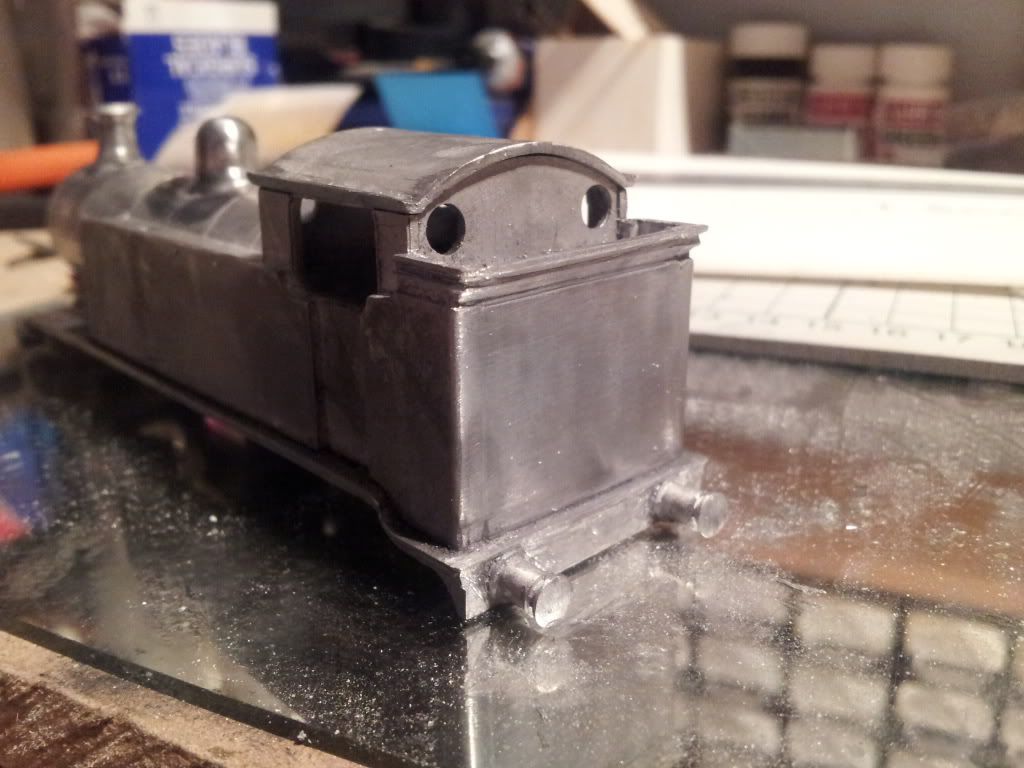
After fitting the bunker back there were two join marks either side almost a full 1mm. This join mark also went through to the coal rails so the cure was much solder blobbed in and then filed smooth. The coal rails had to be reprofiled but a thin file made short work of this.
Image

Small note about the coal rails. I did think they looked rather think and clumsy so was thinking of scratchbuilding them out of brass, but after looking at prototype photographs it seems most of them (not all) actually did have this thicker 'filled in / no gap' design....so i'm leaving them as they are.

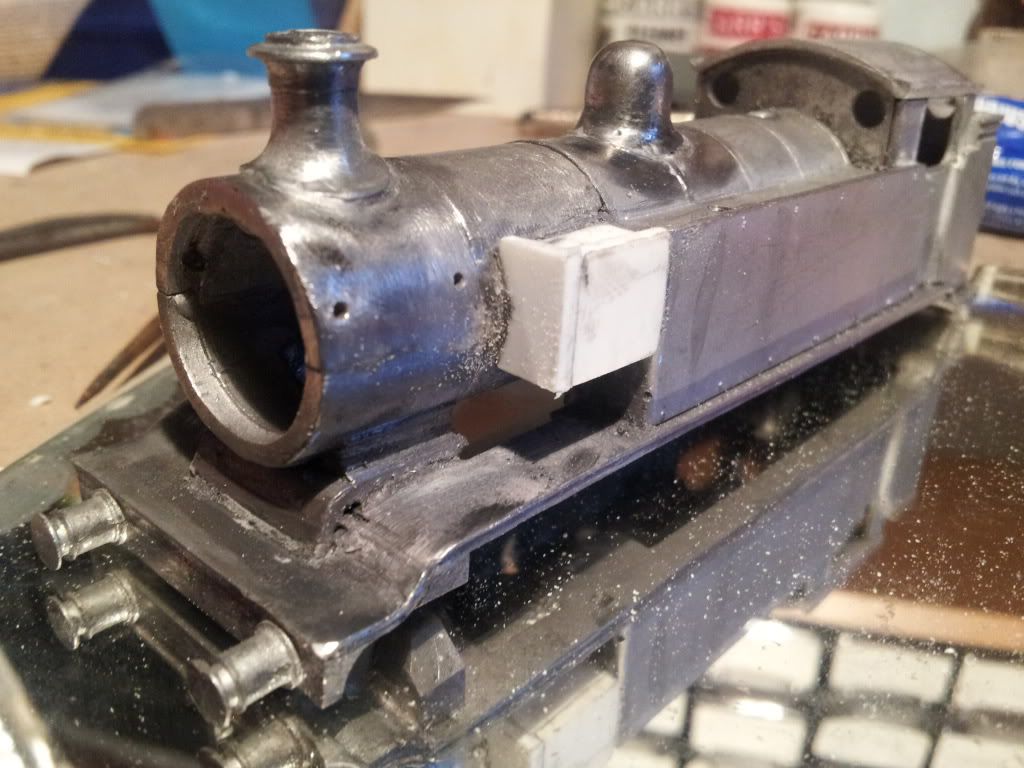
Extension bashed from plastic card. The main rectangle, two bits inside and some wood for strength, and a cap on the front. Glued with Evo-Stick and then later Powerbond 806 Industrial Superglue for the thin gaps. It will be shaped better later.
Image

Ello Mr Milliput, arr lyke you, your my fwend. Seriously, I love the stuff. :thumb
Image

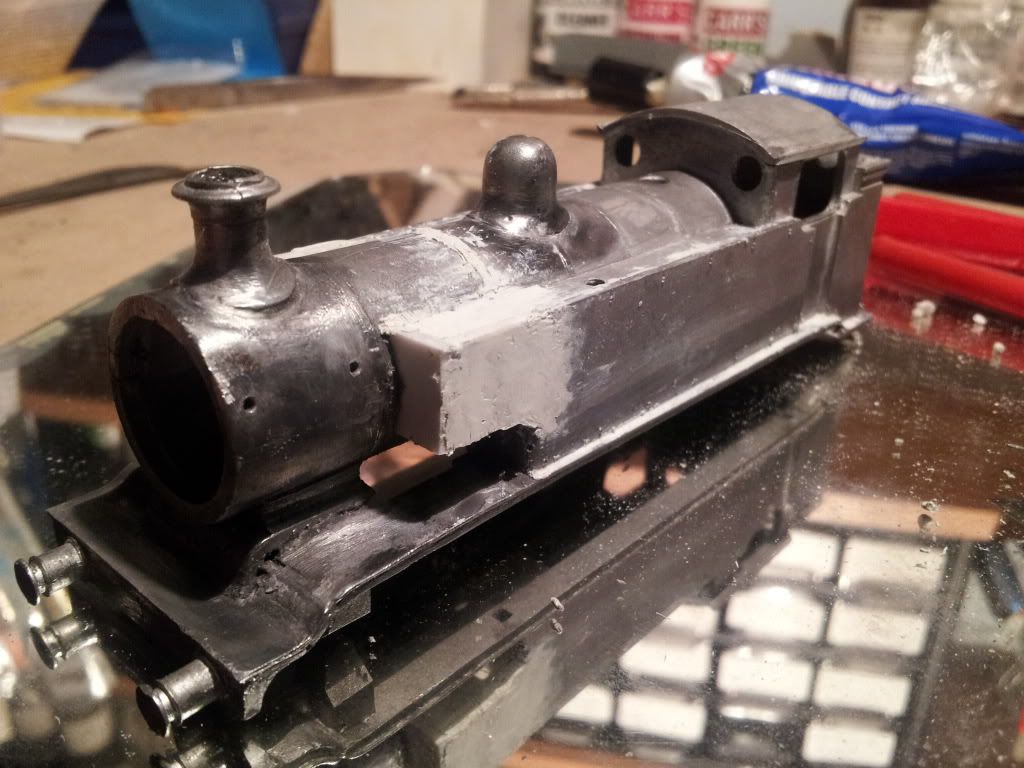
Before application I shaped the tank sides better and cut them back a bit so they are about 1mm before the rear smokebox join/band. Most photographs seem to show this. The curves are also roughly moulded along with gaps in other areas filled. Once dry it's smooth and shape time.
Image

Motor and Gearbox arrived today but I tihnk I'm going to buy that bearing & coupling rod jig from London Road Models first. Seems a really good idea after what you guys said, I'm all for getting the right tools for the job if I can. 8-)


EDIT: Oh yeah, something I forgot to mention. I did actually add smokebox hand rail with two pillars instead of 3 due to the tanks, but then realised that most photographs show the rear part actually extends past the pillar to the tanks. They were glued in with that deicent superglue I mentioned above. After failing miserably at pulling them out with pliers the heads rounded off and I was left with a lump. "AH, Buggeur, now what?" After filing them smooth I had some beautifull brass circles inplace of much needed holes! I did try pin pointing them with the Swan Morton to give a dimple to drill through, but my drill perpetually just slipped off, so after some head scratching I driled two holes adjacient to the half hand rail pillars enough to wiggle them out. This mess was then filled in with solder and holes driled through the solder. Sorted! :D


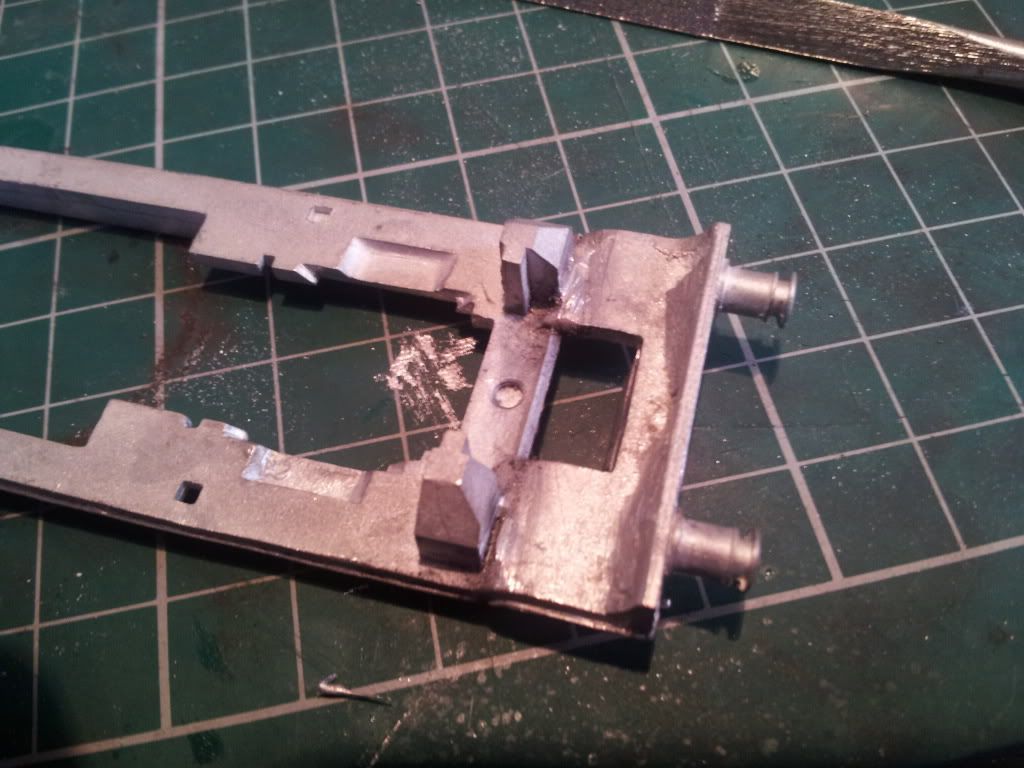
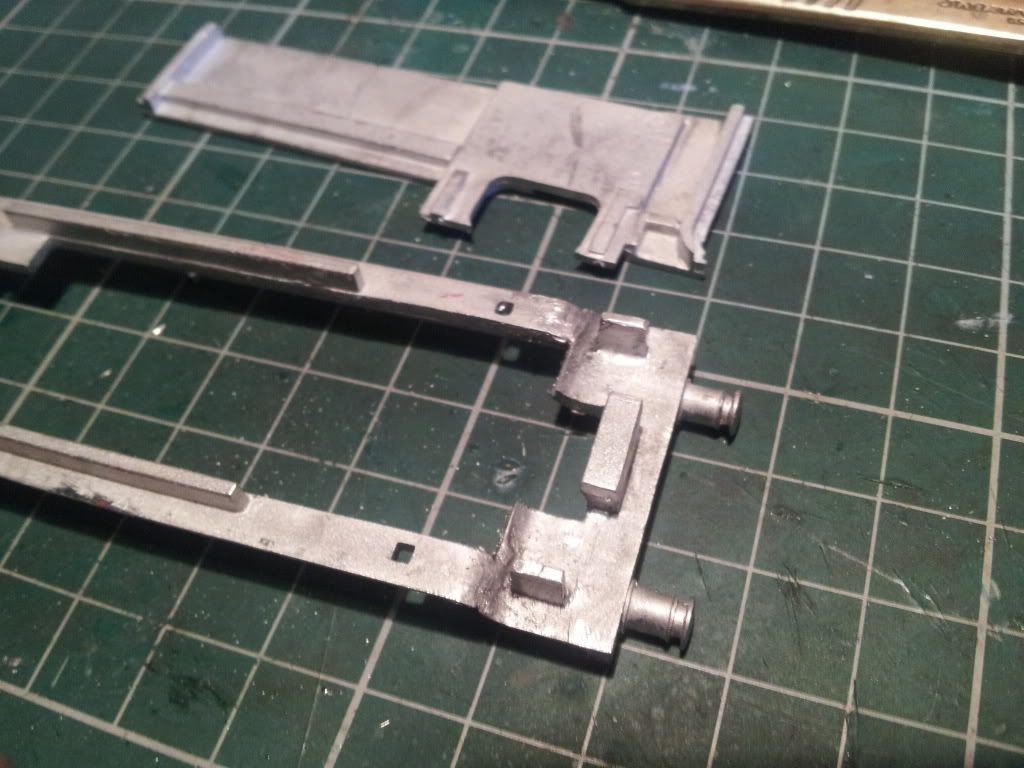
EDIT 2: I've ben looking and reading the chassis instructions and thought I'd remove the bits you don't need in preparation, half etched lines. Chassis designed for more than one loco and it's nickel silver. I initiall thought, "Ok I'll cut it with 20 or strokes of the scalpel blade" but this harder metal is really killing my blades.. On number 2 currently so it's a good job I have a 100 pack. I know or guess this isn't the 'proper' way to do it but I daredn't drill two holes then get a blade between them because I'm scared of bending the fret - must stay super flat.

Any ideas? :? I am getting through but it's taking so long it isn't funny.

EDIT 3: Ok, I managed to get throuh the straights but the corners I can't. Also on blade 3! I've kept them to the side as they are new minus the tips.
Submitted and got the drill out. Holes done, but need to find way of bridging gap without bend. Drill grinders possibly.
“He who dares not offend cannot be honest.” Thomas Paine

https://www.sparkshotcustomcreations.com/
Mostly 3D Printed Loco kits etc.

SCC Price list (7/4/22)
https://www.sparkshotcustomcreations.co ... e77d42.pdf

User avatar
Knuckles
Posts: 1262
Joined: Fri Nov 18, 2011 9:15 pm

Re: SR 0-6-0 E2 (Extended tank versions)

Postby Knuckles » Thu Jan 17, 2013 9:56 pm

Ok, took the plunge. Drilled holes out and filed them to shape, used etch sheares to clip other bits out of the way and then with pliers wiggled them free. Sheares sometimesd bend the etch - not good. Hornblock rectangles removed by clipping the top and bottom part, bending them out sideways and again, wiggeling them free. After all this I had to gently bend, squeeze and tweak the frames to remove bends. :( Was my fear, just hope they will be ok, the look straight again but I don't know what tollerance they really have.
“He who dares not offend cannot be honest.” Thomas Paine

https://www.sparkshotcustomcreations.com/
Mostly 3D Printed Loco kits etc.

SCC Price list (7/4/22)
https://www.sparkshotcustomcreations.co ... e77d42.pdf

Armchair Modeller

Re: SR 0-6-0 E2 (Extended tank versions)

Postby Armchair Modeller » Thu Jan 17, 2013 10:49 pm

I think we all need a stiff whisky after reading your exploits so far - maybe one would not be enough. This is probably a whole new horizon for most people working in P4. Your latest graphic description surpasses anything ever seen on this forum before ;)

Please don't take me too seriously - apart from the last bit, anyway!

Usually, I believe, the hornblock gaps are made over-size to allow a bit of room for manoeuvre when installing the hornblock guides. The jigs you asked about from London Road Models are used to get the hornblocks in the correct position, using the coupling rods as a guide.

Have you decided what hornblocks and gearbox you are using - or indeed what form of suspension you plan to use? You won't be able to go much further with the underframe until you have the components for this and the jigs.

User avatar
Knuckles
Posts: 1262
Joined: Fri Nov 18, 2011 9:15 pm

Re: SR 0-6-0 E2 (Extended tank versions)

Postby Knuckles » Thu Jan 17, 2013 11:10 pm

Your latest graphic description surpasses anything ever seen on this forum before


Which?? ;)

Armchair Modeller wrote:I think we all need a stiff whisky after reading your exploits so far - maybe one would not be enough. This is probably a whole new horizon for most people working in P4. Your latest graphic description surpasses anything ever seen on this forum before ;)

Please don't take me too seriously - apart from the last bit, anyway!

Usually, I believe, the hornblock gaps are made over-size to allow a bit of room for manoeuvre when installing the hornblock guides. The jigs you asked about from London Road Models are used to get the hornblocks in the correct position, using the coupling rods as a guide.

Have you decided what hornblocks and gearbox you are using - or indeed what form of suspension you plan to use? You won't be able to go much further with the underframe until you have the components for this and the jigs.


Other than the jigs which are on their way I think I have everything. Wheels, axles, gearbox, motor, flywheels etc. I think the flywheel might be in the cab mind. :P Paint it black! I might be able to get it in the boiler the other way if I thin the insides though. Pretty sure of that.

I'm going to use the Mashima 1624 with a GB1 gearbox from Comet Models. A tweak big I think but the acetate sheet seemed to be happy. Offering it up to the model seems ok.

Talking of whisky pointers; I just lobbed off overly big and crude buffers and thought I'd put the sprung ones on. The sprung ones have a little cap that you solder to the back of the buffer - no problem, except...I accidently sacrificed ione of them to the 'Great Carpet God' I keep reading about. :(
So that's another £5 or 10 I need for a replacement set. I might bash my own.

Whisky pointer 2. The set comes with no back plate (the plate that goes on the buffer beam) and the whitemetal ones are way too big plus already filed away- so I'm going to have to scratch build some brass plates now too. YAWN!
“He who dares not offend cannot be honest.” Thomas Paine

https://www.sparkshotcustomcreations.com/
Mostly 3D Printed Loco kits etc.

SCC Price list (7/4/22)
https://www.sparkshotcustomcreations.co ... e77d42.pdf

Armchair Modeller

Re: SR 0-6-0 E2 (Extended tank versions)

Postby Armchair Modeller » Thu Jan 17, 2013 11:30 pm

Glad you didn't take my initial comments the wrong way ;)

My main query was what type of suspension you plan to use - and what hornblocks? Do these come with the chassis kit, or have you bought some in as an extra?

User avatar
Will L
Posts: 2527
Joined: Sun Jul 20, 2008 3:54 pm

Re: SR 0-6-0 E2 (Extended tank versions)

Postby Will L » Thu Jan 17, 2013 11:54 pm

Knuckles wrote:..I accidently sacrificed one of them to the 'Great Carpet God' I keep reading about. :(
So that's another £5 or 10 I need for a replacement set.


You clearly haven't spent enough time on your knees yet.

Will

User avatar
Knuckles
Posts: 1262
Joined: Fri Nov 18, 2011 9:15 pm

Re: SR 0-6-0 E2 (Extended tank versions)

Postby Knuckles » Fri Jan 18, 2013 1:12 am

Lol, Yeah, I don't think I'm getting it back sadly; it/he seems happy.

I found the whisky thing funny, but also true. I like to model with a drink but more than 2 and I'm inclined to have dumbo moments so I usually leave it at that.

The chassis has the rectangle horn guide things half etched and now after a worrying struggle they are removed. I brought hornblocks from mainly trains and these have individual springs and screws. There are also long brass rods in the pack so I'm guessing its geared for CSB too. I want to try single springs though.

With these jigs we keep on about will they still make a difference because these horn positons are already determimed by the etch. (unless we are talking about minimal deviations within -I know not)
“He who dares not offend cannot be honest.” Thomas Paine

https://www.sparkshotcustomcreations.com/
Mostly 3D Printed Loco kits etc.

SCC Price list (7/4/22)
https://www.sparkshotcustomcreations.co ... e77d42.pdf

David Knight
Posts: 821
Joined: Sun Jul 20, 2008 6:02 pm

Re: SR 0-6-0 E2 (Extended tank versions)

Postby David Knight » Fri Jan 18, 2013 3:15 am

Hi Knuckles,

Sounds like you got Gibson hornblocks. The springs and screws kind of give it away. The rods are not for CSBs though.

The jigs are to make sure that the axle centres and coupling rod centres are the same. Failure to do this can give a lumpy gait to a loco :cry: and result in excessive consumption of alcohol. :shock:

Cheers,

David

User avatar
Paul Willis
Forum Team
Posts: 3046
Joined: Sun Jul 20, 2008 6:00 pm

Re: SR 0-6-0 E2 (Extended tank versions)

Postby Paul Willis » Fri Jan 18, 2013 6:57 am

Knuckles wrote:EDIT 2: I've ben looking and reading the chassis instructions and thought I'd remove the bits you don't need in preparation, half etched lines. Chassis designed for more than one loco and it's nickel silver. I initiall thought, "Ok I'll cut it with 20 or strokes of the scalpel blade" but this harder metal is really killing my blades.. On number 2 currently so it's a good job I have a 100 pack. I know or guess this isn't the 'proper' way to do it but I daredn't drill two holes then get a blade between them because I'm scared of bending the fret - must stay super flat.

Any ideas? :? I am getting through but it's taking so long it isn't funny.

EDIT 3: Ok, I managed to get throuh the straights but the corners I can't. Also on blade 3! I've kept them to the side as they are new minus the tips.
Submitted and got the drill out. Holes done, but need to find way of bridging gap without bend. Drill grinders possibly.

Get yourself a proper piercing saw from Ebay. My last one (I finally became fed up of the one that my father made for me about 30 years ago...) cost £6.75 a couple of monthsago and it perfectly servicable.

I see that it's gone up slightly:

http://www.ebay.co.uk/itm/PIERCING-SAW- ... 5d38f51168

That, and a pack of spare saw blades so you don't worry about the odd one becming blunt or going <ping> and you'll be sorted. You'll get a much easier, and very much tidier job.

Proper tools are the best modelling investment that you can make...

Oh, and well done on all the cleaning up of the whitemetal and the soldering. It shows how much your modelling has improved in 12 months to see the quality of what you are doing. And I'm sure that you have much (well, a little...) more patience now as well.

Flymo
Beware of Trains - occasional modelling in progress!
www.5522models.co.uk

User avatar
Will L
Posts: 2527
Joined: Sun Jul 20, 2008 3:54 pm

Re: SR 0-6-0 E2 (Extended tank versions)

Postby Will L » Fri Jan 18, 2013 8:59 am

Knuckles wrote:With these jigs we keep on about will they still make a difference because these horn positons are already determimed by the etch. (unless we are talking about minimal deviations within -I know not)


We are talking about the minimal deviations. But fear not the use of the jigs should give your the correct answer.

Will

User avatar
Knuckles
Posts: 1262
Joined: Fri Nov 18, 2011 9:15 pm

Re: SR 0-6-0 E2 (Extended tank versions)

Postby Knuckles » Fri Jan 18, 2013 10:49 am

and result in excessive consumption of alcohol.


Or as Tony Wright said in one of the Right Track DVD's, "Your vocabulary will increase............and you will use expletives!"

I might get a good peircing saw actually. I have one but crude isn't the word, that and I actually broke it trying to get the blade in. How can you tell a good quality one from a cheap wobbily one? (I mean online, not personal inspection)
Proper tools are the best modelling investment that you can make...


I agree. I think I have most of them now, modelling wise.
I could do with some small drills though. I have a couple of Matchboxes but being brass they either blunt quick or snap.
Oh, and well done on all the cleaning up of the whitemetal and the soldering. It shows how much your modelling has improved in 12 months to see the quality of what you are doing. And I'm sure that you have much (well, a little...) more patience now as well.

Thanks Flymo, but what are you comparing this project against? I'd say Fury was my hardest thing and best model yet (in 00 though).
(I say that before I tackle the E2 chassis :shock: )

Also good to know the hornblocks come with jigs, thanks for that. :) I have not opened them yet.

Just for general interest, I think I will be scratch building the earlier open coal rails in favour of the later filled in ones. I'm also thinking of adding the 4 bars in front of the back windows so was thinking of drilling baby holes and inserting 0.3mm brass rod in. That thickness at a guess should do it I rekon.

The tanks and a few other places have a 'lip', I'm thinking of tinning some fine wire and soldering that to the white metal edges. Should help it to look more finescale. I won't claim any of my models to be finescale whether in in 00 or P4 but I do like adding the details; it's what makes a model I think.
“He who dares not offend cannot be honest.” Thomas Paine

https://www.sparkshotcustomcreations.com/
Mostly 3D Printed Loco kits etc.

SCC Price list (7/4/22)
https://www.sparkshotcustomcreations.co ... e77d42.pdf


Return to “Steam Locomotives”

Who is online

Users browsing this forum: ClaudeBot and 1 guest