Perusing the bring and buy at Scaleforum on Sunday afternoon I chanced upon a Peter K kit for the MR Kirtley Well Tank 0-6-0T. A lovely little loco that I couldn't resist adding to the growing collection of unbuilt loco kits.
Sadly the kit is missing one vital ingredient - the instructions! There is a scale drawing of the loco and a parts list, but nothing else.
So has anyone built this kit, or maybe has the kit lurking unbuilt at the the back of the cupboard? If so, are there any instructions you could copy for me? Or even an exploded diagram to give a nudge in the right direction?
If I ever finish the kit I promise to post a picture of the end result.
Thanks
Julian
MR Kirtley Well Tank 0-6-0T - Peter K kit
-
Julian Gascoyne
- Posts: 20
- Joined: Sun Nov 01, 2009 1:27 pm
-
Andy W

- Posts: 884
- Joined: Thu May 21, 2009 8:11 am
Re: Instructions for MR Kirtley Well Tank 0-6-0T
Julian, yes I've built one of these. I have a feeling there might not have been any instructions - and if there were I might well have ignored them. This was not an easy build, a good proportion of the loco ended up being scratchbuilt. However, as you say, it's a lovely prototype.
I'm fairly sure I didn't have grey hair before I built it. I have now!
I'm fairly sure I didn't have grey hair before I built it. I have now!
Make Worcestershire great again.
Build a wall along the Herefordshire border and make them pay for it.
Build a wall along the Herefordshire border and make them pay for it.
-
Julian Gascoyne
- Posts: 20
- Joined: Sun Nov 01, 2009 1:27 pm
Re: Instructions for MR Kirtley Well Tank 0-6-0T
Ealing wrote: I have a feeling there might not have been any instructions - and if there were I might well have ignored them. This was not an easy build, a good proportion of the loco ended up being scratchbuilt.
Oh dear. I think this is going to be something of a challenge then!
Thanks for posting the photo, lovely model you have there.
-
Armchair Modeller
Re: Instructions for MR Kirtley Well Tank 0-6-0T
I bought a different Peter K kit, which too had no instructions - just the parts list you mention with yours.
He/they are still in business at http://www.kemilway.com/peter-k.html. Maybe a request for help would bring rewards?
Apart from the engine chassis, which has some very strange bits, I decided I could work out reasonably well what went where. The parts list gives many clues, as do photos, if any are available for your loco.
-
grovenor-2685

- Forum Team
- Posts: 3923
- Joined: Sun Jun 29, 2008 8:02 pm
Re: Instructions for MR Kirtley Well Tank 0-6-0T
How much faith can one have in a website where the "news" is for 2009.He/they are still in business
Lot of nice models there though.
Keith
-
Horsetan

- Posts: 1385
- Joined: Tue Jul 29, 2008 9:24 am
Re: Instructions for MR Kirtley Well Tank 0-6-0T
grovenor-2685 wrote:How much faith can one have in a website where the "news" is for 2009.He/they are still in business
For some, that's actually quite up-to-the minute.
By contrast, The Daily Telegraph is still in the middle of the Second World War...
That would be an ecumenical matter.
-
hollybeau
- Posts: 91
- Joined: Thu Jul 30, 2009 10:03 am
Re: Instructions for MR Kirtley Well Tank 0-6-0T
I built one of these two years ago from a kit bought (when the company was Jidenco) about 30 years prior to that (which must be some sort of record for things kept in the roud tuit box). When I say "built from a kit" I really meant, as others have reported, that it was loosely based upon the kit but with a fair bit of fettling, bodging and scratchbuilding. I seem to recall that it was sold to me in two parts - an "etchings pack" and a "turnings and other bits" pack. I still don't understand the marketing strategy of this. What I am fairly sure about is that there never were any instructions. This was in the days when men were men and if you couldn't work out where to solder sprocket b to fillet z then you clearly weren't good enough a human being to be allowed near one of their kits. That said the finished article has considerable charm and has turned out to be my favourite loco. As this photo shows however, my lining skills (or my carfeul pre photo dusting!) are not up to Ealing's talents.
I do have the original parts list and some prototype notes and if you would like to PM me Julian I will send you what I have got. You may also be interested in a thread on this very forum started by yours truly in October 2009 (half way down an page 3 of Steam Locomotives) where there are some lovely photos of this loco.
Good luck with the build - you will need it!
Bryan
You do not have the required permissions to view the files attached to this post.
-
John Bateson

- Posts: 809
- Joined: Wed Jul 02, 2008 6:39 pm
Re: Instructions for MR Kirtley Well Tank 0-6-0T
Horsetan wrote:
By contrast, The Daily Telegraph is still in the middle of the Second World War...
As some of us are still regretting 1923 that makes the DT quite topical.
John
Slaving away still on GCR stuff ...
-
grovenor-2685
- Forum Team
- Posts: 3923
- Joined: Sun Jun 29, 2008 8:02 pm
Re: Instructions for MR Kirtley Well Tank 0-6-0T
When I visited the DT site, it says
which is not quite
But, in terms of attitude I would agree...
And for the avoidance of doubt, halfway down page 3 is
http://www.scalefour.org/forum/viewtopic.php?f=20&t=588
Keith
Last updated 1 minute ago | Wednesday 03 October 2012
which is not quite
By contrast, The Daily Telegraph is still in the middle of the Second World War...
But, in terms of attitude I would agree...
And for the avoidance of doubt, halfway down page 3 is
http://www.scalefour.org/forum/viewtopic.php?f=20&t=588
Keith
-
John Bateson
- Posts: 809
- Joined: Wed Jul 02, 2008 6:39 pm
Re: Instructions for MR Kirtley Well Tank 0-6-0T
Keith,
The original comment about the DT was probably about their running a series of reports near the back pages, following the events of the war day by day and using the original material! The reports today are from October 3rd 1942 covering the Stalingrad region.
All of which has no reference to the Kirtley issue!
John
Slaving away still on GCR stuff ...
-
Julian Gascoyne
- Posts: 20
- Joined: Sun Nov 01, 2009 1:27 pm
Re: Instructions for MR Kirtley Well Tank 0-6-0T
hollybeau wrote:I do have the original parts list and some prototype notes and if you would like to PM me Julian I will send you what I have got. You may also be interested in a thread on this very forum started by yours truly in October 2009 (half way down an page 3 of Steam Locomotives) where there are some lovely photos of this loco.
PM sent - thanks for your help! And thanks also for pointing out the thread from a few years ago (which I hadn't seen). I'm amazed there is so much interest in this rather obscure old loco.
Julian
-
Julian Gascoyne
- Posts: 20
- Joined: Sun Nov 01, 2009 1:27 pm
Re: Instructions for MR Kirtley Well Tank 0-6-0T
After 3 months work, running trials commenced this morning. As you can see from the photos, a long way to go yet. Maybe have it finished and painted by Easter!
Many thanks to 'Hollybeau' for all the information and advice provided to help me get the project started.
Runs ok-ish, although never as smooth as one would wish. I'm seriously considering investing in one of those expensive chassis jigs for the next loco, because I'm clearly not quite accurate enough. Are they worth the money?
Julian
You do not have the required permissions to view the files attached to this post.
-
Armchair Modeller
Re: Instructions for MR Kirtley Well Tank 0-6-0T
Would a photo of the underside of the chassis be possible, please? I would be very interested to see what one of these chassis looks like assembled.
-
Paul Willis

- Forum Team
- Posts: 3046
- Joined: Sun Jul 20, 2008 6:00 pm
Re: Instructions for MR Kirtley Well Tank 0-6-0T
Julian Gascoyne wrote:Runs ok-ish, although never as smooth as one would wish. I'm seriously considering investing in one of those expensive chassis jigs for the next loco, because I'm clearly not quite accurate enough. Are they worth the money?
In my opinion, yes.
I'm no engineer, and I can manage to get a satisfactorily running chassis with relatively little effort out of one of those with just a little care and some good quality components (High Level hornblocks and gearbox as standard). I have the Chassis2 one from Avonside (Eileen's) although I'm sure that other people can speak about the Hobby Holidays version.
It's true that they are expensive, so regard it as an investment. If you compare it to the time saved in building and fettling a couple of chassis, then it really does start to make sense, even without the benefit of the improved running achieved.
Just my 2p,
Flymo
Beware of Trains - occasional modelling in progress!
www.5522models.co.uk
www.5522models.co.uk
-
Andy W
- Posts: 884
- Joined: Thu May 21, 2009 8:11 am
Re: Instructions for MR Kirtley Well Tank 0-6-0T
Yes I'd agree with Flymo - but then I'm a sucker for jigs. I have a Hobby Holidays version, which has the advantage of having a rolling road as part of the set up.
Make Worcestershire great again.
Build a wall along the Herefordshire border and make them pay for it.
Build a wall along the Herefordshire border and make them pay for it.
-
Julian Gascoyne
- Posts: 20
- Joined: Sun Nov 01, 2009 1:27 pm
Re: Instructions for MR Kirtley Well Tank 0-6-0T
Armchair Modeller wrote:Would a photo of the underside of the chassis be possible, please? I would be very interested to see what one of these chassis looks like assembled.
Photos of the chassis:
You do not have the required permissions to view the files attached to this post.
-
Armchair Modeller
Re: Instructions for MR Kirtley Well Tank 0-6-0T
Many thanks for the chassis photos 
-
Chris Mitton
- Posts: 258
- Joined: Sun Aug 31, 2008 1:18 pm
Re: Instructions for MR Kirtley Well Tank 0-6-0T
Julian Gascoyne wrote:I'm seriously considering investing in one of those expensive chassis jigs for the next loco, because I'm clearly not quite accurate enough. Are they worth the money?
Julian
What about joining an Area Group (if you're not already in one)? And persuading the members to buy one between them, if they haven't already? The number of locos built by the average AG would surely justify the cost per member?
Happy New Year,
Chris
-
smyles
Re: Instructions for MR Kirtley Well Tank 0-6-0T
Great to see the excellent photos and information about the Kirtley Well Tank. I have some of the etches for the kit but it is not complete with no fittings. Bought some years ago from a second hand stall. I have made a start on the chassis but haven't got very far. Seeing the photos inspires me to get on with building the kit.
Cheers,
Mike
Cheers,
Mike
-
hollybeau
- Posts: 91
- Joined: Thu Jul 30, 2009 10:03 am
Re: Instructions for MR Kirtley Well Tank 0-6-0T
Well done Julian, that is looking good - some nice clean soldering.
You say that running could be better - can you elaborate? Is it a once per wheel revolution problem? If so it suggests a quartering/crankpin clearance issue. I have now built three outside cranked locos (all Kirtleys) and have found that because the coupling rods are some 5mm or so (each side) beyond the normal on-wheel position any errors in quartering etc are magnified. I am not suggesting for one minute that your engineering skills are in any way deficient just that the margin for error is greater - and of course it is not possible (I don't think) to use a George Watts or similar quartering jig. I also found that the cranks could move on the quartering under load so needing careful use of Loctite (and all the attending problems detailed so well in Chris Pendlenton's recent article in MRJ). Driving from one end and having overlapping rods on the central axle (rather than proper forked rods with a separate pin) does not help. Finally, using conventional wiper pick ups may be putting different loadings on the wheels. I always use split axles so can afford to be smug in this area. My solution was simply to open out the holes in the rods a little more than you would do normally (having of course checked everything else first). I know the engineers on here will say that is a bodge - and it probably is - but it worked for me. Just be careful and take your time. One old bit of advice is to disengage the motor, push the chassis along the track until some stiffness can be detected and then check each half rod at a time until you find one that is "locked up". That is the one to open up a smidgen. Once done and running sweetly you can't get enough weight into the model in my opinion.
I have the Avonside chassis jig and find it invaluable although I could not get on with those fiddly finger things. My Well Tank was built prior to getting the jig so I built my own using long 1/8" axles pushed hard into a block of hardwood with the holes drilled on the pillar drill in a straight line and at the correct axle centres. It worked but is not as versatile as the engineered solution. Good idea about sharing one in a group although I suspect that the one person who builds most locos may hog it and will be using it just when you want to build your own loco.
I look forward to seeing more photos.
Bryan
PS should the thread be renamed to drop the reference to "Instructions"?
-
Julian Gascoyne
- Posts: 20
- Joined: Sun Nov 01, 2009 1:27 pm
Re: Instructions for MR Kirtley Well Tank 0-6-0T
hollybeau wrote:You say that running could be better - can you elaborate? Is it a once per wheel revolution problem? If so it suggests a quartering/crankpin clearance issue. I have now built three outside cranked locos (all Kirtleys) and have found that because the coupling rods are some 5mm or so (each side) beyond the normal on-wheel position any errors in quartering etc are magnified. I am not suggesting for one minute that your engineering skills are in any way deficient just that the margin for error is greater - and of course it is not possible (I don't think) to use a George Watts or similar quartering jig. I also found that the cranks could move on the quartering under load so needing careful use of Loctite (and all the attending problems detailed so well in Chris Pendlenton's recent article in MRJ). Driving from one end and having overlapping rods on the central axle (rather than proper forked rods with a separate pin) does not help. Finally, using conventional wiper pick ups may be putting different loadings on the wheels. I always use split axles so can afford to be smug in this area. My solution was simply to open out the holes in the rods a little more than you would do normally (having of course checked everything else first). I know the engineers on here will say that is a bodge - and it probably is - but it worked for me. Just be careful and take your time. One old bit of advice is to disengage the motor, push the chassis along the track until some stiffness can be detected and then check each half rod at a time until you find one that is "locked up". That is the one to open up a smidgen. Once done and running sweetly you can't get enough weight into the model in my opinion.
It is a once per wheel revolution problem. I followed your advice on opening out the holes a bit - I think I had been a bit timid with this - and it now runs a lot better than before. Thanks!
I did use a GW quartering jig, I find this piece of kit invaluable. But I didn't loctite the cranks. Is it worth putting a dab of loctite on the ends of the axles now do you think? Maybe capilliary action will draw some into the joint, although I suspect not. I don't really want to dismantle the cranks to put some loctite in there.
The pick ups are certainly a problem, acting as a drag on the wheels. I had intended to build the chassis split axle, but the branchlines split axles I use are only 27mm long - too short for o/s cranks - so I opted for convential chassis with pick ups. Setting up pick ups is one of my least favourite jobs. What split axles do you use for o/s crank locos?
The third problem was the front cranks catching the outside frame hornblocks. I shortened the front axle to 31mm, and then decided that was a bad idea so left the middle and rear axles untouched at 31.8mm (the length of GIbson o/s crank axles). This seems to be a delicate balancing act between clearing the o/s frames and yet keeping within loading gauge. What axle length have you used for o/s crank locos?
hollybeau wrote:PS should the thread be renamed to drop the reference to "Instructions"?
Good idea - I'll see if i can work out how to do that
Julian
-
grovenor-2685
- Forum Team
- Posts: 3923
- Joined: Sun Jun 29, 2008 8:02 pm
Re: Instructions for MR Kirtley Well Tank 0-6-0T
Good idea - I'll see if i can work out how to do that
I don't think you can edit a post after it has been replied to so I will do that for you with my moderators hat on.
Note this will just change the first post and future replies, not the titles shown on intermediate posts. one of the quirks of the system.
Keith
-
Andy W
- Posts: 884
- Joined: Thu May 21, 2009 8:11 am
Re: MR Kirtley Well Tank 0-6-0T - Peter K kit
"but the branchlines split axles I use are only 27mm long" They should be about 28.2mm, but if that's still too short and you don't want to make your own you can use the Branchlines triple split variety and cut them down. I know it's too late now - just trying to promote split axles!
This is probably irrelevant, but I've cured several chassis that have developed tight spots and "limps" simply by slackening off the retaining bolts holding the chassis to the body by a turn or so. Sometimes these can be tightened too much, so introducing stress and distortion.
This is probably irrelevant, but I've cured several chassis that have developed tight spots and "limps" simply by slackening off the retaining bolts holding the chassis to the body by a turn or so. Sometimes these can be tightened too much, so introducing stress and distortion.
Make Worcestershire great again.
Build a wall along the Herefordshire border and make them pay for it.
Build a wall along the Herefordshire border and make them pay for it.
-
Will L

- Posts: 2527
- Joined: Sun Jul 20, 2008 3:54 pm
Re: MR Kirtley Well Tank 0-6-0T - Peter K kit
Ealing wrote:"This is probably irrelevant, but I've cured several chassis that have developed tight spots and "limps" simply by slackening off the retaining bolts holding the chassis to the body by a turn or so. Sometimes these can be tightened too much, so introducing stress and distortion.
I've just been re-reading the Ian Rice chassis construction book were he makes exactly the same point.
Will
-
Julian Gascoyne
- Posts: 20
- Joined: Sun Nov 01, 2009 1:27 pm
Re: MR Kirtley Well Tank 0-6-0T - Peter K kit
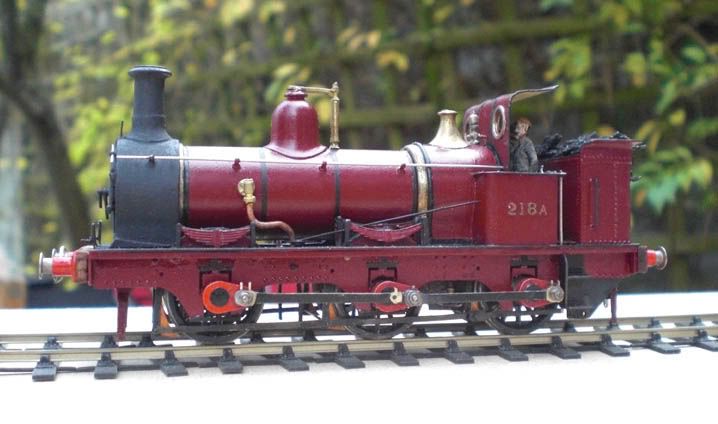
I've finally finished the well tank. I can't believe it has taken me over a year to build this kit! I really must up my work rate.
The first attempt at the chassis wasn't up to much. So after several months of the loco languishing unfinished at the back of the workbench I bit the bullet and unsoldered the chassis to have another go. Second time around I built the chassis split axle and this time made use of an Eileen's chassis jig. I think my home made jig just wasn't accurate enough. Now I am very pleased with the way it runs.
Here are a couple of pictures taken on my phone. I am horrified at the cruelty of the camera flash. In real life it doesn't look so bad, well not from a yard away squinting through one eye . The paint job is suffering from a bad attack of the orange peels, and some seriously wonky lining. On the strength of this performance I have signed up for the Missenden Abbey course on painting and lining next spring. Hopefully I will pick up some tips there.
The first attempt at the chassis wasn't up to much. So after several months of the loco languishing unfinished at the back of the workbench I bit the bullet and unsoldered the chassis to have another go. Second time around I built the chassis split axle and this time made use of an Eileen's chassis jig. I think my home made jig just wasn't accurate enough. Now I am very pleased with the way it runs.
Here are a couple of pictures taken on my phone. I am horrified at the cruelty of the camera flash. In real life it doesn't look so bad, well not from a yard away squinting through one eye
You do not have the required permissions to view the files attached to this post.
Who is online
Users browsing this forum: ClaudeBot and 0 guests