The Great 3F build off

User avatar
Will L
Posts: 2527
Joined: Sun Jul 20, 2008 3:54 pm

Re: The Great 3F build off

Postby Will L » Tue Mar 18, 2014 8:07 pm

MarkS wrote:However, despite using the high level jig, I seem to have the CSB wire touching the horn guide wings, thus pre-loading them ever so slightly (so the axle will not drop), a careful touch of a file to the top of the guides should take care of that... (although once the body is weighted it may not be relevant.)


To be fair I think you'll find the current written instructions that come with the Highlevel jig does point out this happens and suggest you file down the wings if you want to use the lowest hole (row A) in the CSB Tag

User avatar
MarkS
Posts: 296
Joined: Tue Jul 22, 2008 1:15 am

Re: The Great 3F build off

Postby MarkS » Tue Mar 18, 2014 10:23 pm

True Will,
The error was self inflicted. I cannot blame the jig when my drilling tool is a dremel in one hand balanced by a glass of wine in the other !!

(I'm kidding - seriously, spilling wine is a terrible waste...)
Cheers,

Mark.
"In the end, when all is said and done, more will have been said than done..."

Lindsay G
Posts: 209
Joined: Thu Aug 07, 2008 2:16 am

Re: The Great 3F build off

Postby Lindsay G » Tue Mar 18, 2014 10:42 pm

The image shows that the wire is passing through hole B and hitting the wings. I encountered the same thing when building the 782 (again hole B). Sat wondering how this could have happened but could not see any error in construction. Ended up getting a file out.

Lindsay

essdee
Posts: 554
Joined: Sat Nov 29, 2008 4:47 pm

Re: The Great 3F build off

Postby essdee » Wed Mar 19, 2014 9:36 am

Guys,

I too have had the experience of the CSB wire, even in mid-hole B, resting on the fold-up guides of the High Level bearings, and had to grind down to clear. I have a feeling that Chris's fold-up bearings appeared on the market before the CSB spring tag attachments became available, so perhaps this is the origin of the discrepancy; can anyone confirm this order of events?

Mark, the chassis is loooking very nice! Just a thought on proposed dummy slidebars etc. for you to consider before you cut metal. The full-width High Level bearings on your leading axle are greedy of space, and will severely constrain attempts to insert two sets of slidebars and a pair of slide valve rods between them. I now adopt Chris's Slimline bearings and guides in these locations, which allow considerably more space for dummy internal gubbins. I would not advise removing the hornguides already fitetd to your chassis and replacing by the Slimline hornguides, but I would suggest substituting the Slimline bearings themselves, which will immediately save space, even within the existing hornguides. You can go further if you wish, and file/grind the hornguide cheeks back (they will be deeper than the Slimline bearings) to maximise space. This will sacrifice the bearing-retainer lugs at teh base of the horncheeks, but as the bearing is hung frm a CSB wire this is not a problem. If you do go down the grinding/filing route, do be scrupulous about flusing out all swarf from the hornguides - it only takes one stray bit of grot to jam it up!

The two pics here show my sub-assembly for the motion of a caley 812 Class 3F - the motion plate at the rear is missing, it forms an integral part of the chassis as a spacer. As installed, you can see the snug fit of the assembly between the Slimline CSB tags - you will need to ensure these have a bit of lateral play to be unimpeded in operation.

I know this would mean you back-tracking on painted work, but no soldering is involved in the alteration, and I think you would benefit in the longer run?

Good luck anyway, look forward to the next stage.

BW

Steve
You do not have the required permissions to view the files attached to this post.

User avatar
James Moorhouse
Posts: 129
Joined: Tue Jul 22, 2008 8:50 pm

Re: The Great 3F build off

Postby James Moorhouse » Wed Mar 19, 2014 10:35 am

Steve,

Nice to see a silicone (or is it neoprene?) tube and ball bearing universal joint. Out of interest, have you experienced any slipping of the UJ under load?

James

essdee
Posts: 554
Joined: Sat Nov 29, 2008 4:47 pm

Re: The Great 3F build off

Postby essdee » Wed Mar 19, 2014 11:10 am

Hi James,

It's Ripmax 1.6mm bore silicone, aircraft accessory from local model shop. Initial trials with wagons on 'Dewsbury' fine. If I hold the tube, the motor stalls before the tube slips - so far so good. I have yet to test the maximum wagon load!

BW

Steve

User avatar
Russ Elliott
Posts: 930
Joined: Thu Jun 02, 2011 6:38 pm

Re: The Great 3F build off

Postby Russ Elliott » Wed Mar 19, 2014 11:54 am

essdee wrote:I have a feeling that Chris's fold-up bearings appeared on the market before the CSB spring tag attachments became available, so perhaps this is the origin of the discrepancy; can anyone confirm this order of events?

Basically, yes. I think the blocks and guides first appeared in 2006. There were some prototype 'single-hole' carriers around at that time, but the production ones probably didn't appear until a year or so later, and there were always tweakings going on prior to Chris' CSB Jig appearing in 2010.

User avatar
MarkS
Posts: 296
Joined: Tue Jul 22, 2008 1:15 am

Re: The Great 3F build off

Postby MarkS » Wed Mar 26, 2014 4:08 am

essdee wrote -
The two pics here show my sub-assembly for the motion of a caley 812 Class 3F...

I was thinking along the same lines, a drop in type of arrangement, although I was thinking of styrene instead of brass... less paint to disrupt!

It has come out of the paint shop, so here it posed with a wagon from our local club, advertising for our upcoming Great British Train Show, where Dave Knight and I will fly the P4 flag...
and yes, it is blue...
You do not have the required permissions to view the files attached to this post.
Cheers,

Mark.
"In the end, when all is said and done, more will have been said than done..."

David Knight
Posts: 821
Joined: Sun Jul 20, 2008 6:02 pm

Re: The Great 3F build off

Postby David Knight » Wed Mar 26, 2014 1:38 pm

Well done Mark :thumb ! And congratulations 'cos I know I won't be able to catch up at this point.

Styrene for the dummy motion, an excellent idea and certainly less likely to cause mysterious shorts at inopportune times. Funny how one can get into a mindset of not mixing materials even though doing so can often produce a result that looks just as good with less grief. I must try this....

Cheers,

David

essdee
Posts: 554
Joined: Sat Nov 29, 2008 4:47 pm

Re: The Great 3F build off

Postby essdee » Fri Mar 28, 2014 8:49 pm

Hi Mark,

Verrrry nice indeed - you must be well pleased with her! Always good to see a blue period S&D loco featured.

Picking up on your and Dave's comments re styrene dummy motion - that's exactly what I gave my No. 64 in her first incarnation many years ago. With red paintwork, suitably dulled by oily black wash as representative of later 1920s filth levels, it did just fine to fill that gap, and lasted over thirty years until a major strip-down and rebuild (as seen earlier on this thread).

So what's next, Mark....?!

BW

Steve

User avatar
MarkS
Posts: 296
Joined: Tue Jul 22, 2008 1:15 am

Re: The Great 3F build off

Postby MarkS » Fri Mar 28, 2014 10:10 pm

Thanks Dave, Steve,
there is still some finishing up work on the chassis, including dummy motion, and I have to detail and install the backhead...
I have been looking at the "Art of Weathering" too.
Next? a blue 2P of course!
I'm looking forward to building a Bill Bedford chassis...
Cheers,

Mark.
"In the end, when all is said and done, more will have been said than done..."

beachboy

Re: The Great 3F build off

Postby beachboy » Sat Mar 29, 2014 8:54 pm

Mark,

Your 3F has come out really nice.
The S&D blue also looks right, much the same as a Heiron painting I have seen.
May I ask which paint formula you have used ?

Not being familiar with the S&D, I was starting with the Precision colour for my H/box, and added some white to lighten it up. But it has a green hue to it which does not match the descriptions of brilliant blue, Ultramarine, or Prussian blue. These colours being true blue, whereas i think PP have added a touch of yellow. So have rubbed it down and stayed with a pure blue paint mix.

Did you use the HMRS transfers ? If so do they include S&DJR about 1mm high please.

Steve.

User avatar
MarkS
Posts: 296
Joined: Tue Jul 22, 2008 1:15 am

Re: The Great 3F build off

Postby MarkS » Sun Mar 30, 2014 5:18 am

Hi Steve, thank you.
Yes Prussian blue is a difficult colour to get right, and it changes a lot depending on the light and the final finish. Before the dull clearcoat it seemed a bit richer.
The photo, by the way was taken under florescent lighting which brings out the blue...

On to the paint - started with a bauxite primer coat. The blue is Precision Prussian blue, but it seemed a bit light and dull.
So I made up some colour patches to which I added black and a little LMS maroon (also tried Pullman umber) until the colour looked right to my eyes, again under fluorescent light.
From that I made a small bottle thinned for the airbrush.
The transfers are HMRS, from the Midland, S&D, M&GN and LT&S set. They do the loco and coach transfers, the latter I believe are the 1mm size?

BTW, In the photo, the Jinty in the background, was painted with Model Master Acrylic Prussian blue which appears "sun faded"...
also seen here - download/file.php?id=4752&mode=view
Cheers,

Mark.
"In the end, when all is said and done, more will have been said than done..."

beachboy

Re: The Great 3F build off

Postby beachboy » Sun Mar 30, 2014 11:15 am

Mark,

I find your comment of varnish altering the colour tone interesting. It seems to reflect the light before one can see the colour in a small scale.
i sprayed a gearbox Humbrol33 & added an overspray of Precision dirty black ( a dark grey mix ). Some varnish protection, and zap, the b/grey was gone.
Perhaps its better to mix the varnish in with the paint, or use gloss paint & a little matting addition as required.

If I read your paint mix correctly. Adding black and a little red shade to Prec. Prussian Blue will derive a Windsor brown. More red and one would probaly arrive at Indian red. I think Ultramarine blue with various amounts of white will derive a shade similar to your 3F.
I looked at a colour plate of a Prussian blue uniform, and its v. much in the camp of darkish blue, with varing tones of added white.
The Precision blue I have copied by mixing Ultramarine, and a hint of black & yellow.
I note from Nigel Digby's painting of a GER engine the pigment is blue with a hint of red / black. The opposite.
Though having seen a pic of paint being mixed up inside at Brighton paintshop in the early 1900's, left me with the impression
' Yer, that's close to Mr Stroudley's yellow '

Your Jinty pic made me think of the Military guy's varing tones on a flat surfaces to immitate light on a smaller scale.
So while the paint was still wet, if one sprayed the Model Master blue with a touch of blending white from a higher angle downwards, the dome etc, black grey to the upper chimney top etc, will add life to the colours. Much like an artist does.

Your reference to Fluorescent light tubes. The ones I use for modelling have a yellow tinge. The Daylight versions for painting - blue. Outside, a model can look different again. Although I did wonder where & how in Canada, the spraying of a LMS coach was achieved, when it was so cold.

Steve.

User avatar
MarkS
Posts: 296
Joined: Tue Jul 22, 2008 1:15 am

Re: The Great 3F build off

Postby MarkS » Sun Mar 30, 2014 4:47 pm

Steve, you got me thinking, so I being a nice sunny day, (and above 0 degrees!) I took this...

Blue locos.jpg


Different blues. My story is that the jinty was painted in "Bagnall" Prussian blue, while the 3F is in "Highbridge" Prussian blue.
I was trying to move the blue toward the GER blue, after looking at photos of the 7F and coach on the West Somerset.

Isn't dull coat basically a clear emulsion with talcum power in it, so that the light and thus the underlying colour is not directly reflected?
The problem with painting our trains is that a dull surface is better for lining (paint draws out of the pen better), while a gloss surface is needed for transfers to stick.
And the whole lot needs protecting as well as a single tone to bring it all together. And then there is weathering!

The problem with colour is we all see it differently, dust and distance makes it lighter, smoke and oily rags makes it darker...
There is a lot of artistry in what we do, and getting the basic colours right is difficult enough - my problem is I'm not an artist.

Here, thrown into the mix is my Buckjumper, painted with Precision GER blue for comparison.
3 blue locos.jpg

BTW, the coach sides were sprayed last fall, outside, well before the snow started falling.
I will spray acrylics indoors (I still wear a proper cartridge mask) although enamels etc. I spray outside in the warmer months.
You do not have the required permissions to view the files attached to this post.
Cheers,

Mark.
"In the end, when all is said and done, more will have been said than done..."

beachboy

Re: The Great 3F build off

Postby beachboy » Wed Apr 02, 2014 10:03 am

Mark,

A dull coat is paint with matting agent added to counter the glossy shine. Smoke & oil is staining - its the amount of light on the subject that can make a colour lighter or darker. The S&D Trust pics of their coaches show the true Prussian blue. Same colour tone as a tube of Pruss. blu Daler Rowney, or even Humbrol No. 15. But ok on a 30 odd foot coach.
It becomes too dark a shade when condensed to say 6", hence the need to include lighter tones.
I think Precision colours are same match to the real thing. OK. But if you paint a swob of Prec. Indian red - its far to dark if one was to compare and look at that on the City of Turo, which I understand is the same paint formula. Except the real thing is reflecting bags more light for us to see the true colour. And that's the problem with a darker shade of blue.
I find gloss paint looks a good match to a coachworked varnish. Or a very thin / scale layer of varnish added.
With regard to matt finish. Tarnished faded paintwork? Or the dust and distance, you mentioned.
My first spray job was a Tamiya tank with the then authentic colours, which had a shine to the finish.
I thought from other peoples paint jobs its not right, it should be matt. Then visited the Bovington Tank Museum, and found there is no matt paint finishes on any vehicle. The paint mixes produced a more satin shine, or say glossy with protective wax, or varnish. There is not a paint mix pigment for the Military, and another for Railways ?
I do not find a difference when brush or pen lining on gloss or matt. Its the flow/mix of the pen. Or a touch of dried paint on the brush tip perhaps.
But I would weather a model over any laquer, which is more authentic? Being I viewed a thread on another site of a guy who made a nice paint job on a vehicle and weathered it. Thence applied a coat, possibly too thick, of varnish, and half the work he had done was gone, plus as you say the colour tone had changed.
Its possible that a uniform 'corporate' colour would not be correct, as it appears the colour pigments were not always stable. Plus repaints and more varnish.
Your GER loco's nice. Must be unique in N. America. Oh, are you still awaiting your next delivery of coal ?
Steve.

User avatar
MarkS
Posts: 296
Joined: Tue Jul 22, 2008 1:15 am

Re: The Great 3F build off

Postby MarkS » Sun Apr 20, 2014 5:51 pm

While I am waiting the delivery of coal for the 3F ;), I installed the torque reaction link, a variation on Dave Knights version a page or two back.

torque reaction.jpg

It is simply a piece of thin brass off cut, folded over, with a hole drilled in it. It is screwed into a spare hole on the motor mount...

torque bottom.jpg

It allows a little movement and was really simple to build and install.

And while we are at it, the tender pickups, using Will's elegant solution, that was also very simple and quick to install. The gold pins/plug over the right hand axle connect to the loco...

tender pickups.jpg


I will be getting back to weathering later, the colour may be right, but dull coat does not make it realistic...
You do not have the required permissions to view the files attached to this post.
Cheers,

Mark.
"In the end, when all is said and done, more will have been said than done..."

andrew jukes

Re: The Great 3F build off

Postby andrew jukes » Sun Apr 20, 2014 11:29 pm

This arrangement will react the torque - but because the reacting force is vertical it will produce a change in the loading of the driven axle. David Knight's arrangement in contrast, looks like a horizontal link, pivoted at both ends (one end is hard to see), so is likely to ensure the reacting force is horizontal.

The apparently small alteration can be the difference between a loco that lifts its driven axle when attempting to haul a load and one that is well-behaved.

Hope this helps

Regards

Andrew Jukes

David Knight
Posts: 821
Joined: Sun Jul 20, 2008 6:02 pm

Re: The Great 3F build off

Postby David Knight » Mon Apr 21, 2014 12:33 am

My link is soldered at the gearbox end but loose at the other end. There is a fair amount of slack in the hole for ease of assembly and the link is made of 28 SWG phosphor bronze so will have some spring to it. As mentioned with the original post it still has not seen a wheel turn in anger yet :oops: so I can't say quite how it will react but having done a Bill Bedford J72 frame which is somewhat similar in principle I'm hoping it will work.

Cheers,

David

User avatar
Will L
Posts: 2527
Joined: Sun Jul 20, 2008 3:54 pm

Re: The Great 3F build off

Postby Will L » Mon Apr 21, 2014 8:41 am

Andrew is right to say that to work correctly the torsion link needs to act horizontally, otherwise it can affect the performance of the suspension. In your arrangement the force is acting vertical which is the worse case. Whether this has a practical impact on you loco's performance will depends on how free running the chassis is. If there is some stiffness in the motion, then you may find your drive axle hopping in a way it will never do if the reaction force is arranged to work horizontally. It's one of those cases when if everything else is going well there will be no problem, but if the chassis is proving difficult this will be another factor making things worse. It may also result in you loco being able to pull more in one direction than in the other.

User avatar
MarkS
Posts: 296
Joined: Tue Jul 22, 2008 1:15 am

Re: The Great 3F build off

Postby MarkS » Mon Jun 30, 2014 9:37 pm

It has been a couple of months since I last reported on the 3F - Running trials have proven to be a bit of a trial...

A bit of time on the rollers, showed that there were no tight spots, but noisy.
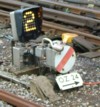
The torsion link referred to by Will and Andrew was removed. (I was thinking about the motor flopping about, not torque, at the time...)
The motor is now held by some foam that keeps the top of the motor from bashing the walls of the firebox, and conveniently the torsion movement is fore & aft at that point.
Once I stopped the motor from resting against the bolt holding the cab to the firebox all was reasonably silent.

So far so good..., the 3F went on the layout.
Well, not so good... just kept falling off. So back to first principles, measuring back to backs, looking for the tender rubbing, out of square axles, etc...
Front set of driving wheels BtB was 17.93 - great for finding all the tight spots in the track, not so good for staying on the track!
The silver lining was I found a bit of track (old C&L flex) where the gauge was less than 18.83 at a key spot on the layout. This is now near the top of the "to be fixed" list.

Next was a trip to Dave Knight's where the 3F behaved, but not to exhibition standards, with the second pair of eyes we narrowed down the tender as the culprit.
Back home, I made some allowance for more lateral movement of the centre wheelset, but still all was not quite right.
Looking even closer, it appears that the springs for the centre axle of the tender are too strong, thus the tender is "light on its feet" or "porpoises".
At the front end this is partially controlled by the drawbar with the loco, but when the loco runs in reverse, the rear wheels will easily ride up over the rails.

So, that is where it stands today, next step will be to decrease the middle spring strength (this chassis uses the original Maygib springs) and continue trials.
However there is now coal in the tender and the boiler backhead has been detailed and installed.
3f on shed.jpg
You do not have the required permissions to view the files attached to this post.
Cheers,

Mark.
"In the end, when all is said and done, more will have been said than done..."

David Knight
Posts: 821
Joined: Sun Jul 20, 2008 6:02 pm

Re: The Great 3F build off

Postby David Knight » Fri Jul 11, 2014 8:30 pm

I thought it about time to bring my loyal reader(s?) up to date. I lost momentum a while back due to a number of factors; a) some problems with adjusting the steel coupling rods, b) a spate of new information with regard to the fittings on the smokebox front, to wit, the extra ring around the door and the dogs needed to hold the door in place, c) the need to turn a new chimney to replace the somewhat oval cast one that came with the kit and finally d) an intrusion of life from outside of the modelling world that took over large chunks of my time and mind. Happily d) seems to be in hand (touching wood as I type this) so it's time to get on with the rest. I spoke with Mark when he came over to test drive his 3F on my layout and we figured that rather than leaving the engine tucked away in its sturdy cardboard box, it would be best to leave it on the layout to make me feel guilty about neglecting it. I'll let you know if this works :wink:

While I'm typing I'd like to thank Will for his kind mention of this thread in the last Snooze. The idea of the 'build off' came from a previous thread started by Neil, viewtopic.php?f=20&t=1346 In which Neil was building an High Level Neilson 0-4-0T kit that I happened to be working on. Being on the same side of the Atlantic and with an event on the horizon that we could both attend, the friendly competition started to the benefit of both of us.

Cheers,

David

User avatar
MarkS
Posts: 296
Joined: Tue Jul 22, 2008 1:15 am

Re: The Great 3F build off

Postby MarkS » Sun Jan 17, 2016 9:59 pm

With the 2016 edition of the "Great British Train Show" coming up in May, the three 3F's may well be together for a photo op, thus I was finally spurred on to fill the great void between the frames.
A couple of hours with some plasticard scrap and a lick of paint did the trick.
It's all very impressionistic, but from "normal" viewing angles does the trick.
3F1.jpg


BTW, the 'drag and drop' feature for photos is so much easier!
You do not have the required permissions to view the files attached to this post.
Cheers,

Mark.
"In the end, when all is said and done, more will have been said than done..."


Return to “Steam Locomotives”

Who is online

Users browsing this forum: ClaudeBot and 1 guest