Replacement Rods

garethashenden
Posts: 406
Joined: Tue Apr 07, 2015 9:41 pm

Replacement Rods

Postby garethashenden » Fri Apr 10, 2015 2:59 pm

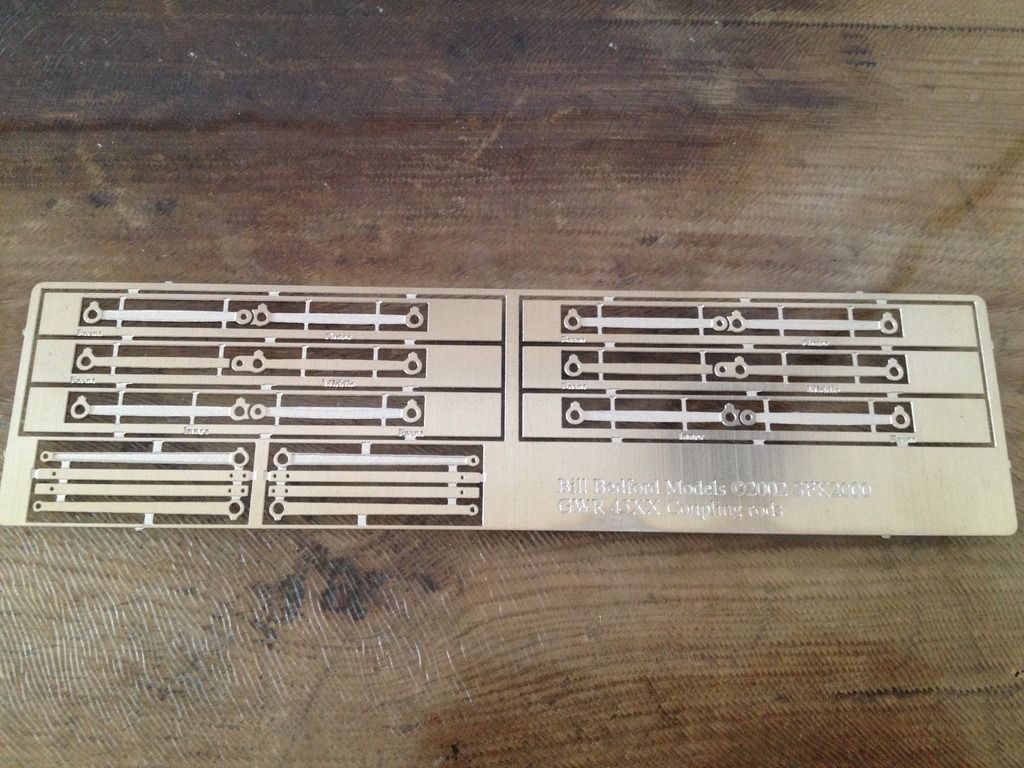
I will shortly begin converting a Bachmann 45xx from OO to EM. Not liking the look of the Bachmann rods I got a replacement set designed by Bill Bedford. Everything looks good except that I'm not sure what a couple of the bits are.
From top to bottom we have connecting rods and then main rods. The mystery parts are the rectangular strips between the two halves of the main rods. There are four in total with one hole at one end and two at the other. Any ideas?
Thanks, Gareth
Image

User avatar
Tim V
Posts: 2870
Joined: Tue Jul 29, 2008 4:40 pm

Re: Replacement Rods

Postby Tim V » Fri Apr 10, 2015 3:21 pm

I, along with others, commissioned Bill to produce 45XX rods. They were a replacement for the Modelex, Malcom Mitchell designed loco. They pre-date the Bachmann product.

Regrettably, he did not produce to our specifications.

You will have to ask Bill how to use them.

Frankly, there is nothing wrong with the Bachmann rods, apart from their dimensional inaccuracies, a quick look at my workbench thread will show you how I corrected it to produce a very smooth running RTR loco.
Tim V
(Not all railways in Somerset went to Dorset)

User avatar
jon price
Posts: 641
Joined: Mon Jun 07, 2010 2:34 pm

Re: Replacement Rods

Postby jon price » Fri Apr 10, 2015 4:34 pm

I would think the parts you mention are an assembly jig. By folding over and putting wire through the holes you will hold the two pieces in registration for soldering.
Connah's Quay Workshop threads: viewforum.php?f=125

User avatar
grovenor-2685
Forum Team
Posts: 3923
Joined: Sun Jun 29, 2008 8:02 pm

Re: Replacement Rods

Postby grovenor-2685 » Fri Apr 10, 2015 5:19 pm

jon price wrote:I would think the parts you mention are an assembly jig. By folding over and putting wire through the holes you will hold the two pieces in registration for soldering.

Agreed, the coupling rods at top don't need a jig as they are normally assembled on a crankpin jig set in the chassis to ensure correct alignment.

NB. The rods at top are 'Coupling Rods', which couple the wheelsets together, hence 4 coupled, 6 coupled etc. Those below are 'Connecting Rods' which connect the cylinders to the wheelsets, or the little end to the big end!

Regards
Keith
Regards
Keith
Grovenor Sidings

garethashenden
Posts: 406
Joined: Tue Apr 07, 2015 9:41 pm

Re: Replacement Rods

Postby garethashenden » Fri Apr 10, 2015 7:02 pm

jon price wrote:I would think the parts you mention are an assembly jig. By folding over and putting wire through the holes you will hold the two pieces in registration for soldering.

Ah yes. That makes sense. Thank you

billbedford

Re: Replacement Rods

Postby billbedford » Sat Apr 11, 2015 11:39 am

It is best to separate the connecting rods parts rather than fold them. this way you ensure that the two parts are in close contact and register with each other.

billbedford

Re: Replacement Rods

Postby billbedford » Sat Apr 11, 2015 11:42 am

Tim V wrote:I, along with others, commissioned Bill to produce 45XX rods. They were a replacement for the Modelex, Malcom Mitchell designed loco. They pre-date the Bachmann product.


No one commissioned these rods. The design evolved after watching someone (no names, no packdrill) screw up three sets of rods in as many weeks.


Return to “Chassis and Suspensions”

Who is online

Users browsing this forum: ClaudeBot and 0 guests