Split axles in use

User avatar
Andy W
Posts: 884
Joined: Thu May 21, 2009 8:11 am

Split axles in use

Postby Andy W » Thu May 16, 2013 5:28 pm

Several people have asked me whether I used the split axles I built in this thread. viewtopic.php?f=19&t=2377
They were primarily for use in a small 0-4-0T tank/tram that I'm building and when ready I'll post its progress. In the meantime I thought I'd show how I've used some of the axles in a split axle chassis for a MR 0-6-0T. Sorry if this sends you to sleep.
Image[/URL]
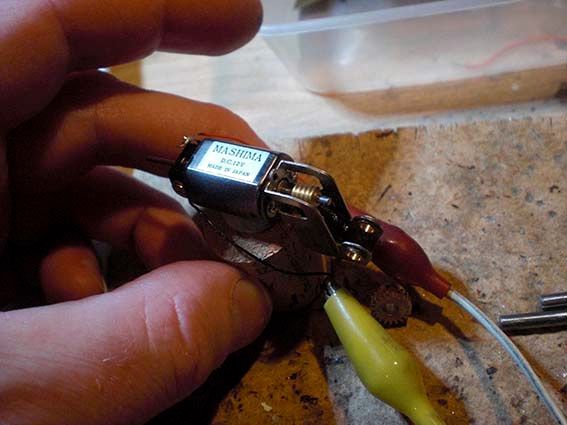
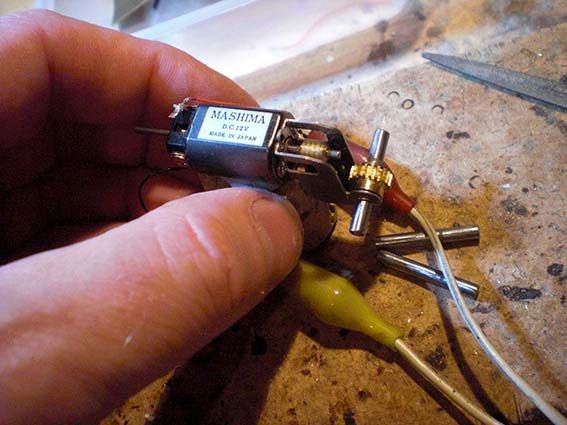
First I test the motor alone (not seen) then I test it with gearbox. The principle being that I only add one element of a build at a time and test. That way I know when the problems are creeping in. I built my first loco before testing ANYTHING. On the track it didn't move. I had no idea why. This approach is cautious, but seems to work.

Image[/URL]
With the driven axle and gear in place. Very zzzzzzzzz, but that's me.

Image
I like to treat the gears and washers with some fine wet and dry to ensure there are no burrs etc.

Image

Image[/URL]
Tested in chassis. This is my first CSB loco. So a few unknowns in the build for me. I've gratefully followed guidance from postings from Will; Russ and others .

Image
High level gearboxes need high level testing.

Image
Out goes the guarantee on these Gibson wheels. I make a groove along the back of two spokes - opposite each other and NEVER anywhere near the crank pin. That can cause shorting problems (via the coupling rod. Believe me.) I also put a cut in the hub in line with the scored spokes to allow the shorting wire to bend along the axle.

Image
Shorting the wheels. Note I don't solder the wires at this point. If you do that now, then when pressing the wheels on the wires are in tension and can break. Honest.

Image
I love George's wheel press. Used with the b2b.

Image
A low angle that shows wires are still not attached. Once pressed on they need guiding into the grooves cut in the spokes.

Image
If you're ever going to find religion or become an alcoholic it's now. A very hot iron, flux and a quick dab is all that's needed. Honest.

Image
The hornblocks are then slid into the chassis. Look! No pick ups! Horrid things. It's tested without and then with the coupling rods.These rods needed opening out a tad to get good running. The chassis must work at this point, or there's no point going on. I don't mean with life - just get the chassis running.

Image
Hi-tech insulation is used (masking tape).

Image
And checked.

Image
Weights test. Whether you're building split frames or not, this is where the advantage of building the chassis BEFORE the upper body become obvious. This way it's easier to spot shorts and fouling points.

Image
The boiler checked for clearance.

Image
Almost a loco.

Image
And checking ride height. The front is too high because I'd slipped too thick a piece of scrap plasticard under the body to ensure nothing shorted.
O.k you can wake up now. I'll post the 0-4-0T build soon.
Andy
Make Worcestershire great again.
Build a wall along the Herefordshire border and make them pay for it.

John Palmer
Posts: 825
Joined: Fri Jul 15, 2011 11:09 pm

Re: Split axles in use

Postby John Palmer » Fri May 17, 2013 12:58 am

Good to see another combination of split axle/CSB chassis construction. Having previously relied on equalising beam suspension I was impressed by how much easier it was to apply CSB suspension to a chassis making use of split axle current collection.

When applying shorting wires to the rear of spokes I have hit the problem of the axle guillotining the shorting wire where it enters the bore. For this reason alone I am increasingly attracted to the option of enlarging the wheel bores so that they may receive a bush into which the axle may be pressed as an interference fit. The shoulder on the bush can be slotted to receive the shorting wire, thereby supplying an ample jointing surface for the wire whilst making the bush bore an assured path by which current can reach the axle.

I have attached a shot of a K2 tender chassis in its initial stage of construction, using Studiolith frame spacer jigs to hold the frames in the correct relative positions for attachment of the PCB stretchers, In the background are the wheelsets with wheels loose upon their split axles. These give some idea of how I have attached the shorting wires to the bushes.
K2 tender frames and wheels.jpg
I find one of the biggest bugbears in split frame construction is finding a satisfactory method for making and mounting brake gear, since somewhere in the pivot-brake hanger-spreader progression an insulated joint must be introduced. I think I may try fitting insulated bushes to the frame into which rod stubs soldered into the hangers’ upper pivot points can be sprung, as this would mean that the vulnerable hangers, pull-rods and spreaders can be soldered together into a relatively robust sub-assembly. However I would like to hear how others approach this.
You do not have the required permissions to view the files attached to this post.

User avatar
Andy W
Posts: 884
Joined: Thu May 21, 2009 8:11 am

Re: Split axles in use

Postby Andy W » Fri May 17, 2013 8:32 am

Neat work John. Your shorting technique looks very robust compared to my 5 amp fuse wire approach. I do find that the shearing problem disappears when the soldering is done after the wheels are pressed. The wire is then pulled tight into the notch on the tyre, and zapped with the iron. Then it's cleaned up with a file.

The brake fittings etc are a problem. I'm going to experiment with plastic hornblocks on the next loco so the chassis stays neutral. The only picks ups will be via the CSBs. Possibly a recipe for sparking - but that doesn't happen on a live chassis so it shouldn't on a neutral one. (Should it?) Whether the current flows is another matter, but as this will be an 0-6-0 with tender there should be enough wheels to provide the juice.
Make Worcestershire great again.
Build a wall along the Herefordshire border and make them pay for it.

hollybeau
Posts: 91
Joined: Thu Jul 30, 2009 10:03 am

Re: Split axles in use

Postby hollybeau » Thu May 30, 2013 11:23 am

Interesting thread.
Wherever possible these days I use the Alan Gibson brass-centred wheels (see my article in a recent Snooze). However, the range is limited (as yet) and even I have to resort to plastic wheels and the problem of shorting that has been outlined here. I too have had problems with the thin wires snapping off when the axle is pushed in and- even worse - a wobbly wheel which when refitted in an attempt to cure the wobble inevitably ends up with a loose fitting wheel and sometimes a fresh start.
Can I therefore offer a simple, trouble-free solution - don't bother to "trap" the wire in between the wheel and axle just have it bear against the axle itself. If you use sping wire - say the ubiquitous guitar spring a la Alex Jackson coupling or CSB use and solder it to the rim after the wheels are on and quartered with the wire held so that it springs onto the axle then the job becomes much easier. You need to remember to first put a fibre washer on and have the wire between the wheel and the washer so that there is no tendency for the wire to "jag out" and interefere with smooth running.
An alternative to doing the soldering afterwards is to solder the wire onto the rim (in a slight cut done with a piercing saw) and have the wire run straight from there down the back of a spoke and out and across the centre line of the hub. When the axle is inserted later the wire moves to one side and the resultant springiness is enough to keep it in contact with the axle. It is of course in constant contact with the same part of the axle: it is not turning around it.
I claim no credit for this idea. It came from Chris Gibbons of High Level fame when we were chatting in a quiet moment at the EMGS north exhibition when it was at Slaithwaite a few years ago. Hope this is useful.

Bryan

Mark Tatlow
Posts: 899
Joined: Tue Dec 02, 2008 11:24 pm

Re: Split axles in use

Postby Mark Tatlow » Thu May 30, 2013 3:52 pm

A suggestion that I had from Bill Bedford for connecting shorting wires to the axle is to solder them to a brass washer (whcih we might well be using anyway) between the wheel and hornblock. There is more than sufficent electrical contact between the washer and axle for conductivity.

Not done it myself yet, but will be soon!
Mark Tatlow

Natalie Graham

Re: Split axles in use

Postby Natalie Graham » Thu May 30, 2013 4:51 pm

I haven't done any in 4mm (yet) but for plastic centred 3mm 14.2mm gauge ones my method was to drill a hole where the plastic wheel centre meets the metal rim, half in each, which sounds like it should be tricky to do because of the drill wandering into the softer material but in pracice drilled quite easily. I was using half axles and muffs a la the 2mm Scale method so drilled a hole throught the axle as well and the shorting wire was a tight push fit into that. An L-shaped leg on the other end went into the hole at the rim and was soldered in place, the soldering iron also being used to melt the wire into the back of a spoke. Again it sounds alarming but I never had a disaster of the melted spoke variety. Or indeed of any other kind, the method worked rather well and kept the rear of the wheel flush without the wire sticking up. I am not sure how easy it would be to drill the holes in a ready assembled axle though. It would require some pretty accurate marking out and drilling. Using half axles they can be left over length and trimmed at either end as required once the wire is in the right place

User avatar
jjnewitt
Posts: 325
Joined: Sat Jan 02, 2010 5:04 pm

Re: Split axles in use

Postby jjnewitt » Thu May 30, 2013 8:30 pm

Mark Tatlow wrote:A suggestion that I had from Bill Bedford for connecting shorting wires to the axle is to solder them to a brass washer (whcih we might well be using anyway) between the wheel and hornblock. There is more than sufficent electrical contact between the washer and axle for conductivity.


I recently did one of my sprung bogie conversions on a Dapol Western and while it doesn't have split axles I shorted the axles so that each bogie was live with the opposite polarity (way too much brass around for my liking with my usual wire pickups). I used Bill Bedfords shorting wires which are etched in 0.005" brass and basically consist of a washer with connecting tabs. There is no problem at all with electrical conductivity, it works a treat! I might well use it on other conversions where I can insulate the bolster plate from the metal 'spine'.

Justin

User avatar
Ian Everett
Posts: 379
Joined: Tue Jul 21, 2009 9:43 pm

Re: Split axles in use

Postby Ian Everett » Fri May 31, 2013 8:08 am

jjnewitt wrote:
Mark Tatlow wrote:A suggestion that I had from Bill Bedford for connecting shorting wires to the axle is to solder them to a brass washer (whcih we might well be using anyway) between the wheel and hornblock. There is more than sufficent electrical contact between the washer and axle for conductivity.


I recently did one of my sprung bogie conversions on a Dapol Western and while it doesn't have split axles I shorted the axles so that each bogie was live with the opposite polarity (way too much brass around for my liking with my usual wire pickups). I used Bill Bedfords shorting wires which are etched in 0.005" brass and basically consist of a washer with connecting tabs. There is no problem at all with electrical conductivity, it works a treat! I might well use it on other conversions where I can insulate the bolster plate from the metal 'spine'.

Justin

I too have used BB's shorting etches with complete success, and also with Brassmasters'.

Ian

User avatar
Andy W
Posts: 884
Joined: Thu May 21, 2009 8:11 am

Re: Split axles in use

Postby Andy W » Fri May 31, 2013 9:59 am

Yes interesting ideas. I'm sure they work. However, I'm a great believer in the KISS theory, so I find using .5 fuse wire in grooved wheels, soldered after the wheels are pressed on works for me. Having now run this loco loco on several layouts and test tracks it's performed without a wobble or a stall.

However I'm always looking to try new things out to find easier/better ways of doing things. On this loco I've tried three experimental (for me) approaches which have all been gleaned from this forum. I thought this would be a good time to assess them and see if I'll be using them again on future locos. They are CSBs; knuckle joints on the coupling rods and using a Hobby Holiday jig to set up the chassis.

CSBs: Using a High Level jig to set out the pivot points was straightforward and my concerns about fixing the ride height was also unfounded as this seemed to sort itself out. In any case there is the ability to adjust this via the different holes in the ride tags and/or the thickness of the springs. A signifiant advantage of CSBs as opposed to beams is the ability to remove the wheels after the chassis has been tested, and before painting.

The clincher, however, is that this loco runs very smoothly. So I will definitely use CSBs again.

Knuckle joints. I have to admit I was sceptical about Will's claims that this was the best way to joint rods. However, after his patient explanations, I understood the theory. Again it works - because an element of slop is taken away.

Chassis Jig. I love jigs. And this one worked a treat. It also provides a rolling road. By using this plus a GW wheel press a number of major variants are eliminated. A definite hit.

So I've learned a lot building this loco, and it's proved what a huge boon this board is. Thanks to the input of people like Will; Tim; Russ; Jol and all the others I've pushed my modelling on a step or two, and it's helped me to experience an enjoyable build.

Here's the stage the loco's at now. I'm setting up some adapted Brassmaster couplings for the motor train working. It's unlined, but not unloved.

Image

Image
Make Worcestershire great again.
Build a wall along the Herefordshire border and make them pay for it.

billbedford

Re: Split axles in use

Postby billbedford » Fri May 31, 2013 12:00 pm

If it was really KISS there would be no need to split the frames or have pickups at all……...

jaytwentyone
Posts: 1
Joined: Sat Mar 10, 2012 4:56 pm

Re: Split axles in use

Postby jaytwentyone » Sat Nov 02, 2013 8:42 pm

Regarding brakes on Split Axle Loco's, just fix the cross wires as you would with a 'normal' wiper pick-up set up but use a higher melting point solder e.g. 145 on copperclad spacers and 188 on inside of frames where top wires cross over. Then snip wires off at back of frames. You can then use thin plastic rod ( by Slaters) ay the bottom of brake shoes and epoxy your pull rods to these. The brakeshoes can be set as near to the wheels as you like, as there is no chance of shorting. On the subject of shorting pieces from axle to back of tyre, the EM Gauge Society sell a fret of these which has both sizes required, and I believe this is a better method than pushing a wire alongside the axle ! They also sell 1/8th axles already assembled and an insulating 'muff' 2mm inside diameter for tender axles.


Return to “Chassis and Suspensions”

Who is online

Users browsing this forum: ClaudeBot and 1 guest