My First S4 Locomotive: Springing Up A Bachmann Class 25/1 Diesel

Martin Kelly
Posts: 114
Joined: Mon Aug 02, 2021 10:03 am

My First S4 Locomotive: Springing Up A Bachmann Class 25/1 Diesel

Postby Martin Kelly » Thu Jun 22, 2023 3:58 pm

I've dithered a lot about where to start when it comes to motive power but I've finally made a decision. I'm going to attempt to convert a Bachmann Class 25/1 diesel to ScaleFour by using the Penbits sprung bogies kit and set of Ultrascale wheels that I sourced through the kind assistance of Society members in these fora (Tony Wilkins in particular). I know the Bachmann model has a number of prototype inaccuracies but I'm going to live with those and focus on three aims for this project:

1). Finish up with an operational ScaleFour locomotive.
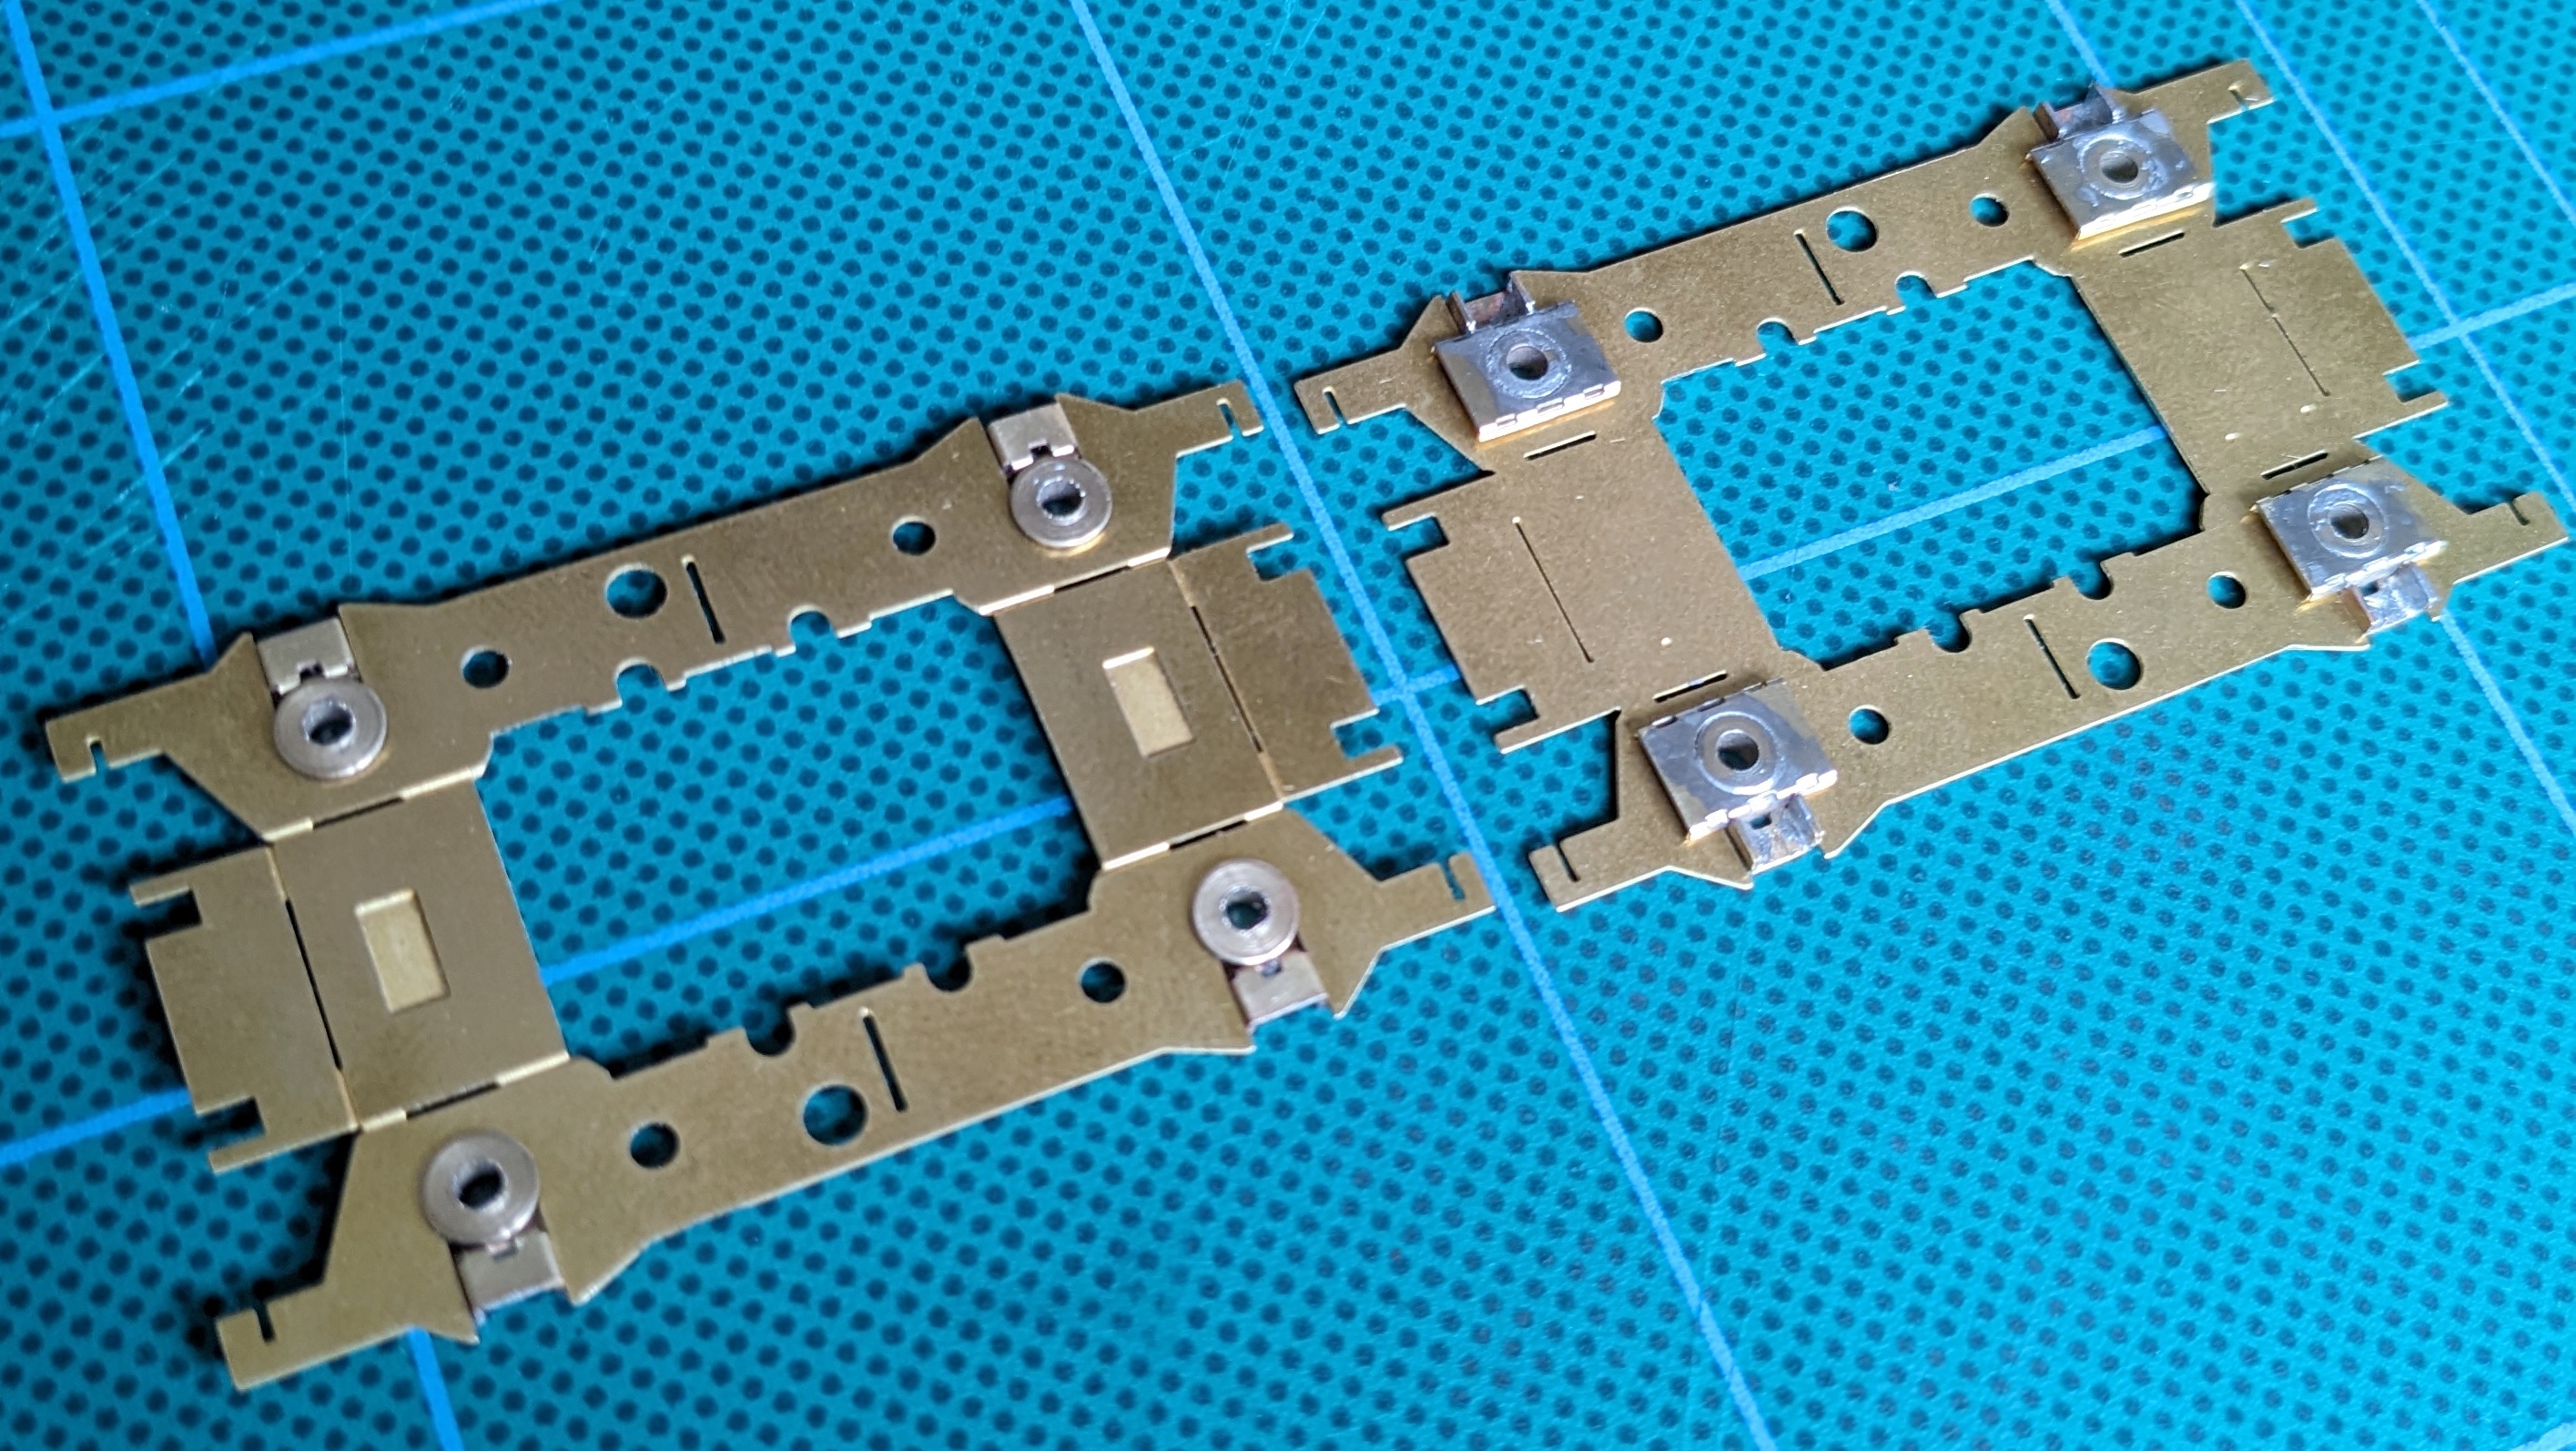
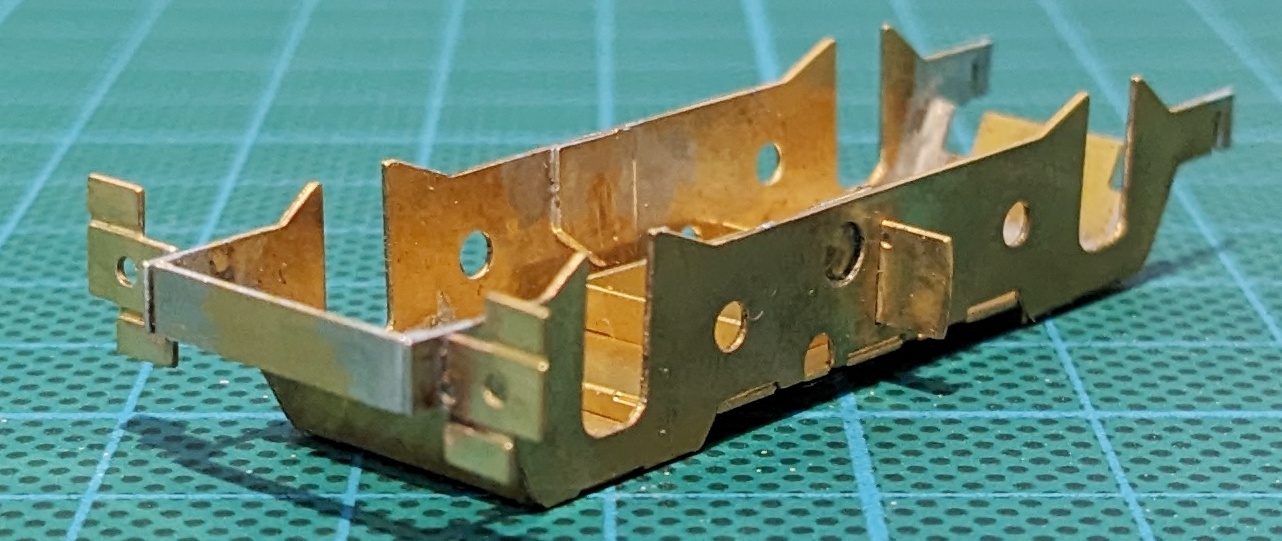
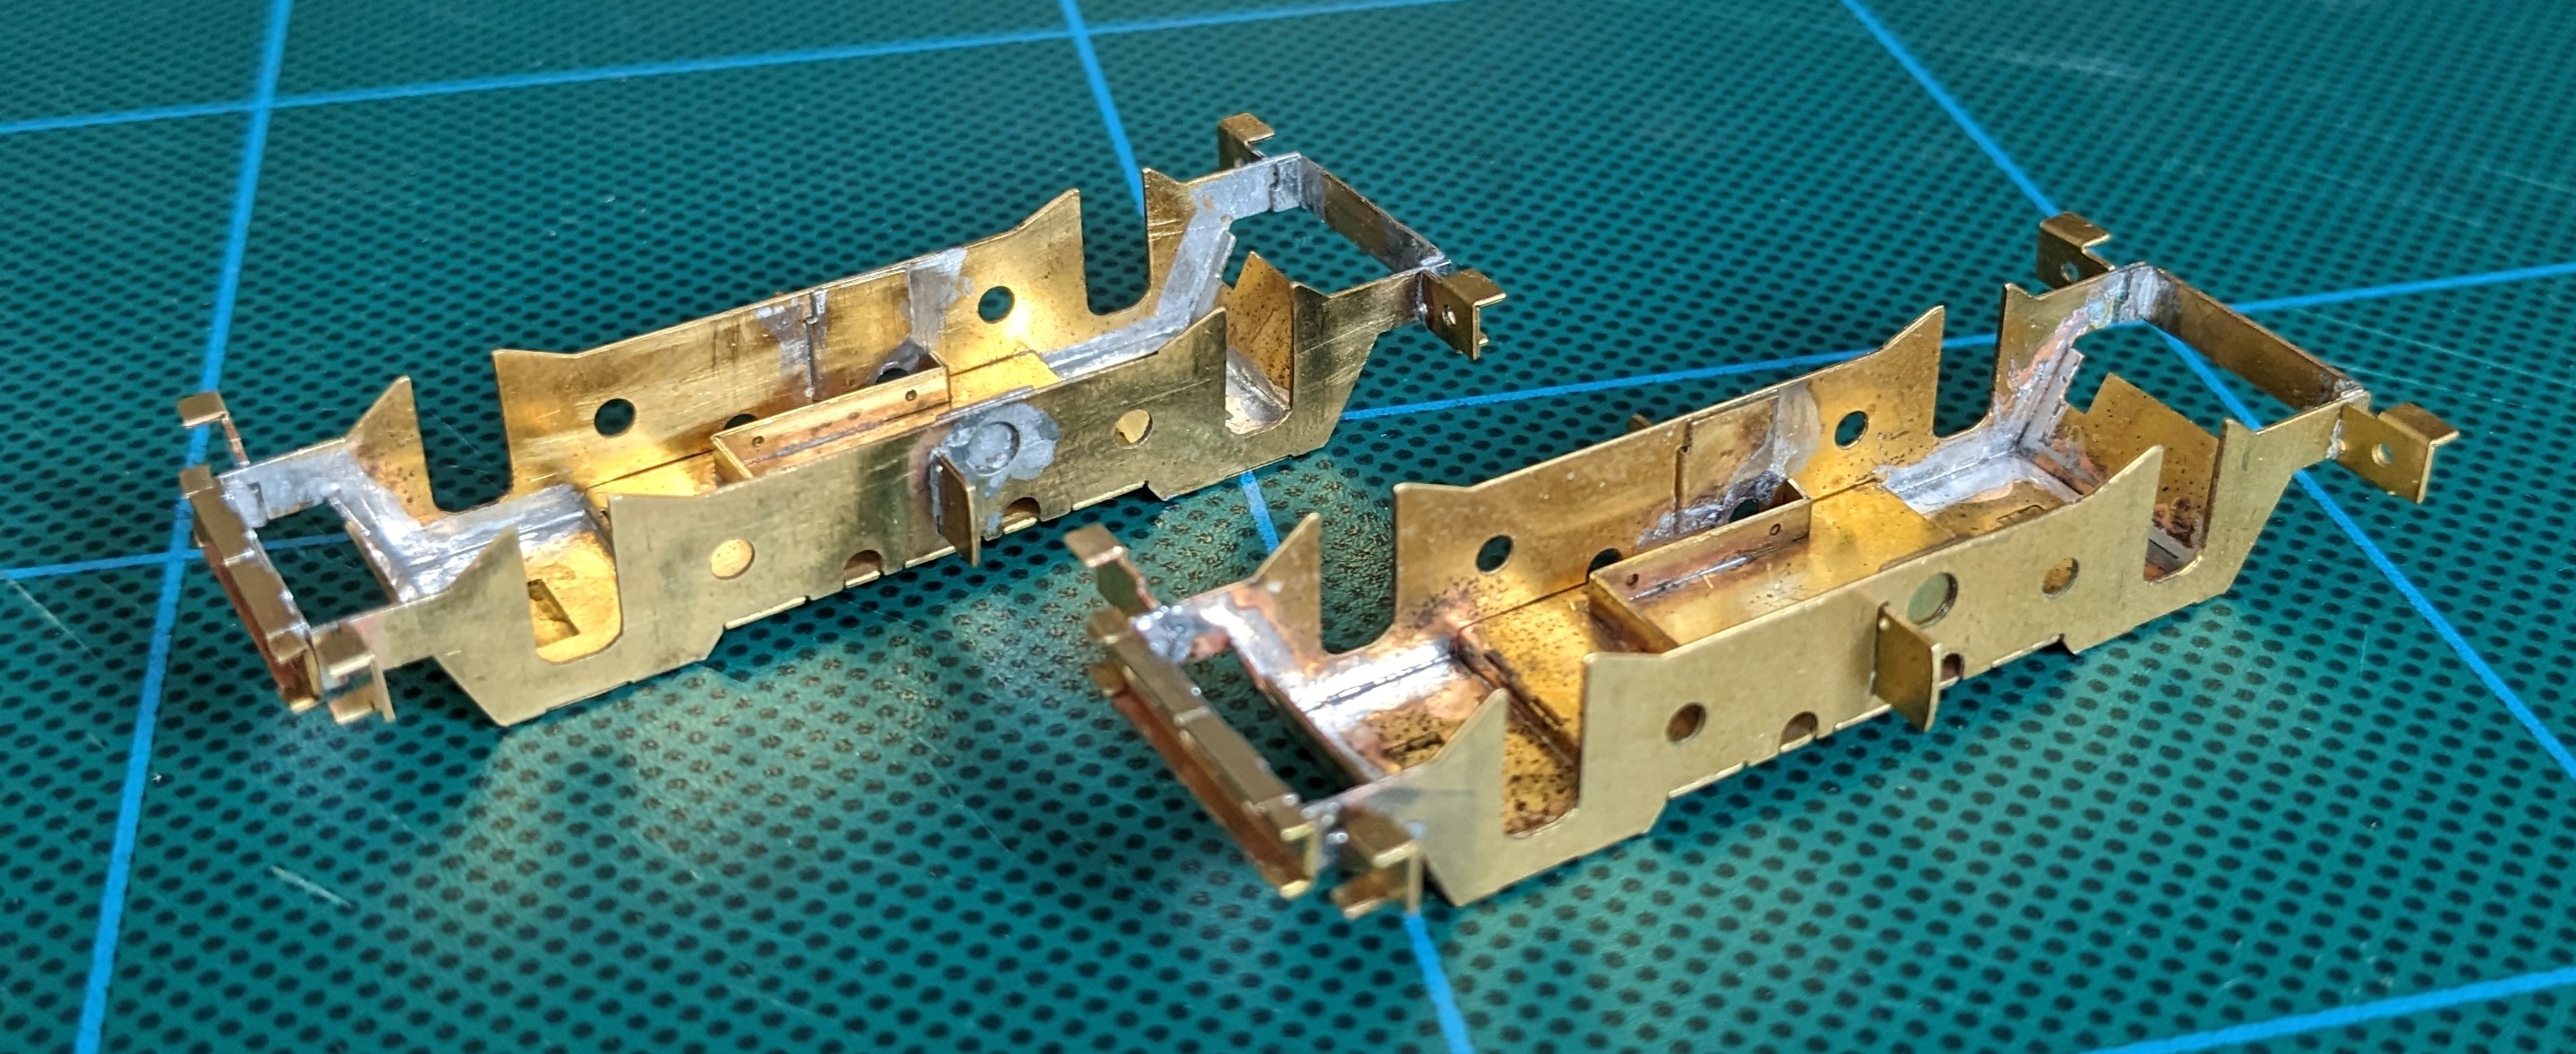
2). Learn all about Penbits sprung bogies so that I can apply that knowledge to future projects.
3). Experiment with a selection of ideas I have for stripping, repainting, decaling and weathering diesel locomotives.

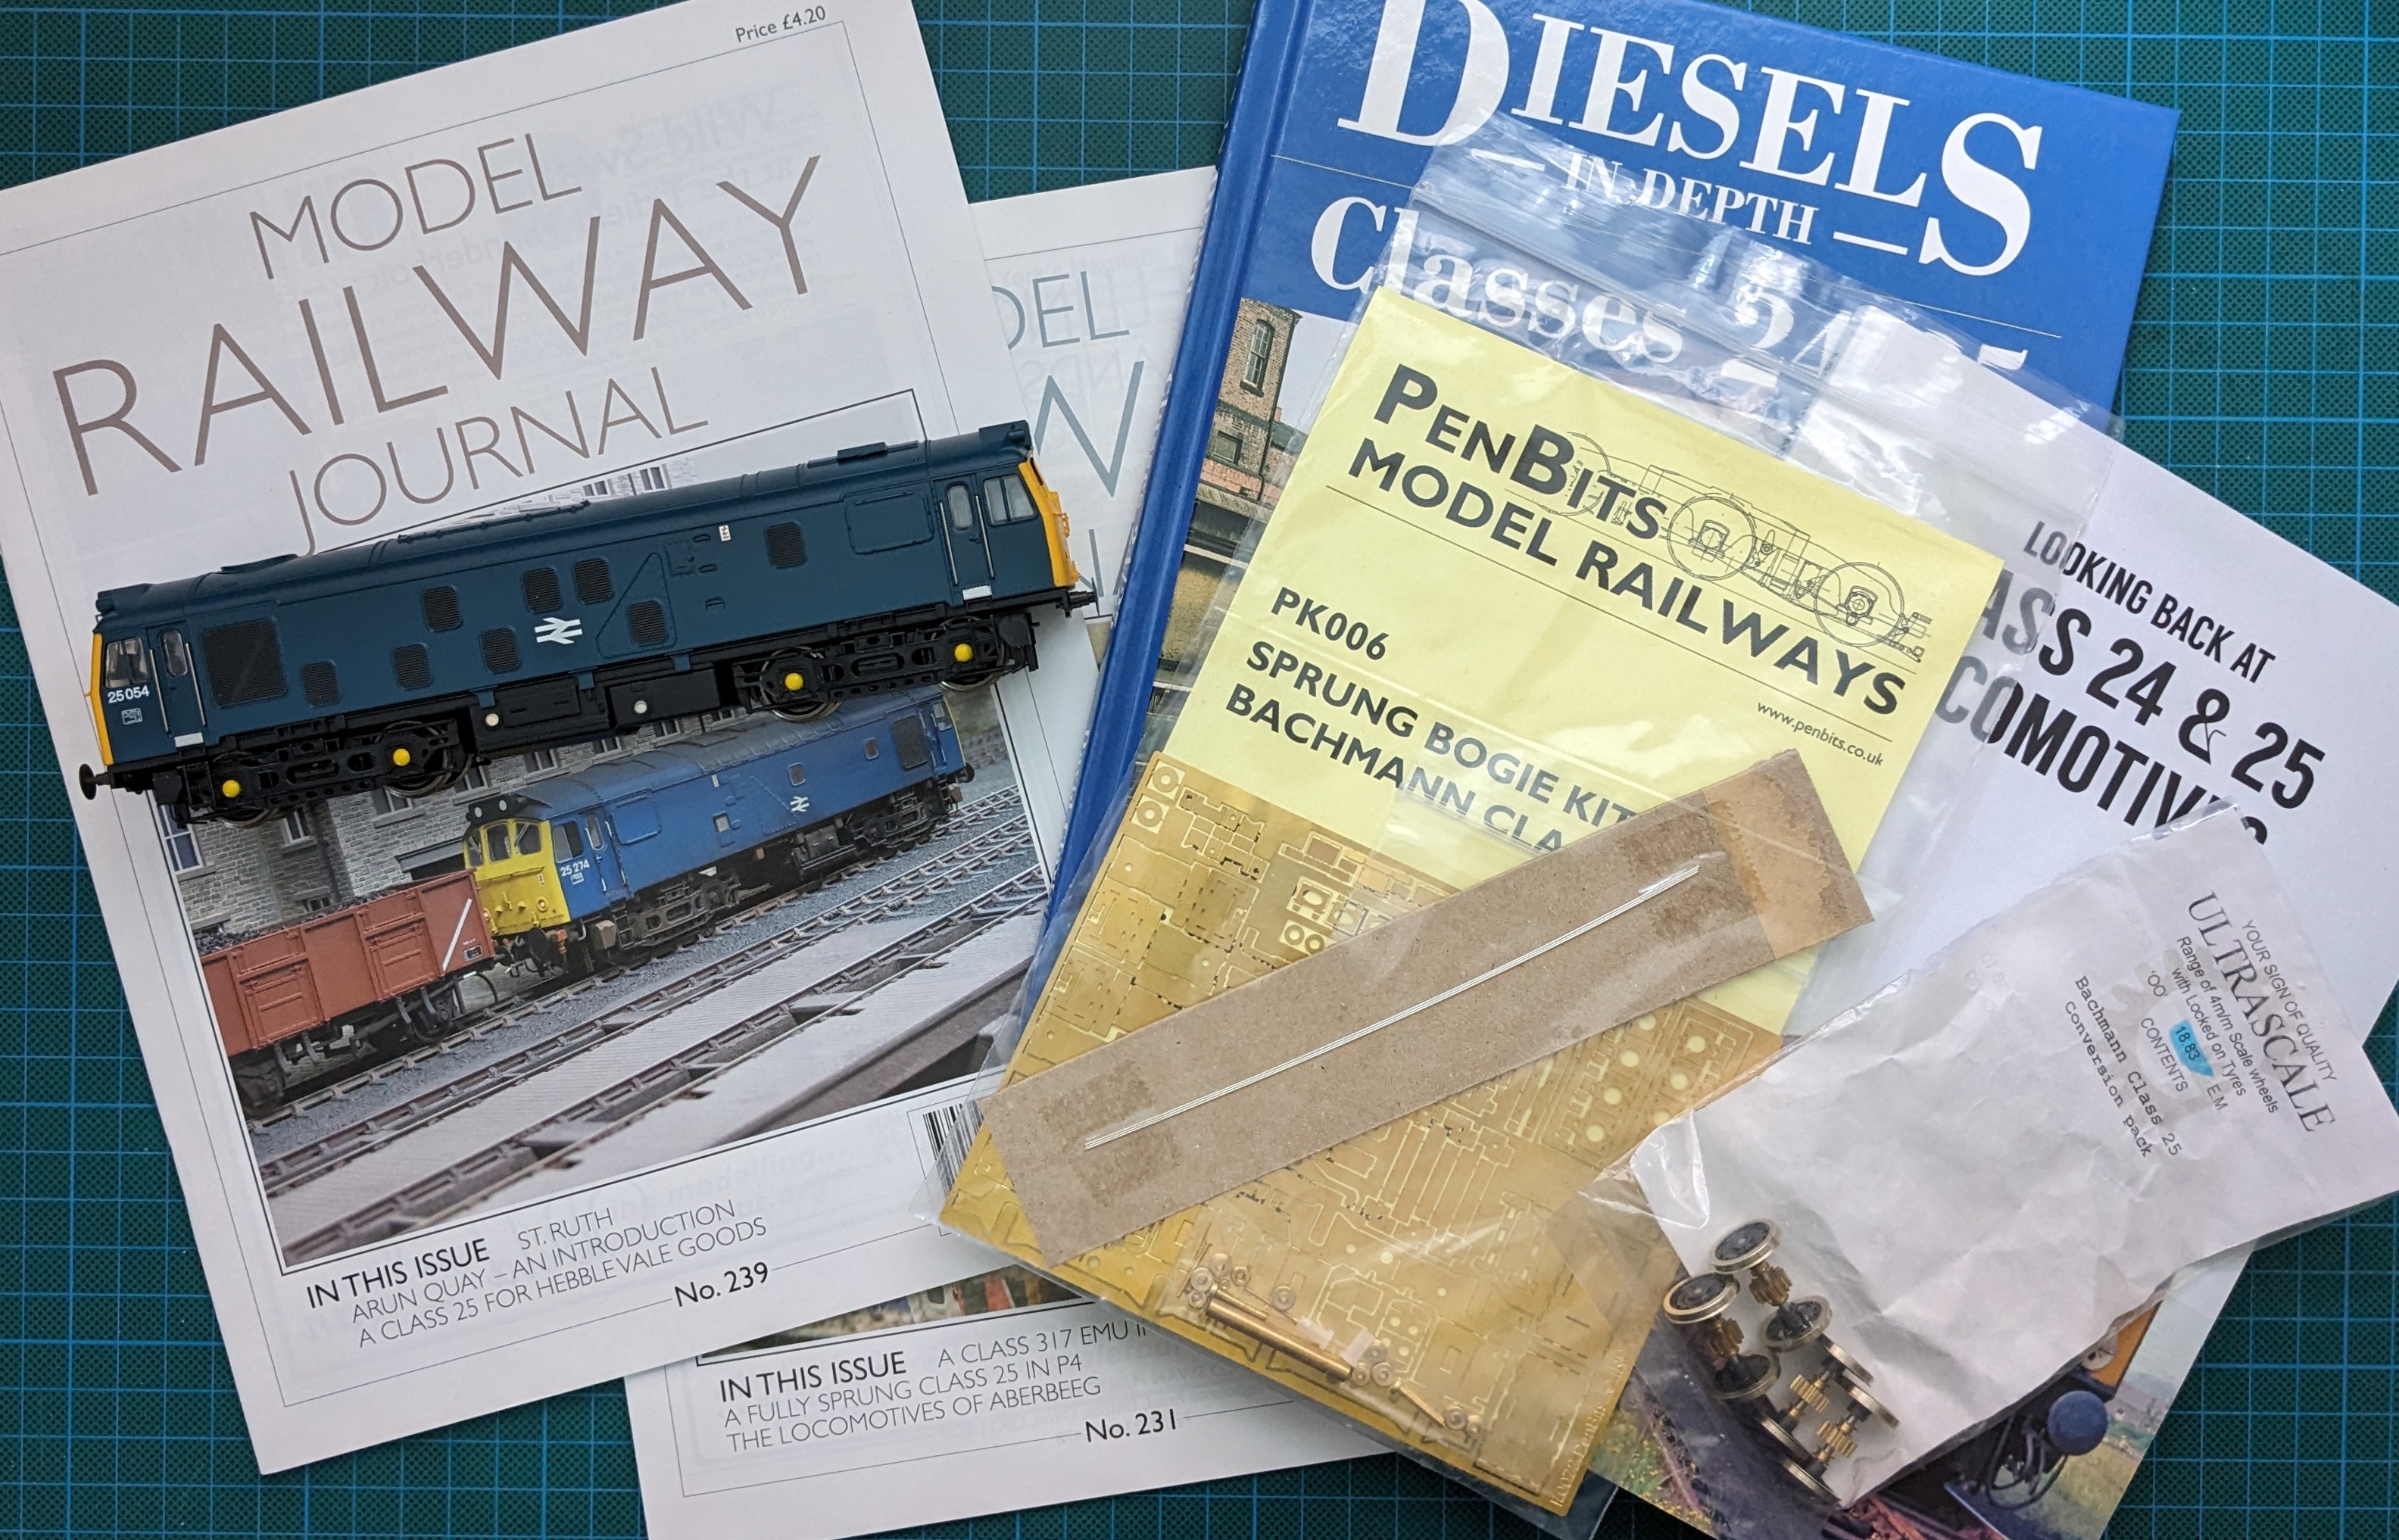
With all that in mind, I've acquired a range of materials to help me on my way:

Image

I'm not expecting this to be a fast moving project but I'll share brief updates periodically here and link to fully descriptions of my progress (or the lack of it!) on my blog. Starting with this:

https://everywagontellsastory.wordpress ... roduction/

I expect I'll encounter a few trials and tribulations along the way. So maybe some of you with greater experience will be able to help me get out of any pickles I get into :-)
Last edited by Martin Kelly on Tue Oct 24, 2023 11:30 am, edited 2 times in total.

mikeknowles
Posts: 72
Joined: Mon Dec 01, 2008 8:58 am

Re: My First S4 Locomotive: Springing Up A Bachmann Class 25/1 Diesel

Postby mikeknowles » Thu Jun 22, 2023 4:28 pm

Hello Martin.
Good to see you having a go. The Class 25 was the first loco I converted to P4 using the same combination of Penbits sprung bogies and Ultrascale wheels. I found the whole process quite straightforward due in particular to the extremely accurate etchings from Penbits (they almost clipped together) and also the comprehensive instructions.
If you can lay your hands on it there's a very good article in DEMU Update magazine issue 48 (from a few years ago) by Jim Smith Wright detailing modifications to improve the body and chassis.
Since then I have done a Class 37 using the Penbits bogies and a 31 using those available from Rumney Models. Again good to put together.
Good luck with it all, keep us posted.

User avatar
John Donnelly
Web Team
Posts: 1092
Joined: Fri Mar 16, 2012 7:03 pm

Re: My First S4 Locomotive: Springing Up A Bachmann Class 25/1 Diesel

Postby John Donnelly » Fri Jun 23, 2023 7:20 am

mikeknowles wrote:Hello Martin.
the comprehensive instructions.


I'd go so far as to say that they are the best instructions I've ever come across.

John

Martin Kelly
Posts: 114
Joined: Mon Aug 02, 2021 10:03 am

Re: My First S4 Locomotive: Springing Up A Bachmann Class 25/1 Diesel

Postby Martin Kelly » Fri Jun 23, 2023 9:52 am

mikeknowles wrote:Hello Martin.
Good to see you having a go. The Class 25 was the first loco I converted to P4 using the same combination of Penbits sprung bogies and Ultrascale wheels. I found the whole process quite straightforward due in particular to the extremely accurate etchings from Penbits (they almost clipped together) and also the comprehensive instructions.
If you can lay your hands on it there's a very good article in DEMU Update magazine issue 48 (from a few years ago) by Jim Smith Wright detailing modifications to improve the body and chassis.
Since then I have done a Class 37 using the Penbits bogies and a 31 using those available from Rumney Models. Again good to put together.
Good luck with it all, keep us posted.


Hello Mike!

Thank you for the encouragement. I really enjoyed seeing Boston Frodsham at Scaleforum last September (plus the article in the last issue of ScaleFour News). I suspect that you have had some subliminal influence on my choice to do this project! So thank you for that. Jim S-W has already pointed me in the direction of his article but I appreciate you mentioning it too.

And yes, as John D. wrote, another factor in the choice of this project was Ian Penberth's exception instructions for his sprung bogie kits. They give me real confidence that I can follow them and get a good outcome.

Worzels Works
Posts: 74
Joined: Tue Jun 20, 2023 4:04 am

Re: My First S4 Locomotive: Springing Up A Bachmann Class 25/1 Diesel

Postby Worzels Works » Fri Jun 23, 2023 10:14 am

This will be one to follow with interest! Good luck Martin, having read your blog a little this morning I must say I'm inclined to follow your footsteps into the world of brass with wagons first, currently waiting for Judith Edge to restock the Oxford Janus chassis etches as my first crack at a loco... but a real soft spot for Sulzer type 2's lurks dangerously in me :shock: must stay focused...

Looking forward to further updates! Keep it up :thumb
Yours aye,
James

Martin Kelly
Posts: 114
Joined: Mon Aug 02, 2021 10:03 am

Re: My First S4 Locomotive: Springing Up A Bachmann Class 25/1 Diesel

Postby Martin Kelly » Sat Jun 24, 2023 4:01 pm

Thanks for the words of encouragement, James!

Sadly, today, I couldn't make it to sunny Devon for the Society's AGM so, instead, I consoled myself with a bit of modelling. The first stage in building the Penbits sprung bogies is to assemble the bearing carriers. A couple of hours folding, soldering and fettling has resulted in the eight bearing carriers running smoothly when test fitted in their axle slots on the subframes...

Image

All in all, a pretty satisfactory outcome. Full details, if you're interested, on my blog at:

https://everywagontellsastory.wordpress ... -carriers/

Try not to look to closely at some of the slightly less than tidy soldering!

Martin Kelly
Posts: 114
Joined: Mon Aug 02, 2021 10:03 am

Re: My First S4 Locomotive: Springing Up A Bachmann Class 25/1 Diesel

Postby Martin Kelly » Tue Jul 04, 2023 12:41 pm

Here's the next little instalment of progress on my project. Mixed results this time: I made a mistake and had some misfortune putting together the subframes. However, it's all part of the learning curve and one of my objectives with this project was to learn about the ins and outs of the Penbits sprung bogie kit. And I certainly did learn from this experience!

Here's what one of the subframes looks like after I fixed my mistake with the inner stretcher part but it's still not finished because I managed to drop and break the outer stretcher part:

Image

You can read more about this slightly chastening part of the journey in my lates blog posting at:

https://everywagontellsastory.wordpress ... subframes/

Martin Kelly
Posts: 114
Joined: Mon Aug 02, 2021 10:03 am

Re: My First S4 Locomotive: Springing Up A Bachmann Class 25/1 Diesel

Postby Martin Kelly » Sat Aug 26, 2023 3:36 pm

Summer holidays and a couple of other distractions have slowed progress but I recently got time to work on the bolsters for the Penbits sprung bogies. I'm pleased to say this stage went much better than the subframes and the outcome looks like this:

Image

In general, I followed the excellent instructions to the letter but I did take a slightly different approach to a couple of tasks - in particular soldering the nuts to the bolster centres in a way that avoided the risk of also soldering the bolts! You can read all about it in my latest blog post:

https://everywagontellsastory.wordpress ... -bolsters/

When I get my hands on a second kit, I can plunder it for spare parts to resume work on the subframes. Otherwise, I'll probably test assemble the wheels.

Terry Bendall
Forum Team
Posts: 2428
Joined: Sun Jul 27, 2008 7:46 am

Re: My First S4 Locomotive: Springing Up A Bachmann Class 25/1 Diesel

Postby Terry Bendall » Sun Aug 27, 2023 7:49 am

Martin Kelly wrote:In general, I followed the excellent instructions to the letter but I did take a slightly different approach to a couple of tasks - in particular soldering the nuts to the bolster centres in a way that avoided the risk of also soldering the bolts!


Out of interest, I looked atm your blog and the method of using a cocktail stick works perfectly well. A trick which also works, and may well be mentioned in the Penbits instructions, is to cover the treads of the screw with lubricating grease which will avoid the problem of soldering up the screw.

Terry Bendall

Martin Kelly
Posts: 114
Joined: Mon Aug 02, 2021 10:03 am

Re: My First S4 Locomotive: Springing Up A Bachmann Class 25/1 Diesel

Postby Martin Kelly » Tue Aug 29, 2023 8:07 am

Hi Terry!

Yes, Ian's excellent instructions do mention the grease technique, you can see the relevant part here:

https://www.penbits.co.uk/Content/KitDo ... lster.html

I've also seen people recommend things like permanent marker pen.

In the end, it's good to know that there's more than one "right way" to tackle challenges like this. Different ones suit different people at different times. The cocktail stick method fits in with my ways of working but the other methods are equally valid.

Thanks for taking the time to read my blog.

Philip Hall
Posts: 1956
Joined: Mon Aug 10, 2009 7:49 pm

Re: My First S4 Locomotive: Springing Up A Bachmann Class 25/1 Diesel

Postby Philip Hall » Tue Aug 29, 2023 8:21 am

Permanent marker pen works, but I also use chemical blackening from a etch marker pen.

Philip

User avatar
Will L
Posts: 2527
Joined: Sun Jul 20, 2008 3:54 pm

Re: My First S4 Locomotive: Springing Up A Bachmann Class 25/1 Diesel

Postby Will L » Tue Aug 29, 2023 3:31 pm

Philip Hall wrote:Permanent marker pen works, but I also use chemical blackening from a etch marker pen.

Philip


The marker pen will work to stop solder flow, but you cant hold the nut in place with it while your solder it on :D .

User avatar
zebedeesknees
Posts: 334
Joined: Mon Jul 12, 2010 5:15 pm

Re: My First S4 Locomotive: Springing Up A Bachmann Class 25/1 Diesel

Postby zebedeesknees » Wed Aug 30, 2023 10:29 am

Will L wrote:
Philip Hall wrote:Permanent marker pen works, but I also use chemical blackening from a etch marker pen.

Philip


The marker pen will work to stop solder flow, but you cant hold the nut in place with it while your solder it on :D .

While I had some blackening liquid mixed, I dropped two of each BA size and a couple of 2mm brass screws into it.
Once blackened, they can be used to hold the nut, after filing any burrs from the nut mating face and it can be srewed tightly into place so that the solder can flow round it with little chance of the solder getting to the thread. The screw can be released even if it does, and that can be cleaned out with a tap, though it often makes the clean screw a tighter fit so less likely to loosen in service.

Ted.
(A purists' purist)

davebradwell
Posts: 1181
Joined: Fri Jan 18, 2019 3:48 pm

Re: My First S4 Locomotive: Springing Up A Bachmann Class 25/1 Diesel

Postby davebradwell » Wed Aug 30, 2023 6:05 pm

You can just screw nuts in place using a tap as a screw. Solder fills tap and you just wind it out. Saves a lot of preparation.

DaveB

Martin Kelly
Posts: 114
Joined: Mon Aug 02, 2021 10:03 am

Re: My First S4 Locomotive: Springing Up A Bachmann Class 25/1 Diesel

Postby Martin Kelly » Wed Aug 30, 2023 6:48 pm

Well, that's an interesting selection of techniques. I knew that blackening fluid was solder resistant but I never thought of dunking whole bolts in it!

davebradwell wrote:You can just screw nuts in place using a tap as a screw. Solder fills tap and you just wind it out. Saves a lot of preparation.


Dave, I presume that's because the tap is made from steel and hence the solder won't bond it to the brass. Is that right or have I misunderstood the chemistry at play here?

davebradwell
Posts: 1181
Joined: Fri Jan 18, 2019 3:48 pm

Re: My First S4 Locomotive: Springing Up A Bachmann Class 25/1 Diesel

Postby davebradwell » Wed Aug 30, 2023 9:46 pm

It doesn't matter what happens to it, the tap just cuts its way out. As it's probably a bit greasy from previous applications of RTD, it's unlikely the solder would get a good hold anyway but it certainly gets in and has a go. I've been doing it like this for years and it has appeared in some of my instructions.

DaveB

User avatar
Will L
Posts: 2527
Joined: Sun Jul 20, 2008 3:54 pm

Re: My First S4 Locomotive: Springing Up A Bachmann Class 25/1 Diesel

Postby Will L » Wed Aug 30, 2023 11:06 pm

davebradwell wrote:It doesn't matter what happens to it, the tap just cuts its way out. As it's probably a bit greasy from previous applications of RTD, it's unlikely the solder would get a good hold anyway but it certainly gets in and has a go. I've been doing it like this for years and it has appeared in some of my instructions.

DaveB


Interesting. As a confirmed cocktail stick user, I generally run a tap through the nut after I've soldered it down. I like the hole under the nut to be a little undersize too so you end up with the taped hole extending through that as well so the nuts even less likely to come unstuck in use. Given that taps are a bit brittle and easy to brake if not treated with care, I would be a bit wary of doing it your way but clearly it works for you.

davebradwell
Posts: 1181
Joined: Fri Jan 18, 2019 3:48 pm

Re: My First S4 Locomotive: Springing Up A Bachmann Class 25/1 Diesel

Postby davebradwell » Thu Aug 31, 2023 8:14 am

You're only tapping the solder, Will and hopefully not too much of it. As long as you use a pin-vice as a tapwrench and not something with a long lever the tap should be quite safe. If you're tapping the plate as well then do this first and then with tap still in the job just run the nut up against it.

DaveB

davebradwell
Posts: 1181
Joined: Fri Jan 18, 2019 3:48 pm

Re: My First S4 Locomotive: Springing Up A Bachmann Class 25/1 Diesel

Postby davebradwell » Thu Aug 31, 2023 10:58 am

Will also throw-in that I use plumbers flux which doesn't encourage a bond to steel.

DaveB

Martin Kelly
Posts: 114
Joined: Mon Aug 02, 2021 10:03 am

Re: My First P4 Locomotive: Springing Up A Bachmann Class 25/1 Diesel

Postby Martin Kelly » Sun Oct 15, 2023 9:26 am

Time for a little progress update. Having acquired another Penbits kit, I raided it for the replacement part I needed to finish the subframe work. Now I have two complete subframes like this:

Image

This feels like a milestone has been achieved! More details in my latest blog posting:

https://everywagontellsastory.wordpress ... revisited/

I'm going to look at the wheels next so that I can test assemble the subframe springing to check that it works smoothly.


Return to “Martin Kelly”

Who is online

Users browsing this forum: ClaudeBot and 0 guests