That last shot in particular is stunning...
John
New Street
-
John Donnelly

- Web Team
- Posts: 1092
- Joined: Fri Mar 16, 2012 7:03 pm
-
jim s-w

- Posts: 2189
- Joined: Wed Jul 30, 2008 5:56 pm
Re: New Street progress
Thanks chaps
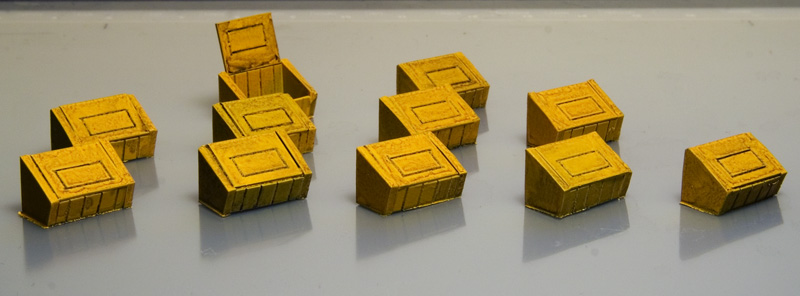
I was hoping the Bachmann grit boxes would be just the third RTP item i could use on the layout. However its an odd design and certainly nothing like the ones at New Street in the '80s. So, armed with some dimensions from a suppliers website, some bits of plasticard and some yellow paint I have made a batch of my own.
Cheers
Jim
-
Trevor Grout
- Posts: 137
- Joined: Mon Jul 21, 2008 10:34 am
Re: New Street progress
I hope there all empty too, oh and where is the one with the missing and or broken lid.. nice work jim
-
jim s-w
- Posts: 2189
- Joined: Wed Jul 30, 2008 5:56 pm
Re: New Street progress
Hi All
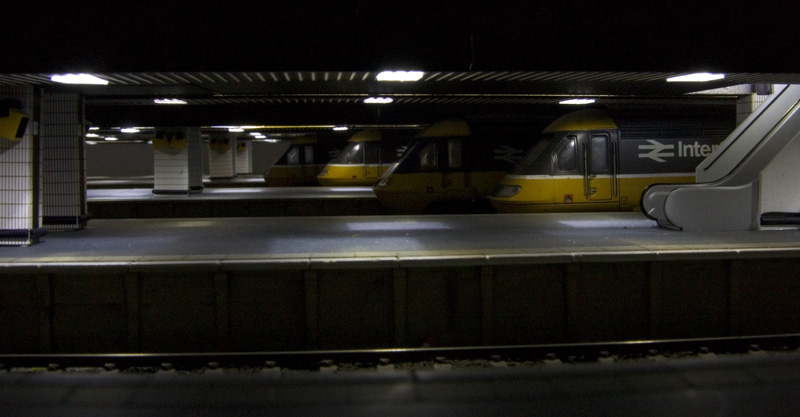
A few more under the roof pictures.


101 departs ECS for Tysley (with a smidge of photoshop)
Cheers
Jim
A few more under the roof pictures.
101 departs ECS for Tysley (with a smidge of photoshop)
Cheers
Jim
-
Re6/6

- Posts: 492
- Joined: Sat Jul 26, 2008 4:53 pm
-
jim s-w
- Posts: 2189
- Joined: Wed Jul 30, 2008 5:56 pm
Re: New Street progress
Thanks
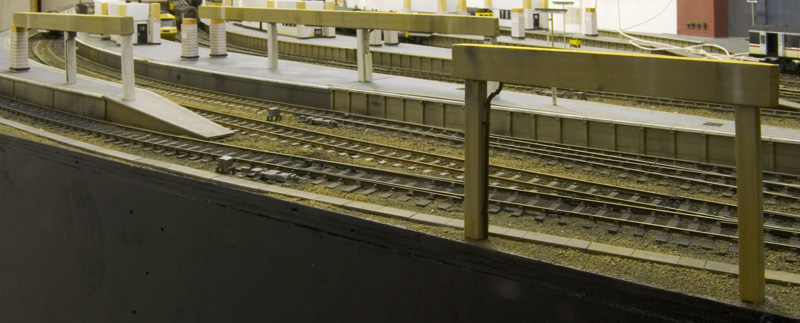
Knocked up a few of the supporting pillars for the Derby side of the station
For more see http://www.p4newstreet.com/category/workbench
Cheers
Jim
Knocked up a few of the supporting pillars for the Derby side of the station
For more see http://www.p4newstreet.com/category/workbench
Cheers
Jim
-
jim s-w
- Posts: 2189
- Joined: Wed Jul 30, 2008 5:56 pm
Re: New Street progress
Hi All
I do promise that I will get bored with taking pictures under the roof at some point but a few more that I am quite pleased with.
Cheers
Jim
I do promise that I will get bored with taking pictures under the roof at some point but a few more that I am quite pleased with.
Cheers
Jim
-
DougN
- Posts: 1253
- Joined: Wed Sep 01, 2010 9:57 am
Re: New Street progress
Why Jim, I think you have more than enough time to take heaps and put the fug of all those throbbing Diesel engines in. 
Doug
Still not doing enough modelling
Still not doing enough modelling
-
jim s-w
- Posts: 2189
- Joined: Wed Jul 30, 2008 5:56 pm
Re: New Street progress
Thanks Doug
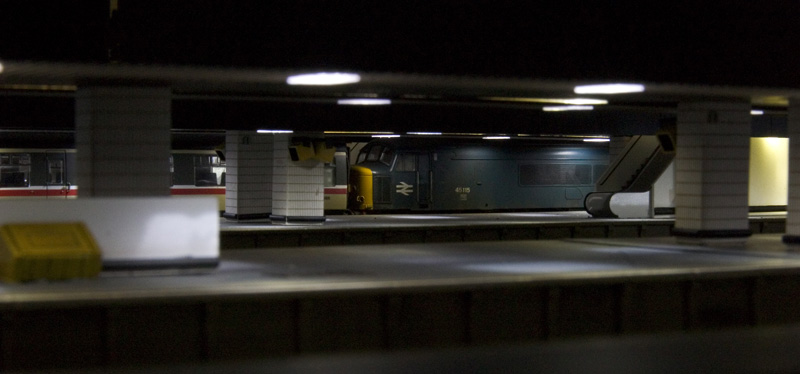
In response to a request on another forum a few pictures of electric loco's
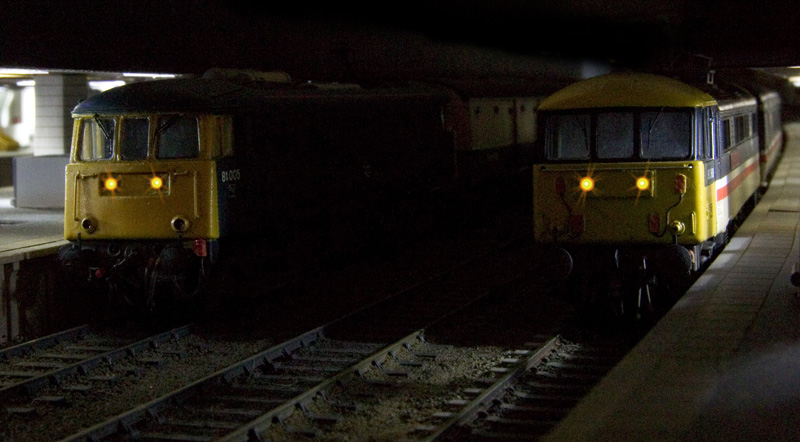
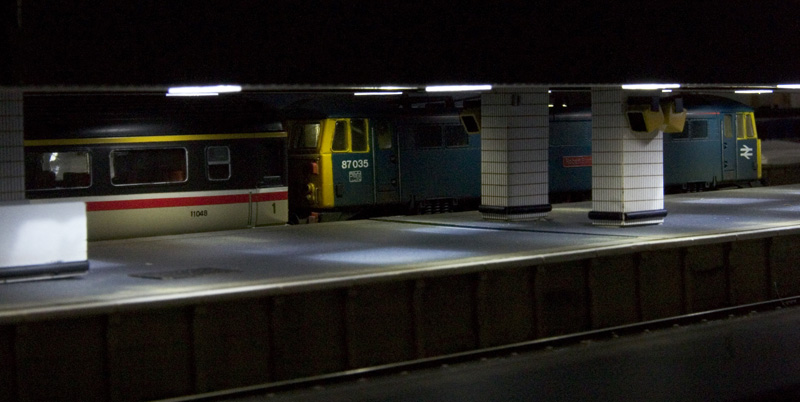
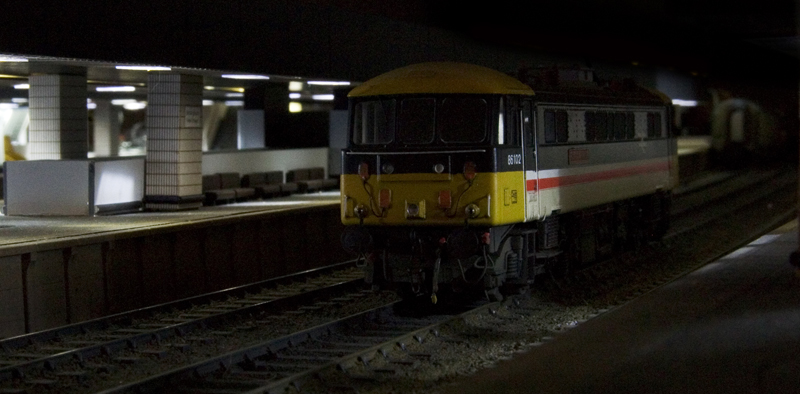
Under the roof is one of the few places I can take pictures of Electrics without it looking odd due to the lack of overhead.
Cheers
Jim
In response to a request on another forum a few pictures of electric loco's
Under the roof is one of the few places I can take pictures of Electrics without it looking odd due to the lack of overhead.
Cheers
Jim
-
jim s-w
- Posts: 2189
- Joined: Wed Jul 30, 2008 5:56 pm
Re: New Street progress
Hi All
Added some thoughts on people to my workbench
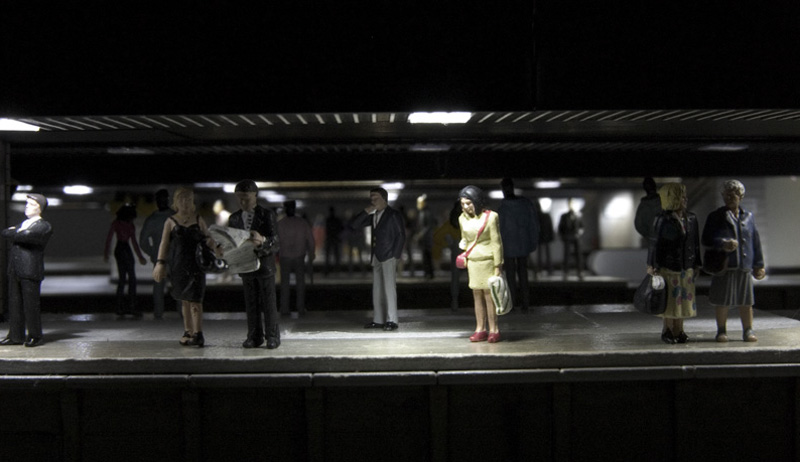
I'm thinking that unlike the high contrast style that military modellers use a low contrast, low saturation approach is better for 4mm scale. The above image is a mock up of our of the packet figures with the saturation of the picture halved. For more and to compare the original picture go to http://www.p4newstreet.com/thoughts-on-the-little-people-part-2.html#comments
Cheers
Jim
Added some thoughts on people to my workbench
I'm thinking that unlike the high contrast style that military modellers use a low contrast, low saturation approach is better for 4mm scale. The above image is a mock up of our of the packet figures with the saturation of the picture halved. For more and to compare the original picture go to http://www.p4newstreet.com/thoughts-on-the-little-people-part-2.html#comments
Cheers
Jim
-
Will L

- Posts: 2524
- Joined: Sun Jul 20, 2008 3:54 pm
Re: New Street progress
Will L wrote:Your going to need a few hundred figures Jim. I've never seen New Street that empty
That's better
Will
-
Mark Tatlow
- Posts: 899
- Joined: Tue Dec 02, 2008 11:24 pm
Re: New Street progress
jim s-w wrote:[I do promise that I will get bored with taking pictures under the roof at some point but a few more that I am quite pleased with.
With good reason too Jim!
You definately need noise, smells, smoke and more rubbish though - they were my memories of BNS!
Mark Tatlow
-
John Fitton
Re: New Street progress
Mark Tatlow wrote:jim s-w wrote:[I do promise that I will get bored with taking pictures under the roof at some point but a few more that I am quite pleased with.
With good reason too Jim!
You definately need noise, smells, smoke and more rubbish though - they were my memories of BNS!
I can imagine Jim installing a Seuthe smoke unit under there somewhere belching out fumes, creating "real" atmosphere!!
-
jim s-w
- Posts: 2189
- Joined: Wed Jul 30, 2008 5:56 pm
Re: New Street progress
Hi all
Popped over to Tim's last week to play with his laser cutter. More on the main reason later but a little side project was to cut new springs for the bachmann 08.
This is the (almost*) final result along with the hangers replaced with wire.
For more see http://www.p4newstreet.com/category/workbench
Cheers
Jim
* almost because it needs the weathering blended back in
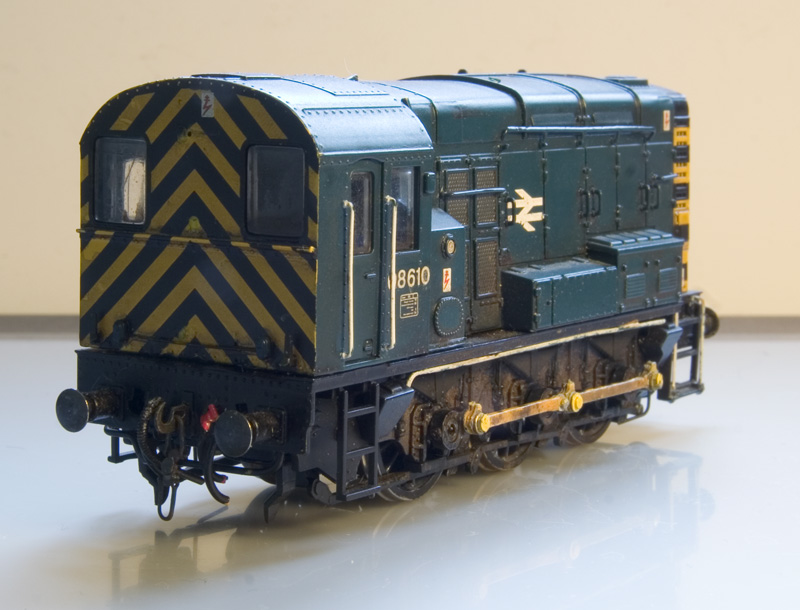
-
jim s-w
- Posts: 2189
- Joined: Wed Jul 30, 2008 5:56 pm
Re: New Street progress
As mentioned in the last post, the class 08 springs were a side project, the main reason for my visit to Tim's was to get started on the shopping center. The ramps at the Wolves end were drawn up as a set of parts in Illustrator and cut out on Tim's laser cutter. The first of the 2 beams has now been basically assembled and mocked up for a picture.
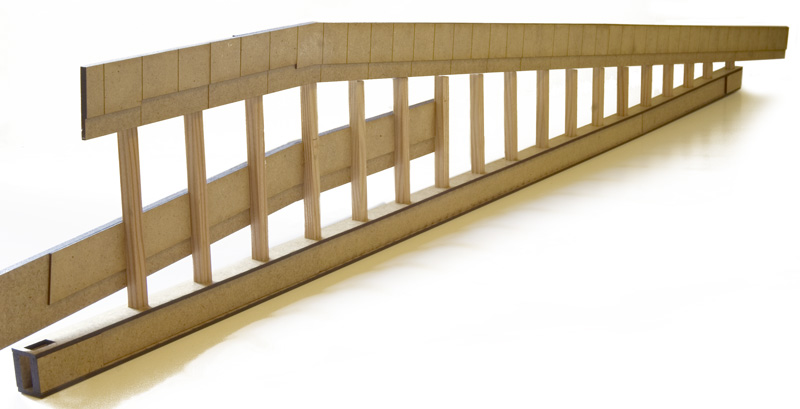
At the moment the top beam is loosely held on with blue-tac but you get the idea. The Laser cutter has turned what would be a bit of a mission into something that's been quite a nice project so far and at least assembly wise, pretty easy.
At the moment the top beam is loosely held on with blue-tac but you get the idea. The Laser cutter has turned what would be a bit of a mission into something that's been quite a nice project so far and at least assembly wise, pretty easy.
-
jim s-w
- Posts: 2189
- Joined: Wed Jul 30, 2008 5:56 pm
Re: New Street progress
Hi all
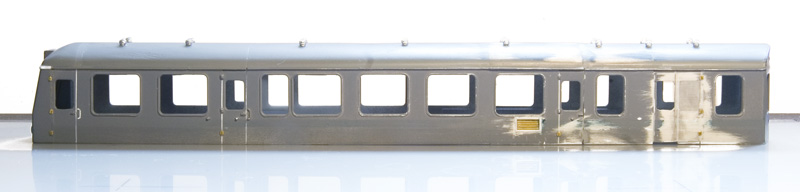
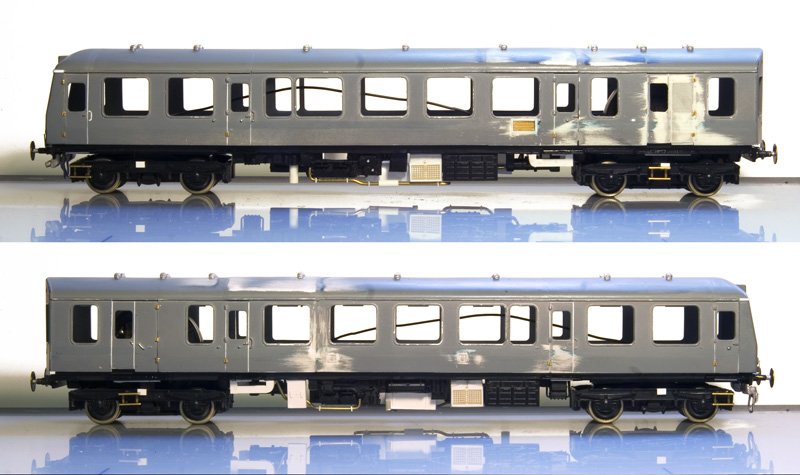
Been attacking a defensless hornby 110 with a razor saw again! This time to do a class 114, by good fortune Tysley inherited some in 1987. Thus a 114 is a good candidate for either a Brum-Nottingham or a Brum-Cambridge service
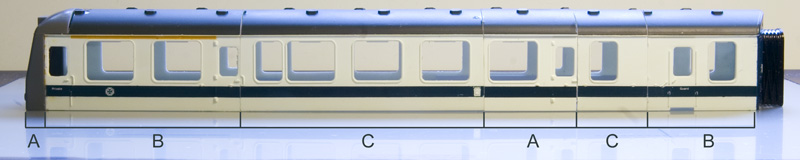
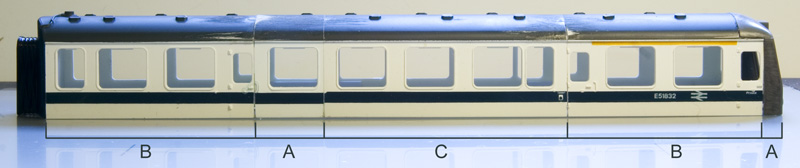
DMBS top and DTC below reassembled with cabs from DC kits. Sections marked as A are new, sections marked as B are original and C are orignal but reversed. Next stage will be to remove the roof vents, fill the joins that need filling and adjust the profile.
Cheers
Jim
Been attacking a defensless hornby 110 with a razor saw again! This time to do a class 114, by good fortune Tysley inherited some in 1987. Thus a 114 is a good candidate for either a Brum-Nottingham or a Brum-Cambridge service
DMBS top and DTC below reassembled with cabs from DC kits. Sections marked as A are new, sections marked as B are original and C are orignal but reversed. Next stage will be to remove the roof vents, fill the joins that need filling and adjust the profile.
Cheers
Jim
-
David Knight
- Posts: 819
- Joined: Sun Jul 20, 2008 6:02 pm
Re: New Street progress
Jim,
You seem to get wonderfully square cuts, is that just practice or do you use a jig of some sort?
Cheers,
David
You seem to get wonderfully square cuts, is that just practice or do you use a jig of some sort?
Cheers,
David
-
jim s-w
- Posts: 2189
- Joined: Wed Jul 30, 2008 5:56 pm
Re: New Street progress
Just luck David!
I cut the sides first using the door line or a drawn line (with a little square). Then join them up over the roof with masking tape. I then use that as a guide.
Cheers
Jim
I cut the sides first using the door line or a drawn line (with a little square). Then join them up over the roof with masking tape. I then use that as a guide.
Cheers
Jim
-
jim s-w
- Posts: 2189
- Joined: Wed Jul 30, 2008 5:56 pm
Re: New Street progress
Hi all
Further process on my class 114 project.
More on my site
Cheers
Jim
Further process on my class 114 project.
More on my site
Cheers
Jim
-
jim s-w
- Posts: 2189
- Joined: Wed Jul 30, 2008 5:56 pm
Re: New Street progress
Hi all
Further progress on my class 114 project

Turns out the only part on the Lima underframe that didn't need to be moved are the battery boxes. But as they are too small they too were replaced.
Cheers
Jim
Further progress on my class 114 project
Turns out the only part on the Lima underframe that didn't need to be moved are the battery boxes. But as they are too small they too were replaced.
Cheers
Jim
-
jim s-w
- Posts: 2189
- Joined: Wed Jul 30, 2008 5:56 pm
Re: New Street progress
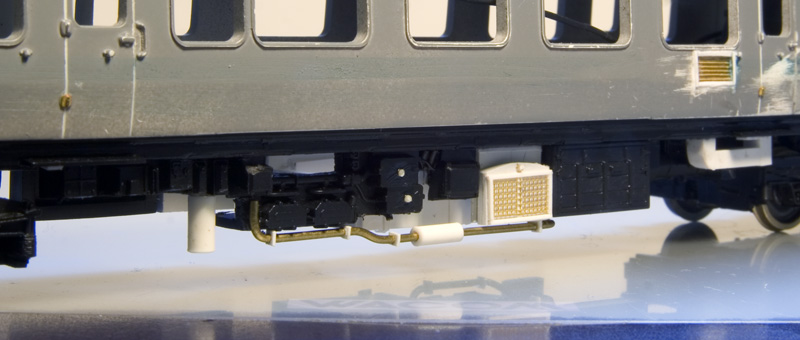
Moving on to the DMBS like the DTS the easy option would to be to use the Lima 117 chassis as is and like the DTS most people will be none the wiser. However hacking DMU underframes about a bit it quite a good way to spend an evening.
Some parts are repositioned while others are made from bits of plasticard, microstrip or brass rod. The radiators are quite distinctive and I do believe unique to the class. These were made with a bit of an old Shawplan class 56 grill for the mesh. Given the position of the filler and the odd curved tops I wonder if these were standard items from a bus?
Cheers
Jim
-
jim s-w
- Posts: 2189
- Joined: Wed Jul 30, 2008 5:56 pm
Re: New Street progress
Hi all
A few more 'just for the hell of it' pictures


Cheers
Jim
A few more 'just for the hell of it' pictures
Cheers
Jim
-
jim s-w
- Posts: 2189
- Joined: Wed Jul 30, 2008 5:56 pm
Re: New Street progress
Hi all
Added some thoughts on a couple of different routes to a mk2b or c BFK to my website.
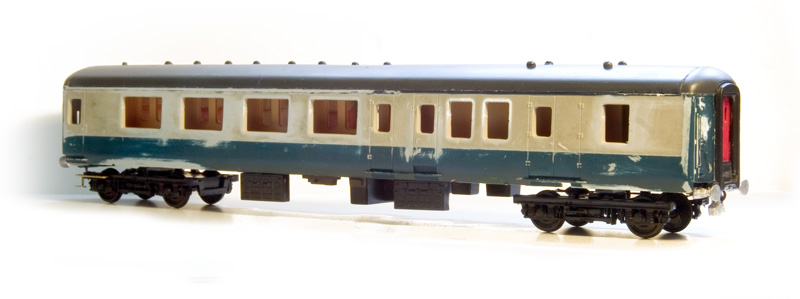
The Lima route
The Bachmann route
http://www.p4newstreet.com/take-a-brake.html
Cheers
Jim
Added some thoughts on a couple of different routes to a mk2b or c BFK to my website.
The Lima route
The Bachmann route
http://www.p4newstreet.com/take-a-brake.html
Cheers
Jim
-
jim s-w
- Posts: 2189
- Joined: Wed Jul 30, 2008 5:56 pm
Re: New Street progress
Hi all
Polished off a few ongoing projects this week starting with
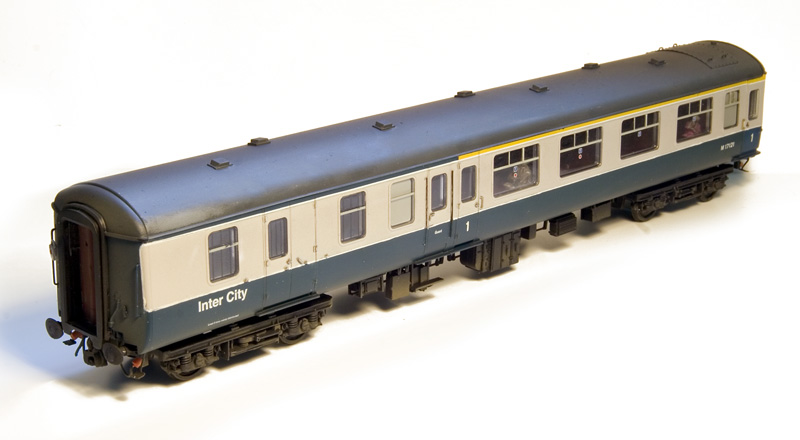
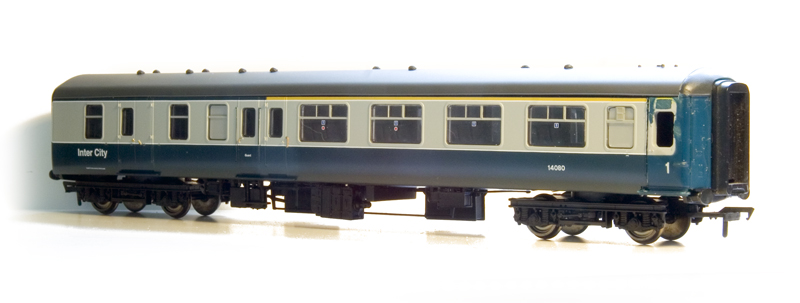
My bachmann mk2a to mk2c conversion
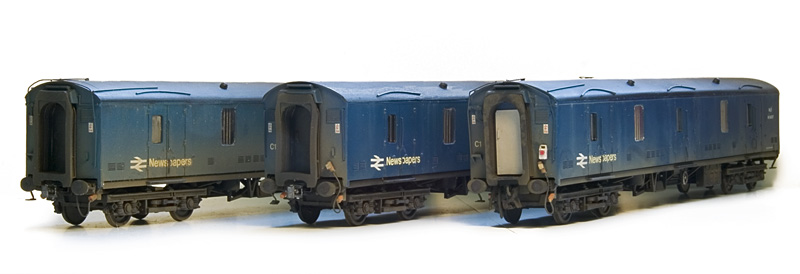
My newspaper GUV conversions as well as my mk3 Pullmans and...

My class 114 project
Cheers
Jim
Polished off a few ongoing projects this week starting with
My bachmann mk2a to mk2c conversion
My newspaper GUV conversions as well as my mk3 Pullmans and...
My class 114 project
Cheers
Jim
-
jim s-w
- Posts: 2189
- Joined: Wed Jul 30, 2008 5:56 pm
Re: New Street progress
Sometimes I just get an urge to do something new or something that I haven't done in a while. This week I had a bit of a hankering to do something with brass, not like bunging a few CCU's together but something more creative, something from scratch.
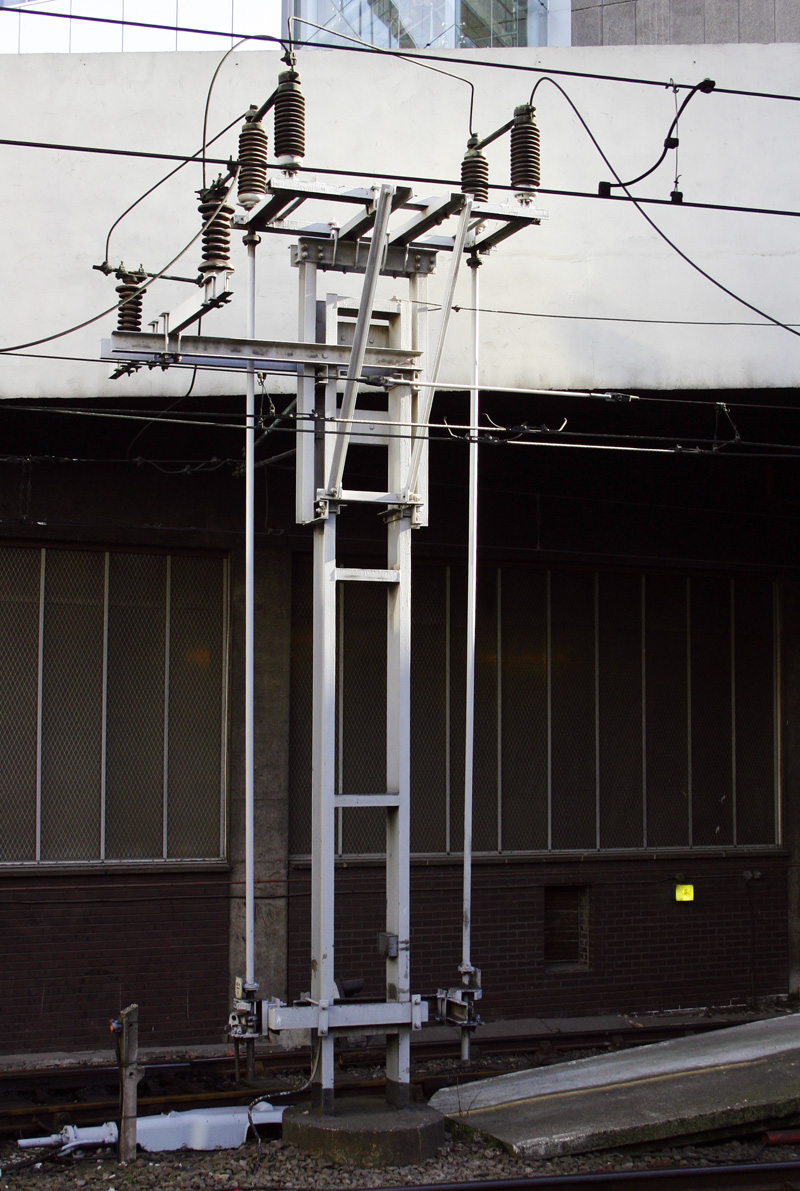
My intended victim, an isolation mast from the Eastern end of platform 12. I suppose I could have built a standard (ish) mast but ive done those before and fancied something a bit different, something that's a bit of a crowd pleaser I suppose. So a drawing was made, some section picked up from Modellers Mecca and the soldering iron and mini drill fired up for a couple of sessions at my workbench.
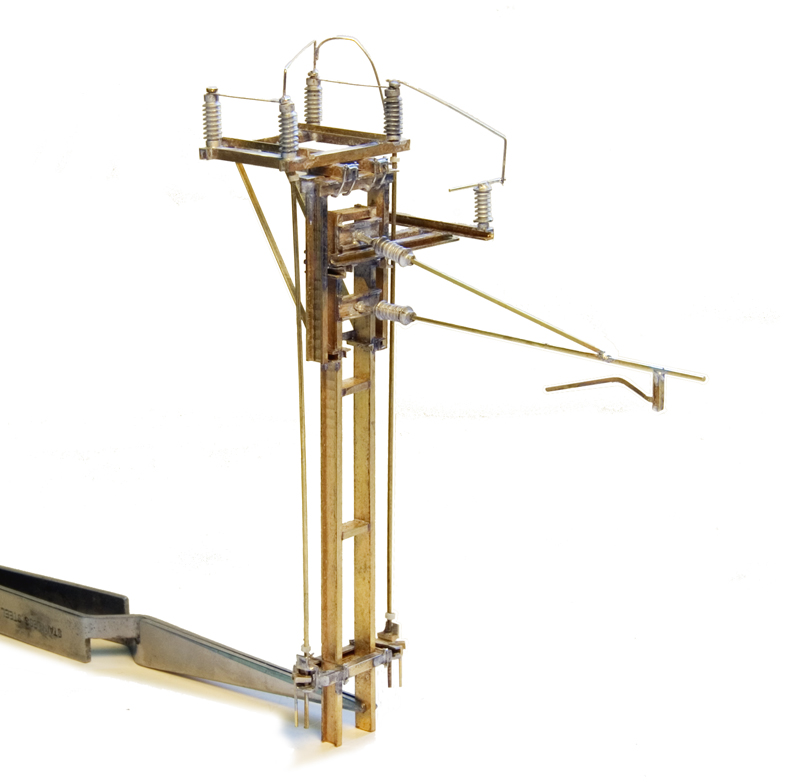
Heres the result of my labours. It went together surprisingly well and despite the use of Colin Craig's insulators and my own etch for the registration arm it's all good old-fashioned fabrication work. I have to admit im pretty pleased with how it turned out.
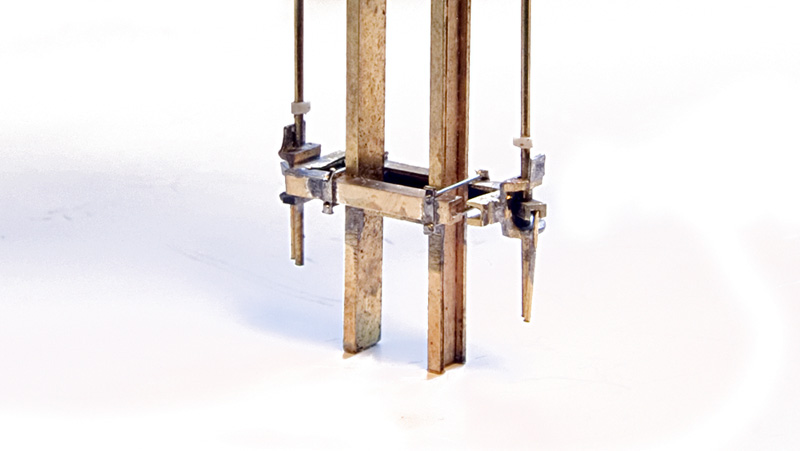
Close up of the handles and brackets for the isolation gear.
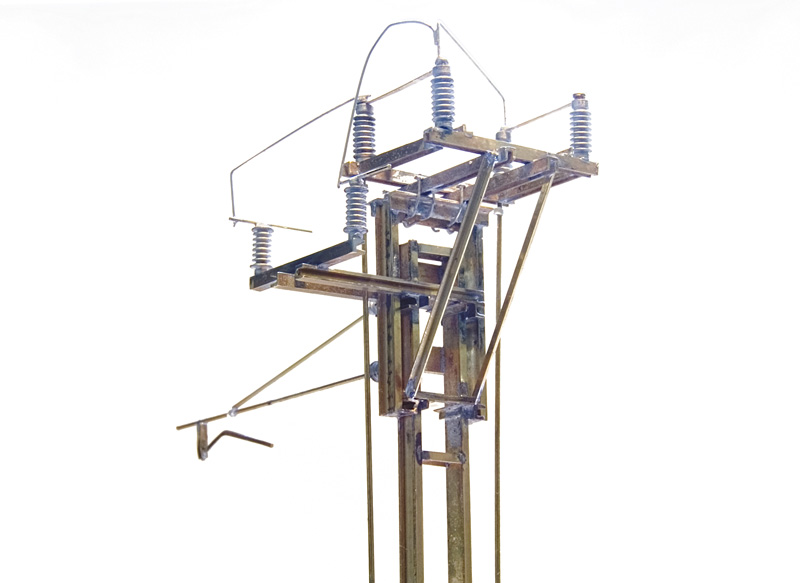
A typical 'platform enders' view of the interesting bit!
Question is now, is the urge satisfied or have I just made it worse?
My intended victim, an isolation mast from the Eastern end of platform 12. I suppose I could have built a standard (ish) mast but ive done those before and fancied something a bit different, something that's a bit of a crowd pleaser I suppose. So a drawing was made, some section picked up from Modellers Mecca and the soldering iron and mini drill fired up for a couple of sessions at my workbench.
Heres the result of my labours. It went together surprisingly well and despite the use of Colin Craig's insulators and my own etch for the registration arm it's all good old-fashioned fabrication work. I have to admit im pretty pleased with how it turned out.
Close up of the handles and brackets for the isolation gear.
A typical 'platform enders' view of the interesting bit!
Question is now, is the urge satisfied or have I just made it worse?
Who is online
Users browsing this forum: ClaudeBot and 2 guests