Looking very atmospheric, Jim. I particularly like that last shot.
Dave.
Brettell Road - Back to wagons - and a correction.
-
Guy Rixon

- Posts: 910
- Joined: Sun Mar 27, 2011 6:40 pm
Re: Brettell Road
jim s-w wrote:Plus as anyone who's ever researched a real place will know, not everything at a location will always make a lot of sense.
Amen to that. There was a lovely example at an SECR Soc. talk yesterday. There's a semi-circular bulge in a boundary wall of the railway alongside a works, for no apparent reason. It turns out that the works is on the site of a cherry orchard. When the owner sold land to the railway and removed his orchard to build the works, he wanted to keep his one, favourite tree, which happened to be right on the boundary; hence the wall went round the tree. The bulge in the wall survived the tree by decades.
PS: love the crossing box.
-
Tony Wilkins
- Posts: 818
- Joined: Tue Mar 20, 2012 3:57 pm
Re: Brettell Road
Not just railway properties. The gardens either side of my parents house had two rows of fruit trees, but our garden had none. It was many years before we discovered that the houses were built on the site of a previous orchard and the way the trees were spaced meant every alternate garden inherited two rows of trees.
Regards
Tony.
Regards
Tony.
Inspiration from the past. Dreams for the future.
-
jim s-w

- Posts: 2189
- Joined: Wed Jul 30, 2008 5:56 pm
Re: Brettell Road
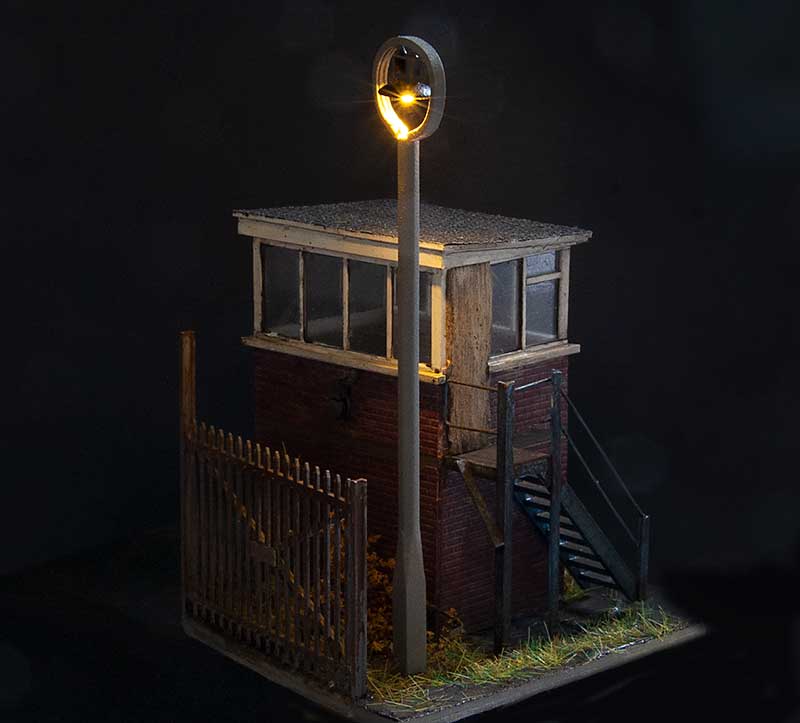
In order to 'plant' my abandoned crossing box I needed a base so opportunity was taken to do a micro diorama and take a piccie first. This is the side no one will ever see so it was worth recording for posterity.
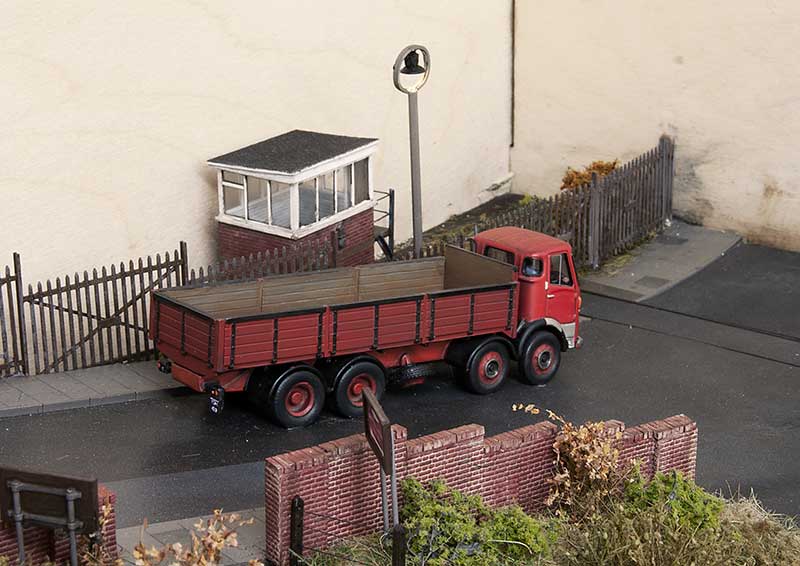
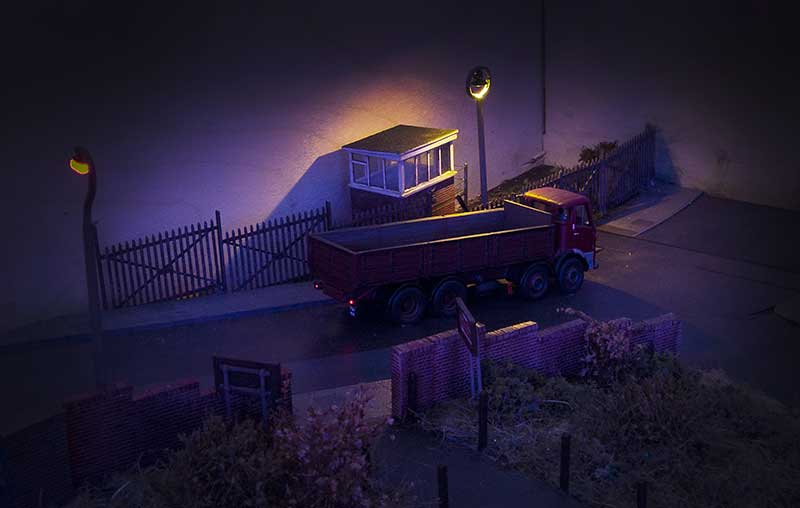
Here's were it goes on the layout. One of those little out of the way areas that viewers will need to search out a little. The fence is Knightwing modified to resemble pictures of the real place in the late 50s. Below is the low light version.
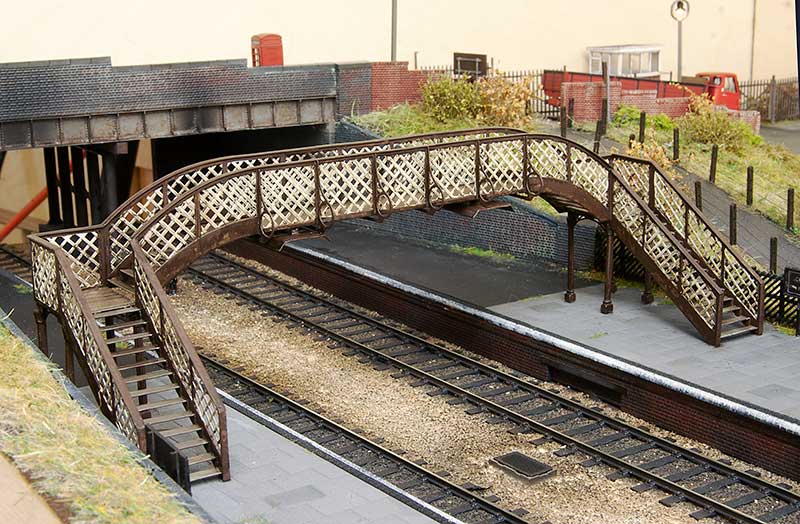
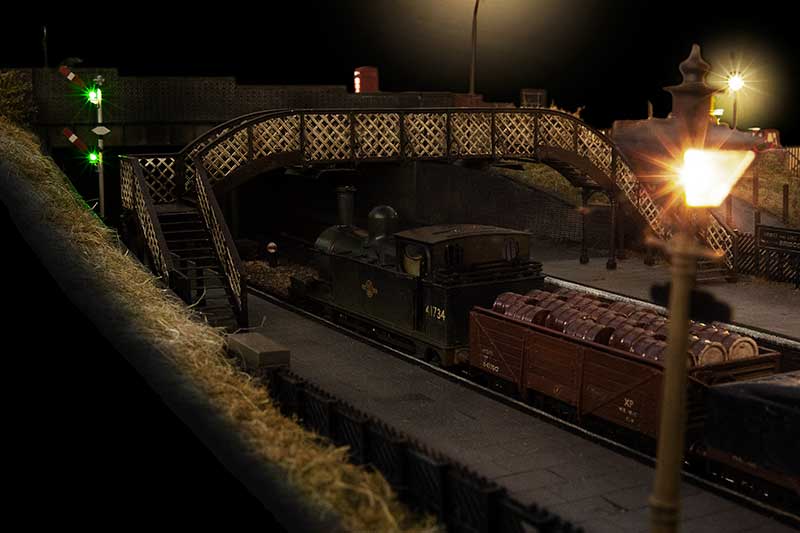
Ive also finished off my footbridge. In keeping with the rest of the layout (in fact in keeping with everything I do!) it's modelled to look tired.
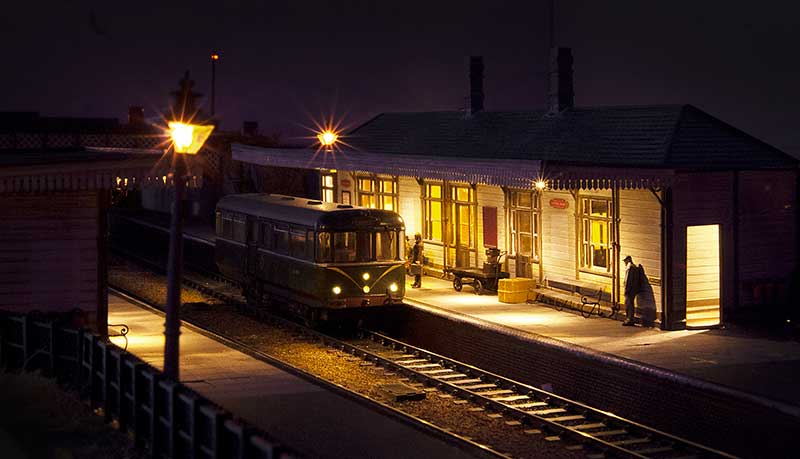
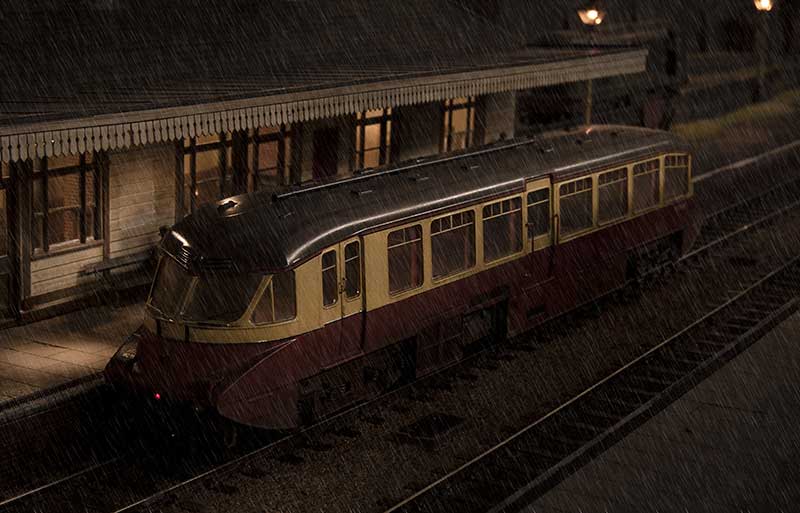
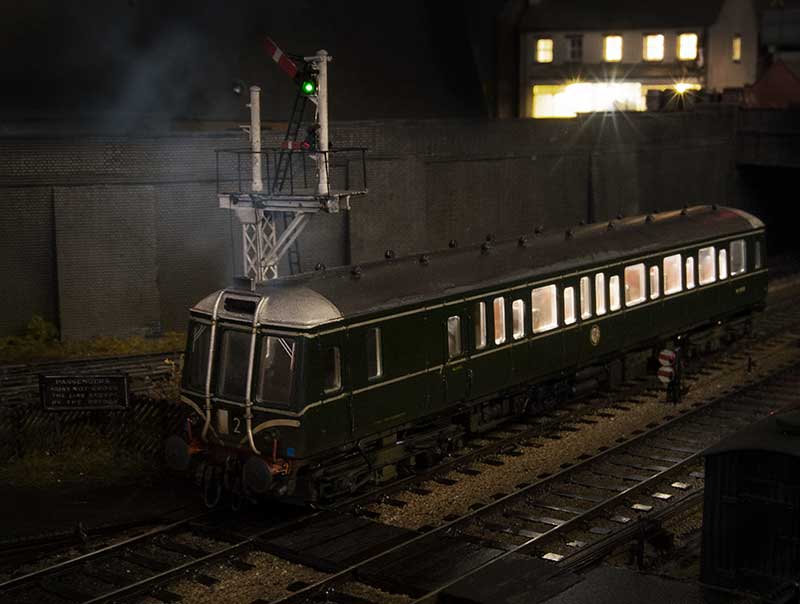
In an effort to keep the line open to passengers a 4 new fangled 4 wheel railbus was tried on the route. The experiment didn't work out and the station would be closed a few weeks later.
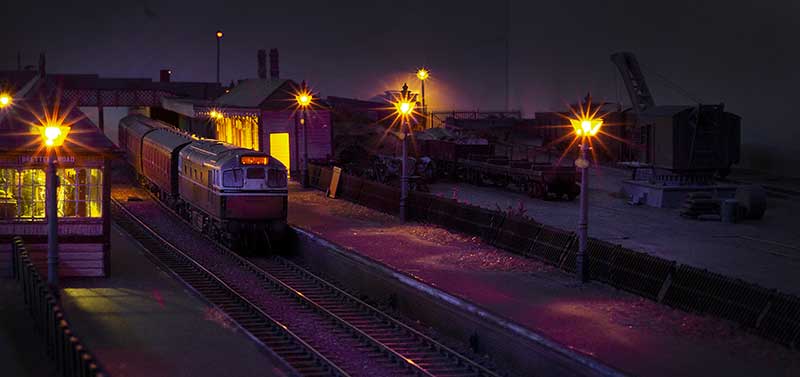
I've mentioned before my preference for long platforms and short trains. A BRCW type 2 and its 3 coaches demonstrates the effect I was after.
-
jim s-w
- Posts: 2189
- Joined: Wed Jul 30, 2008 5:56 pm
Re: Brettell Road
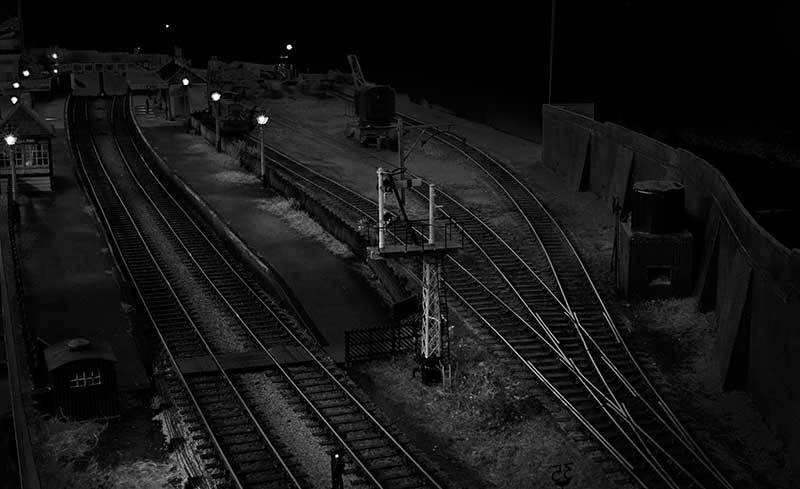
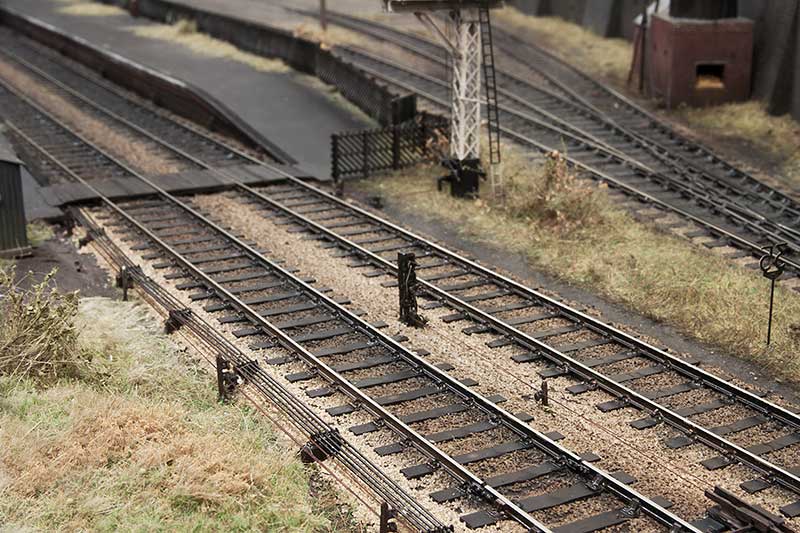
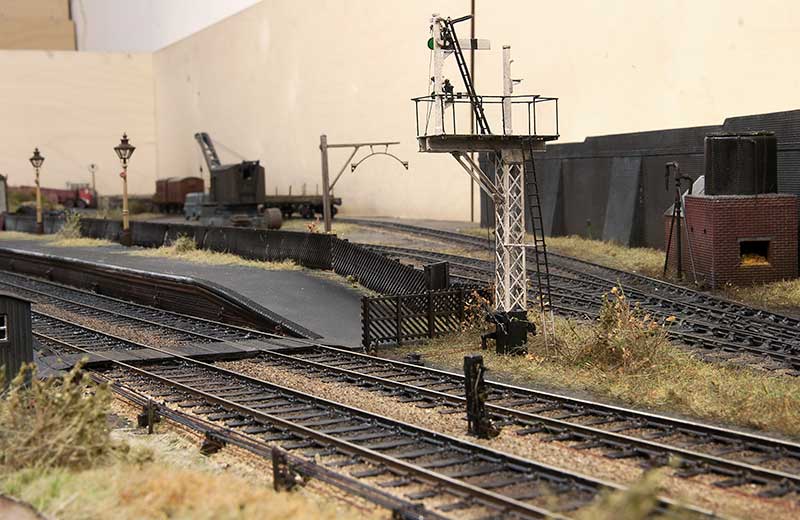
I think I may have mentioned before but one of my favourite things on Moor Street is the mechanical signals. Obviously on New Street there was never going to be an opportunity to do any but on Brettell Road things were different. I had already built a few ground signals on part 1 and an abandoned one but part 2 has given me the opportunity to do some proper, working ones.
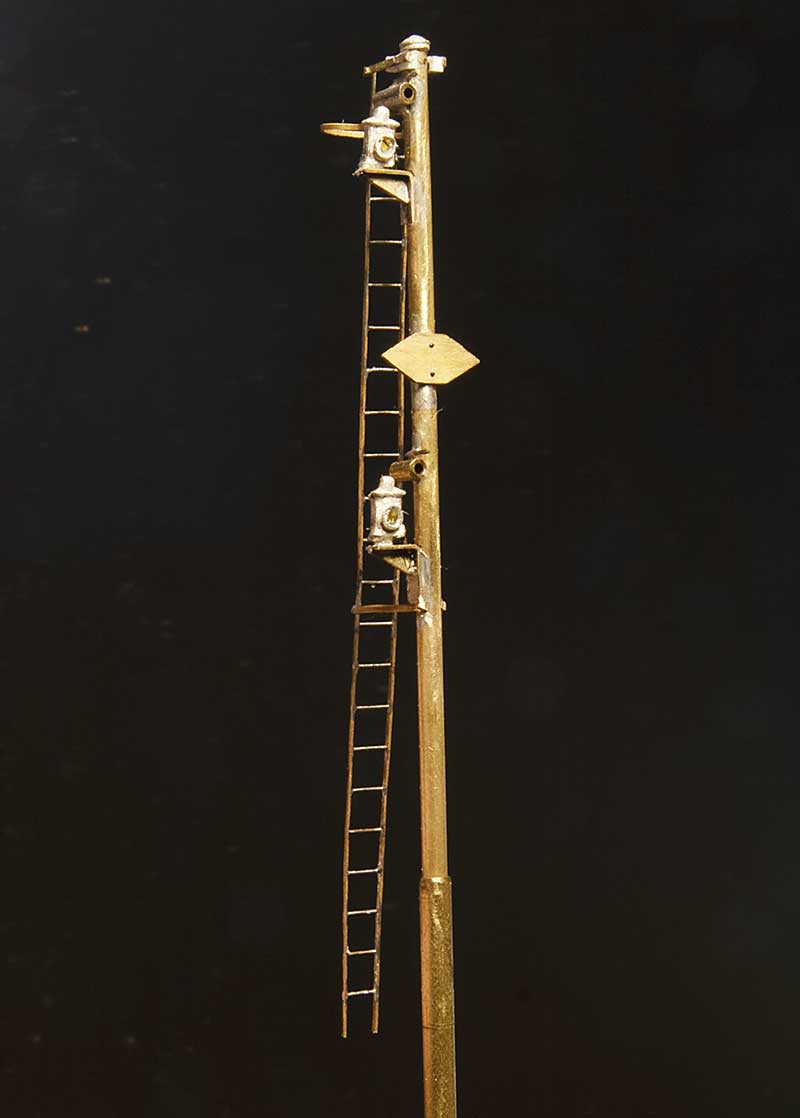
So starting with the post for the simple one. Basically a bog standard upper quadrant affair only complicated by the need to have a co-acting signal due to where the signal stands in relation to the footbridge. The balance weights are below the platforms surface. The parts used are the MSE upper quadrant signal parts (S0012/1), LMS/LNER tubular post caps (SC0019) and LMS Adlake signal lamps (SC0011). The Ladder is from Stenson models and various diameters of tube, sized from the left overs from the signal I built before. This will sit at the Stourbridge end of the platform.
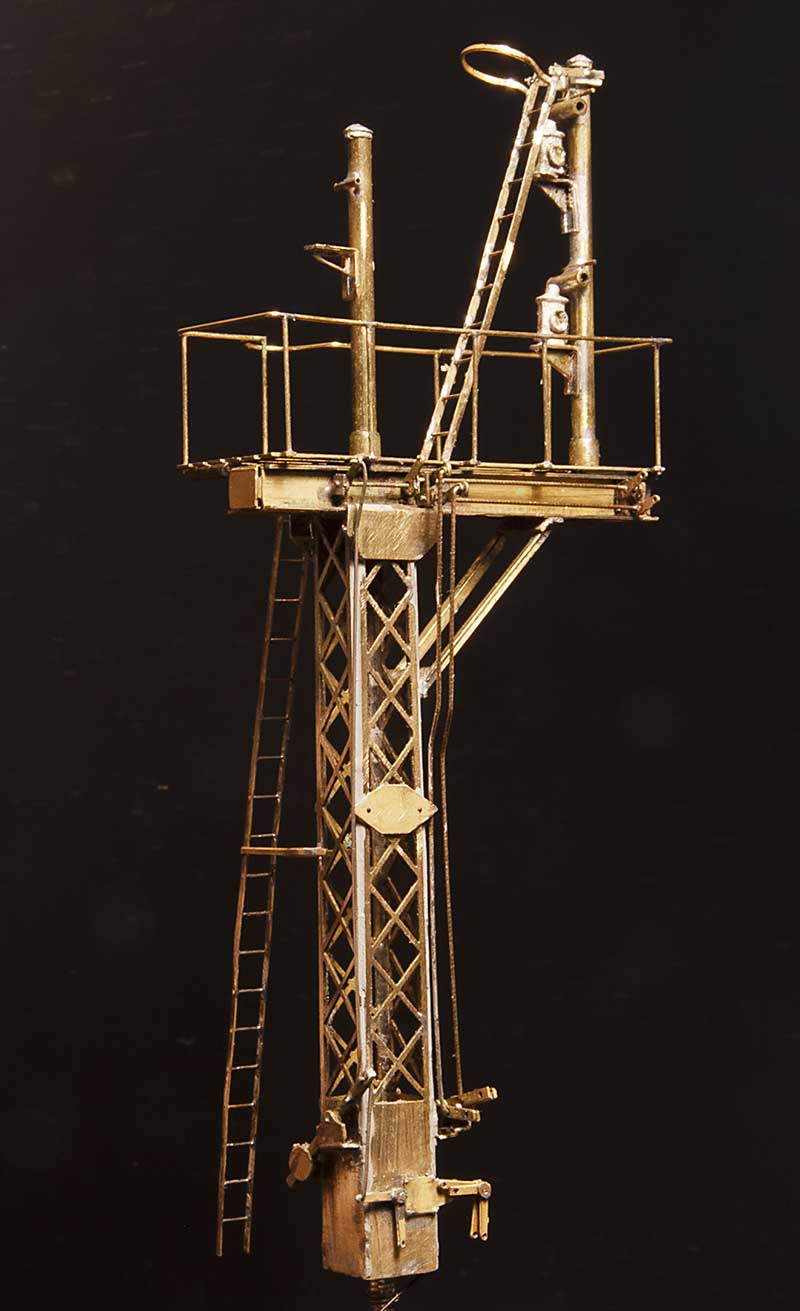
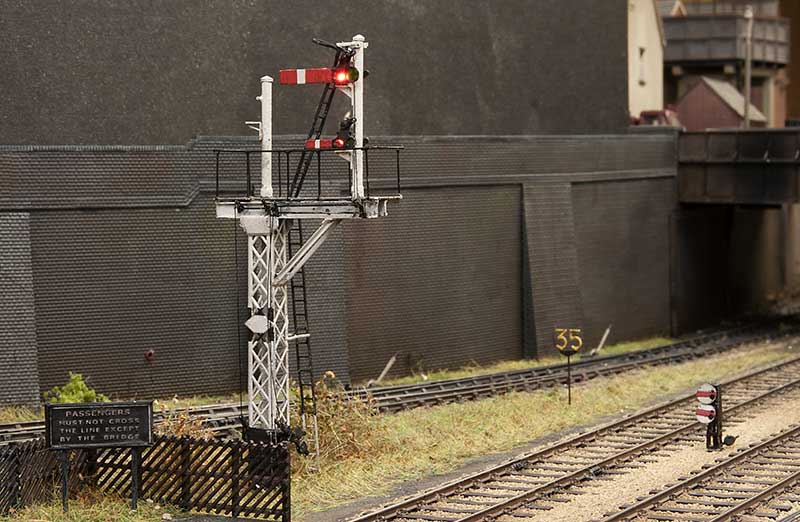
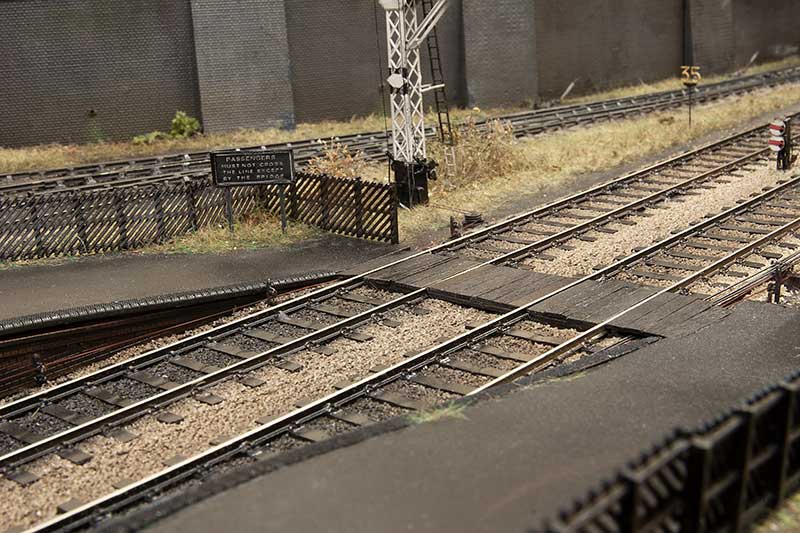
At the Dudley end things are a little more entertaining. So having found a suitable victim (which turned out to be a bit of a mongrel) I set to work emulating what I could see. More MSE bits such as Heavy Lattice Bracket Signal Base Post (S0010) and LMS welded stem bracket (50029) for the platform. The rockers came from the Brassmasters point rodding etch. After I took this photo I decided that the operating 'wires' were too big so they have been replaced with no8 guitar strings.
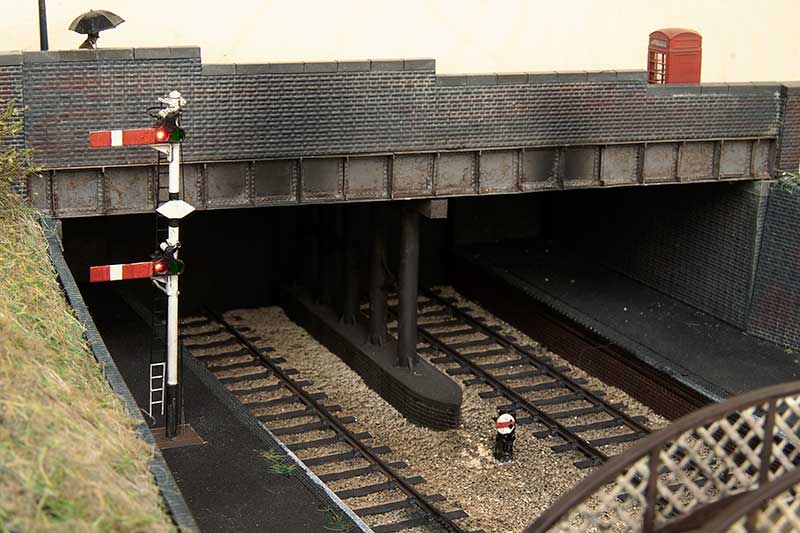
Platform starter in position.
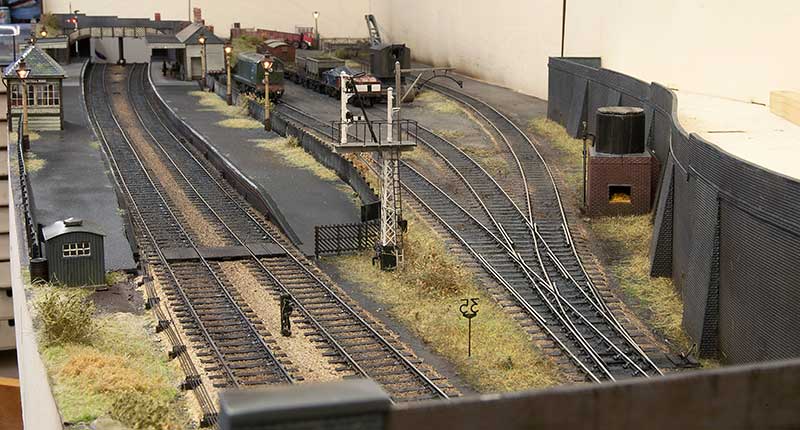
Gantry in position. The left arm was used for the Kingswinford branch (now disconnected)
https://www.wizardmodels.ltd/
https://www.stensonmodels.co.uk/
http://www.brassmasters.co.uk/
So starting with the post for the simple one. Basically a bog standard upper quadrant affair only complicated by the need to have a co-acting signal due to where the signal stands in relation to the footbridge. The balance weights are below the platforms surface. The parts used are the MSE upper quadrant signal parts (S0012/1), LMS/LNER tubular post caps (SC0019) and LMS Adlake signal lamps (SC0011). The Ladder is from Stenson models and various diameters of tube, sized from the left overs from the signal I built before. This will sit at the Stourbridge end of the platform.
At the Dudley end things are a little more entertaining. So having found a suitable victim (which turned out to be a bit of a mongrel) I set to work emulating what I could see. More MSE bits such as Heavy Lattice Bracket Signal Base Post (S0010) and LMS welded stem bracket (50029) for the platform. The rockers came from the Brassmasters point rodding etch. After I took this photo I decided that the operating 'wires' were too big so they have been replaced with no8 guitar strings.
Platform starter in position.
Gantry in position. The left arm was used for the Kingswinford branch (now disconnected)
https://www.wizardmodels.ltd/
https://www.stensonmodels.co.uk/
http://www.brassmasters.co.uk/
-
Rod Cameron

- Posts: 850
- Joined: Fri Jul 25, 2008 12:01 pm
-
Re6/6

- Posts: 492
- Joined: Sat Jul 26, 2008 4:53 pm
-
jim s-w
- Posts: 2189
- Joined: Wed Jul 30, 2008 5:56 pm
Re: Brettell Road
Thanks both.
Need a bit more fiddling yet as the lamps are way to bright at the moment
Need a bit more fiddling yet as the lamps are way to bright at the moment
-
jim s-w
- Posts: 2189
- Joined: Wed Jul 30, 2008 5:56 pm
Re: Brettell Road
Sea of reds
You do not have the required permissions to view the files attached to this post.
-
bécasse
- Posts: 377
- Joined: Sun Jun 17, 2018 8:26 am
Re: Brettell Road
The street lamp needs a front shield so that it doesn't impede sighting of the signal at night. Back in the days of semaphore signals shielded street lamps were far more common than you might think, but because they were outside railway property enthusiasts tended not to notice them.
-
jim s-w
- Posts: 2189
- Joined: Wed Jul 30, 2008 5:56 pm
Re: Brettell Road
Thanks I’ll have a look
-
jim s-w
- Posts: 2189
- Joined: Wed Jul 30, 2008 5:56 pm
Re: Brettell Road
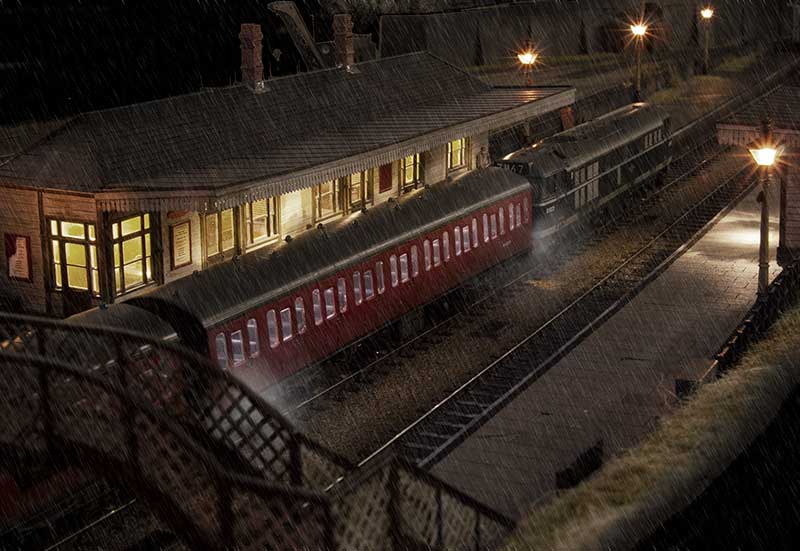
After much experimentation on Brettell Road part 1 and coming up with a working formula. Adding rain to part 2 was a much simpler process (although still a bugger to photograph mind you!)
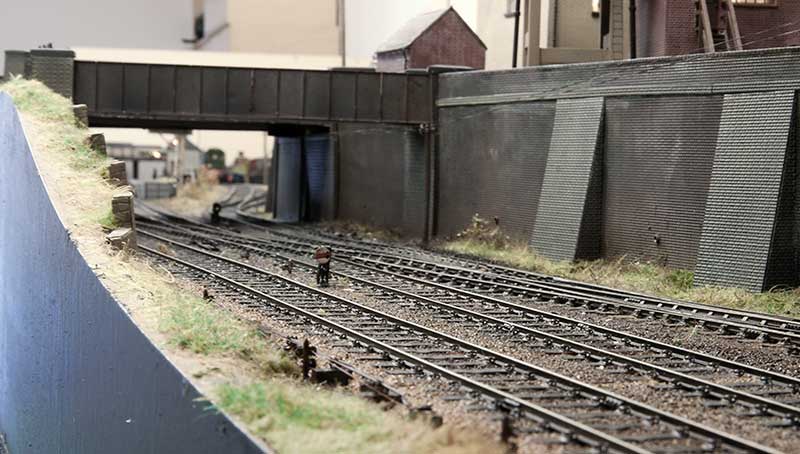
View from the middle looking towards Stourbridge. The method I have settled on is to spray everything that needs to be wet with a fine coat of Tamiya smoke. When dry a coat of AK interactive wet effect is added and thats really it. Simple enough now but it took an awful lot of faffing about to get here!

View towards Dudley
This is the view from the old layout to the new one . While its not something I intended to capture when I took the picture it does show the elevation changes quite well.
Below a few evening pictures
View from the middle looking towards Stourbridge. The method I have settled on is to spray everything that needs to be wet with a fine coat of Tamiya smoke. When dry a coat of AK interactive wet effect is added and thats really it. Simple enough now but it took an awful lot of faffing about to get here!
View towards Dudley
This is the view from the old layout to the new one . While its not something I intended to capture when I took the picture it does show the elevation changes quite well.
Below a few evening pictures
-
Dave Holt
- Posts: 555
- Joined: Thu May 28, 2009 9:44 pm
Re: Brettell Road
A bit of a faff, maybe, but a superb result, Jim.
Hope to see it in the flesh some time.
Dave.
Hope to see it in the flesh some time.
Dave.
-
Terry Bendall
- Forum Team
- Posts: 2426
- Joined: Sun Jul 27, 2008 7:46 am
Re: Brettell Road
Dave Holt wrote:A bit of a faff, maybe, but a superb result, Jim
Yes very good Jim. It is always refreshing when a layout is presented differently to the usual spring or summer setting.
Terry Bendall
-
jim s-w
- Posts: 2189
- Joined: Wed Jul 30, 2008 5:56 pm
Re: Brettell Road
As 2021 draws to an end I've been doing some of those fiddly little jobs that I kind of hope always get lost into the scene but I know they are there.
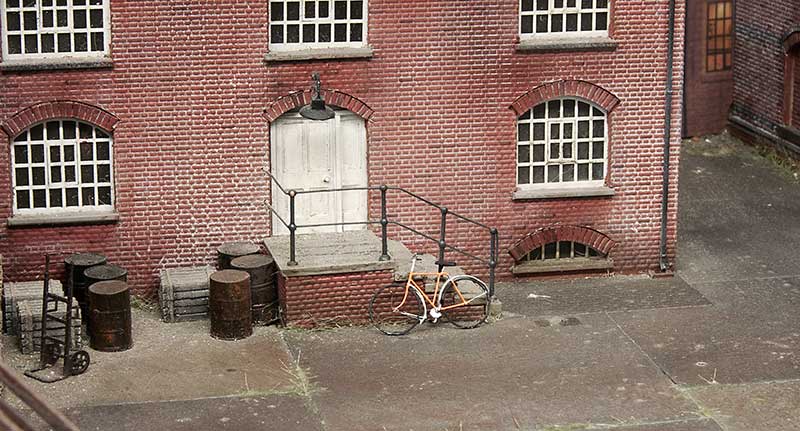
Starting with a pushbike from the Southwark Bridge Models Kit. The kit is for a late 19th century bike so I modernised it a little. I think these may be reduced from 7mm scale model as some of the parts are at the very limit of what will etch and gives you a decent idea of what it must be like to try and solder a spiders web together!
I've finished off the signal wires using MSE posts and easyline.
This meant I could finally get the barrow crossing finished too.
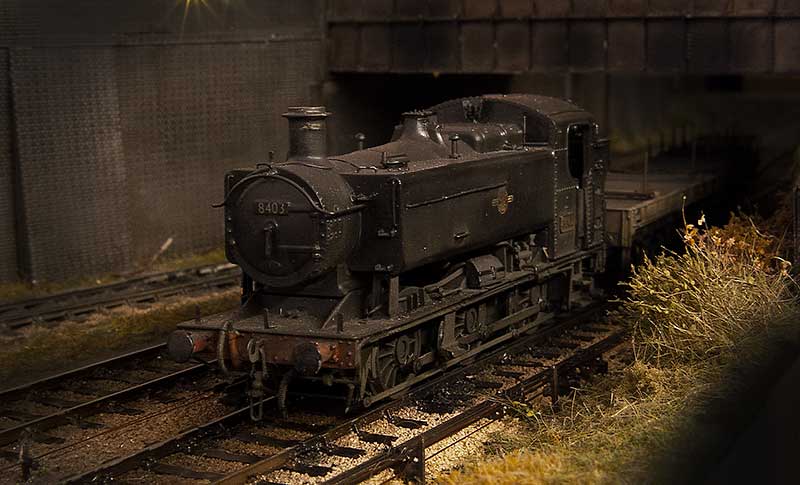
Below are a few evening shots of various comings and goings.
Starting with a pushbike from the Southwark Bridge Models Kit. The kit is for a late 19th century bike so I modernised it a little. I think these may be reduced from 7mm scale model as some of the parts are at the very limit of what will etch and gives you a decent idea of what it must be like to try and solder a spiders web together!
I've finished off the signal wires using MSE posts and easyline.
This meant I could finally get the barrow crossing finished too.
Below are a few evening shots of various comings and goings.
-
steve howe

- Posts: 912
- Joined: Sun Feb 01, 2009 10:16 pm
Re: Brettell Road
Lovely work Jim, very atmospheric.
Steve
Steve
-
David Knight
- Posts: 819
- Joined: Sun Jul 20, 2008 6:02 pm
Re: Brettell Road
I feel like I should be putting my wellies and raincoat on to look at some of those shots. You’ve captured the feeling wonderfully.
BTW congrats on your prize winning pic for Modelu!
Cheers,
David
BTW congrats on your prize winning pic for Modelu!
Cheers,
David
-
bill wilson
- Posts: 12
- Joined: Fri Mar 15, 2013 8:18 pm
Re: Brettell Road
Looking great Jim. Oozes atmosphere! Looking forward to seeing it at a show once we start to head towards some form of normality (whatever that may be)
Regards.
Bill.
Regards.
Bill.
-
jim s-w
- Posts: 2189
- Joined: Wed Jul 30, 2008 5:56 pm
Re: Brettell Road
Bit of a pick 'n' mix post this one.
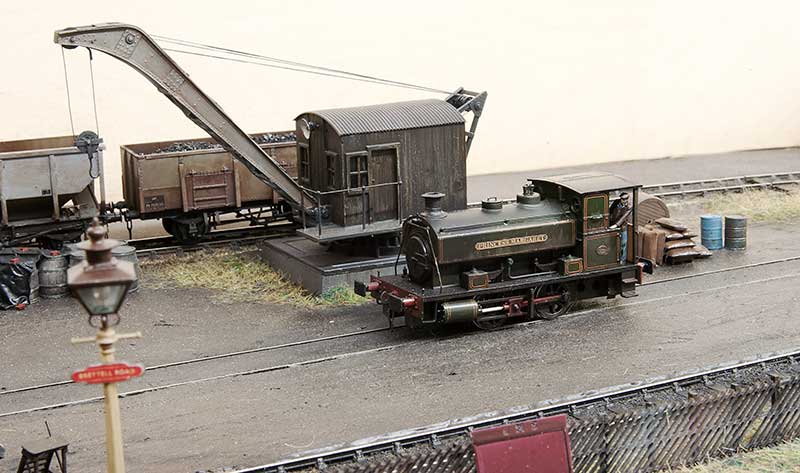
Lady Margaret now has her identity thanks to some custom nameplates from Narrow Planet
Finding your own compromise
When it comes to plastic kit building it helps if you think of a line. At one end of the line you have the kit as supplied, built as per the instructions with no attention or research what so ever on the prototype itself. At the other end you have the kit, researched, wrong parts replaced or corrected and superior parts substituted, as much extra detail as you can manage. Rumney chassis kind of thing. Inevitably we all need to find our place somewhere along the line that we feel comfortable.
This place can be influenced by several factors.
Cost - adding a lot of extra parts can mount up to quite an expensive model.
Expediency - high end models take a lot longer to build. Do we have the time
Reliability - no point adding every little detail if in use you're going to knock it all off again.
Usage - if you wagon is part of a train of 30 that are only ever going to trundle past at a scale 40mph are you going to have the opportunity to notice the extra work?
Consistency - no point mixing highly detailed and basic kit builds together really.
Volume - how many models are we going to need?

Heres my pretty much standard position along that line. The base model is a parkside kit. As mentioned elsewhere I'm not particularly worried about compensation or springing on a 10ft wheelbase wagon but i do use it for vehicles longer than 12ft wb.
A - brass tie bars. I use 0.8mm L section. the real things aren't L section but i use this for strength and you cant tell unless you turn the model upside down. In plastic kits the tie bars are a real weakness ad they are either bendy, get broken or to avoid those 2 things, massively thick.
B - break hangers from Bill Bedford - It doesn't take much to add a little finesse to the brake gear and trick the mind into thinking it's all a bit more refined that it actually is.
C - metal buffers, or in this case metal buffer heads. Unless your kit comes with metal buffers already lets be honest here, the plastic ones are going to be awful. These are MJT buffer heads.
D - couplings. A whole discussion on compromises in itself. In my case I use Smiths which i know are overscale but they are (quite) easy to use in operation.
E - brake pipe from Lanarkshire models.
Glue
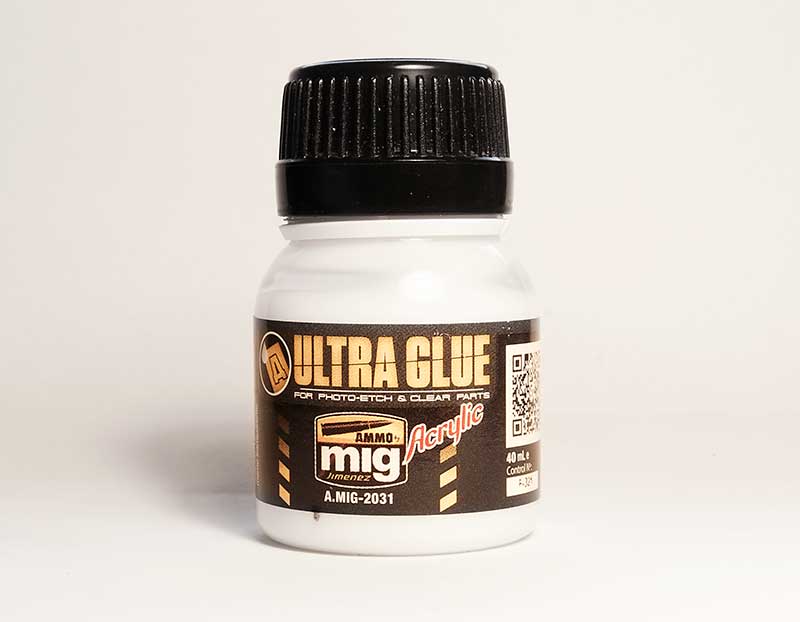
I've recently been trying this stuff. Ultra Glue from MIG for etched and clear parts. Its water based so can be thinned if required and so far it seems to do the job at least as well as superglue. Its especially good for fitting name plates as while it has good grab it takes a few hours to fully harden and being water base any that creeps out can be lifted off with a wet paintbrush.
Reading
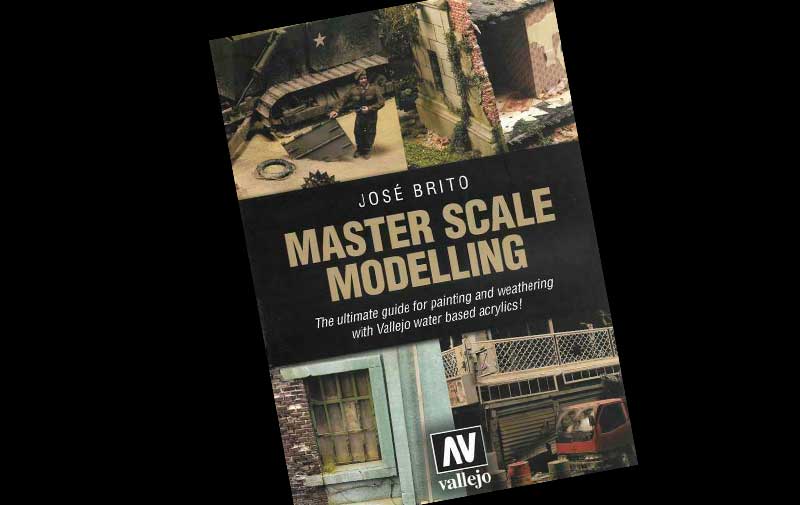
It's been an awful long time since Martin Welch treated us to his 'bible' the art of weathering. And while still essential reading things have moved on a bit, especially so in the last few years or so. Some of the paints Martin used are no longer available (Humbrol tarmac for example) but theres a whole market now of weathering paints and materials. This (rather large at over 500 pages) book is an excellent window outside of our sometimes a little comfortable railway world.
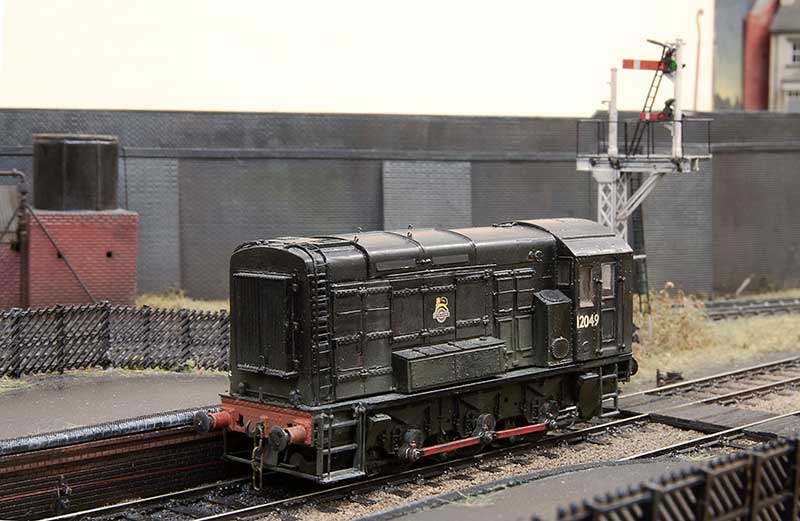
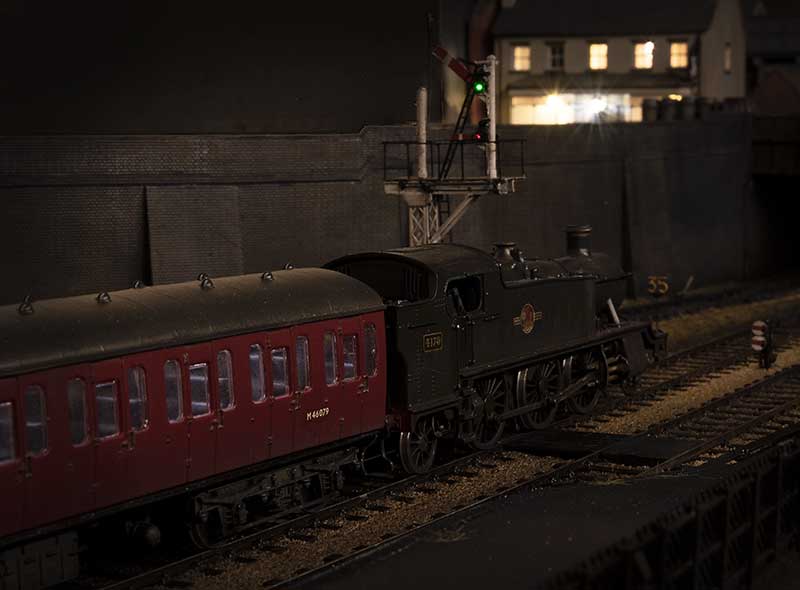
Having had a little trundle to Stourbridge shed and back for some Diesel, Class 11 shunter 12049 waits for the nod back into the yard at Brettell Road.
Lady Margaret now has her identity thanks to some custom nameplates from Narrow Planet
Finding your own compromise
When it comes to plastic kit building it helps if you think of a line. At one end of the line you have the kit as supplied, built as per the instructions with no attention or research what so ever on the prototype itself. At the other end you have the kit, researched, wrong parts replaced or corrected and superior parts substituted, as much extra detail as you can manage. Rumney chassis kind of thing. Inevitably we all need to find our place somewhere along the line that we feel comfortable.
This place can be influenced by several factors.
Cost - adding a lot of extra parts can mount up to quite an expensive model.
Expediency - high end models take a lot longer to build. Do we have the time
Reliability - no point adding every little detail if in use you're going to knock it all off again.
Usage - if you wagon is part of a train of 30 that are only ever going to trundle past at a scale 40mph are you going to have the opportunity to notice the extra work?
Consistency - no point mixing highly detailed and basic kit builds together really.
Volume - how many models are we going to need?
Heres my pretty much standard position along that line. The base model is a parkside kit. As mentioned elsewhere I'm not particularly worried about compensation or springing on a 10ft wheelbase wagon but i do use it for vehicles longer than 12ft wb.
A - brass tie bars. I use 0.8mm L section. the real things aren't L section but i use this for strength and you cant tell unless you turn the model upside down. In plastic kits the tie bars are a real weakness ad they are either bendy, get broken or to avoid those 2 things, massively thick.
B - break hangers from Bill Bedford - It doesn't take much to add a little finesse to the brake gear and trick the mind into thinking it's all a bit more refined that it actually is.
C - metal buffers, or in this case metal buffer heads. Unless your kit comes with metal buffers already lets be honest here, the plastic ones are going to be awful. These are MJT buffer heads.
D - couplings. A whole discussion on compromises in itself. In my case I use Smiths which i know are overscale but they are (quite) easy to use in operation.
E - brake pipe from Lanarkshire models.
Glue
I've recently been trying this stuff. Ultra Glue from MIG for etched and clear parts. Its water based so can be thinned if required and so far it seems to do the job at least as well as superglue. Its especially good for fitting name plates as while it has good grab it takes a few hours to fully harden and being water base any that creeps out can be lifted off with a wet paintbrush.
Reading
It's been an awful long time since Martin Welch treated us to his 'bible' the art of weathering. And while still essential reading things have moved on a bit, especially so in the last few years or so. Some of the paints Martin used are no longer available (Humbrol tarmac for example) but theres a whole market now of weathering paints and materials. This (rather large at over 500 pages) book is an excellent window outside of our sometimes a little comfortable railway world.
Having had a little trundle to Stourbridge shed and back for some Diesel, Class 11 shunter 12049 waits for the nod back into the yard at Brettell Road.
-
Terry Bendall
- Forum Team
- Posts: 2426
- Joined: Sun Jul 27, 2008 7:46 am
Re: Brettell Road
jim s-w wrote:Bit of a pick 'n' mix post this one
But all very useful Jim. Thank you.
Terry Bendall
-
Captain Kernow

- Posts: 482
- Joined: Sat Jul 26, 2008 8:08 pm
Re: Brettell Road
Superb stuff, Jim.
Thanks for the tip about the Jose Brito book, looks worth investigating.
Your philosophy regarding wagons seems to be virtually identical to mine!
Thanks for the tip about the Jose Brito book, looks worth investigating.
Your philosophy regarding wagons seems to be virtually identical to mine!
Tim M
Member of the Devon Riviera Area Group.
Member of the Devon Riviera Area Group.
-
David Knight
- Posts: 819
- Joined: Sun Jul 20, 2008 6:02 pm
Re: Brettell Road
All very sensible Jim and practical to boot. Oh, and congrats on your piece in MRJ 287. It fair oozed atmosphere. 
Cheers,
David
Cheers,
David
-
jim s-w
- Posts: 2189
- Joined: Wed Jul 30, 2008 5:56 pm
Re: Brettell Road
Thanks David
Its always a bit of a quandary as to whether i should send in pics that show the mood i'm after for pics that better show the modelling itself. I noted a chap on RMweb saying he didn't like them as they were 'rather dismal' but ironically rather dismal is exactly what I'm after
Im toying with the idea of doing a set exactly the same but in the light and popping them on my website
Cheers Jim
-
Philip Hall
- Posts: 1953
- Joined: Mon Aug 10, 2009 7:49 pm
Re: Brettell Road
I think the bloke who said he didn't like them because he thought they were dismal is, as you say, exactly missing the point. You are doing what we are all supposed to be doing, representing the railway and its surroundings as faithfully as you can. And in this case you have been pushing the boundaries by including the British weather and some run down infrastructure. It may be that many of us like the railway and the weather to appear as it always does in Michael Portillo's series (he calls the weather 'Portillo's Luck') but we all know it isn't like that a lot of the time.
So ignore the critic(s) and congratulations on doing something very different, and doing it rather well.
Philip
So ignore the critic(s) and congratulations on doing something very different, and doing it rather well.
Philip
-
jim s-w
- Posts: 2189
- Joined: Wed Jul 30, 2008 5:56 pm
Re: Brettell Road
Thanls Philip
Im not bothered by the critics as it was always going to be a marmite layout but then what layout isnt?
Im not bothered by the critics as it was always going to be a marmite layout but then what layout isnt?
Who is online
Users browsing this forum: ClaudeBot and 2 guests