Not wishing to deviate too far from Jim's excellent Brettell Road project which I enjoy following, the Hymeks did have one annoying trait. As a teenager in the 1960s, we lived between Lawrence Hill and Stapleton Road on the Bristol to South Wales main line. The headshunt for Lawrence Hill goods yard was about 100 yards from the bottom of the garden. Mid morning, a trip working would arrive with a Hymek at the head. Following a bit of shunting, the loco would be stabled on the headshunt for an hour or so with the engine left idling. Unfortunately, they seemed to have the same resonant frequency as our kitchen window which had to be wedged firmly closed to prevent it vibrating itself to destruction by loosening the dried out putty.
Roy
Brettell Road - Back to wagons - and a correction.
-
jim s-w

- Posts: 2190
- Joined: Wed Jul 30, 2008 5:56 pm
Re: Brettell Road
Don't worry Roy
If our efforts get people reminiscing then that's all good in my book.
If our efforts get people reminiscing then that's all good in my book.
-
Tony Wilkins
- Posts: 818
- Joined: Tue Mar 20, 2012 3:57 pm
Re: Brettell Road
The Hymeks did have a strong low frequency resonance. Walking past the turntable at Old Oak common shed, which was like an open round house, when 2 or 3 of them were sitting there idling away it was very noticeable.
Regards
Tony.
Regards
Tony.
Inspiration from the past. Dreams for the future.
-
Rod Cameron

- Posts: 850
- Joined: Fri Jul 25, 2008 12:01 pm
Re: Brettell Road
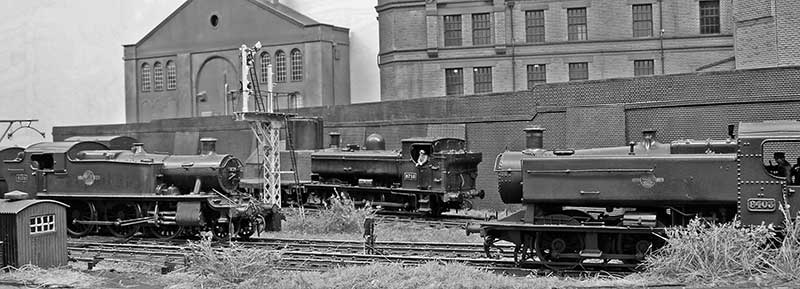
Which reminded me of these from 16 October 1966 
You do not have the required permissions to view the files attached to this post.
Rod
-
jim s-w
- Posts: 2190
- Joined: Wed Jul 30, 2008 5:56 pm
Re: Brettell Road
Good Stuff Rod. Thanks for posting
-
jim s-w
- Posts: 2190
- Joined: Wed Jul 30, 2008 5:56 pm
Re: Brettell Road
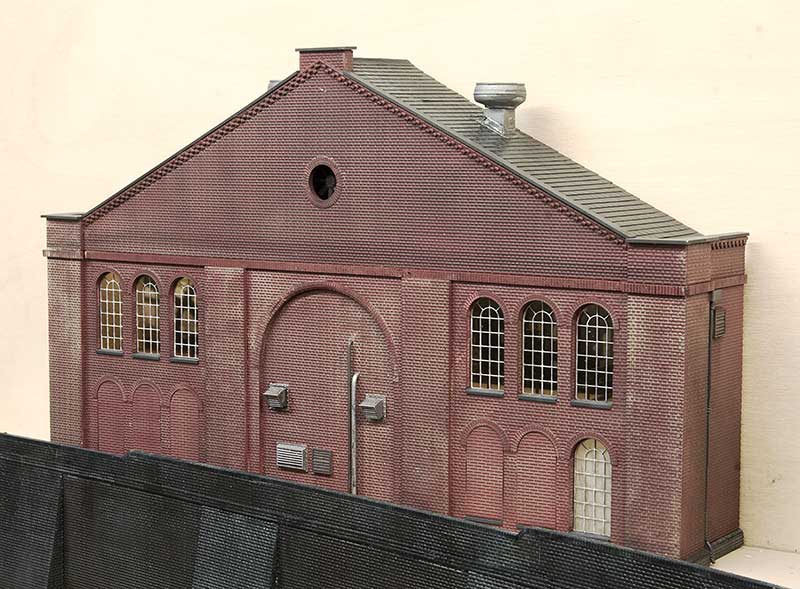
This is my latest building for Brettell road and likely to be the last but one physical model building for the layout. I have plenty more buildings to create yet but as those will be on the backscene they will need to be illustrated instead.
As usual it takes its inspiration from a local structure and this time its the Lion Health building in Stourbridge. Or at least a bit of it. Construction is the same as the others featured recently so I wont go over old ground again. Before it was a health centre the Lion Health building was an Ironworks built by Foster, Rastrick and Company in 1821. John Urpeth Rastrick was originally from Morpeth and had previously constructed an early railway locomotive for Richard Trevithick in 1808. The company would continue to produce steam engines as well as proving machines for chain cable, saws, mills, and boilers. It also produced structural components for buildings, bridges and gas works and in 1825 it listed railway components in a catalogue of products including rail, sleepers and chairs. Its fourth locomotive, Agenoria, was built for the Earl of Dudley's railway and it survives to this day at the National Railway Museum. The company fared far worse than Agenoria and it was officially dissolved on 20 June 1831 and it was absorbed into the Stourbridge Iron Works of John Bradley & Co. James Foster was already the major partner (John Bradley was his half brother) and after 1832 James became the sole owner.
The site went through several more owners but they kept the name John Bradley & Co. (Stourbridge) Ltd. The first was when, in 1919, the Stourbridge Iron Works were sold to a company owned by Edward J. Taylor and then in the interwar period, N. Hingley & Sons Ltd took over but it still continued to trade under the John Bradley & Co name until 1963. The company was finally wound up in 1966 but the Stourbridge Ironworks continued as a rolling mill within the F.H. Lloyd Group until 1982. The building became derelict was nearly destroyed completely due to a fire in 2004. In 2012 it was renovated to become Lion Health which opened in 2014. In 2009 a couple of urban explorers managed to get in and took some pictures, these can be seen here https://www.28dayslater.co.uk/threads/foster-rastrick-and-company-stourbridge-west-midlands-may-09.40640/
What have lions got to do with any of this?
In 1829 Foster, Rastrick and Company built a locomotive for the Delaware & Hudson Canal Company in the USA and this loco, Lion, or rather the Stourbridge Lion is noted to be one of the first foreign built locomotives to be operated in the United States, and one of the first locomotives to ever operate outside Britain. The locomotive performed well in its first test in August 1829 but was found to be too heavy for the track and was never used for its intended purpose of hauling coal trains. Parts of this locomotive also survive and are on display at the B&O Railroad Museum in Baltimore.
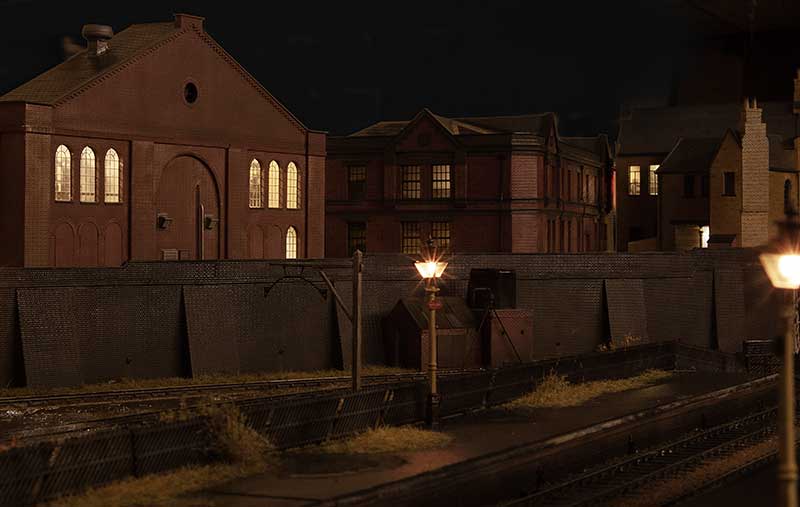
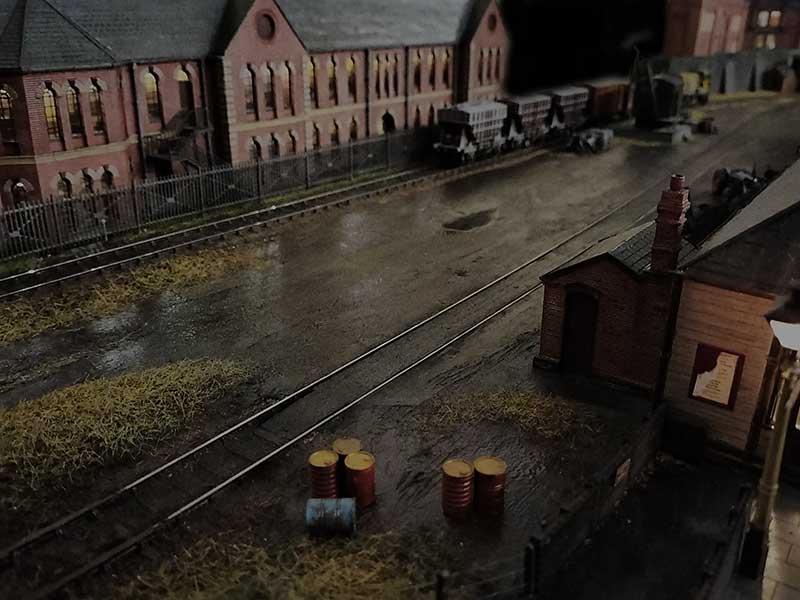
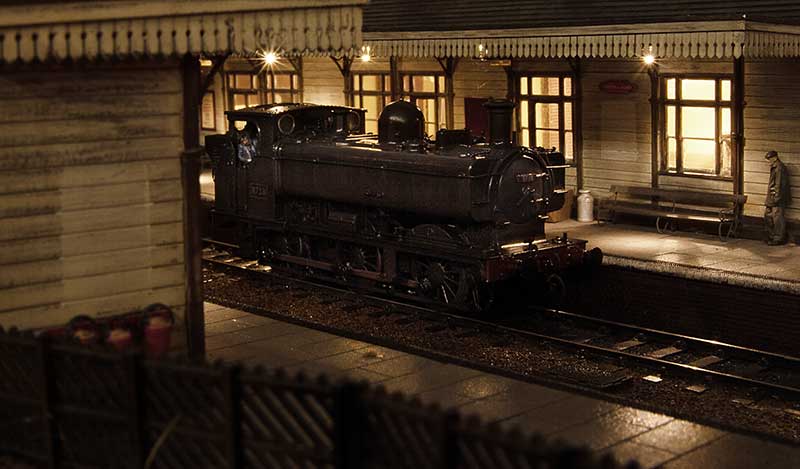
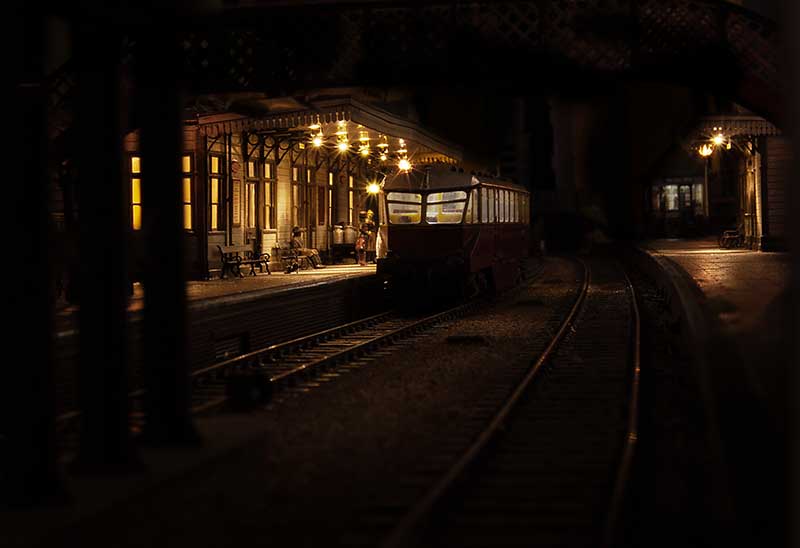
A view from the platform. I think i'll tone the lighting down a bit more.
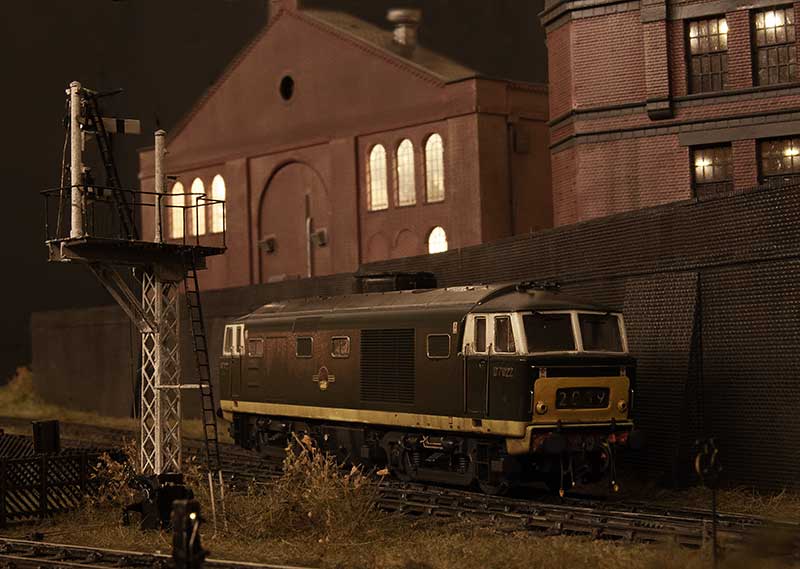
The recently completed Hymek trundles past.
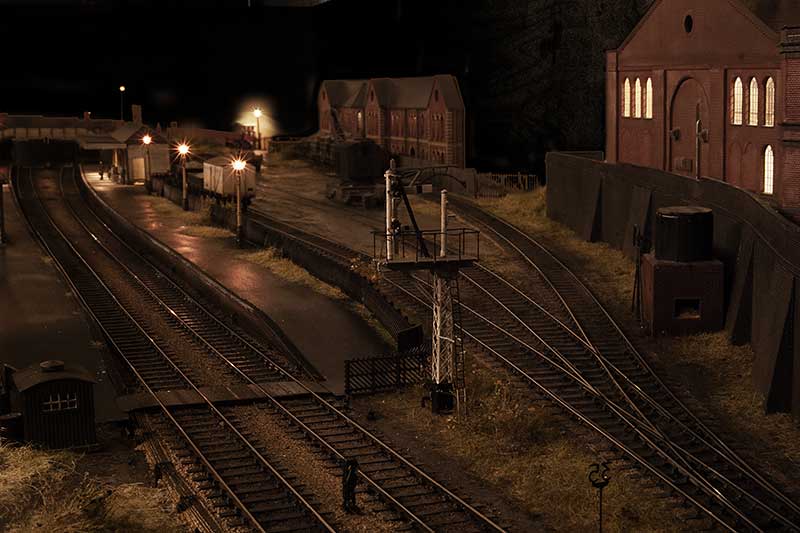
Below are a couple of overall layout shots which I think captures the wet look I'm after. The last one from my phone so apologies for the lack of depth of field.
-
Re6/6

- Posts: 492
- Joined: Sat Jul 26, 2008 4:53 pm
-
Neil Smith

- Posts: 244
- Joined: Tue Dec 03, 2019 12:53 pm
Re: Brettell Road
I agree with John - and I'd also add that the last one, the phone camera shot, if you ignore the barrels being crisply in focus, actually the view of the distant wagons and buildings all being a bit fuzzy to my eye is redolent of a drizzly evening where the water isn't just on the ground, but still falling! Great stuff!
All the best
Neil
All the best
Neil
-
Highpeak
- Posts: 127
- Joined: Sat Oct 13, 2012 8:33 pm
Re: Brettell Road
Those two pictures really do capture a rainy evening, especially the appearance and natural pattern of the puddles.
Neville
If at first you don't succeed, try reading the instructions.
If at first you don't succeed, try reading the instructions.
-
jim s-w
- Posts: 2190
- Joined: Wed Jul 30, 2008 5:56 pm
Re: Brettell Road - 57xx Pannier Tank
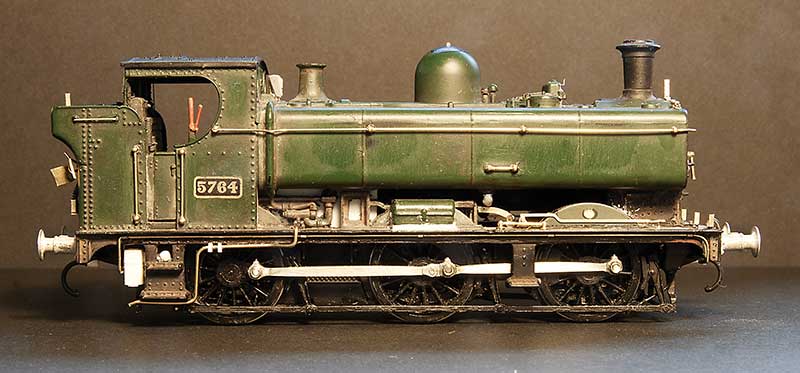
One of my slow burning projects has been a humble little 57xx tank. A combination of the old (But essentially quite good) Mainline body and a High Level Kits chassis but with a bit of twist.
Iain Rice wrote about these back in MRJ 61 and 62 using a similar route, in his case using a Perseverance chassis as that was what was available around the time, and I would urge readers to refer to this as a start point.
The High Level chassis
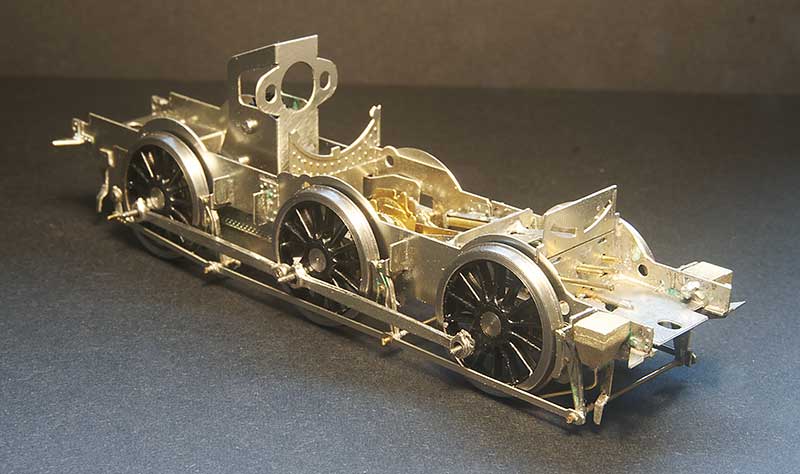
Like all of Chris' chassis this was a joy to build (this is my 4th of his chassis kits now, who would have thought it?) I opted to use Brassmasters bearings which may have messed the alignment up a little as I found I needed to mount the break gear 1 mm lower than as supplied. Strangely though the buffer height seems fine. I differed a little bit from the instructions by making all of the brake gear removable. The rear rods that go behind the wheels seems to trap the rear axle in place as supplied.
Eagle eyed viewers might spot something little odd and yes, you've guessed it - I've gone off piste again.
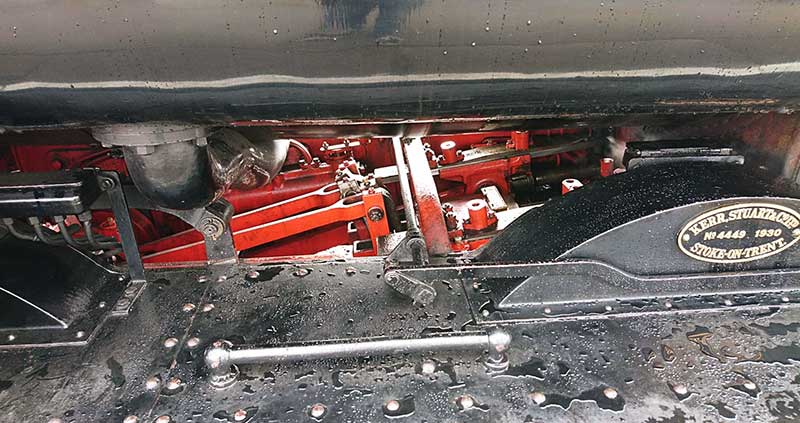
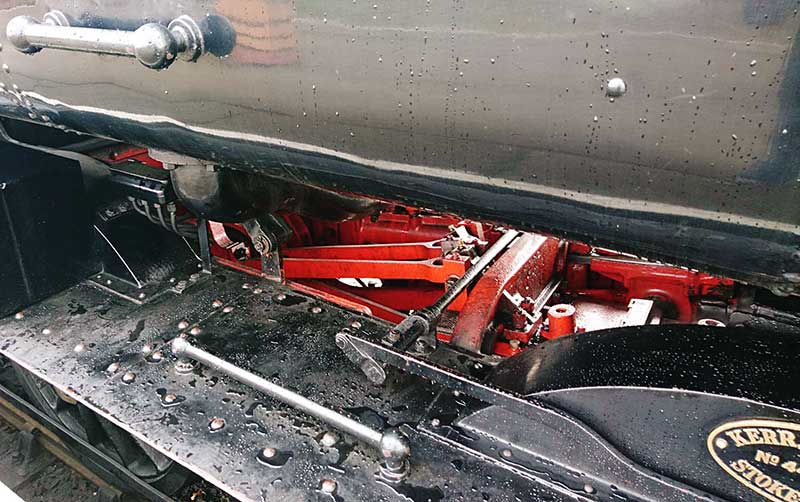
A couple of prototype pics from the Severn Valley. Personally i though the inside motion was pretty obvious looking at the real thing and while there is a representation of it in the High Level Kit I wanted it to move.
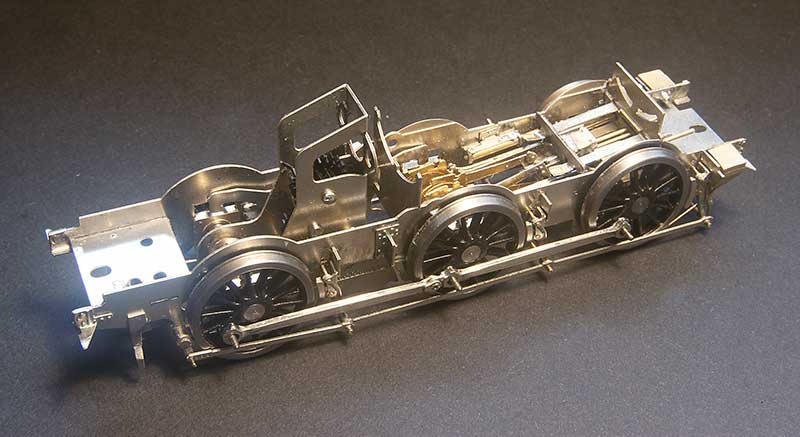
So this is a mish mash of bits - Brassmasters 4f bits at the axle end and Finney GW bits at the front. The GWR version of inside motion seems much simpler that the midland one and the hardest part of this task wasn't putting it all together but getting it in place. Being a small loco theres not a huge amount of wiggle room.
The body is essentially good, you could say extremely good for its time. The obvious stand out bit of weirdness was the top of the dome but nothing a spot of filing can't sort out. It did come with a separate main handrail and some wire ones around the bunker but they were all a bit heavy so i replaced those along with those handrails that were moulded on. I reduced the size of the front wheel splasher by cutting it off and gluing it back on, The width of the cut being all you really need. I didn't feel the need to fiddle with the centre and rear ones. While on my 94xx I replaced all the pipework under the tanks in front of the cab with this model I thought it was good enough as is, although I have cut away the 'holes' as per Iain's article. Theres a bit more detailing to add to the footplate yet and the lower pipework will need to be replaced.
Iain Rice wrote about these back in MRJ 61 and 62 using a similar route, in his case using a Perseverance chassis as that was what was available around the time, and I would urge readers to refer to this as a start point.
The High Level chassis
Like all of Chris' chassis this was a joy to build (this is my 4th of his chassis kits now, who would have thought it?) I opted to use Brassmasters bearings which may have messed the alignment up a little as I found I needed to mount the break gear 1 mm lower than as supplied. Strangely though the buffer height seems fine. I differed a little bit from the instructions by making all of the brake gear removable. The rear rods that go behind the wheels seems to trap the rear axle in place as supplied.
Eagle eyed viewers might spot something little odd and yes, you've guessed it - I've gone off piste again.
A couple of prototype pics from the Severn Valley. Personally i though the inside motion was pretty obvious looking at the real thing and while there is a representation of it in the High Level Kit I wanted it to move.
So this is a mish mash of bits - Brassmasters 4f bits at the axle end and Finney GW bits at the front. The GWR version of inside motion seems much simpler that the midland one and the hardest part of this task wasn't putting it all together but getting it in place. Being a small loco theres not a huge amount of wiggle room.
The body is essentially good, you could say extremely good for its time. The obvious stand out bit of weirdness was the top of the dome but nothing a spot of filing can't sort out. It did come with a separate main handrail and some wire ones around the bunker but they were all a bit heavy so i replaced those along with those handrails that were moulded on. I reduced the size of the front wheel splasher by cutting it off and gluing it back on, The width of the cut being all you really need. I didn't feel the need to fiddle with the centre and rear ones. While on my 94xx I replaced all the pipework under the tanks in front of the cab with this model I thought it was good enough as is, although I have cut away the 'holes' as per Iain's article. Theres a bit more detailing to add to the footplate yet and the lower pipework will need to be replaced.
-
Andrew Ullyott
- Posts: 225
- Joined: Fri Aug 08, 2008 2:31 pm
Re: Brettell Road
Very nice Jim.
Don’t know if you’re aware but RT models do an etch of the sanding levers for the pannier.
Don’t know if you’re aware but RT models do an etch of the sanding levers for the pannier.
-
jim s-w
- Posts: 2190
- Joined: Wed Jul 30, 2008 5:56 pm
Re: Brettell Road
Thanks Andrew
I have got some - where I've put them though is a different story!
I have got some - where I've put them though is a different story!
-
Steve Carter
- Posts: 645
- Joined: Tue Nov 11, 2008 6:51 pm
Re: Brettell Road
jim s-w wrote:Thanks Andrew
I have got some - where I've put them though is a different story!
Steve Carter
-
jim s-w
- Posts: 2190
- Joined: Wed Jul 30, 2008 5:56 pm
Re: Brettell Road
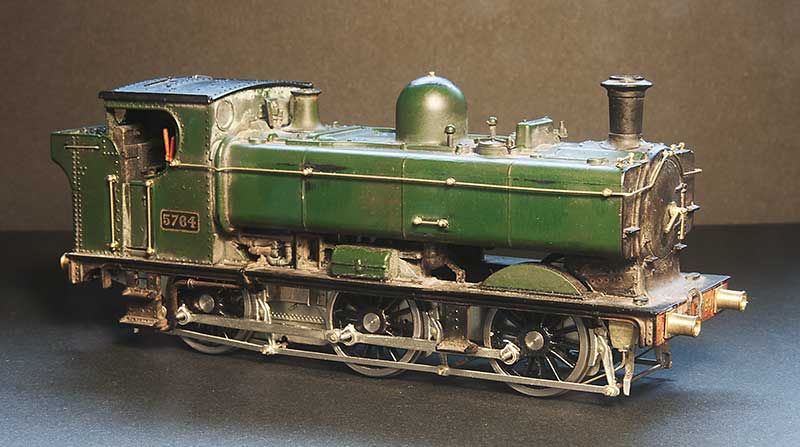
Thoughts turn to the remaining detailing on the body of my 57xx tank. I like to take pictures pre paint for prosperity before it all disappears under plain black and grime and no one really notices what you've done anymore!
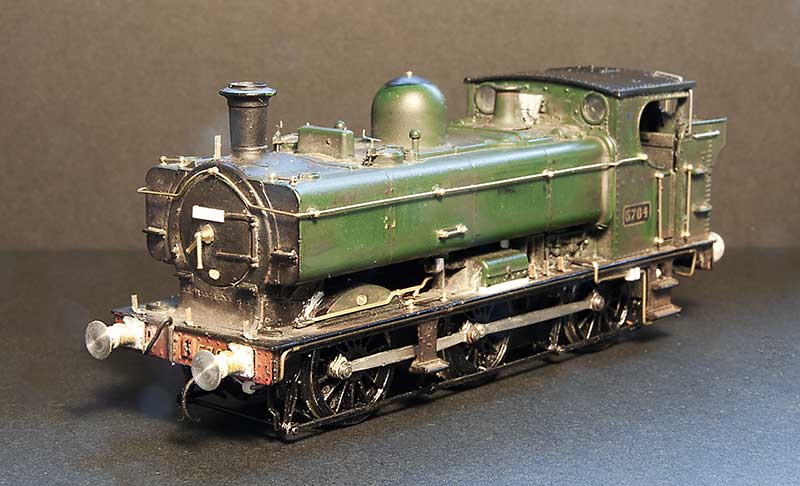
Front 3 quarter view. You will notice that the buffers are different. Due to a timely new casting arriving from Lanarkshire models. Lamp irons are from Masokits and the sanding levers from RT models.

The footplate pipework has been replaced with wire The Whistle shield is from Modelu reinforced with a bit of wire. The tool box seemed a little 'floaty' as mainline had modelled it so I filled in the gap and re-scribed a finer one.
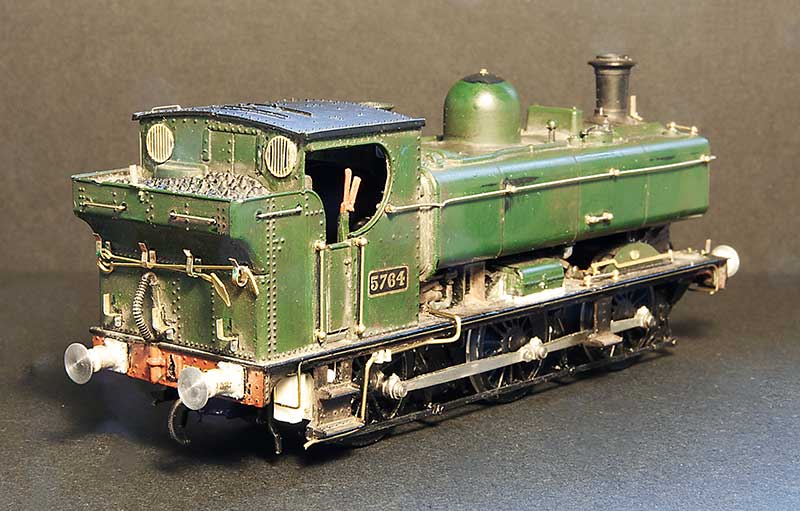
Rear view. The fire irons are from Springside Models and the rear windows from Mainly Trains (now Wizard models). I've thinned down the cab sides
I tried to do the water balancing pipe as one piece secured by magnets but as its all a little bit small the magnets weren't really strong enough. I had fears of it falling off and causing havoc with the inside motion so I had to settle for it being in 3 parts instead. Not sure what the little box is behind the rear footstep not all locos had them. I think it might be related to the AWS gear.
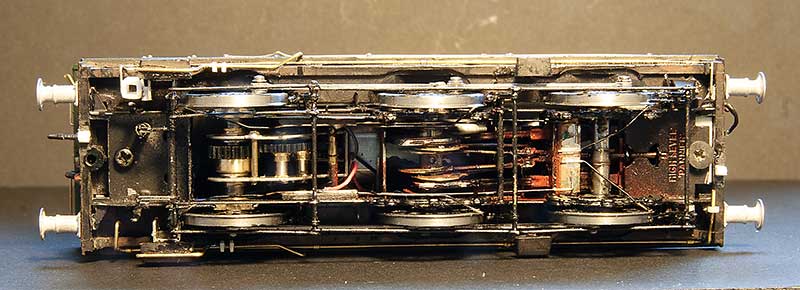
Underside view - you can just make out the way the pickups are arranged.
My intended victim for this model was 8718 which in Brettell Lane era was a Kidderminster Loco. It later went to Stourbridge where it lost its number plates and gained painted on numbers in a reasonable attempt at the GWR font. I preferred the proper number plate. Searching for pictures I couldn't make out a BR logo on the tank sides. A request to the GWR modellers and British Railways Steam era 1948 to 1968 facebook groups didn't yield any answers either so reverting to my 'model what you see, not what you think you know' approach I left the logo off.
Below a few images of the finished loco. The crew are the customary Modelu products.
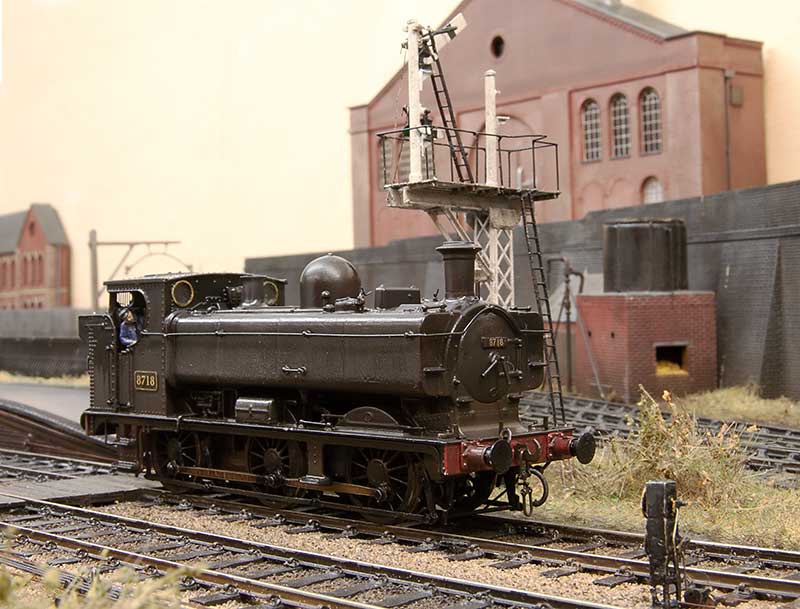
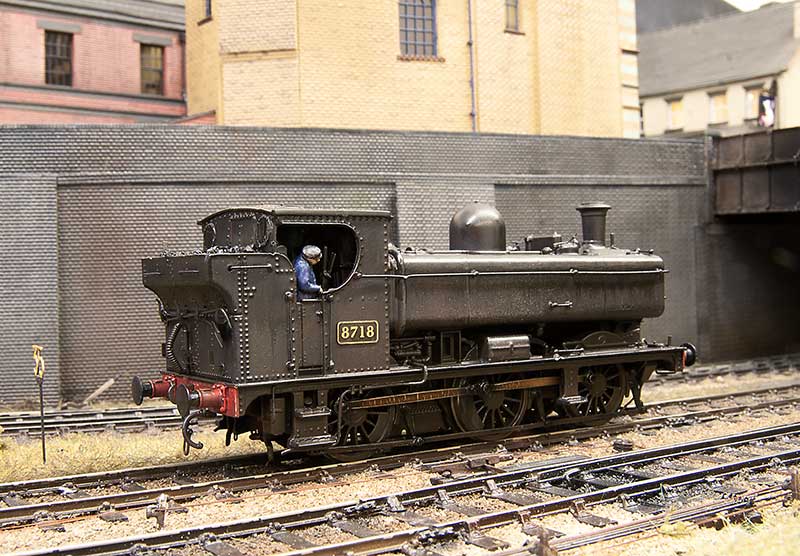
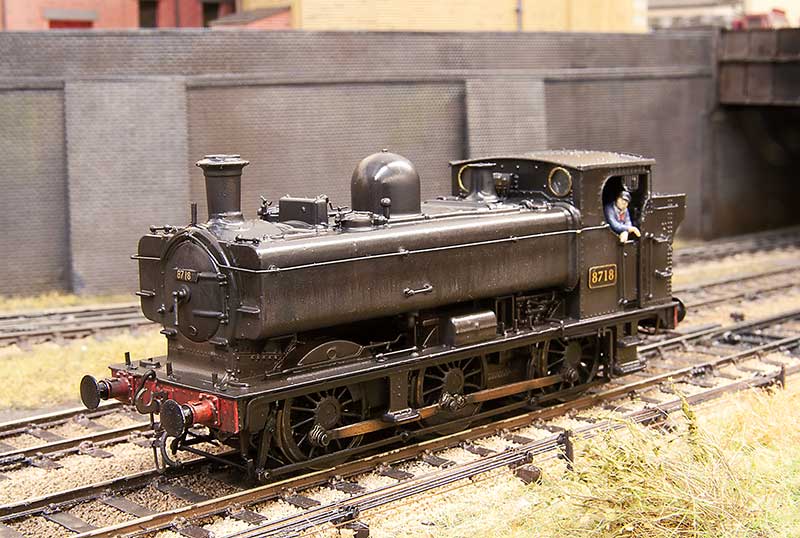
So there you have it - An unremarkable little tank engine.
Front 3 quarter view. You will notice that the buffers are different. Due to a timely new casting arriving from Lanarkshire models. Lamp irons are from Masokits and the sanding levers from RT models.
The footplate pipework has been replaced with wire The Whistle shield is from Modelu reinforced with a bit of wire. The tool box seemed a little 'floaty' as mainline had modelled it so I filled in the gap and re-scribed a finer one.
Rear view. The fire irons are from Springside Models and the rear windows from Mainly Trains (now Wizard models). I've thinned down the cab sides
I tried to do the water balancing pipe as one piece secured by magnets but as its all a little bit small the magnets weren't really strong enough. I had fears of it falling off and causing havoc with the inside motion so I had to settle for it being in 3 parts instead. Not sure what the little box is behind the rear footstep not all locos had them. I think it might be related to the AWS gear.
Underside view - you can just make out the way the pickups are arranged.
My intended victim for this model was 8718 which in Brettell Lane era was a Kidderminster Loco. It later went to Stourbridge where it lost its number plates and gained painted on numbers in a reasonable attempt at the GWR font. I preferred the proper number plate. Searching for pictures I couldn't make out a BR logo on the tank sides. A request to the GWR modellers and British Railways Steam era 1948 to 1968 facebook groups didn't yield any answers either so reverting to my 'model what you see, not what you think you know' approach I left the logo off.
Below a few images of the finished loco. The crew are the customary Modelu products.
So there you have it - An unremarkable little tank engine.
-
Lord Colnago

- Posts: 403
- Joined: Tue Aug 11, 2009 8:42 pm
Re: Brettell Road
Nice job Jim. An atmospheric little tank engine, certainly not unremarkable.
John.
John.
The second best priest
-
Noel

- Posts: 1983
- Joined: Wed Jun 23, 2010 1:04 pm
Re: Brettell Road
jim s-w wrote:Not sure what the little box is behind the rear footstep not all locos had them. I think it might be related to the AWS gear.
It's the battery box for the WR AWS.
Regards
Noel
Noel
-
jim s-w
- Posts: 2190
- Joined: Wed Jul 30, 2008 5:56 pm
Re: Brettell Road
Thanks Noel
Jim
Jim
-
jim s-w
- Posts: 2190
- Joined: Wed Jul 30, 2008 5:56 pm
Re: Brettell Road
Let's start with a little observation. Modelling railways is expensive these days, the reason for this has been discussed elsewhere but if I were starting out now I certainly wouldn't be able to afford it. I actually think the prices are what they are but there are one or 2 things where manufacturers really are taking the mick.
Case in point is the 24ton LMS iron ore hopper. Firstly its not one, at all! Basically yes it is a hopper but thats about it. It's a loose model of the Charles Roberts hopper with a body stretched to fit a generic 10ft chassis. When you consider that this model first appeared in the 1977-78 mainline railways catalogue charging nearly £30 rrp for a completely wrong, very old tooled model is a fictitious livery is more than a little bit dodgy, Considering thousands of these are out there in various liveries for a fraction of the price you have to wonder who's actually buying the things?
So let's look at what this model attempts to be.
LMS hoppers are something of a gap in the RTR market as they have been hardly touched by either RTR or kit manufactures. I believe that the model is trying to masquerade as a diagram 1893-1942 iron ore hopper. From what i can tell these were all the same except for the materials used.
D1893 - 50 wagons built in 1934 by the Metropolitan Carriage, Wagon and Finance Company out of Chromador Steel
D1894 - 300 wagons built in 1934 by the trade out of mild steel
D1941 - 450 wagons built in 1936-38 by the trade out of copper bearing steel
D1942 - 100 wagons built in 1936 by the Gloucester Carriage and Wagon company out of an unspecified material.
Many of these lasted into the BR era and were cascaded to various steel works meaning theres quite a few liveries that can be done and an enterprising manufacturer can cash in on the current rise of interest in industrial modelling.
The model
While the RTR hoppers wheelbase of 10 ft is actually closer to the LMS wagons 10ft 6 than it is the Charles Roberts 9ft wheelbase theres nothing about the model that can really give you ahead start on constructing one of these so the easiest method is just to scratch-build one.
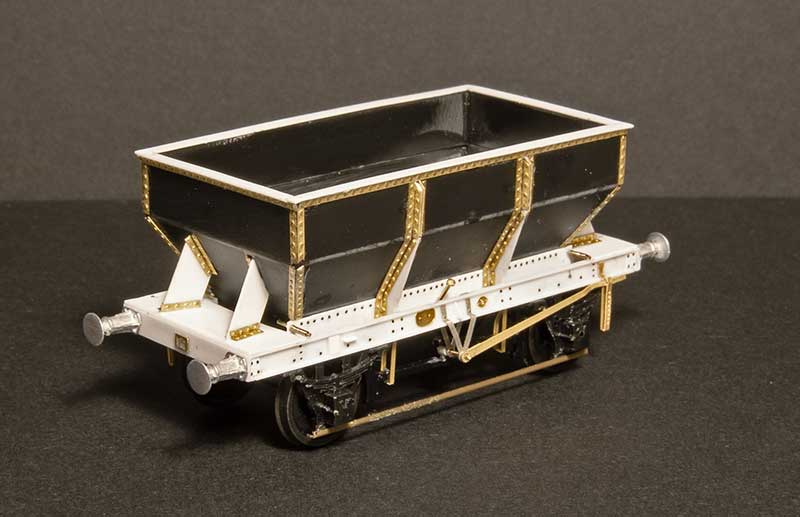
Which is what I did. Construction is plasticard with evergreen sections for the chassis and rivet strips from Mainly Trains or transfers from Archers. Buffers are from Lanarkshire models and underframe ironwork from Ambis and Bill Bedford. The axleguards, axle boxes and springs are salvaged from parkside kits. Drawings in LMS wagons volume 1 were used as a guide.
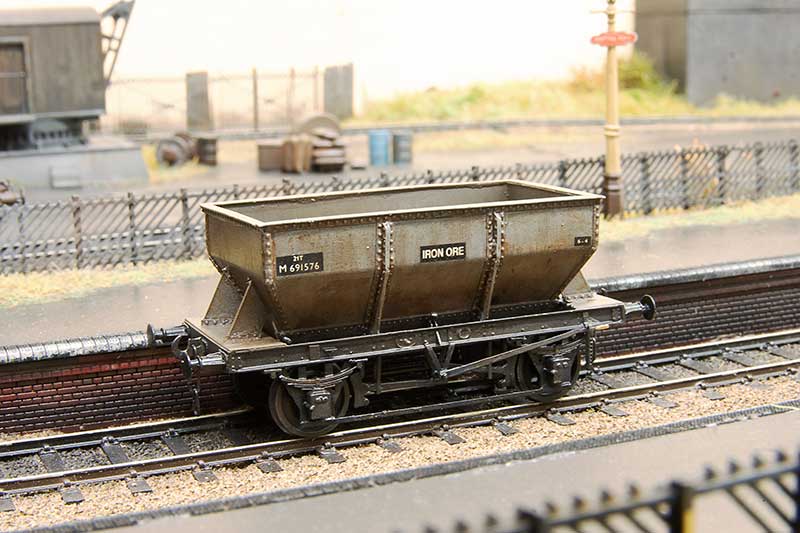
Painted up with transfers from Modelmaster and Fox.
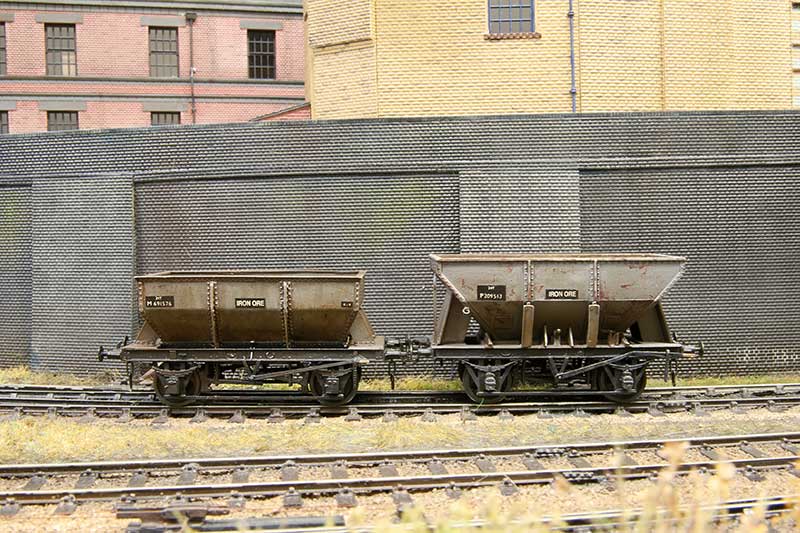
Comparison with the Charles Roberts wagon on the right. This has been shortened and rebuilt on a 9ft chassis so its not a direct comparison with the RTR model as supplied. To see what I did to that one click https://p4newstreet.com/those-little-mainline-iron-ore-hoppers/
Case in point is the 24ton LMS iron ore hopper. Firstly its not one, at all! Basically yes it is a hopper but thats about it. It's a loose model of the Charles Roberts hopper with a body stretched to fit a generic 10ft chassis. When you consider that this model first appeared in the 1977-78 mainline railways catalogue charging nearly £30 rrp for a completely wrong, very old tooled model is a fictitious livery is more than a little bit dodgy, Considering thousands of these are out there in various liveries for a fraction of the price you have to wonder who's actually buying the things?
So let's look at what this model attempts to be.
LMS hoppers are something of a gap in the RTR market as they have been hardly touched by either RTR or kit manufactures. I believe that the model is trying to masquerade as a diagram 1893-1942 iron ore hopper. From what i can tell these were all the same except for the materials used.
D1893 - 50 wagons built in 1934 by the Metropolitan Carriage, Wagon and Finance Company out of Chromador Steel
D1894 - 300 wagons built in 1934 by the trade out of mild steel
D1941 - 450 wagons built in 1936-38 by the trade out of copper bearing steel
D1942 - 100 wagons built in 1936 by the Gloucester Carriage and Wagon company out of an unspecified material.
Many of these lasted into the BR era and were cascaded to various steel works meaning theres quite a few liveries that can be done and an enterprising manufacturer can cash in on the current rise of interest in industrial modelling.
The model
While the RTR hoppers wheelbase of 10 ft is actually closer to the LMS wagons 10ft 6 than it is the Charles Roberts 9ft wheelbase theres nothing about the model that can really give you ahead start on constructing one of these so the easiest method is just to scratch-build one.
Which is what I did. Construction is plasticard with evergreen sections for the chassis and rivet strips from Mainly Trains or transfers from Archers. Buffers are from Lanarkshire models and underframe ironwork from Ambis and Bill Bedford. The axleguards, axle boxes and springs are salvaged from parkside kits. Drawings in LMS wagons volume 1 were used as a guide.
Painted up with transfers from Modelmaster and Fox.
Comparison with the Charles Roberts wagon on the right. This has been shortened and rebuilt on a 9ft chassis so its not a direct comparison with the RTR model as supplied. To see what I did to that one click https://p4newstreet.com/those-little-mainline-iron-ore-hoppers/
-
Terry Bendall
- Forum Team
- Posts: 2427
- Joined: Sun Jul 27, 2008 7:46 am
Re: Brettell Road
jim s-w wrote:... so the easiest method is just to scratch-build one.
A very good result Jim and for those who may not feel very confident about scratch building, a good starting point.
Terry Bendall
-
jim s-w
- Posts: 2190
- Joined: Wed Jul 30, 2008 5:56 pm
Re: Brettell Road
This time we have a couple of classics from the Cambrian range
The good old catfish. Built with the use of Stenson models hand wheels and replacement handrails. One thing with these, as supplied, is that the wheels seem a long way away from the w W-irons, even in P4 so I cut the moulded rings off the back and moved the solebars closer together. A lot of people say these are a bit tricky but the only real difference to any other kit is you just need to take a lot longer and really let things set. They aren't really a bung it together in an afternoon style job. I found another 2 kits in my stash which i will build up for New Street and might do a bit of a step by step on how to do them.
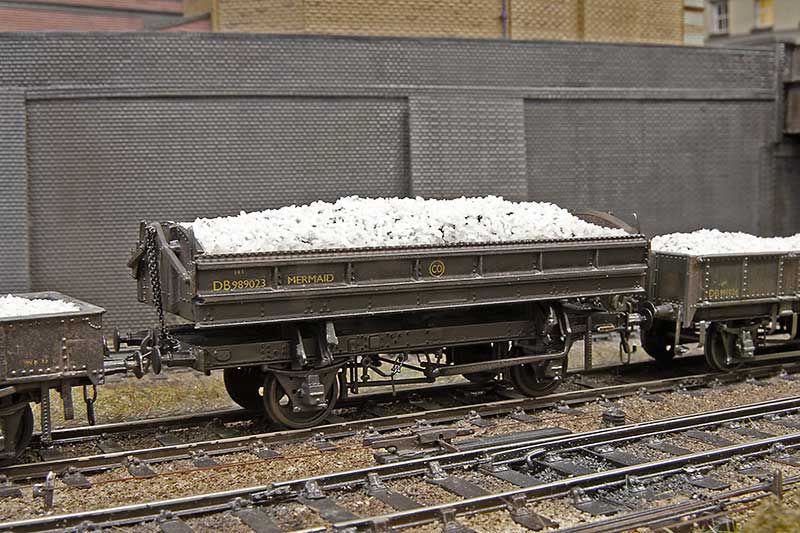
Next up the mermaid. I have built this as an early one which were the same as the original GWR builds. The main difference is push rod brakes instead of clasp, no vacuum brakes and earlier buffers. The rail clamps were replaced with Roxey mouldings shackles.
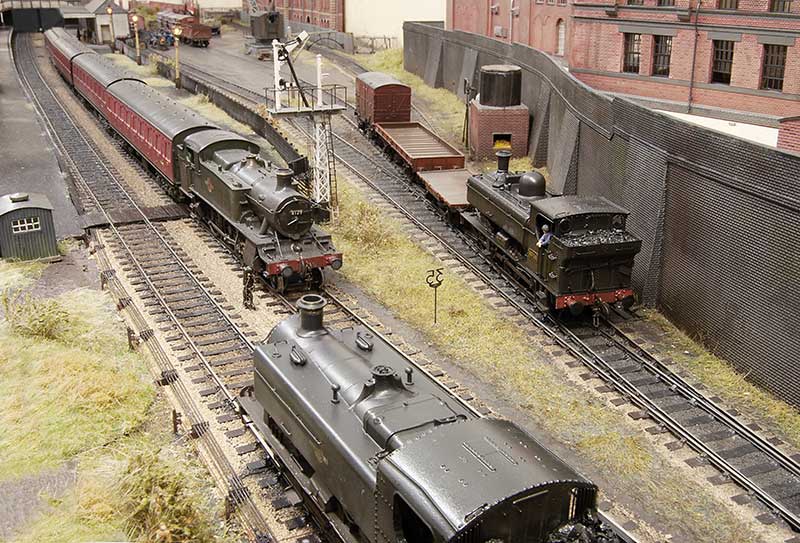
Below - It seems Brettell Road has had something of a GWR take over today!
The good old catfish. Built with the use of Stenson models hand wheels and replacement handrails. One thing with these, as supplied, is that the wheels seem a long way away from the w W-irons, even in P4 so I cut the moulded rings off the back and moved the solebars closer together. A lot of people say these are a bit tricky but the only real difference to any other kit is you just need to take a lot longer and really let things set. They aren't really a bung it together in an afternoon style job. I found another 2 kits in my stash which i will build up for New Street and might do a bit of a step by step on how to do them.
Next up the mermaid. I have built this as an early one which were the same as the original GWR builds. The main difference is push rod brakes instead of clasp, no vacuum brakes and earlier buffers. The rail clamps were replaced with Roxey mouldings shackles.
Below - It seems Brettell Road has had something of a GWR take over today!
-
ACJ
- Posts: 9
- Joined: Thu Mar 20, 2014 10:50 pm
Re: Brettell Road
Hi Jim,
Your last photo is superb. Very atmospheric and I feel that I am standing on the platform. Reminds me of a published colour photograph of Ross on Wye at night illuminated by incandescent lights. Yours is just as convincing
Andrew
Your last photo is superb. Very atmospheric and I feel that I am standing on the platform. Reminds me of a published colour photograph of Ross on Wye at night illuminated by incandescent lights. Yours is just as convincing
Andrew
Andrew
-
jim s-w
- Posts: 2190
- Joined: Wed Jul 30, 2008 5:56 pm
Re: Brettell Road
Thanks Andrew. Its taken a lot of fiddling to get the lighting to somewhere near where i want it to be.
-
jim s-w
- Posts: 2190
- Joined: Wed Jul 30, 2008 5:56 pm
Re: Brettell Road
Let's talk about glass. Something Stourbridge is particularly renowned for. It is believed that there has been glass production in the area for hundreds of years with a factory opening at the lower end of what is now Brettell Lane in the 1640s and production continuing in the area ever since.
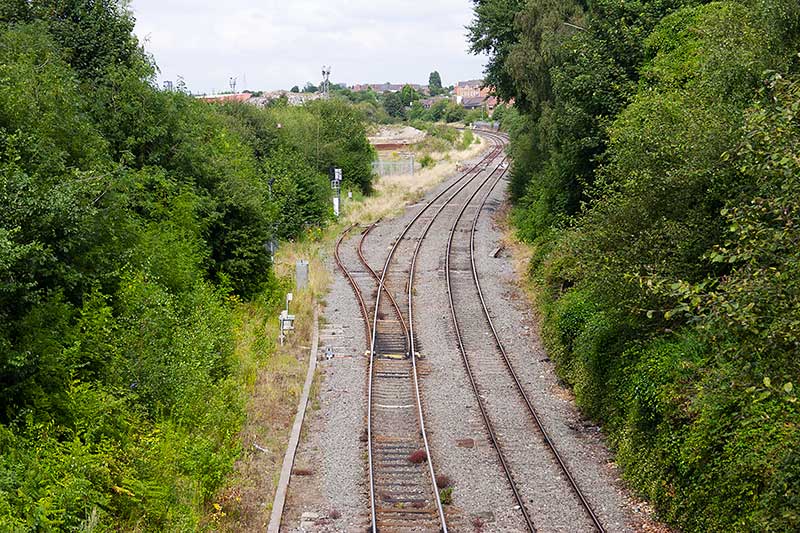
You're going to need your imagination for this bit! Regular readers will know that Brettell Road is not an accurate model of the real Brettell lane but is inspired by it and the local area. The above picture taken in August 2014 (that long already?) shows what was left of the goods yard at Moor Lane. Brettell Lane is behind us. The line to Pensnett branched off on the left and the yard is petty much straight ahead of us. You can see the flood lights against the skyline. This was the view from the left hand end of the original version of Brettell Road and is now the view from the middle looking to the right. On the model the line is not an S curve but a continuous left hand bend. Also the main line descends from this point on the layout while the real line rises as it goes away from us.
On the right, long gone now, there used to be a siding which served the Brierley Hill glassworks. The buildings are still there and can just be seen behind the trees in the distance where the mainline disappears.
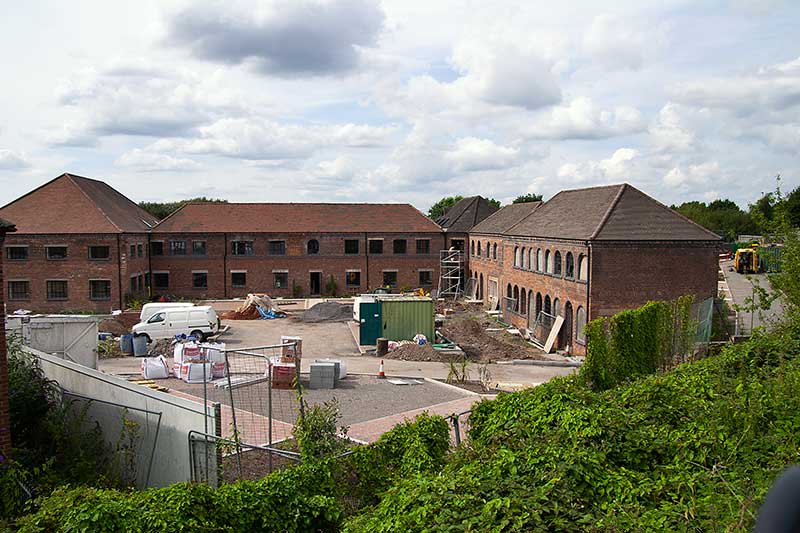
Another view from 2014 that shows the building being converted into apartments. If you stand looking at the right hand end of the layout you would effectively be standing in this building. The line runs behind it and you can just make out the ironwork of Moor Lane Bridge on the right of the picture above the yellow van. This building is represented on the layout as part of the backscene.
Brierley Hill glass was more of the decorative, cut glass and crystal type than the industrial large sheets and I have a few shockvans as a nod to glass traffic but of course they could be carrying anything so only I know that. However thanks to a gift from my friend Tom i now have something a little more obvious...

I present you the ancient K's kit for the GWR Coral glass wagon. These were built in 1908, to 2 diagrams, by Swindon to carry large plate glass in crates. BR briefly continued with these building 6 more examples before switching to the LMS design but even then only building 42 wagons (also at Swindon).
I decided to build one of the BR types with the main differences being (as far as i can tell) the shape of the ends of the frames, the GWR ones being more curvy, and the brake levers. The model had been started by Tom's dad but was dunked in some cellulose thinners which dissolved the glue (but not the paint strangely) before it was reassembled using low melt solder. The kit had some nice brass buffers which were replaced with Lanarkshire models which better match the BR examples. The upper frames were cast in whitemetal and there were only 2 of them so they were replaced with brass section. A part of the original casting was soldered to the end of the underframe and reshaped to better match the BR design. I used the slotted bearing and central pivot method of compensation as previously used on my lowmac.
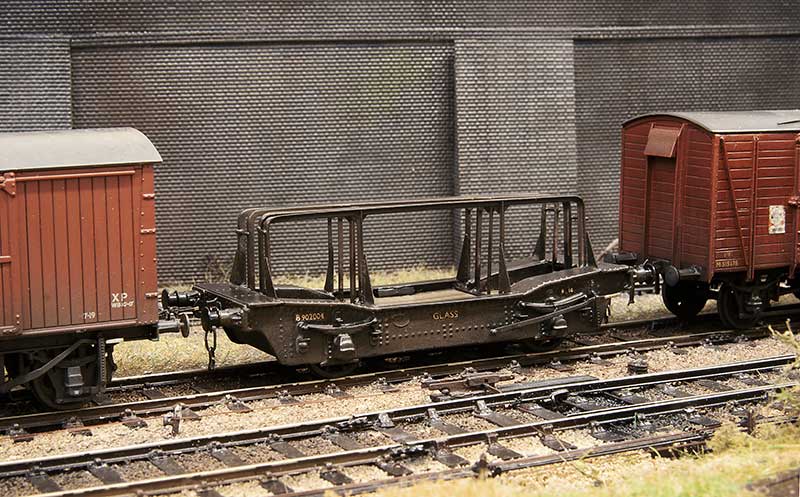
In service on the layout. As mentioned it's not really the sort of glass that Brierley Hill was known for but it is a nod to the industry. Apparently some of the real wagons were transferred to the steel industry anyway so perhaps its on trial in the area for that reason instead?
Thanks go to Tom and his dad.
You're going to need your imagination for this bit! Regular readers will know that Brettell Road is not an accurate model of the real Brettell lane but is inspired by it and the local area. The above picture taken in August 2014 (that long already?) shows what was left of the goods yard at Moor Lane. Brettell Lane is behind us. The line to Pensnett branched off on the left and the yard is petty much straight ahead of us. You can see the flood lights against the skyline. This was the view from the left hand end of the original version of Brettell Road and is now the view from the middle looking to the right. On the model the line is not an S curve but a continuous left hand bend. Also the main line descends from this point on the layout while the real line rises as it goes away from us.
On the right, long gone now, there used to be a siding which served the Brierley Hill glassworks. The buildings are still there and can just be seen behind the trees in the distance where the mainline disappears.
Another view from 2014 that shows the building being converted into apartments. If you stand looking at the right hand end of the layout you would effectively be standing in this building. The line runs behind it and you can just make out the ironwork of Moor Lane Bridge on the right of the picture above the yellow van. This building is represented on the layout as part of the backscene.
Brierley Hill glass was more of the decorative, cut glass and crystal type than the industrial large sheets and I have a few shockvans as a nod to glass traffic but of course they could be carrying anything so only I know that. However thanks to a gift from my friend Tom i now have something a little more obvious...
I present you the ancient K's kit for the GWR Coral glass wagon. These were built in 1908, to 2 diagrams, by Swindon to carry large plate glass in crates. BR briefly continued with these building 6 more examples before switching to the LMS design but even then only building 42 wagons (also at Swindon).
I decided to build one of the BR types with the main differences being (as far as i can tell) the shape of the ends of the frames, the GWR ones being more curvy, and the brake levers. The model had been started by Tom's dad but was dunked in some cellulose thinners which dissolved the glue (but not the paint strangely) before it was reassembled using low melt solder. The kit had some nice brass buffers which were replaced with Lanarkshire models which better match the BR examples. The upper frames were cast in whitemetal and there were only 2 of them so they were replaced with brass section. A part of the original casting was soldered to the end of the underframe and reshaped to better match the BR design. I used the slotted bearing and central pivot method of compensation as previously used on my lowmac.
In service on the layout. As mentioned it's not really the sort of glass that Brierley Hill was known for but it is a nod to the industry. Apparently some of the real wagons were transferred to the steel industry anyway so perhaps its on trial in the area for that reason instead?
Thanks go to Tom and his dad.
-
Jol Wilkinson

- Posts: 1114
- Joined: Mon Jul 21, 2008 7:39 pm
Re: Brettell Road
Thanks for posting those photos, Jim. I have a set of castings (both sides and floor) for that K's kit but didn't know what it was. I think it came in a job lot of bits.
Free to a good home for the cost of P&P.
Free to a good home for the cost of P&P.
-
martin goodall
- Posts: 1425
- Joined: Fri Oct 02, 2009 6:20 pm
Re: Brettell Road
I would be happy to take it off your hands, Jol (if no-one else has made a prior claim).
I have had one of these on my wish list for some time, but never expected to find one after all this time.
Please PM me if it is still available, and I'll let you have address details, and arrange to pay P&P.
Cheers
MARTIN
I have had one of these on my wish list for some time, but never expected to find one after all this time.
Please PM me if it is still available, and I'll let you have address details, and arrange to pay P&P.
Cheers
MARTIN
Who is online
Users browsing this forum: ClaudeBot and 2 guests