Here's a little something for the weekend! To talk about that is. Couplings.
I'm just looking for advise and opinions on the different types of automatic couplings. Their advantages and disadvantages.
Having been away from the hobby for many years I'm out of touch to what is available. I know of the Jackson, Sprat and Winkles and Dinghams. I used to use just screw and 3 link couplings which in my heart of heart is what I want to still use but as the layout I have planned is to last me well into my twilight years, I still want to be able to uncouple things when me hands become less than steady. LOL.
What I want to be able to do is be able to uncouple wagons and loose shunt them to their desired position etc but what I understand of these auto-couplings is that they are activated by a fixed magnet which raises the coupling to release it. Can you then propel the uncoupled wagon without it re-coupling up again?
For example, the fixed magnet is places at the entrance of a siding, you have a rake of wagons for which you wish to uncouple the last two wagons. The wagons are placed so that the coupling between the second and third wagon is over the magnet and they uncouple. You then want to push them down the siding to the stops. Can this be done without them re-coupling?
I look forwards to reading your replies and suggestions.
Dave
The Gentle Art of Couplings
-
nigelcliffe
- Posts: 751
- Joined: Mon Jul 21, 2008 8:31 am
Re: The Gentle Art of Couplings
Serjt-Dave wrote:What I want to be able to do is be able to uncouple wagons and loose shunt them to their desired position etc but what I understand of these auto-couplings is that they are activated by a fixed magnet which raises the coupling to release it. Can you then propel the uncoupled wagon without it re-coupling up again?
For example, the fixed magnet is places at the entrance of a siding, you have a rake of wagons for which you wish to uncouple the last two wagons. The wagons are placed so that the coupling between the second and third wagon is over the magnet and they uncouple. You then want to push them down the siding to the stops. Can this be done without them re-coupling?
Yes for most well designed auto-couplings.
I use Alex Jackson's, on the local group layout there are magnets at strategic entrance places to sidings, as a moving train is pushed into the siding an electromagnet is energised at the appropriate time and the couplings release on the moving train. On stopping, the train can be pulled back, leaving the wagon in its desired place.
Most other well designed auto-couplers can do a similar thing.
There are some limitations in train movements with such electromagnets (its difficult to spot one wagon down a siding, come back a little and drop a second wagon, etc..), but for most cases it works fine.
Or, I recently there was a letter in Scalefour News about adding a small bit of iron wire to the loop on a Dingham, and then a wand (magnet on stick) can be waved over it to release it anywhere.
Or, if you've a mind for some fairly small bits and pieces, I've written in Scalefour News of methods to control couplings from a DCC function output; this totally frees things from fixed magnets.
- Nigel
Nigel Cliffe - Blog of various mostly model making topics
-
Knuckles

- Posts: 1262
- Joined: Fri Nov 18, 2011 9:15 pm
Re: The Gentle Art of Couplings
Bottom fat paragraph has a sentence or two in wrong place, please try to decode my drivel yourself as I'm phone typing again and cant tweak things once its too far down page. Absolute crap. If I get on a comp I'll edit it. Sorry.
You can with Dingham couplers also. I've only been using them for a small while but so far am happy with my choice.
I brought the Alex Jackson book and enjoyed a good read, but decided it wasn't for me. One thing I don't like about it, is it is to my eye actually too unobtrusive and the stock looks like it's being propelled by ghosts.
The Dinghams don't look too out of place in comparison to some of the others and you can fit 3 links to the latch end.
One advantage of Dinghams is you can still use them with 3, Instanter and Screw link, only with less functionality. another advantage is you can uncouple on the move without stopping, but in my small amount of experience with them this only works about 75% of the time. After investigations I blame myself rather than the design.so if you have a rake that isn't going to be shunted often it's compatible still. The drawback is that once uncoupled, pushing them will couple again.
Great tip off Nigel, I like the sound of a wand addition very much.
...activated by a fixed magnet which raises the coupling to release it. Can you then propel the uncoupled wagon without it re-coupling up again?
You can with Dingham couplers also. I've only been using them for a small while but so far am happy with my choice.
I brought the Alex Jackson book and enjoyed a good read, but decided it wasn't for me. One thing I don't like about it, is it is to my eye actually too unobtrusive and the stock looks like it's being propelled by ghosts.
The Dinghams don't look too out of place in comparison to some of the others and you can fit 3 links to the latch end.
One advantage of Dinghams is you can still use them with 3, Instanter and Screw link, only with less functionality. another advantage is you can uncouple on the move without stopping, but in my small amount of experience with them this only works about 75% of the time. After investigations I blame myself rather than the design.so if you have a rake that isn't going to be shunted often it's compatible still. The drawback is that once uncoupled, pushing them will couple again.
Great tip off Nigel, I like the sound of a wand addition very much.
“He who dares not offend cannot be honest.” Thomas Paine
https://www.sparkshotcustomcreations.com/
Mostly 3D Printed Loco kits etc.
SCC Price list (7/4/22)
https://www.sparkshotcustomcreations.co ... e77d42.pdf
https://www.sparkshotcustomcreations.com/
Mostly 3D Printed Loco kits etc.
SCC Price list (7/4/22)
https://www.sparkshotcustomcreations.co ... e77d42.pdf
-
David Knight
- Posts: 821
- Joined: Sun Jul 20, 2008 6:02 pm
Re: The Gentle Art of Couplings
Serjt-Dave wrote: snipped
For example, the fixed magnet is places at the entrance of a siding, you have a rake of wagons for which you wish to uncouple the last two wagons. The wagons are placed so that the coupling between the second and third wagon is over the magnet and they uncouple. You then want to push them down the siding to the stops. Can this be done without them re-coupling?
I look forwards to reading your replies and suggestions.
Dave
Hi Dave,
I can speak for Dinghams as I've been using them happily for a number of years and they will do as asked. There is a catch however and I suspect it applies with the other types of coupling too, if the running is less than smooth and the wagons bounce back and forth (oscillate?) there is a chance that they may re-couple so level track and a reliable engine are a must. Dinghams will work magnetically and manually. The manual route is to use a shunting pole to lift the loop and drop it back on top of the latch, I've not tried the magnetic wand thing mentioned by Knuckles but it sounds interesting. The Dingham website answers most questions http://www.dingham.co.uk/ but if you have more ask away and I'll try to answer them.
Cheers,
David
-
Knuckles
- Posts: 1262
- Joined: Fri Nov 18, 2011 9:15 pm
Re: The Gentle Art of Couplings
It was Nigel who mentioned the wand, I just mentioned his mention. I guess it brings a whole new dimension. Eeugh, bad.
I've found your words true about good track and non jerky locomotives. There is this one area of the baseboard that is a bit naff and as a result when propelling wagons through it and especially with a less than good runner, once uncoupled upon passing the electro-magnet the trucks usually run away slightly thus recouple when the loco catches up! So I usually go through that area a wee bit faster. Bad baseboard building...by me.
I've found your words true about good track and non jerky locomotives. There is this one area of the baseboard that is a bit naff and as a result when propelling wagons through it and especially with a less than good runner, once uncoupled upon passing the electro-magnet the trucks usually run away slightly thus recouple when the loco catches up! So I usually go through that area a wee bit faster. Bad baseboard building...by me.
“He who dares not offend cannot be honest.” Thomas Paine
https://www.sparkshotcustomcreations.com/
Mostly 3D Printed Loco kits etc.
SCC Price list (7/4/22)
https://www.sparkshotcustomcreations.co ... e77d42.pdf
https://www.sparkshotcustomcreations.com/
Mostly 3D Printed Loco kits etc.
SCC Price list (7/4/22)
https://www.sparkshotcustomcreations.co ... e77d42.pdf
-
Serjt-Dave

- Posts: 643
- Joined: Tue Oct 02, 2012 3:31 pm
Re: The Gentle Art of Couplings
Thanks guys for getting back.
I noticed no one mentioned the Sprat and Winkle couplings? Are they not very good? I brought a pack to try {but have not tried yet} I quite like the look of them. Watching some YouTube video clips of Bradford Gloucester Square layout he uses S&W which seems to work well.
To me the Dinghams look very similar to the S&W but a bit more chunky. They are also handed which could be a bit of a bugger. As with your comments I have only heard positive things about this system. A recent letter in MRJ {225} mentions them as well.
I will probably be burnt alive for being an un-believer for saying this, but the Alex Jackson couplings don't float my boat. You seem to need a degree in engineering just to be able to use the jig just to make the dam things.
Now a system where you don't need magnets and is DCC, this sounds interesting. Nigel I would love to read your article on this, please can you let me know which SF News it's in.
Have a good weekend
Dave
-
Tim V

- Posts: 2870
- Joined: Tue Jul 29, 2008 4:40 pm
Re: The Gentle Art of Couplings
I think that's a bit unfair on the AJ coupling, the jigs are fairly easy to use. Try bending one up out of a steel coat hanger to see how the angles work.
Having said that, the major criticism of the AJ is that it is very fragile, and easily put out of kilter. Refer to the St Merryn book, to see how their fault-list is dominated by coupling problems.
I'm currently experimenting with Dinghams.
Having said that, the major criticism of the AJ is that it is very fragile, and easily put out of kilter. Refer to the St Merryn book, to see how their fault-list is dominated by coupling problems.
I'm currently experimenting with Dinghams.
Tim V
(Not all railways in Somerset went to Dorset)
(Not all railways in Somerset went to Dorset)
-
David B

- Posts: 1515
- Joined: Sun Jul 20, 2008 5:30 pm
Re: The Gentle Art of Couplings
Serjt-Dave wrote:I will probably be burnt alive for being an un-believer for saying this, but the Alex Jackson couplings don't float my boat. You seem to need a degree in engineering just to be able to use the jig just to make the dam things.
You are not alone, Dave. I am not keen on Jacksons either. Tim has a point, though I think them decidedly fiddly but my main objection is their fragility and vulnerability especially for exhibition running. The occasions I have been operating where Jacksons have been in use have been interrupted regularly by the couplings requiring readjustment.
I don't know the answer. I would like to see some sort of automated 3-link but that is some way off, so in the meantime I prefer the shunter's pole, about which there has been writing elsewhere on this Forum.
-
Knuckles
- Posts: 1262
- Joined: Fri Nov 18, 2011 9:15 pm
Re: The Gentle Art of Couplings
I had this idea for Dingham's I may try. You can fit 3 links on the "hook and latch end only", and I do that because it doesn't look to far removed from the real thing. However, instead of using the soft iron wire on the loop end I might try using steel 3 links there also. All my links as far as I know are steel. The main problem would be that the chain would be set back about a scale 9-12 inches too back and slightly lower, also a coupled train would then have two sets of links dangeling and not one. Thus seems in my view to better than having a pole dangeling though. If it does work maybe leaving links off the latch end would visually be more correct in a train but not stationary head on.
Might try this, might not.
Might try this, might not.
“He who dares not offend cannot be honest.” Thomas Paine
https://www.sparkshotcustomcreations.com/
Mostly 3D Printed Loco kits etc.
SCC Price list (7/4/22)
https://www.sparkshotcustomcreations.co ... e77d42.pdf
https://www.sparkshotcustomcreations.com/
Mostly 3D Printed Loco kits etc.
SCC Price list (7/4/22)
https://www.sparkshotcustomcreations.co ... e77d42.pdf
-
Armchair Modeller
Re: The Gentle Art of Couplings
For my odd-ball tramway-style layout, I think I need something that looks a bit like a combined centre coupling/buffer arrangement - but not like the American knuckle couplings. None of the other couplings look right somehow. The DG loop is unprototypical, but the appearance of the buffer plate is certainly heading in the right direction.
I got a 4mm scale pack from Wizard Models and will be experimenting with them shortly. Only time will tell how good they are in 4mm scale. I have always been impressed with their use in 2mm scale though.
The delayed-action uncoupling feature is particularly useful, without any need for the KD shuffle.
-
dal-t
- Posts: 654
- Joined: Mon Jan 11, 2010 8:06 pm
Re: The Gentle Art of Couplings
You asked about S&W, so you might like a personal appraisal from some fairly extensive use during my EM days (circa 1984-2005).
Pros
Easy to fit to most underframes. I usually chose to solder the suspension loop to a baseplate and fix (solder or glue) that to the vehicle, but other solutions, including loop ends into a tube or direct to the underside of the floor, are as simple and successful.
Positive coupling and, providing the magnetic bottom loops of the hanging chain are a consistent height, positive uncoupling. Work equally well with permanent or electro-magnets.
Pretty inconspicuous, particularly if blackened (but metal black is much better than paint, which flakes off the brass hook whatever primer/undercoat/finishing treatment you try)
Pretty robust, and easy to bend back to shape if they do get damaged.
You get the visual effect of swinging chain loops as part of the system.
I've no direct experience of the delayed uncoupling facility, because I only used the older 'Mk 1' hook, but all accounts I've heard suggest the modified version does what it says on the tin (packet)
Cons
If you set them at the recommended height, you have to sacrifice the scale coupling hook and pocket for a razor-sawed slot. That means you can't easily couple to stock that only have scale couplings (as many of my bogie coaches did).
If the magnetic loops are set too low, or a coupling sticks 'down', anything in the 4-foot that can 'catch' the loop has the potential to cause a dramatic pile-up. I know this because ...
If you fit the bar across the buffer faces (by glue or solder) you avoid the danger of bufferlock, but at some point the bar will pull off. If you fit the bar around/behind the buffers (glue, solder, or winding around the shank), you still risk bufferlock and at some point the buffer will pull off.
If you give up on fitting a simple bar to the buffers, and instead use a projecting loop fitted through or below the bufferbeam, reverse curves offer the intriguing prospect of both buffer and 'bar' locking. It's difficult to explain how this happens, but it when it does long wheelbase vehicles in particular rise off the track with a strange corkscrew grace!
On balance, a simple, reliable system, but like all such with compromises (inevitably). For me, the irritation of the flaws came to outweigh the undoubted benefits, which is why I've now switched to AJs. But YMMV.
David L-T
-
dave_long
- Posts: 65
- Joined: Mon Feb 02, 2009 9:21 pm
Re: The Gentle Art of Couplings
Something you could try is the Winterley coupling, uncouple anywhere hands free. You do need perfect stock, track and very good motor control, but hey we are P4 modellers!
http://www.winterleyproducts.co.uk/wint ... uplin.html
http://www.winterleyproducts.co.uk/wint ... uplin.html
-
Knuckles
- Posts: 1262
- Joined: Fri Nov 18, 2011 9:15 pm
Re: The Gentle Art of Couplings
Hnmm, I'm interested. As my mini layout is a testbed for experiments and balls ups (and I'm doing a lot of both!) I may give the these a shot. I don't have perfect track though and I don't like the idea of having the wagons not roll quite as smooth as they could in order to work well. I'll think on it.
To Mod's; would it be better if this thread be moved into another area? l'm also soon thinking of doing a small writeup with pictures based on a little experiment I did last night, the one described above and I feel this thread is starting to be a useful one with a substantial knowledge base suitable for future reading. Just seems in a strange place. I can't think of a better place to put my upcoming post other than here or my wagon thread, but then couplings arn't strictly wagon wise. No prob's if not.
EDIT: Or maybe put my post in here viewtopic.php?f=19&t=2626
or put this thread next to it in same area or? I'm just trying to do things neatly and correctly.
To Mod's; would it be better if this thread be moved into another area? l'm also soon thinking of doing a small writeup with pictures based on a little experiment I did last night, the one described above and I feel this thread is starting to be a useful one with a substantial knowledge base suitable for future reading. Just seems in a strange place.
EDIT: Or maybe put my post in here viewtopic.php?f=19&t=2626
or put this thread next to it in same area or? I'm just trying to do things neatly and correctly.
“He who dares not offend cannot be honest.” Thomas Paine
https://www.sparkshotcustomcreations.com/
Mostly 3D Printed Loco kits etc.
SCC Price list (7/4/22)
https://www.sparkshotcustomcreations.co ... e77d42.pdf
https://www.sparkshotcustomcreations.com/
Mostly 3D Printed Loco kits etc.
SCC Price list (7/4/22)
https://www.sparkshotcustomcreations.co ... e77d42.pdf
-
Terry Bendall
- Forum Team
- Posts: 2427
- Joined: Sun Jul 27, 2008 7:46 am
Re: The Gentle Art of Couplings
The problem of course is that there are advantages and disadvanatages to all the types of coupling mentioned. Some years ago there was a demonstration at Scaleforum on the different types of coupling so I asked the demonstrator which was best. The answer was none are the best, becuase of the pros and cons mentioned in this thread.
I personally dislike the AJ coupling but if you want to know how to make it, and make it work successfully buy the book published by the Society and do what it says. The angles must be consistent, and they must be kept in good condition, which for those who take their layouts to exhibitions, means careful storeage of the stock during transport.
I still use three link couplings and standardise on the Smiths type for three link and Instanter types and the Roxey type for screw couplings. The Smiths one are a bit overscale but give you more of a chance to get things coupled. The Roxey ones are a bit basic by today's standaerds but they do the job.
Terry Bendall
-
John Bateson

- Posts: 809
- Joined: Wed Jul 02, 2008 6:39 pm
Re: The Gentle Art of Couplings
And if Knuckles is feeling in the mood to experiment then the following are in various boxes in the attic here :-
MJT 4951 £3.10 4 pairs http://www.dartcastings.co.uk/resources/MJT%204951%20screw%20link%20instructions.pdf or http://www.dartcastings.co.uk/mjt/4951.php
Shire Scenes S35: COSMETIC SCREW COUPLINGS £3.00 3 pairs http://www.dartcastings.co.uk/mjt/S35.php
Markits MCOUP/S £4.70 1 pair
Exactoscale E4CP S01A £13.00 1 Pair http://www.finescale.org.uk/index.php?route=product/product&product_id=3951&search=screw+couplings
Of all the above, the Exactoscale are the ones I would prefer to purchase! My older stock is fitted with the Markits version - where it is fitted at all!
John
Slaving away still on GCR stuff ...
-
Knuckles
- Posts: 1262
- Joined: Fri Nov 18, 2011 9:15 pm
Re: The Gentle Art of Couplings
For Screw Link I usually use the Hornby ones that are on modern RTR engines, you can get a pack of 10 for next to nothing.
http://www.hornbyspares.com/x5069-small ... -p-66.html
http://www.modeltrains4u.co.uk/00-Gauge ... -Parts.htm
They are the two websites I ordered them off before, whether they are the right ones or if they are still for sale I'm unsure on. No pics again = next to useless for Dumbo's like me.
In my opinion look very realistic, and they are already assembled, blackened / painted and hinged. Only thing is the hook shank is a bit fat so I usually thin it down.
-------------------------------------------------
Dingham Couplings - Now More Realistic!
I know I probably haven't given enough time for my above query to be answered, yet I'm doing my aforementioned post now. If it's in a bad place it or the thread could be moved some day I guess.
I have a handful of wagons converted with Dingham's and so far am happy with the result, they operate well once you've got the hang of making them and compared to some other couplings they don't look too wrong in comparison, not to mention the fact that they are compatible with 3-link, Instanter and Screw scale couplings. I'm a little unhappy with the way the iron droppers look however, so what follows is an experiment to try to improve things visually.
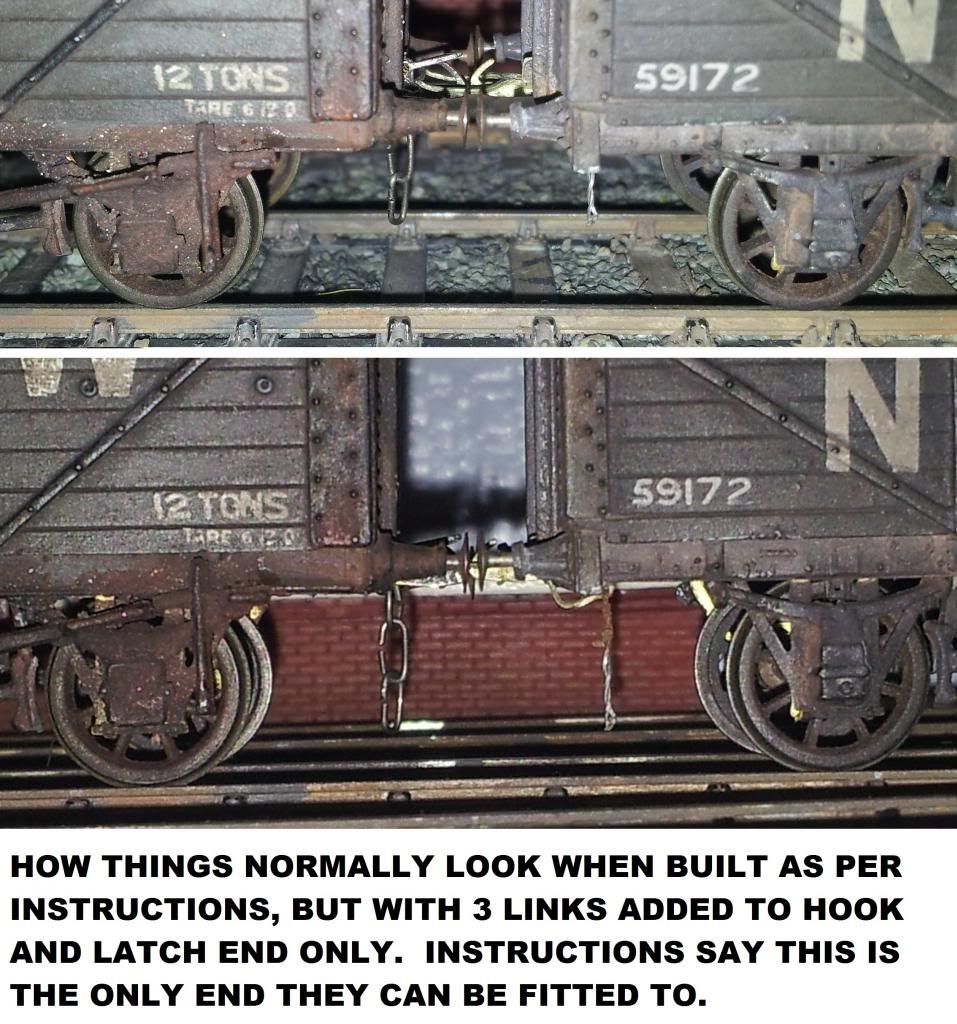
So from the usual set up I swapped the iron wire for steel Slaters 3-links instead, bent the brass pivot dropper into a shape that would move the chain further forward and upwards. This looks a little more realistic than it dangling too far rear and under. I had to make sure that the dropper eye didn't foul the buffer-beam and that the curved 'elbow / apex' could move enough forward before it hit the lift restraint tab.
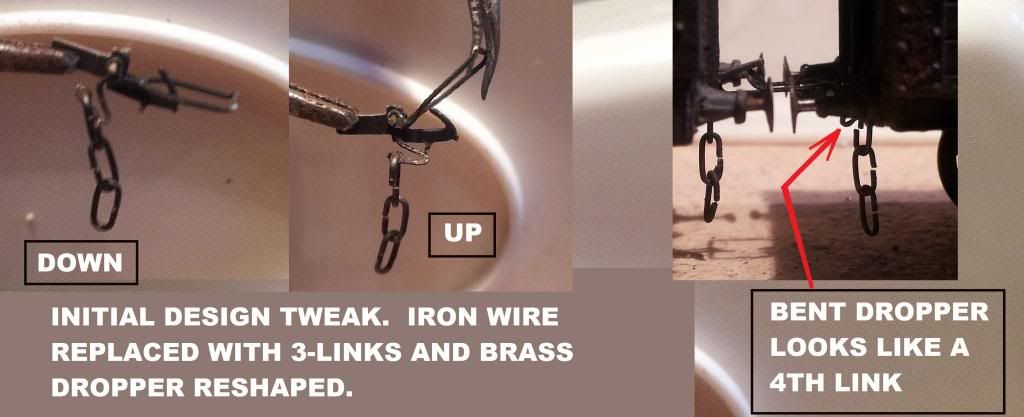
As in the picture, the new shape of the brass dropper looks a little like a 4th link, and in better lighting than the picture - more so. Upon testing it functioned fine. I thought I'd further experiment by shaping the brass dropper into a link, and then fix 2 links to that instead of 3, thus looking like 3 links and not 4. Result was visually perfect, but functionally naff. The brass dropper has to protrude back a small amount to give it the 'see-saw' effect we need for operation.
So before I tried the 2 link version, this is what the 3 linked version looked like.
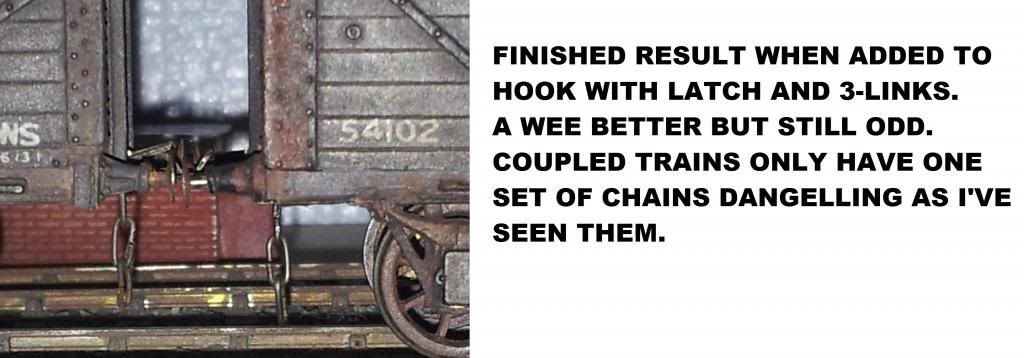
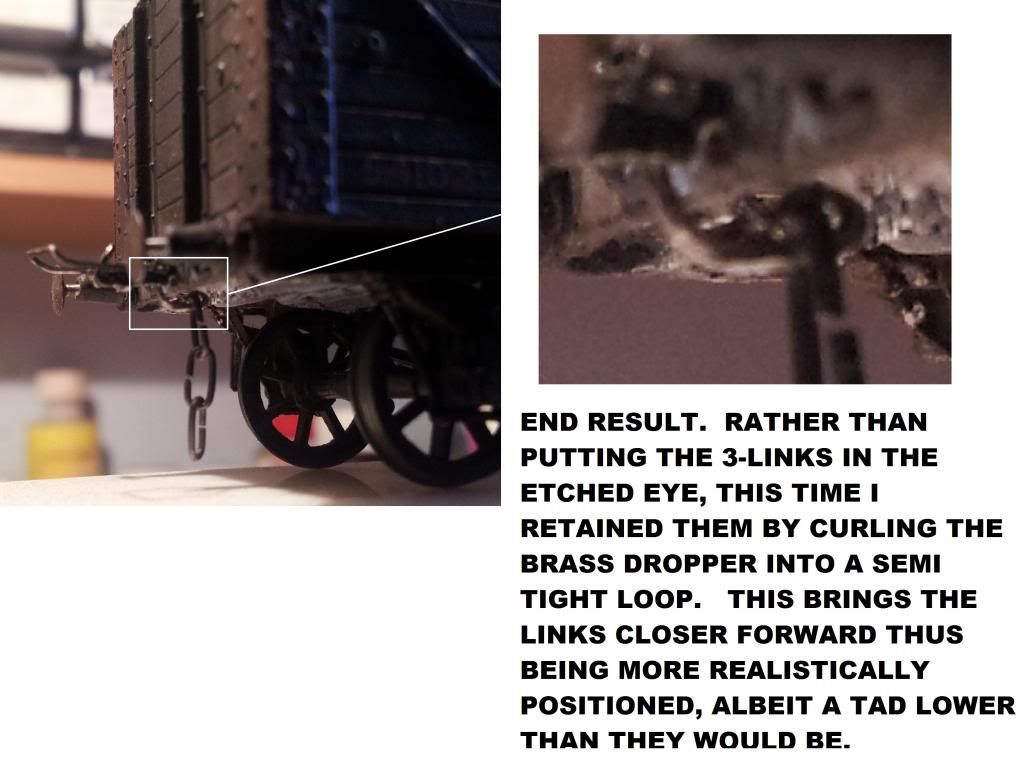
After the 2 link failure I reverted to the 3 link version, only this time instead of putting the initial link back in the eye (that was abused out of shape!) I decided to actually bend the brass dropper into a slight curve to retain it. This also pushed the chain forward slightly visually improving things.
As described in the picture I didn't have a latched end without links but regardless... (Oh yeah, the solebar under number 54102 is the repair job with brass wire in my wagon thread - not too bad IMHO)
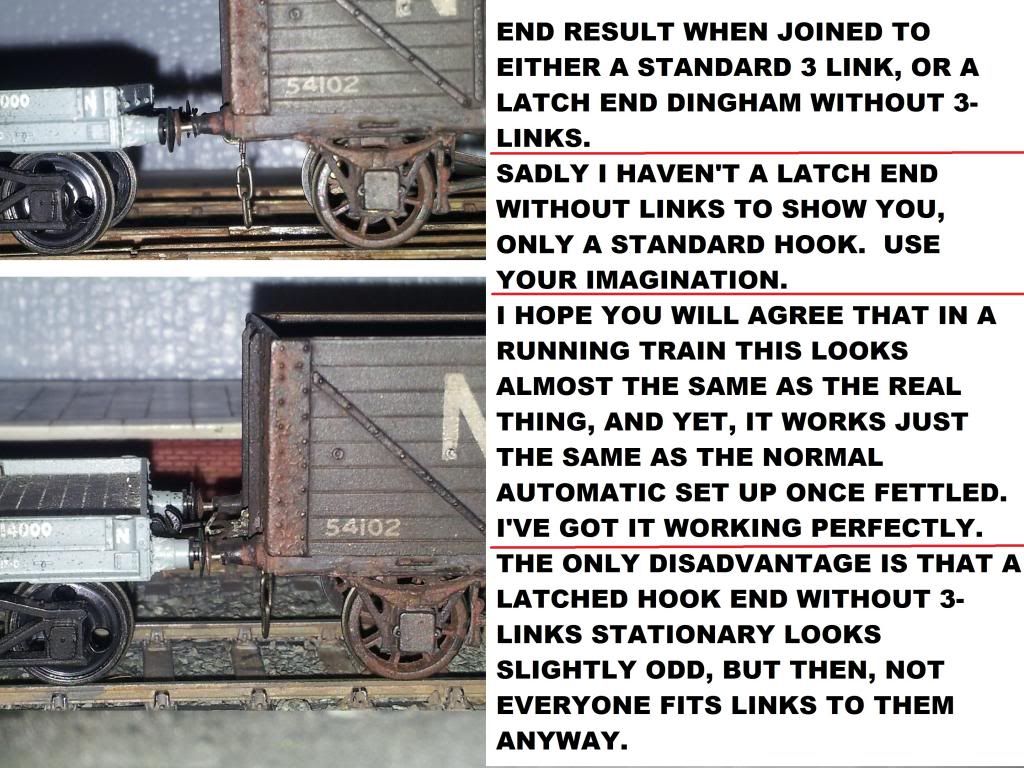
Tadah! Works as well as a standard one! I tried it on the move also, and fine. The instructions said you can't fit links to the looped end. Oh well, this is why I said before I rarely take peoples words as truth without investigating things first, obviously you can. (with a slight redesign) Maybe you see this result as a bit silly or pointless, but it's nice to know the option is workable.
In my view this has been a fun experiment and one that has worked. In doing so I (we?) can now have a magnetically operated, fully coupled train that finally looks almost as good as scale 3-links, and yet is still compatible with them.
A wagon sitting on a siding with a latch but no links might look a little lacking, but the instructions said the links were optional anyway. I'm repeating myself.
Well, please comment if you like this or have further ideas.
http://www.hornbyspares.com/x5069-small ... -p-66.html
http://www.modeltrains4u.co.uk/00-Gauge ... -Parts.htm
They are the two websites I ordered them off before, whether they are the right ones or if they are still for sale I'm unsure on. No pics again = next to useless for Dumbo's like me.
In my opinion look very realistic, and they are already assembled, blackened / painted and hinged. Only thing is the hook shank is a bit fat so I usually thin it down.
-------------------------------------------------
Dingham Couplings - Now More Realistic!
I know I probably haven't given enough time for my above query to be answered, yet I'm doing my aforementioned post now. If it's in a bad place it or the thread could be moved some day I guess.
I have a handful of wagons converted with Dingham's and so far am happy with the result, they operate well once you've got the hang of making them and compared to some other couplings they don't look too wrong in comparison, not to mention the fact that they are compatible with 3-link, Instanter and Screw scale couplings. I'm a little unhappy with the way the iron droppers look however, so what follows is an experiment to try to improve things visually.

So from the usual set up I swapped the iron wire for steel Slaters 3-links instead, bent the brass pivot dropper into a shape that would move the chain further forward and upwards. This looks a little more realistic than it dangling too far rear and under. I had to make sure that the dropper eye didn't foul the buffer-beam and that the curved 'elbow / apex' could move enough forward before it hit the lift restraint tab.

As in the picture, the new shape of the brass dropper looks a little like a 4th link, and in better lighting than the picture - more so. Upon testing it functioned fine. I thought I'd further experiment by shaping the brass dropper into a link, and then fix 2 links to that instead of 3, thus looking like 3 links and not 4. Result was visually perfect, but functionally naff. The brass dropper has to protrude back a small amount to give it the 'see-saw' effect we need for operation.
So before I tried the 2 link version, this is what the 3 linked version looked like.

After the 2 link failure I reverted to the 3 link version, only this time instead of putting the initial link back in the eye (that was abused out of shape!) I decided to actually bend the brass dropper into a slight curve to retain it. This also pushed the chain forward slightly visually improving things.

As described in the picture I didn't have a latched end without links but regardless... (Oh yeah, the solebar under number 54102 is the repair job with brass wire in my wagon thread - not too bad IMHO)

Tadah! Works as well as a standard one! I tried it on the move also, and fine. The instructions said you can't fit links to the looped end. Oh well, this is why I said before I rarely take peoples words as truth without investigating things first, obviously you can. (with a slight redesign) Maybe you see this result as a bit silly or pointless, but it's nice to know the option is workable.
In my view this has been a fun experiment and one that has worked. In doing so I (we?) can now have a magnetically operated, fully coupled train that finally looks almost as good as scale 3-links, and yet is still compatible with them.
A wagon sitting on a siding with a latch but no links might look a little lacking, but the instructions said the links were optional anyway. I'm repeating myself.
Well, please comment if you like this or have further ideas.
Last edited by Knuckles on Sun Sep 22, 2013 12:10 pm, edited 4 times in total.
“He who dares not offend cannot be honest.” Thomas Paine
https://www.sparkshotcustomcreations.com/
Mostly 3D Printed Loco kits etc.
SCC Price list (7/4/22)
https://www.sparkshotcustomcreations.co ... e77d42.pdf
https://www.sparkshotcustomcreations.com/
Mostly 3D Printed Loco kits etc.
SCC Price list (7/4/22)
https://www.sparkshotcustomcreations.co ... e77d42.pdf
-
Will L

- Posts: 2527
- Joined: Sun Jul 20, 2008 3:54 pm
Re: The Gentle Art of Couplings
John Bateson wrote:...
Of all the above, the Exactoscale are the ones I would prefer to purchase! My older stock is fitted with the Markits version - where it is fitted at all!
John
There speeks a true masochist, the Exactocasle coupling look good but they are a total B*****r to put together and actually where I tried to use them they didn't last long, though I can't rememberer at this moment what the mode of failure was, may have been corrosion problems. But Masochism is a good hint as the Masokits etch of 7 is good value and IMHO makes up into the best looking of the practical screw couplings. See here for their full list, the couplings are on page 5
Will
-
steve howe

- Posts: 912
- Joined: Sun Feb 01, 2009 10:16 pm
Re: The Gentle Art of Couplings
John[/quote]
There speeks a true masochist, the Exactocasle coupling look good but they are a total B*****r to put together and actually where I tried to use them they didn't last long,
Will[/quote]
Knuckles' experIments give me renewed hope in finding an auto coupling that is reasonably simple to install. Currently I use Exactoscale 3 links on Horsley Bank and whilst looking superb, they are an absolute swine to use especially on layouts where shunting is "intensive" I am thinking the Dingham might be a pragmatic solution where sharp curves are concerned.
Steve
-
Knuckles
- Posts: 1262
- Joined: Fri Nov 18, 2011 9:15 pm
Re: The Gentle Art of Couplings
I'm not sure how well Dingham's operate on corners, But I think others could advise. It took me a long time to make my first few but with practice like many things you get quicker. 90% of the compoments on the fret have been cut out and pre blackened, washed and put in a clear bag. Makes life so much easier. Trying to blacken things after instillation I found gummed things somewhat. Also don't solder the pin pivots in place, just get pliers and squash the ends into a sweet wrapper shape. This is an area where I learnt the hard way.
What is it about the above post that has renewed your hope? Good to know though.
What is it about the above post that has renewed your hope? Good to know though.
“He who dares not offend cannot be honest.” Thomas Paine
https://www.sparkshotcustomcreations.com/
Mostly 3D Printed Loco kits etc.
SCC Price list (7/4/22)
https://www.sparkshotcustomcreations.co ... e77d42.pdf
https://www.sparkshotcustomcreations.com/
Mostly 3D Printed Loco kits etc.
SCC Price list (7/4/22)
https://www.sparkshotcustomcreations.co ... e77d42.pdf
-
Serjt-Dave
- Posts: 643
- Joined: Tue Oct 02, 2012 3:31 pm
Re: The Gentle Art of Couplings
Hi All, thanks for responding, some good stuff coming out here.
It looks like the Dinghams couplings are going to be worth a look at.
I like the look of the Winterley but don't the look of the Winterley if you get what I mean.
For me what I am looking for is the ability to be able operate my layout with the minimum of intervention {the hand of god effect}. However to achieve this there must be a compromise between freedom of movement {fixed location of magnets etc} and the aesthetics of the coupling. I think we all agree that the Dinghams look more the part than say the AJ's and the Winterley, but the Winterley's have better freedom. The other option what Nigel {nigelcliffe} mentioned the DCC operated coupling, more info on this please.
Knuckles suggested that this tread be moved to another section. No problems with that if the Admin Chaps want to do that.
For now I think I'll order some Dinghams and some Winterleys and have ago.
Have a Good Week
Dave
-
nigelcliffe
- Posts: 751
- Joined: Mon Jul 21, 2008 8:31 am
Re: The Gentle Art of Couplings
DCC couplings: you could read my blog over the last four/five years, the last chapter of the Alex Jackson book ( though I've replaced everything shown there with better bits, so the ideas are fine, but ignore implementation), and an article in Scalefour News, another in The 2mm Magazine. And there are numerous pieces by others writers.
I'm sure my methods could work a Dingham easily. A different mechanism is need at each end, but I know how I'd do both.
http://www.nigelcliffe.blogspot.com And then dig back to find stuff.
I'll be at Scaleforum on the Sunday and will have a loco or two with me.
Nigel
I'm sure my methods could work a Dingham easily. A different mechanism is need at each end, but I know how I'd do both.
http://www.nigelcliffe.blogspot.com And then dig back to find stuff.
I'll be at Scaleforum on the Sunday and will have a loco or two with me.
Nigel
Nigel Cliffe - Blog of various mostly model making topics
-
Serjt-Dave
- Posts: 643
- Joined: Tue Oct 02, 2012 3:31 pm
Re: The Gentle Art of Couplings
Thanks Nigel, will do so. Alas I will only be at Saclefour on the Saturday {need to get me Jinty}.
-
David Knight
- Posts: 821
- Joined: Sun Jul 20, 2008 6:02 pm
Re: The Gentle Art of Couplings
ISTR Jim S-W had a way of DCCing Dinghams but can't remember it I saw it in the Snooze or on this forum.
Cheers,
David
Cheers,
David
-
Tony W
- Posts: 116
- Joined: Thu Apr 02, 2009 10:42 pm
Re: The Gentle Art of Couplings
For those of you who are interested I will have a test track on the Society Stand at Scaleforum this weekend to demonstrate the Alex Jackson Coupling. There have been a few views expressed in this thread that need to be put right.......! 
Tony
Tony
-
Andy C
Re: The Gentle Art of Couplings
After a few road to Damascus conversions this weekend then Tony? I suspect the chemical weapons there may just turn out to be Caseys Liquid Gun Blue !!
At the risk of being excommunicated from the Manchester Group, a word or two in support of S & W couplings which eradicate some of the cons mentioned earlier by dal-t. The latest versions (which have been out a good few years) can be soldered to mounting plates which just stick underneath the vehicle. The advantages of this are that you can make the full assembly on the bench and just mount it underneath without any, or very little butchery as mentioned. No longer do you have to make the unsightly cut in the buffer beam. I like S and W, whilst they are not totally bomb proof, they certainly take knocks and still function well, also the delay mechanism, whilst a simple solution, works very well. But then dont all simple solutions!
At the risk of being excommunicated from the Manchester Group, a word or two in support of S & W couplings which eradicate some of the cons mentioned earlier by dal-t. The latest versions (which have been out a good few years) can be soldered to mounting plates which just stick underneath the vehicle. The advantages of this are that you can make the full assembly on the bench and just mount it underneath without any, or very little butchery as mentioned. No longer do you have to make the unsightly cut in the buffer beam. I like S and W, whilst they are not totally bomb proof, they certainly take knocks and still function well, also the delay mechanism, whilst a simple solution, works very well. But then dont all simple solutions!
Last edited by Andy C on Thu Sep 26, 2013 8:25 pm, edited 1 time in total.
Who is online
Users browsing this forum: ClaudeBot and 0 guests