Good stuff Rob. I've always liked the 'stuff in the way' approach to layout presentation.
What's the other end look like?
Mount Woodville Works
-
jim s-w

- Posts: 2190
- Joined: Wed Jul 30, 2008 5:56 pm
-
RobM

- Posts: 1091
- Joined: Sun Feb 15, 2009 4:39 pm
Re: Mount Woodville Works
Thanks Jim,
In real life there is always stuff in the way and I think it adds interest and 'frames' small sections of the scenery rather than trying to take it all in at one time especially if the layout is almost at eye level.
Today have finished bits and bobs around the tipping stage and sorted out some photos..........
Rob
jim s-w wrote:I've always liked the 'stuff in the way' approach to layout presentation.
In real life there is always stuff in the way and I think it adds interest and 'frames' small sections of the scenery rather than trying to take it all in at one time especially if the layout is almost at eye level.
jim s-w wrote:What's the other end look like?
Today have finished bits and bobs around the tipping stage and sorted out some photos..........
Rob
You do not have the required permissions to view the files attached to this post.
-
Armchair Modeller
Re: Mount Woodville Works
The rust and the colour of the wood look really good, Rob.
What did you use to make the corrugated iron?
What did you use to make the corrugated iron?
-
RobM
- Posts: 1091
- Joined: Sun Feb 15, 2009 4:39 pm
Re: Mount Woodville Works
Armchair Modeller wrote:The rust and the colour of the wood look really good, Rob.
What did you use to make the corrugated iron?
Thanks Richard…….the corrugated iron is from South Eastern Finecast…..details on Page 2 4th post down.
Rob
-
Winander

- Posts: 860
- Joined: Thu Mar 20, 2014 12:19 pm
Re: Mount Woodville Works
Another fine piece of modelling Rob. I particularly like the odd bits of clutter around the place, like the old staircase.
regards
regards
-
RobM
- Posts: 1091
- Joined: Sun Feb 15, 2009 4:39 pm
Re: Mount Woodville Works
Thanks Richard…….it all tells a little story…….initially an unconnected platform from a door……but then the stairs obviously long unused, rotted and fallen and stacked against the wall then overgrown…….
Rob
Rob
-
Knuckles

- Posts: 1262
- Joined: Fri Nov 18, 2011 9:15 pm
Re: Mount Woodville Works
Think you have mastered the art of crudery in a really good way. Loving the steps, even the downpine has done a wee pee all over them and made them green.Maybe you could pinch a few of those slats and nock up an 'orrid table for break time, probably not enough though.
Liking the rust and cack all over.
Liking the rust and cack all over.
“He who dares not offend cannot be honest.” Thomas Paine
https://www.sparkshotcustomcreations.com/
Mostly 3D Printed Loco kits etc.
SCC Price list (7/4/22)
https://www.sparkshotcustomcreations.co ... e77d42.pdf
https://www.sparkshotcustomcreations.com/
Mostly 3D Printed Loco kits etc.
SCC Price list (7/4/22)
https://www.sparkshotcustomcreations.co ... e77d42.pdf
-
RobM
- Posts: 1091
- Joined: Sun Feb 15, 2009 4:39 pm
Re: Mount Woodville Works
Thanks Gavin…..I always save oddments from kits etc, they come in handy for making up the crud…….
Rob
Rob
-
jim s-w
- Posts: 2190
- Joined: Wed Jul 30, 2008 5:56 pm
Re: Mount Woodville Works
I do likewise rob. Unfortunately I usually find the perfect bits of leftover bits after I've just made what I wanted from scratch! 
-
RobM
- Posts: 1091
- Joined: Sun Feb 15, 2009 4:39 pm
Re: Mount Woodville Works
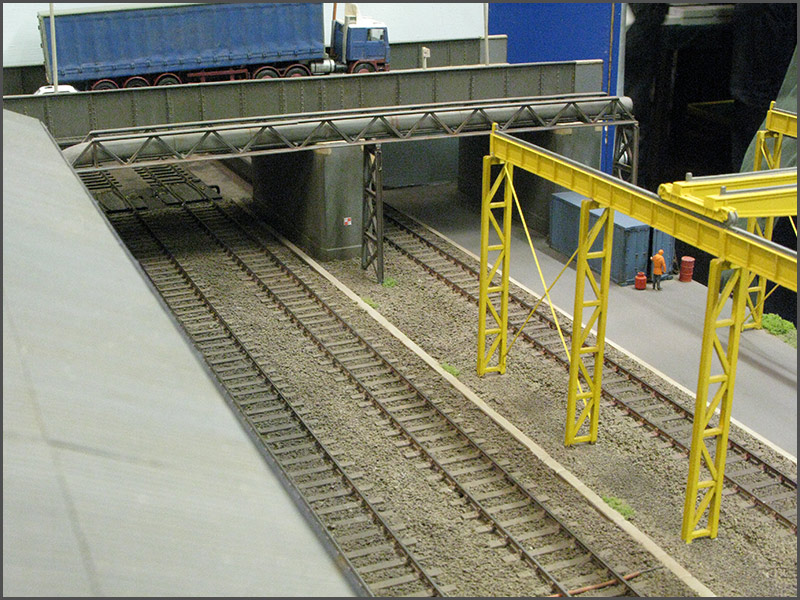
For added interest I'm considering running a lagged steam pipe (6" diam inc. lagging) from the boiler house to a set of buildings about 200 scale feet away.
The pipe will be supported on lattice posts at a scale height of 16 feet. Lattice posts being vertical 'I' beams with 0.5mm angle lattice work.
Before I purchase the necessary metal section and embark on this I have learnt to check here first to see if the pipe line would be correct…….
From reference photos and a load of 'Googling' I have gleaned that the pipe requires supports every 25 feet. On a run of 200 feet just 1 expansion loop approximately half way would suffice.
Comments welcome please………
Rob
-
steve howe

- Posts: 912
- Joined: Sun Feb 01, 2009 10:16 pm
Re: Mount Woodville Works
Rob,
Have you had a look at the Scalelink website? they do a big range of etches for gantries etc. for architectural modelling.
Steve
Have you had a look at the Scalelink website? they do a big range of etches for gantries etc. for architectural modelling.
Steve
-
RobM
- Posts: 1091
- Joined: Sun Feb 15, 2009 4:39 pm
Re: Mount Woodville Works
Thanks for that Steve...  ... Some useful stuff there but nothing for the design I envisage. Like the stair cases as fire escapes though although a lack of dimensions.
Methinks that Eileen's brass angle and I beams will be the way to go and the cheapest plus need to get the moneys worth out of the RSU.
Rob
Methinks that Eileen's brass angle and I beams will be the way to go and the cheapest plus need to get the moneys worth out of the RSU.
Rob
-
Armchair Modeller
Re: Mount Woodville Works
From memories of brewery piping, external steam pipes wouldn't need to be too strongly supported, but were well lagged and painted black - presumably to reduce heat loss. Can't help you on the expansion joints though. You probably won't find an expert until you are displaying the finished model at a show.
Gut feeling would be for unsophisticated supports like wooden posts or something made out of old rails, rather than anything fancy, but it's your model.
Here's an American modeller's take on a steam pipe for a loco facility http://mrrminutiae.blogspot.co.uk/2013/ ... steam.html
Good luck!
Gut feeling would be for unsophisticated supports like wooden posts or something made out of old rails, rather than anything fancy, but it's your model.
Here's an American modeller's take on a steam pipe for a loco facility http://mrrminutiae.blogspot.co.uk/2013/ ... steam.html
Good luck!
-
RobM
- Posts: 1091
- Joined: Sun Feb 15, 2009 4:39 pm
Re: Mount Woodville Works
Thanks Richard. You have put me right re the colour of the painted lagging. Now need to re-paint the existing steam pipe.
The reference photos I'm using shows steel lattice supports in the area of the works. Further afield at the clay pits the pipe runs from a boiler house to the winding engines at a much lower level with simple supports. So in keeping with the full size works, which is the basis of the model, I'll stay with the lattice supports and I'll enjoy making all eight of them. After an afternoon of producing drawings and making mock ups, angle instead of 'I' beams will be used.
Re the expansion loops there are a number of sites on the web where you can calculate pipe sizes, lengths and loops although some do get a bit technical, way above my head…... ……….
……….
Rob
The reference photos I'm using shows steel lattice supports in the area of the works. Further afield at the clay pits the pipe runs from a boiler house to the winding engines at a much lower level with simple supports. So in keeping with the full size works, which is the basis of the model, I'll stay with the lattice supports and I'll enjoy making all eight of them. After an afternoon of producing drawings and making mock ups, angle instead of 'I' beams will be used.
Re the expansion loops there are a number of sites on the web where you can calculate pipe sizes, lengths and loops although some do get a bit technical, way above my head…...
Rob
-
John Palmer
- Posts: 825
- Joined: Fri Jul 15, 2011 11:09 pm
Re: Mount Woodville Works
Some of the product illustrations in John Russell & Co Ltd's 1916 catalogue are shown at http://www.historywebsite.co.uk/articles/Walsall/Russell/tubes.htm and may be of interest, as they include two expansion loops for steam lines.
-
Armchair Modeller
Re: Mount Woodville Works
Fair enough Rob.
The other thing I remember about the lagging was that it was held in place on the pipe by some kind of netting or wire mesh. It wasn't a smooth finish. The lagging bulged a bit here and there. Edges were visible where one piece of lagging overlapped another. This was just one part of one brewery though, so others might have been different. I am also talking about the 1970s.
The other thing I remember about the lagging was that it was held in place on the pipe by some kind of netting or wire mesh. It wasn't a smooth finish. The lagging bulged a bit here and there. Edges were visible where one piece of lagging overlapped another. This was just one part of one brewery though, so others might have been different. I am also talking about the 1970s.
-
Terry Bendall
- Forum Team
- Posts: 2427
- Joined: Sun Jul 27, 2008 7:46 am
Re: Mount Woodville Works
RobM wrote: I'll stay with the lattice supports
If you look at http://www.scalefour.org/shows/S4North2 ... t_4232.jpg Rob you will get a glimpse of what I did on Ravencroft Sidings for a large pipe run across the track. The actual pipe is a scale 2 feet diameter so larger than you would want but the girder supports are all soldered up from brass channel and angle sections obtained from Eileens - and no RSU used either, just a simple jig made from a piece of board with panel pins driven in. The girder supports are plastic mouldings were from parts of a Wather's Kit pack. The actual pipe was made from 8mm copper tube filled with lead so that it could be bent without buckling and the lead melted out afterwards. Smaller sizes of tube are of course available - I just happened to have the size available.
Terry Bendall
-
RobM
- Posts: 1091
- Joined: Sun Feb 15, 2009 4:39 pm
Re: Mount Woodville Works
John Palmer wrote:Some of the product illustrations in John Russell & Co Ltd's 1916 catalogue are shown at http://www.historywebsite.co.uk/articles/Walsall/Russell/tubes.htm and may be of interest, as they include two expansion loops for steam lines.
Thanks John, some interesting stuff there.
Armchair Modeller wrote:Fair enough Rob.
The other thing I remember about the lagging was that it was held in place on the pipe by some kind of netting or wire mesh. It wasn't a smooth finish. The lagging bulged a bit here and there. Edges were visible where one piece of lagging overlapped another. This was just one part of one brewery though, so others might have been different. I am also talking about the 1970s.
I remember that lagging. In the 60's I lived above a laundrette. The boiler room was immaculate with the oil fired boiler lagged with what I think was an asbestos based product and painted red. The steam pipe was similarly lagged and painted but when it passed to the rear of the steam dryers it looked a bit grotty being out of normal sight.
Terry Bendall wrote:RobM wrote: I'll stay with the lattice supports
If you look at http://www.scalefour.org/shows/S4North2 ... t_4232.jpg Rob you will get a glimpse of what I did on Ravencroft Sidings for a large pipe run across the track. The actual pipe is a scale 2 feet diameter so larger than you would want but the girder supports are all soldered up from brass channel and angle sections obtained from Eileens - and no RSU used either, just a simple jig made from a piece of board with panel pins driven in. The girder supports are plastic mouldings were from parts of a Wather's Kit pack. The actual pipe was made from 8mm copper tube filled with lead so that it could be bent without buckling and the lead melted out afterwards. Smaller sizes of tube are of course available - I just happened to have the size available.
Terry Bendall
Thanks Terry. My pipe work will be made from 1/8th aluminium bar. This includes the lagging and I can also turn flanges where necessary with breaks in the lagging.
Rob
Last edited by RobM on Fri Dec 16, 2016 9:17 am, edited 2 times in total.
-
RobM
- Posts: 1091
- Joined: Sun Feb 15, 2009 4:39 pm
Re: Mount Woodville Works
As this image appears in numerous places on the web thought I'd show it here just to illustrate the nature of the works and the steam pipes from the boiler house which is on the right…………
On the far left there is a large gantry carrying one steam line (already built, see previous page.). Slightly to the right of this and partially obscured by the building is another lattice support which from other photos carries steam pipes to other parts of the works.
Rob
(Photo C. Shepherd. Book published by Industrial Railway Society)
You do not have the required permissions to view the files attached to this post.
-
RobM
- Posts: 1091
- Joined: Sun Feb 15, 2009 4:39 pm
Re: Mount Woodville Works
It's what inspired me when I saw it on the IRS site…so had to buy the book and have not been disappointed with the content. I still keep finding small details so easily overlooked. Love the way the coal has been dumped over the tracks only for the loco to find its path through.
Rob
Rob
-
Phil O
- Posts: 364
- Joined: Sun May 05, 2013 5:23 pm
Re: Mount Woodville Works
Devonport Dockyard has a steam main running around it, the main is 6 inch plus lagging and the condensate (return) is 3 or 4 inch diameter plus lagging.
I have a book on the dockyard railway, I will have look to see if there are any suitable photos of the expansion Omega Loops and the distance apart.
The steam main is now used solely for heating the buildings, whereas in the days of steam ships the supply was also to the dockside to provide steam for heating and cooking onboard whilst the boilers were undergoing maintenance.
PS, I am currently visiting my parents and I return home on Wednesday.
Phil
-
RobM
- Posts: 1091
- Joined: Sun Feb 15, 2009 4:39 pm
Re: Mount Woodville Works
Thanks Phil. I have since gleaned from the web a right angled expansion loop giving measurements, this now ties in with some of the not so clear photos in the book which shows a steam line and I can now identify simple right angle expansion loops. As for the number required on a 200 foot run I may well stick to the minimum of 1 (from a web pipe line design calculator) or have 2 for belt and braces.
Onward with the last of the buildings to complete the left base board………..
Rob
Onward with the last of the buildings to complete the left base board………..
Rob
-
RobM
- Posts: 1091
- Joined: Sun Feb 15, 2009 4:39 pm
Re: Mount Woodville Works
More buildings completed.............
Rob
Rob
You do not have the required permissions to view the files attached to this post.
-
Armchair Modeller
Re: Mount Woodville Works
Very nice again, Rob.
When do you go public with this one, or am I jumping the gun?
When do you go public with this one, or am I jumping the gun?
Return to “Standard Gauge Workbench”
Who is online
Users browsing this forum: ClaudeBot and 0 guests