SR 0-6-0 E2's - Latest build complete with Video Operation
-
Andy W

- Posts: 884
- Joined: Thu May 21, 2009 8:11 am
Re: SR 0-6-0 E2 (Extended tank versions)
"Also good to know the hornblocks come with jigs" I don't think they do.
Make Worcestershire great again.
Build a wall along the Herefordshire border and make them pay for it.
Build a wall along the Herefordshire border and make them pay for it.
-
Jol Wilkinson

- Posts: 1115
- Joined: Mon Jul 21, 2008 7:39 pm
Re: SR 0-6-0 E2 (Extended tank versions)
A quick look at the AG catalogue doesn't show a reference to hornblock jigs, so the bits of brass may be for something else.
I've attached photos of the LRM jigs (now in stainless steel AFAIK) and cast hornguides with turned bearings, as this may help in showing how the jigs are used.
The thing with the holes on the inside of the frame is one of the CSB/spring locators from the LRM CSB adaptor etch.
Jol
I've attached photos of the LRM jigs (now in stainless steel AFAIK) and cast hornguides with turned bearings, as this may help in showing how the jigs are used.
The thing with the holes on the inside of the frame is one of the CSB/spring locators from the LRM CSB adaptor etch.
Jol
You do not have the required permissions to view the files attached to this post.
-
Knuckles

- Posts: 1262
- Joined: Fri Nov 18, 2011 9:15 pm
Re: SR 0-6-0 E2 (Extended tank versions)
Ok, thanks. The pics do help. I'm still unsure how to use them fully but will have a piddle upon arrival...and probably ask questions then. Don't you all get bored of my 100's of questions? I appreciate your collective endurance and help very much anyway.
I said they seem to come with CSB rods, then another suggested it was a jig, now apparently its not a jig! I'll open the pack later and find out.
I said they seem to come with CSB rods, then another suggested it was a jig, now apparently its not a jig! I'll open the pack later and find out.
“He who dares not offend cannot be honest.” Thomas Paine
https://www.sparkshotcustomcreations.com/
Mostly 3D Printed Loco kits etc.
SCC Price list (7/4/22)
https://www.sparkshotcustomcreations.co ... e77d42.pdf
https://www.sparkshotcustomcreations.com/
Mostly 3D Printed Loco kits etc.
SCC Price list (7/4/22)
https://www.sparkshotcustomcreations.co ... e77d42.pdf
-
Andy W
- Posts: 884
- Joined: Thu May 21, 2009 8:11 am
Re: SR 0-6-0 E2 (Extended tank versions)
"Don't you all get bored of my 100's of questions?" In a word - no. I'm still asking questions after building locos for years. Anyone who claims they know everything they need to know is full of bull*****. For me one of the beauties of this hobby is that I'll always be learning. How to build models; the prototypes; electrics (that'll fill several lifetimes alone) etc etc. there's plenty of gaps in my knowledge that I'd like to fill.
You're just about to step into a difficult, frustrating but ultimately rewarding area of loco building - namely getting a chassis to run. Most of us have (well I have) learned by making every mistake there is to be made. This board might help you skip a few of them. But when you get you first smooth running chassis it's all worth it.
Take your time and test your chassis at every stage. I built my first one, added the motor; wheels; pick ups and body - then I tested it. There was no way I could know what the problem was - or rather - problems were.
Keep going, your energy is an inspiration.
Make Worcestershire great again.
Build a wall along the Herefordshire border and make them pay for it.
Build a wall along the Herefordshire border and make them pay for it.
-
Paul Willis

- Forum Team
- Posts: 3046
- Joined: Sun Jul 20, 2008 6:00 pm
Re: SR 0-6-0 E2 (Extended tank versions)
Knuckles wrote:I might get a good peircing saw actually. I have one but crude isn't the word, that and I actually broke it trying to get the blade in. How can you tell a good quality one from a cheap wobbily one? (I mean online, not personal inspection)
Hmm... It is difficult, and can be pot-luck. If I'm using Ebay then I tend to look for an established supplier, possibly the online presence of a bricks-and-mortar business, and probably UK based. That's a bit horses for courses though, as for many things like electronics it's best to go directly to Hong Kong or other points east.
Knuckles wrote:Proper tools are the best modelling investment that you can make...
I agree. I think I have most of them now, modelling wise.
I could do with some small drills though. I have a couple of Matchboxes but being brass they either blunt quick or snap.
Find a proper engineering tool supplier. If he's watching, Derek at Eileen's will curse me but avoid those boxed sets of twenty different sized drills.
Go to somewhere like http://www.arceurotrade.co.uk/Catalogue/Cutting-Tools/Twist-Drills/Drill-Bits---Polished and get a couple of packets of five drills in each of a few sizes. I think that I picked up 0.4, 0.6 and 0.8mm and they worked out at about 35p each.
When they are that cheap (compared to buying them individually over the counter at a model shop) you don't mind the odd breakage or changing it as soon as it starts to get blunt.
Knuckles wrote:Oh, and well done on all the cleaning up of the whitemetal and the soldering. It shows how much your modelling has improved in 12 months to see the quality of what you are doing. And I'm sure that you have much (well, a little...) more patience now as well.
Thanks Flymo, but what are you comparing this project against? I'd say Fury was my hardest thing and best model yet (in 00 though).
(I say that before I tackle the E2 chassis)
Well, really just the general level that you showed in the first things that you tried and showed on the Forum. You should be very pleased.
Knuckles wrote:Just for general interest, I think I will be scratch building the earlier open coal rails in favour of the later filled in ones. I'm also thinking of adding the 4 bars in front of the back windows so was thinking of drilling baby holes and inserting 0.3mm brass rod in. That thickness at a guess should do it I rekon.
Yes, that's where having a decent stock of 0.4mm drills comes in
The technique that you suggest is exactly the right one though. Start the drill off slowly in a pin-vice (you have one of those, don't you?) and twiddle it gently, with plenty of spit on the drill and you'll be fine.
Knuckles wrote:The tanks and a few other places have a 'lip', I'm thinking of tinning some fine wire and soldering that to the white metal edges. Should help it to look more finescale. I won't claim any of my models to be finescale whether in in 00 or P4 but I do like adding the details; it's what makes a model I think.
If you have some of the Alan Gibson straight wire, and can bend it to shape before you try fitting it, then you will find it much easier. Good luck! With your soldering skills, such as the repairs on the wonky castings, then you are more than capable of doing it.
Cheers
Flymo
Beware of Trains - occasional modelling in progress!
www.5522models.co.uk
www.5522models.co.uk
-
MarkS

- Posts: 296
- Joined: Tue Jul 22, 2008 1:15 am
Re: SR 0-6-0 E2 (Extended tank versions)
Just for general interest, I think I will be scratch building the earlier open coal rails in favour of the later filled in ones. I'm also thinking of adding the 4 bars in front of the back windows so was thinking of drilling baby holes and inserting 0.3mm brass rod in. That thickness at a guess should do it I rekon.
For the window bars I use these... http://www.mainlytrains.co.uk/acatalog/exp_mt226.htm
I find Mainly Trains has some useful detailing etches, useful for adding all those details that sets a model apart.
I have kit built and scratch built a few chassis over the years, and can only reiterate - patience will overcome the many challenges ahead, bracing liquids are the reward for a job well done...
Keep up the good work!
Cheers,
Mark.
"In the end, when all is said and done, more will have been said than done..."
Mark.
"In the end, when all is said and done, more will have been said than done..."
-
Knuckles
- Posts: 1262
- Joined: Fri Nov 18, 2011 9:15 pm
Re: SR 0-6-0 E2 (Extended tank versions)
"Don't you all get bored of my 100's of questions?" In a word - no. I'm still asking questions after building locos for years. Anyone who claims they know everything they need to know is full of bull*****.
Fair Enough!
You're just about to step into a difficult, frustrating but ultimately rewarding area of loco building - namely getting a chassis to run.
I've already stepped into it with a 'James' kitbashed from a L&YR Class 28. Runs so so but leaves much to be desired. In 00 though.
This will be my second venture into loco building, but my first with suspension.
Most of us have (well I have) learned by making every mistake there is to be made. This board might help you skip a few of them.
This is one reason I like to document and post my work. For ages and especially when researching P4 I found that there were a serious shortage of blogs/projects and posts that gave potential P4 modellers the information they needed, but with the few I did find I would spend hours and hours reading through their threads for information, thoroughly enthralled. I also find (in any gauge/scale) that when people ask questions, others answer, and mistakes are humbly posted, that there is much one can learn from it all. So that's partly why I like to do these modelling posts. Have been for quite a few years now, although most in 00.
Well, really just the general level that you showed in the first things that you tried and showed on the Forum. You should be very pleased.
Ohh, now I get you. Ok.
Start the drill off slowly in a pin-vice (you have one of those, don't you?) and twiddle it gently, with plenty of spit on the drill and you'll be fine......................If you have some of the Alan Gibson straight wire, and can bend it to shape before you try fitting it, then you will find it much easier. Good luck!
I might have gave the impression I'm new to this area but this is an area highly practiced!
Those drills you mentioned I might get. Thanks for the link.
For the window bars I use these... http://www.mainlytrains.co.uk/acatalog/exp_mt226.htm
Ahh! Cheers MarkS, that should save an hour or so. Might just do that.
I don't know if they will be suitable sizes but I'll get some and find out.
Keep up the good work!
I'll try.
Sadly I've accidently filed a few tank rivets off in the process of filing the Milliput...so I'm going to drill holes, insert brass rod and then clip and file to reinstate them.
“He who dares not offend cannot be honest.” Thomas Paine
https://www.sparkshotcustomcreations.com/
Mostly 3D Printed Loco kits etc.
SCC Price list (7/4/22)
https://www.sparkshotcustomcreations.co ... e77d42.pdf
https://www.sparkshotcustomcreations.com/
Mostly 3D Printed Loco kits etc.
SCC Price list (7/4/22)
https://www.sparkshotcustomcreations.co ... e77d42.pdf
-
Will L

- Posts: 2527
- Joined: Sun Jul 20, 2008 3:54 pm
Re: SR 0-6-0 E2 (Extended tank versions)
MarkS wrote:For the window bars I use these... http://www.mainlytrains.co.uk/acatalog/exp_mt226.htm
Good advice, getting separate wires to look regular enough is not easy. Requires drilling a lot of holes in exactly the right places.
As for small drills you will need a stock of small ones as everybody brakes them so buy ten at a time. I stick with just the 0.5mm ones as I find this is the smallest size that I can reliably not break every time I use them. Generally It won't matter if you can't drill anything smaller than that and for the next few size up the best thing is a set of Taper Broaches. These make it simple to open up a 0.5mm hole to the required size. Also you will need something like it when fitting the coupling rods. I've given you the link to Eileen's but they are available else where. Never cheep but less than buying lots of drills.
When you feeling flush a selection of single good quality drills in the 1mm to 3mm size ranges is worth it and these will not brake unless your really ham fisted.
The non adjustable Piercing Saw frame available on Ebay is cheep but NBG, as you don't want to to discard a saw blade just because you've broken it. Like small drills these blades break very easily but you can usually keep on working with the biggest bit, if the fame is adjustable. The one on Eileen's shows you the sort of thing you need. Even though they brake more easily err in the direction of a very fine blades as you can't cut thin sheet material with a course toothed blade.
Will
-
Chris Mitton
- Posts: 258
- Joined: Sun Aug 31, 2008 1:18 pm
Re: SR 0-6-0 E2 (Extended tank versions)
Hi Knuckles
Not too far from you is H S Walsh & Sons Ltd, either on your computer at http://www.hswalsh.com/default.aspx or a train ride away in Birmingham's Jewellery Quarter. They supply an astonishing range of tools, aimed largely at the jewellery industry (surprisingly), but as some people have compared P4 loco building to watchmaking why not get quality stuff that watchmakers use to earn their living?
Regards
Chris
-
Knuckles
- Posts: 1262
- Joined: Fri Nov 18, 2011 9:15 pm
Re: SR 0-6-0 E2 (Extended tank versions)
Hi guys, I might have a look at the jewelry stuff.
I have a couple of match boxes of drills but breaking them is precisely the reason I asked for advice where to get better ones! Which you have gave, so I'll look into buying them. I find the small sizes I use mostly are 0.5 and 0.7 or 0.75 and 1mm.. The first for the 0.45 wire I use all the time, the second for the 0.7mm wire I use fairly often and the other for general use. I have a couple of sets of small taper broaches from really small size up to 1/8th for axles. These do not have handles though so if I need to apply a lot of pressure I stick them in a tap and die handle.
apart from taper reamer / broaches, what sort of Jewelry tools are a good idea for P4-ers?
“He who dares not offend cannot be honest.” Thomas Paine
https://www.sparkshotcustomcreations.com/
Mostly 3D Printed Loco kits etc.
SCC Price list (7/4/22)
https://www.sparkshotcustomcreations.co ... e77d42.pdf
https://www.sparkshotcustomcreations.com/
Mostly 3D Printed Loco kits etc.
SCC Price list (7/4/22)
https://www.sparkshotcustomcreations.co ... e77d42.pdf
-
Knuckles
- Posts: 1262
- Joined: Fri Nov 18, 2011 9:15 pm
Re: SR 0-6-0 E2 (Extended tank versions)
Mini update. Where I accidently filed the rivets smooth I've drilled holes, inserted .45mm brass rod with superglue. Then they were clipped off and filed. I just need to finish cleaning them up, removing the glue and fine tune the tank extension shape as the join is smooth to the touch now. Also added the grab handle seen in photographs.
Bunker gone! Will scratch build my own. Chimney position looks crap here so might resolder it.
Accupuncture pin cushion
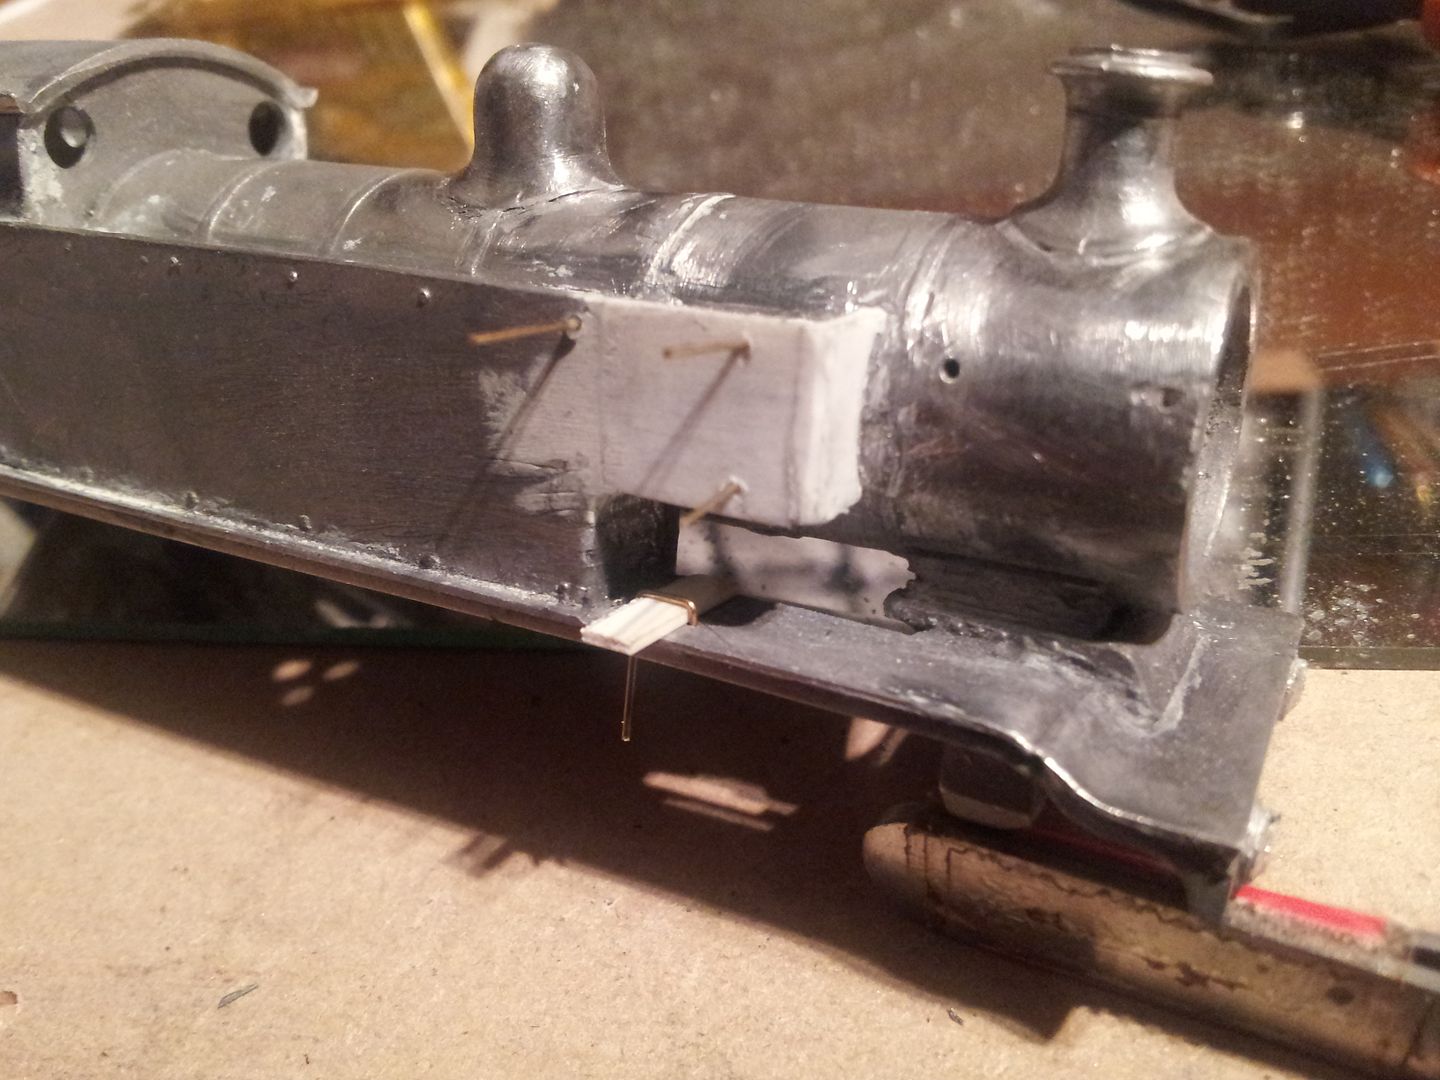
Nails clipped and filed, still needs a manicure though
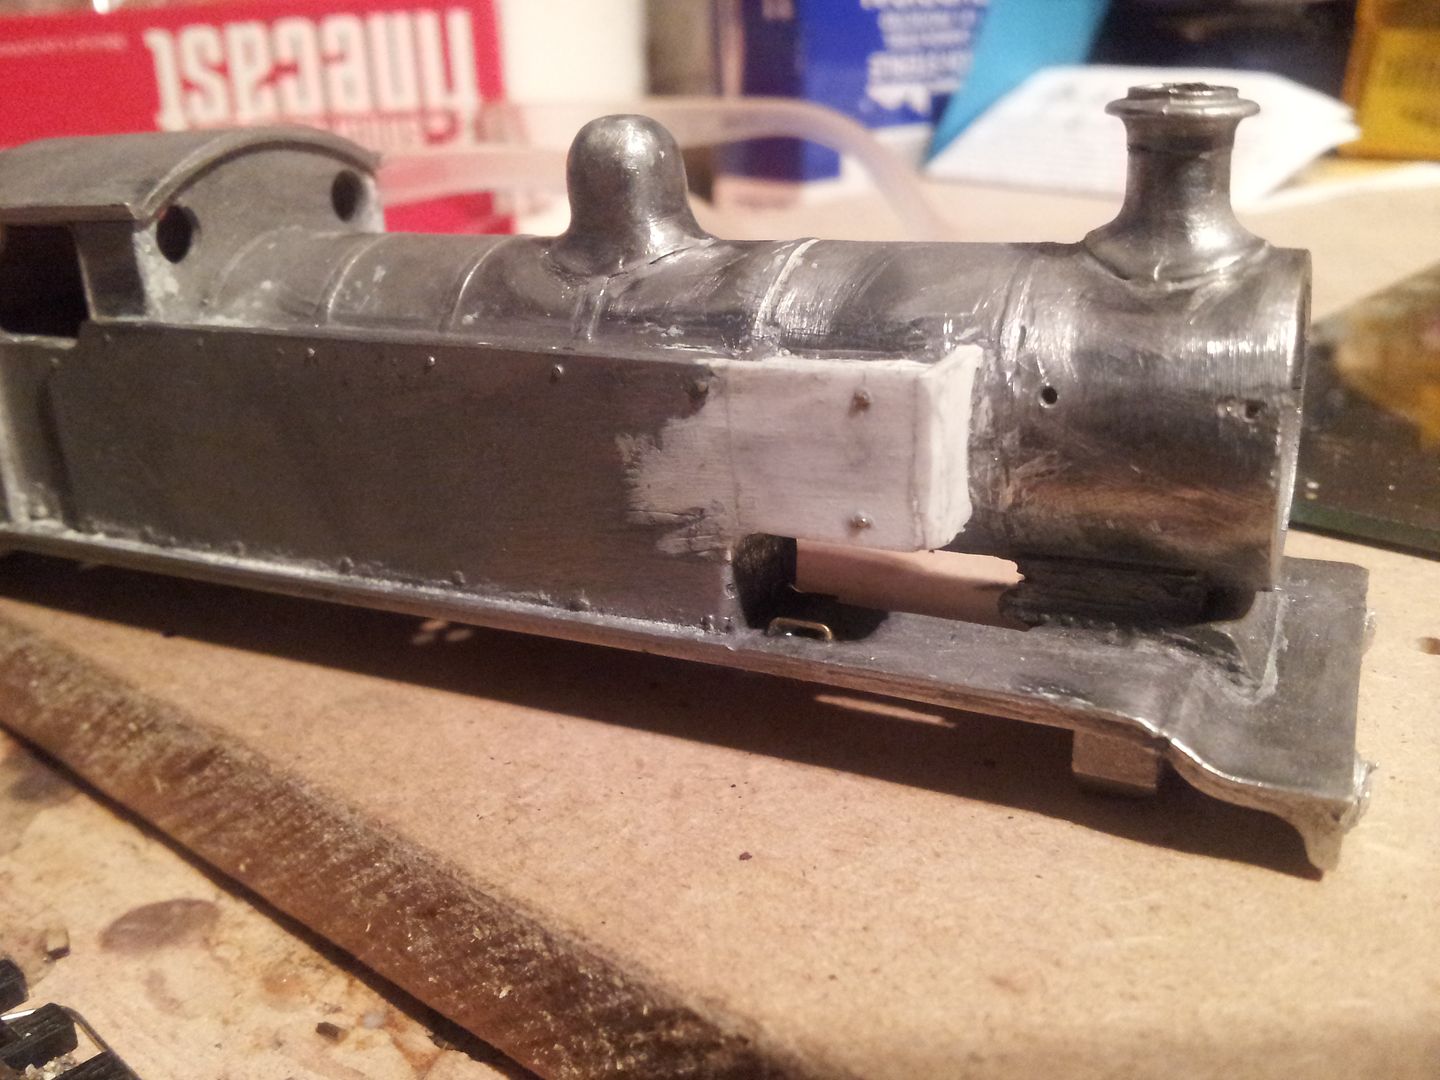
Serious surgery.
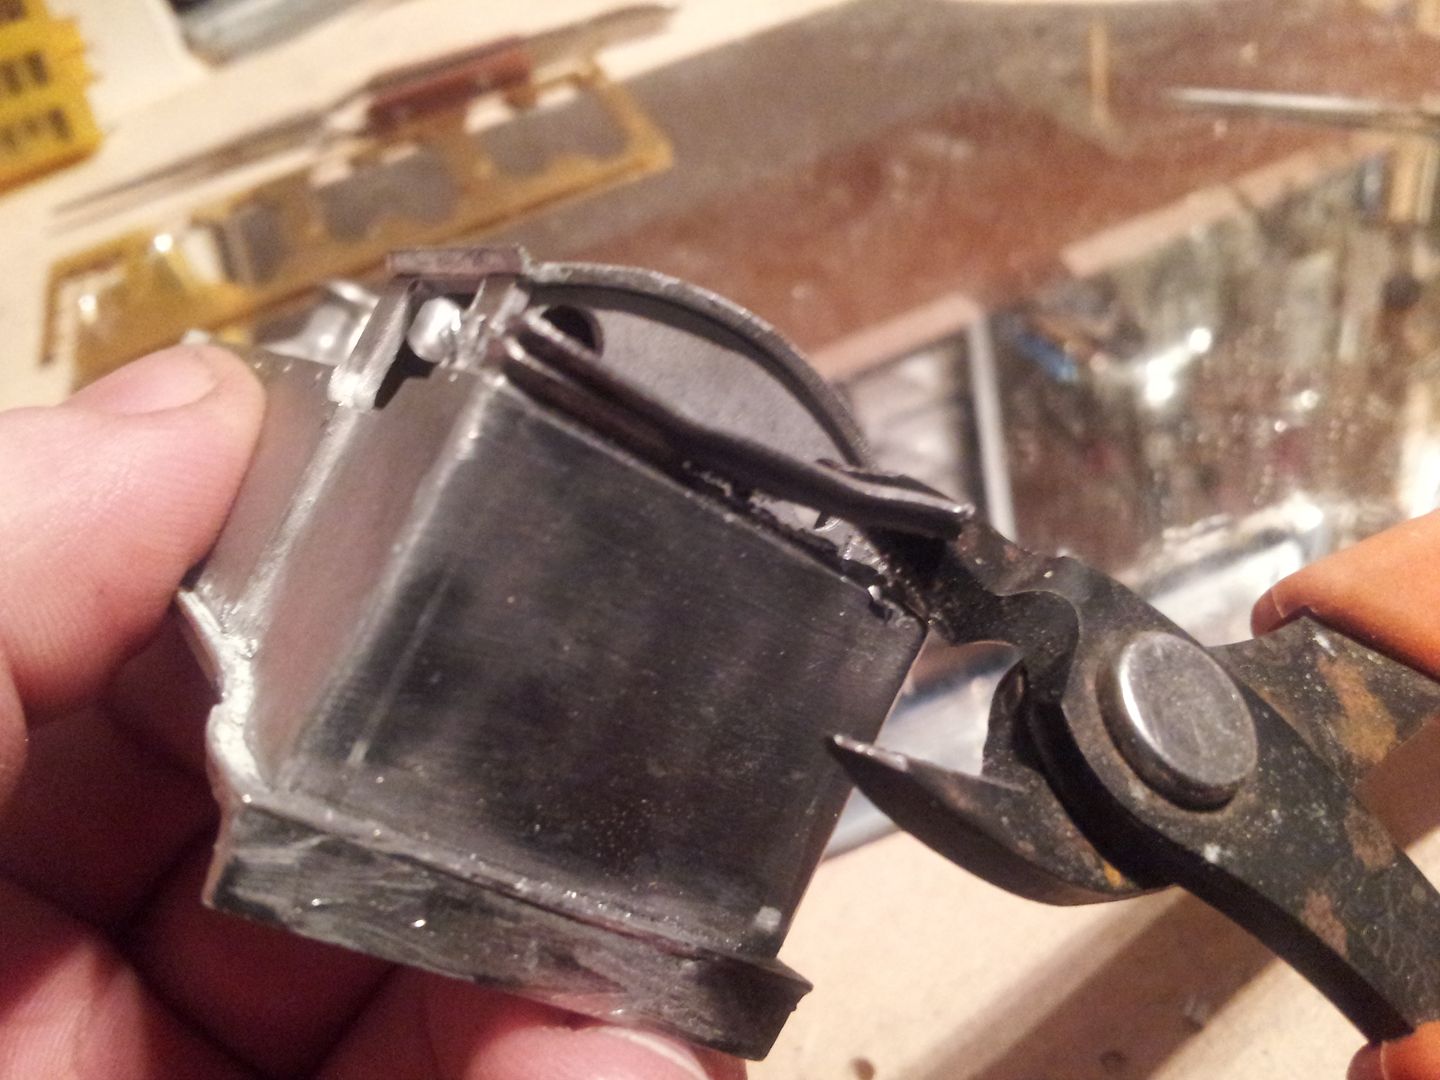
Bunker gone! Will scratch build my own. Chimney position looks crap here so might resolder it.
Accupuncture pin cushion
Nails clipped and filed, still needs a manicure though
Serious surgery.
“He who dares not offend cannot be honest.” Thomas Paine
https://www.sparkshotcustomcreations.com/
Mostly 3D Printed Loco kits etc.
SCC Price list (7/4/22)
https://www.sparkshotcustomcreations.co ... e77d42.pdf
https://www.sparkshotcustomcreations.com/
Mostly 3D Printed Loco kits etc.
SCC Price list (7/4/22)
https://www.sparkshotcustomcreations.co ... e77d42.pdf
-
grovenor-2685

- Forum Team
- Posts: 3923
- Joined: Sun Jun 29, 2008 8:02 pm
Re: SR 0-6-0 E2 (Extended tank versions)
re Piercing saws aka jewelers saws.
Flymo wrote:
Then Will wrote:
Now the one on Ebay that Flymo linked to IS adjustable and looks pretty much identical to Eileen's version, and I have one here very similar that has done me good service over the years.
But if you want to go hi-tech, check here, although not adjustable
Keith
Flymo wrote:
Get yourself a proper piercing saw from Ebay. My last one (I finally became fed up of the one that my father made for me about 30 years ago...) cost £6.75 a couple of monthsago and it perfectly servicable. I see that it's gone up slightly:
http://compare.ebay.co.uk/like/251023994912?var=lv<yp=AllFixedPriceItemTypes&var=sbar&adtype=pla&crdt=0
Then Will wrote:
The non adjustable Piercing Saw frame available on Ebay is cheep but NBG, as you don't want to to discard a saw blade just because you've broken it. Like small drills these blades break very easily but you can usually keep on working with the biggest bit, if the fame is adjustable. The one on Eileen's shows you the sort of thing you need.
Now the one on Ebay that Flymo linked to IS adjustable and looks pretty much identical to Eileen's version, and I have one here very similar that has done me good service over the years.
But if you want to go hi-tech, check here, although not adjustable
Keith
-
Paul Willis
- Forum Team
- Posts: 3046
- Joined: Sun Jul 20, 2008 6:00 pm
Re: SR 0-6-0 E2 (Extended tank versions)
Cast aluminium? How very 20th Century!
I'd have expected a carbon fibre frame at least
Flymo
Beware of Trains - occasional modelling in progress!
www.5522models.co.uk
www.5522models.co.uk
-
David Thorpe
Re: SR 0-6-0 E2 (Extended tank versions)
I#m in need of a new piercing saw and the one on ebay looks just the job - and as Keith points out, it is adjustable. I get confused by the numerous blade "sizes", however - what would you reckon to be the most useful tpi (which I assume means teeth per inch)?
DT
DT
-
Paul Willis
- Forum Team
- Posts: 3046
- Joined: Sun Jul 20, 2008 6:00 pm
Re: SR 0-6-0 E2 (Extended tank versions)
DaveyTee wrote:I#m in need of a new piercing saw and the one on ebay looks just the job - and as Keith points out, it is adjustable. I get confused by the numerous blade "sizes", however - what would you reckon to be the most useful tpi (which I assume means teeth per inch)?
DT
I'm really sorry, I can't help on that! I've fished my pack of blades out of the drawer and the bulk pack (144 items) simply says "assorted". I just choose whichever one is most appropriate for the material.
And that is the key thing - you should aim to have at least one tooth in the depth of the material that you are cutting to avoid it snagging and jumping. That can also be achieved by tilting the blade forward at an angle to increase the effective depth.
However squinting at what I have in the frame at the moment, it looks like it is around 50 tpi. So for brass/nickel silver, of our sort of grade I would be looking at least a 3/0, and probably a 4/0.
I do have some coarser blades, which get fitted for plasticard and similar sheet material.
This is just a pragmatic response based on what I have in front of me. No doubt others have better experience.
Cheers
Flymo
Beware of Trains - occasional modelling in progress!
www.5522models.co.uk
www.5522models.co.uk
-
Paul Willis
- Forum Team
- Posts: 3046
- Joined: Sun Jul 20, 2008 6:00 pm
Re: SR 0-6-0 E2 (Extended tank versions)
Oh, and one final thing - don't forget that Scalefour Society members receive a 10% discount off the cost of online orders from Shesto.
Full details are on this very Forum under "Discount Offers".
For a single item, well-known auction sites may be cheaper, but if you are doing a serious stocking up of tools, I would recommend having a good look at Shesto.
HTH
Flymo
Full details are on this very Forum under "Discount Offers".
For a single item, well-known auction sites may be cheaper, but if you are doing a serious stocking up of tools, I would recommend having a good look at Shesto.
HTH
Flymo
Beware of Trains - occasional modelling in progress!
www.5522models.co.uk
www.5522models.co.uk
-
BryanJohnson

- Posts: 181
- Joined: Wed Jul 23, 2008 7:45 pm
Re: SR 0-6-0 E2 (Extended tank versions)
I logged the range of piercing blade codes from Wikipedia a while ago:
Fine - 8/0, 7/0, 6/0, 5/0, 4/0, 3/0, 2/0, 1/0, 00, 0, 1, 2, 3, 4, 5, 6 - Coarse
Bryan
Fine - 8/0, 7/0, 6/0, 5/0, 4/0, 3/0, 2/0, 1/0, 00, 0, 1, 2, 3, 4, 5, 6 - Coarse
Bryan
-
Knuckles
- Posts: 1262
- Joined: Fri Nov 18, 2011 9:15 pm
Re: SR 0-6-0 E2 (Extended tank versions)
Thanks to all the advice on the blades, it will help. I'm guessing the finest blades are best for etches. I'm unsure if I would need an adjustable. blade as the feature seems redundant. I don't know. The rigid blade type I think will be the best. The one I had before was soft and bendy, the blades.kept bending and when I tightened up the blade handle grip after a while the metal just snapped. Cheapo Dump.
As anyone got any thoughts on my latest post, rivets and all that. It's a technique I thought up but now I have tried it I rekon it's fair. After a clean up especially but these pics show the positioning to be somewhat shakey, yet they look better when you have the model. I guess it's the zoom effect; shows all the points.that need tweaking rather explicitly.
As anyone got any thoughts on my latest post, rivets and all that. It's a technique I thought up but now I have tried it I rekon it's fair. After a clean up especially but these pics show the positioning to be somewhat shakey, yet they look better when you have the model. I guess it's the zoom effect; shows all the points.that need tweaking rather explicitly.
“He who dares not offend cannot be honest.” Thomas Paine
https://www.sparkshotcustomcreations.com/
Mostly 3D Printed Loco kits etc.
SCC Price list (7/4/22)
https://www.sparkshotcustomcreations.co ... e77d42.pdf
https://www.sparkshotcustomcreations.com/
Mostly 3D Printed Loco kits etc.
SCC Price list (7/4/22)
https://www.sparkshotcustomcreations.co ... e77d42.pdf
-
LesGros

- Posts: 546
- Joined: Thu Oct 08, 2009 10:05 pm
Re: SR 0-6-0 E2 (Extended tank versions)
Keith wrote:
Knuckles,
My two-penny worth, is that piercing/jewellers saw blades are delicate things, and break easily. Therefore, using a fixed frame saw is a waste of money and frustrating. The key to longer blade life is to ensure that the ensemble cuts on the pull stroke ; let the weight of the saw apply the pressure. As flymo says, cut with the blade at an angle to increase the effective thickness of the cut. In my experience, they cut best if there are at least two or three teeth within the cut. Having a well illuminated desk magnifier is beneficial to getting the blade the correct way around; alternatively run the blade gently back and forth over a piece of scrap. Which way the teeth bite will be obvious.
finally, to overcome the floppyness of a slackened frame, secure the fixed-end clamp on the blade first, and hold the frame in a vice, you now have sufficient hands free to manipulate the adjustable end clamp, and ensure that the blade does not have a twist along the cutting length [a major casue of blade snatch and breakage]. When the blade does break, it is a simple matter to shorten the frame and use the broken bits until they are too short to be effective.
I got mine from "Eileen's"
re Piercing saws aka jewelers saws...
... But if you want to go hi-tech, check here, although not adjustable
Knuckles,
My two-penny worth, is that piercing/jewellers saw blades are delicate things, and break easily. Therefore, using a fixed frame saw is a waste of money and frustrating. The key to longer blade life is to ensure that the ensemble cuts on the pull stroke ; let the weight of the saw apply the pressure. As flymo says, cut with the blade at an angle to increase the effective thickness of the cut. In my experience, they cut best if there are at least two or three teeth within the cut. Having a well illuminated desk magnifier is beneficial to getting the blade the correct way around; alternatively run the blade gently back and forth over a piece of scrap. Which way the teeth bite will be obvious.
finally, to overcome the floppyness of a slackened frame, secure the fixed-end clamp on the blade first, and hold the frame in a vice, you now have sufficient hands free to manipulate the adjustable end clamp, and ensure that the blade does not have a twist along the cutting length [a major casue of blade snatch and breakage]. When the blade does break, it is a simple matter to shorten the frame and use the broken bits until they are too short to be effective.
I got mine from "Eileen's"
LesG
The man who never made a mistake
never made anything useful
The man who never made a mistake
never made anything useful
-
grovenor-2685
- Forum Team
- Posts: 3923
- Joined: Sun Jun 29, 2008 8:02 pm
Re: SR 0-6-0 E2 (Extended tank versions)
re Piercing saws aka jewelers saws...
... But if you want to go hi-tech, check here, although not adjustable
That is, not adjustable for length of blade! assumes that those wanting to spend that much on a saw don't need to reuse broken blades
The major benefit I could see with it is a much better tension adjustment compared to the standard model.
There is a review in the January issue of MRH which shows it much better than the advert.
http://model-railroad-hobbyist.com/
Keith
-
LesGros
- Posts: 546
- Joined: Thu Oct 08, 2009 10:05 pm
Re: SR 0-6-0 E2 (Extended tank versions)
Keith wrote :
Thanks Keith, An interesting review which clearly shows the characteristics of the saw, and some of it's limitations.
It appears to be a quality tool. However, when doing piercing work, I would prefer the Eileen's adjustable saw for the ability to turn the blade so that the back frame does not obscure any part of the work piece.
Bottom line: is horses for courses, the option to recycle part blades, and personal preference.
cheerydoo
re Piercing saws aka jewelers saws...
...There is a review in the January issue of MRH which shows it much better than the advert...
Thanks Keith, An interesting review
It appears to be a quality tool. However, when doing piercing work, I would prefer the Eileen's adjustable saw for the ability to turn the blade so that the back frame does not obscure any part of the work piece.
Bottom line: is horses for courses, the option to recycle part blades, and personal preference.
cheerydoo
LesG
The man who never made a mistake
never made anything useful
The man who never made a mistake
never made anything useful
-
James Moorhouse
- Posts: 129
- Joined: Tue Jul 22, 2008 8:50 pm
Re: SR 0-6-0 E2 (Extended tank versions)
For a quick way of changing piercing saw blades and achieving the right amount of tension, try the following:
Rest the end of the saw frame on the edge of the workbench, with the handle up against your chest. Now lean towards the workbench, thus compressing the saw frame. This leaves both your hands free to change the blade and tighten the thumbscrews. The attached diagram probably illustrates the technique more effectively.
Rest the end of the saw frame on the edge of the workbench, with the handle up against your chest. Now lean towards the workbench, thus compressing the saw frame. This leaves both your hands free to change the blade and tighten the thumbscrews. The attached diagram probably illustrates the technique more effectively.
You do not have the required permissions to view the files attached to this post.
-
grovenor-2685
- Forum Team
- Posts: 3923
- Joined: Sun Jun 29, 2008 8:02 pm
Re: SR 0-6-0 E2 (Extended tank versions)
I flagged up the Knew saw for interest not as an advocate, I also use the usual design.
But I don't see the difference here, both designs allow the blade to be turned through 180 degrees but not any intermediate angle. I would find a 90 degree option like you get with a coping saw useful. Currently if you need to do longer cuts than the frame allows you have to get a deeper frame version and those are more difficult to use and usually don't give full tension. Its not often needed however.
Keith
I would prefer the Eileen's adjustable saw for the ability to turn the blade so that the back frame does not obscure any part of the work piece.
But I don't see the difference here, both designs allow the blade to be turned through 180 degrees but not any intermediate angle. I would find a 90 degree option like you get with a coping saw useful. Currently if you need to do longer cuts than the frame allows you have to get a deeper frame version and those are more difficult to use and usually don't give full tension. Its not often needed however.
Keith
-
Knuckles
- Posts: 1262
- Joined: Fri Nov 18, 2011 9:15 pm
Re: SR 0-6-0 E2 (Extended tank versions)
Without wishing to sound rude (although I fear it will be inevitable), could we please leave the blade thing now or move it to another thread. This thread seems like it's changing topic or becoming hijacked somewhat. To argue against myself though, I do wander where that 'line' is, I mean; If we are discussing ideas and sharing advices then things have to move topic to a degree, but how much?
Anyawynz, new update.
The replacement sprung buffers have a small cap that needs to be soldered in place, but once that is done I found that the components were not supplied with a back buffer plate, and so I had to make my own. I did lose a cap but I again made my own.
The following photograph I recieved from Tom Biddle (A.K.A Blue Pioneer), and may I say thankyou again, for it is a great picture. For a while I've been debating with myself whether or not to discard the 'enclosed' coal rails that came with the kit or make some myself to represent the earlier 'open' type you see. Prototype photograhs show both types so it seems it's a case of location and time period.
The following progress isn't to my eye perfect but it is I think good enough for now, and for the top rail a second attempt. The first wasn't bent outward enough. The second still isn't but better than it was.
The picture below, showing the 3 middle posts to be wider. What I've used isn't wide enough I don't think but it's all I had to hand and I think underscaling is sometimes better than overscaling anyway. You will notice that inbetween the 2 rails there is in fact a 3rd that goes part the way through. The original plan was to add this also but since it seems I'd need thinner wire without it looking enclosed I decided to leave it off. Truth is, This is the only deicent photograph I have seen of the back and so I do not know for sure whether there was more than one design. Good thing is there is nothing stopping me adding the other rail later if I decide to.
This is what I did, followed by two rails on the out side.
And a jumble of views in attempt to save space and clutter.
Although not bang on, what you think?
Maybe get some thinner rod and redo the outside rails, including the 3rd because I think it's a little fat.
“He who dares not offend cannot be honest.” Thomas Paine
https://www.sparkshotcustomcreations.com/
Mostly 3D Printed Loco kits etc.
SCC Price list (7/4/22)
https://www.sparkshotcustomcreations.co ... e77d42.pdf
https://www.sparkshotcustomcreations.com/
Mostly 3D Printed Loco kits etc.
SCC Price list (7/4/22)
https://www.sparkshotcustomcreations.co ... e77d42.pdf
-
LesGros
- Posts: 546
- Joined: Thu Oct 08, 2009 10:05 pm
Re: SR 0-6-0 E2 (Extended tank versions)
Knuckles wrote:
It is your topic, you decide. The "Blade thing" has pretty well run its course, with contributions from members giving their time to offer you enlightenment.
If you do not want too many diversions to the thread, there is always the option to pose your additional questions in a new topic.
Without wishing to sound rude (although I fear it will be inevitable), could we please leave the blade thing now or move it to another thread. This thread seems like it's changing topic or becoming hijacked somewhat. To argue against myself though, I do wander where that 'line' is, I mean; If we are discussing ideas and sharing advices then things have to move topic to a degree, but how much?
It is your topic, you decide. The "Blade thing" has pretty well run its course, with contributions from members giving their time to offer you enlightenment.
If you do not want too many diversions to the thread, there is always the option to pose your additional questions in a new topic.
LesG
The man who never made a mistake
never made anything useful
The man who never made a mistake
never made anything useful
Who is online
Users browsing this forum: No registered users and 0 guests