There's some niche wagons there Jim.I particularly like the Palshoc Van.
I assume you didn't fancy doing anything about the ends on the LMS Shocopen? There were a few little differences between the LMS and BR Shocopens but the big one was the corrugations on the end which went outwards like the vans instead of inwards like on other opens.
Keep up the good work. Always nice to see someone doing something different with their wagons.
Cheers,
Justin
Brettell Road - Going over old ground
-
jjnewitt

- Posts: 325
- Joined: Sat Jan 02, 2010 5:04 pm
-
jjnewitt
- Posts: 325
- Joined: Sat Jan 02, 2010 5:04 pm
Re: Brettell Road
Noel wrote:jjnewitt wrote:he other visual difference between the LMS d2150 (and d2110) and the BR builds that followed was the diagonal side strapping which finished on the side or curb rail on the LMS wagons but beneath it on the BR ones.
ACtually, quite a few LMS ones had diagonal strapping attached to a bracket on the upright below the floor, possibly because they didn't have curb rails?
Sorry Noel, I missed your response. You are quite correct. A lot of LMS wagons had the strapping finish on a bracket beneath the curb rail but they had wooden ends not corrugsted ones. My second sentence implied that but perhaps I should have been clearer. The presence of a curb rail may have been the reason though it didn't seem to make a difference to BR.
Justin
-
jim s-w

- Posts: 2192
- Joined: Wed Jul 30, 2008 5:56 pm
Re: Brettell Road - A quartet of shock wagons
jjnewitt wrote:
I assume you didn't fancy doing anything about the ends on the LMS Shocopen? There were a few little differences between the LMS and BR Shocopens but the big one was the corrugations on the end which went outwards like the vans instead of inwards like on other opens
Cheers,
Justin
Thanks Justin.
To be honest it's not something I noticed in the pics. Still got plenty of spare parkside van ends I can hack about so the dilemma is fix this one or convert it back to a BR one and build another?
Jim
Last edited by jim s-w on Tue Jan 16, 2024 7:33 pm, edited 1 time in total.
-
jjnewitt
- Posts: 325
- Joined: Sat Jan 02, 2010 5:04 pm
Re: Brettell Road - A quartet of shock wagons
Hi Jim,
If the ends worry you then I think you'd be better off renumbering it to a BR wagon. It seems a shame to tear it apart now. Diagram 1/048 were built without tarp bars. The only difference would be 1' 6" buffers and Instanters rather than 1' 8 1/2" and screw.
The van ends might not be quite wide enough but it's worth investigating. Another slight difference to note is the profile of the wrap around corrugated panels at the bottom of the sides. They built them in Morton unfitted and LMS clasp VB forms though the unfitted version was much more numerous. From what I've seen those that were retrofitted early in the modernisation program kept the 1' 6" buffer housings but had the buffer 'head' extended to the correct length for screw couplings by means of a collar. I've seen Dowty's on others so presumably self contained and Oleos are also a possibility.
Justin
-
Noel

- Posts: 1984
- Joined: Wed Jun 23, 2010 1:04 pm
Re: Brettell Road - A quartet of shock wagons
jjnewitt wrote:From what I've seen those that were retrofitted early in the modernisation program kept the 1' 6" buffer housings but had the buffer 'head' extended to the correct length for screw couplings by means of a collar. I've seen Dowty's on others so presumably self contained and Oleos are also a possibility.
Justin, according to David Larkin ["Wagons of the Middle BR Era"] VB Retro-fits had:
late 1955 to late 1956 - collared 18in spindle
late 1956 to late 1957 - 20½in spindle
late 1957 to late 1958 - 20½in self-contained
late 1958 to late 1959 - 20½in hydraulic, mostly Oleo but also some Dowty.
Regards
Noel
Noel
-
jjnewitt
- Posts: 325
- Joined: Sat Jan 02, 2010 5:04 pm
Re: Brettell Road - A quartet of shock wagons
Noel wrote:Justin, according to David Larkin ["Wagons of the Middle BR Era"] VB Retro-fits had:
late 1955 to late 1956 - collared 18in spindle
late 1956 to late 1957 - 20½in spindle
late 1957 to late 1958 - 20½in self-contained
late 1958 to late 1959 - 20½in hydraulic, mostly Oleo but also some Dowty.
Seen that list a few times. I wonder where he got the dates from though I'm not going to disagree with him.
The LMS Shocopens had Duplex buffers of course so were slightly different. Tricky to weld a collar to a Duplex buffer so they fitted one behind the buffer head instead. They could have swapped the Duplex buffers for longer ones on some but the examples I've seen (admittedly not many) all seem to have 1'6" housings and collars attached where they weren't changed to a different type. Aside from a few SR Shocopens (which all seemed to have spindle buffers anyway), I think these were the only retrofitted shock absorbing wagons as everything else was built with vacuum brakes.
Justin
-
Porcy Mane
- Posts: 133
- Joined: Wed Apr 11, 2012 4:55 pm
-
jim s-w
- Posts: 2192
- Joined: Wed Jul 30, 2008 5:56 pm
Re: Brettell Road - A quartet of shock wagons
Porcy Mane wrote:Gents, you may have seen this photograph on flickr already.
https://flic.kr/p/dEFrDA
P
-
jim s-w
- Posts: 2192
- Joined: Wed Jul 30, 2008 5:56 pm
Re: Brettell Road - A quartet of shock wagons
jjnewitt wrote:Hi Jim,
The van ends might not be quite wide enough but it's worth investigating.
Justin
If anyone want to beat me to it the van ends are 1mm narrower than the built up open. Couple of bits of 20thou either side will sort it.
Jim
-
jim s-w
- Posts: 2192
- Joined: Wed Jul 30, 2008 5:56 pm
Re: Brettell Road - A quartet of shock wagons
One working that passed through the real Brettell Lane and kind of fascinated me was the St Blazey to Etruria china clay working. This service ran for years and was somewhat erratic in the paths it took. Usually going via Worcester, Stourbridge then Dudley before heading off to Bescot. Or it could go right at Stourbridge via Old Hill and (I think) Soho Junction. These routes avoided the Lickey but I've seen pictures of it going that way too in later years. When I was at University in Stoke it would often turn up at lunch time behind a pair of class 37s although it did switch to a class 60 in the time I was there.
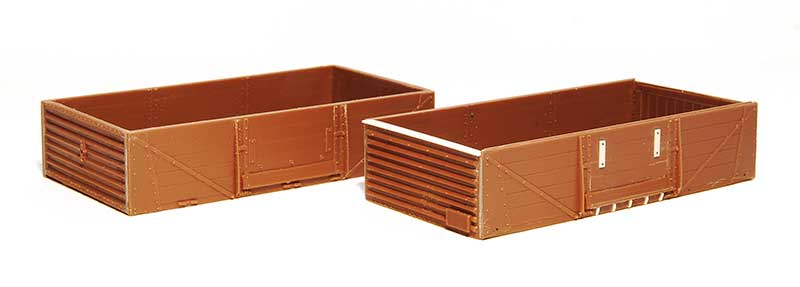
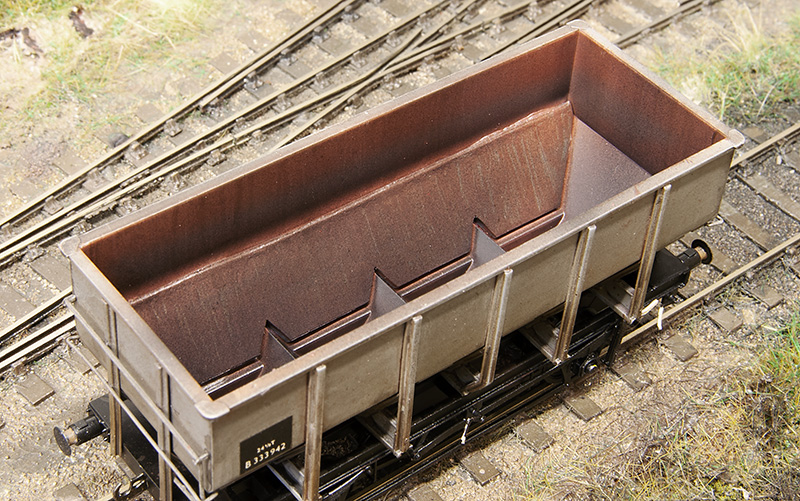
So to have a clay train on Brettell road makes sense as a through service. I like the classic diagram 1/051 clay opens with their sort of cute, baby open wagon look about them. A little bit of rewriting of history is needed though as they tended to stay in Cornwall and not venture out to the Midlands. Brettell Road is set before the introduction of the clayliner service so my justification is that BR was trialing things out to see how they would work and thats good enough for me.
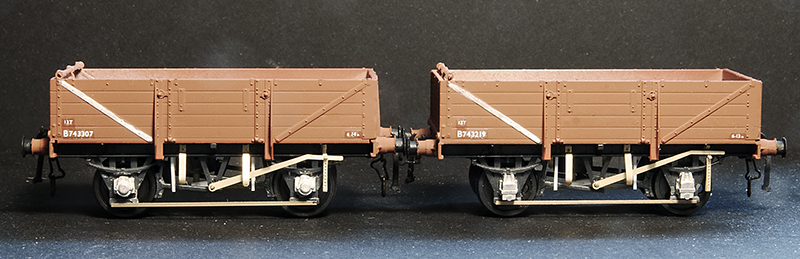
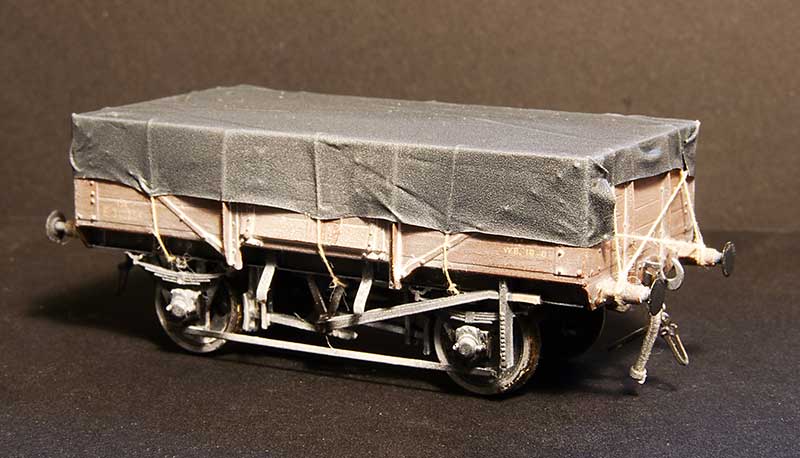
Ratio make a nice little kit for these and I was fortunate to find someone selling a box of 7 on Ebay for what basically worked out as a fiver each. The bodies go together well with a little bit of modification to make the ends fit. The kit features a somewhat crude attempt at a roller bearing and the brake levers are quite poor. It also includes cast buffers that aren't all that great. So the bearings were replaced with MJT ones although my research showed oil axleboxes to be more common anyway. Brake levers are from the Mainly Trains etch, door bangers from Rumney models and buffers from Lanarkshire models. I did one as a test then built the other 6 as a batch.
Before I move onto the sheets a bit about the weathering. I followed my usual approach of a wash of dark grime followed by a spray of AK interactive dark mud. This was then all sealed with Klear before AK interactive white ink was used (in various levels of dilution) to give an overall effect of clay staining. You don't want a fully weathered wagon at this stage, try to think of it as you are aiming for about half the effect you ultimately want.
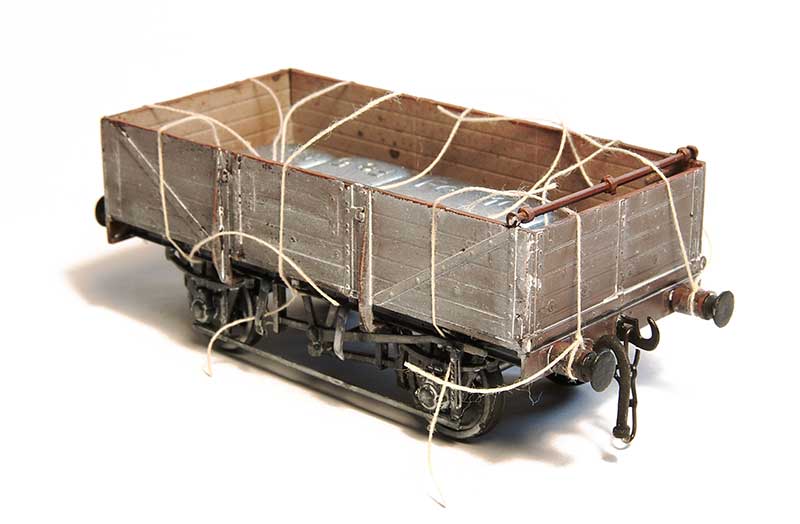
Previously when I have done wagon sheets I make the sheet up with the ropes attached to it and then attach it to the wagon. This is a bit of a faff and sometimes the glue holding the rope to the sheet can give an odd effect so I approached this a bit differently. Roping of wagon sheets is a whole topic on its own and I will leave that too someone who has properly studied the subject but I just looked at pictures and coped what I saw. So the first stage is to attach the ropes (cotton) to the wagon - Tying it on at the visible ends and gluing to the wagon top with Loctite
This was then tided up by first sealing the knots with Zap Pink superglue. Theres no huge reason to trim the ropes inside the wagon but it pays to just keep things neat so they don't get in the way later.

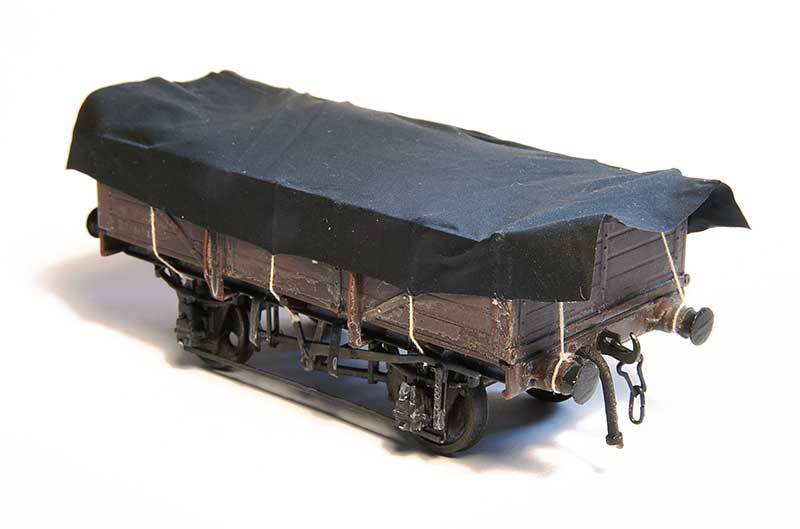
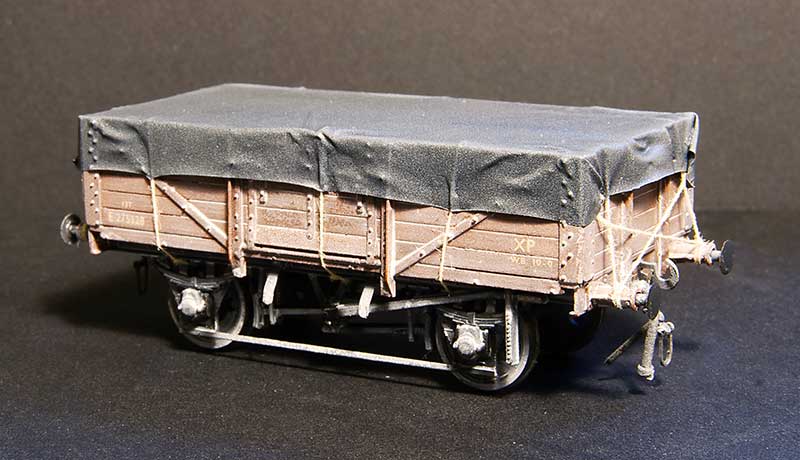
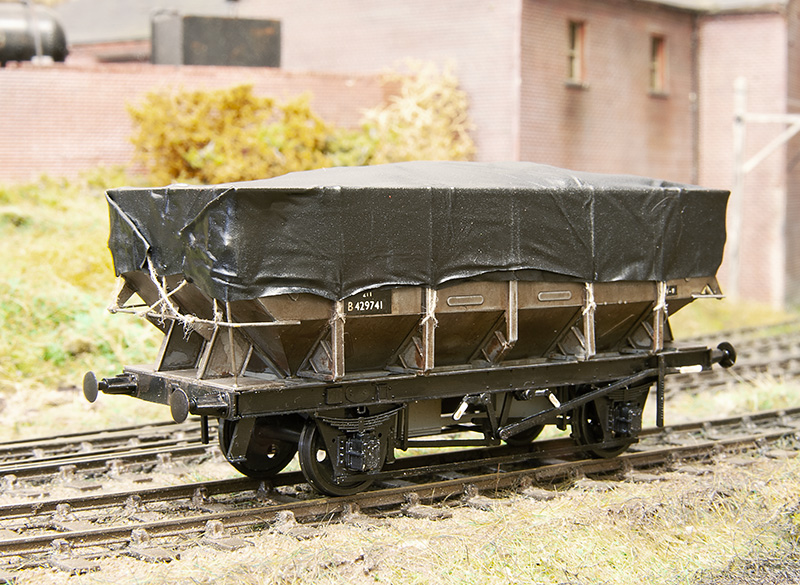
As mentioned before the sheet is made from black latex gloves (actually nitrile) and mine are a brand called Supertouch. They are a bit awkward to cut as the material tends to snag on the scalpel blade even if the blade is brand new. A method I found to work best is to stretch the glove over a bit of cardboard, make a template and to cut it using the handle end of the blade not the pointy end, pushing the scalpel away from you to cut. I don't know why this makes a difference but it does! As i've mentioned in the past the material is black on the outside and a dark grey on the inside. I use the black side as its depicting wet conditions but the grey is good for a nice sunny day layout.
The sheet is then positioned in place, not forgetting to add weight inside the wagon and bulking it up with a bit of tissue first before gluing to the wagon tops in 6 places, about where the ropes are. Use Loctite and start in the middle (it sets very quickly) and remember to pull it taught as you glue the outer sides. This is one of those things were you probably need a bit of variation but you don't want to force it. I find if I try to be as neat as I can, I'm not all that neat really and I get the variation by default.
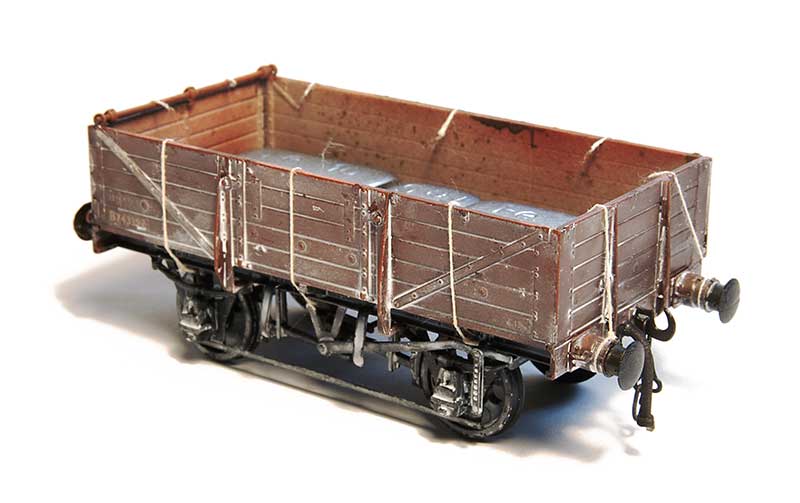
Next stage is to glue the sides of the sheet to the ropes, again with loctite and again puling the sheet taught. I found holding it in place for 10 seconds was all you need. It pays to glue the sheet the side of the wagon at the ends at this stage
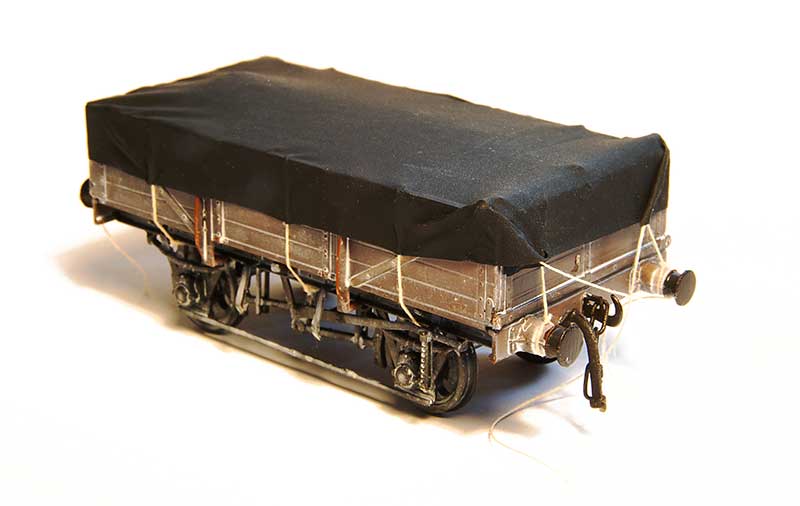
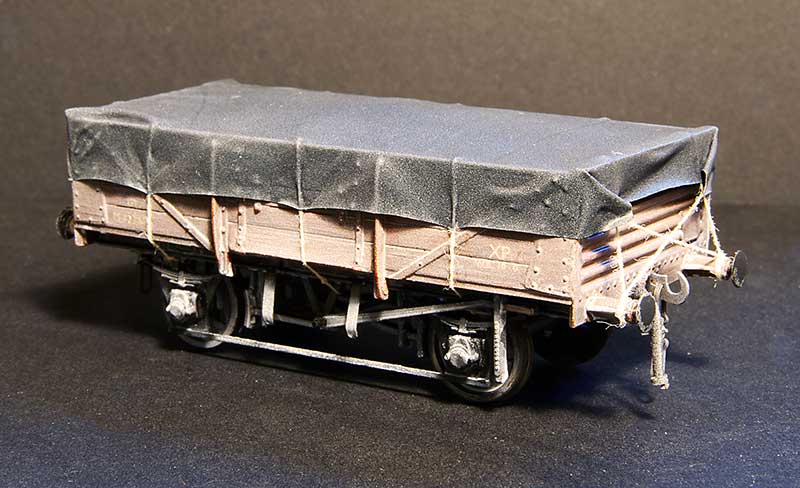
On to the ends. Another drop of super glue on the top and the sheet can be glued in place. The corners can be folded and secured in place and the last set of ropes glued into the sheet itself.
The last ropes tied into place and tidied up.
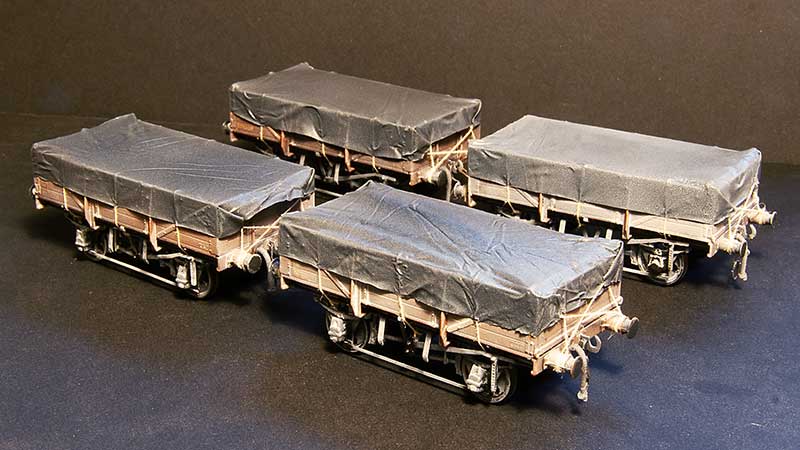
The final weathering, back to the white ink (sprayed this time) with some additional grease stains on the underframe.
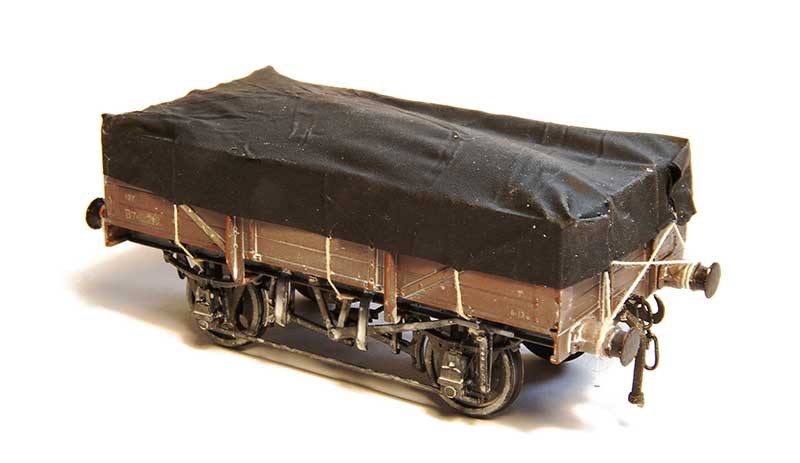
To break up the rake a bit I added a few 10ft wheelbase opens too. These are actually way more typical of the actual wagons used in the clayliners. The ex LMS Diagram 2150 I've featured before a few posts ago (remember Noel getting excited by the axleboxes?).
Likewise the ex LNE diagram 210 (although not this specific model)
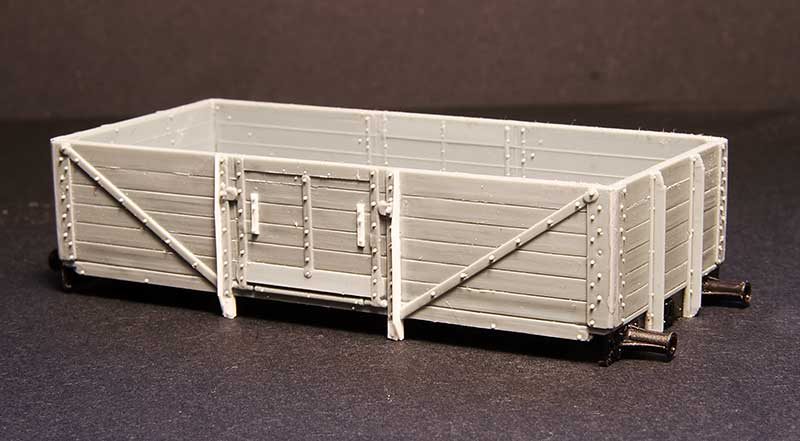
A new wagon type for me is the ex LNE diagram 185. This was constructed from the body of the Cambrian kit C81 for the LNER 12ton 6 plank Open Wagon, With a Parkside 10ft underframe. Theres a few tweaks needed to the body as can be seen and theres an additional top support across the top of the door which is worth adding assuming you aren't going to cover it over with a sheet that is!
Just need an enterprising transfer manufacturer to produce some sheet markings now.
So to have a clay train on Brettell road makes sense as a through service. I like the classic diagram 1/051 clay opens with their sort of cute, baby open wagon look about them. A little bit of rewriting of history is needed though as they tended to stay in Cornwall and not venture out to the Midlands. Brettell Road is set before the introduction of the clayliner service so my justification is that BR was trialing things out to see how they would work and thats good enough for me.
Ratio make a nice little kit for these and I was fortunate to find someone selling a box of 7 on Ebay for what basically worked out as a fiver each. The bodies go together well with a little bit of modification to make the ends fit. The kit features a somewhat crude attempt at a roller bearing and the brake levers are quite poor. It also includes cast buffers that aren't all that great. So the bearings were replaced with MJT ones although my research showed oil axleboxes to be more common anyway. Brake levers are from the Mainly Trains etch, door bangers from Rumney models and buffers from Lanarkshire models. I did one as a test then built the other 6 as a batch.
Before I move onto the sheets a bit about the weathering. I followed my usual approach of a wash of dark grime followed by a spray of AK interactive dark mud. This was then all sealed with Klear before AK interactive white ink was used (in various levels of dilution) to give an overall effect of clay staining. You don't want a fully weathered wagon at this stage, try to think of it as you are aiming for about half the effect you ultimately want.
Previously when I have done wagon sheets I make the sheet up with the ropes attached to it and then attach it to the wagon. This is a bit of a faff and sometimes the glue holding the rope to the sheet can give an odd effect so I approached this a bit differently. Roping of wagon sheets is a whole topic on its own and I will leave that too someone who has properly studied the subject but I just looked at pictures and coped what I saw. So the first stage is to attach the ropes (cotton) to the wagon - Tying it on at the visible ends and gluing to the wagon top with Loctite
This was then tided up by first sealing the knots with Zap Pink superglue. Theres no huge reason to trim the ropes inside the wagon but it pays to just keep things neat so they don't get in the way later.
As mentioned before the sheet is made from black latex gloves (actually nitrile) and mine are a brand called Supertouch. They are a bit awkward to cut as the material tends to snag on the scalpel blade even if the blade is brand new. A method I found to work best is to stretch the glove over a bit of cardboard, make a template and to cut it using the handle end of the blade not the pointy end, pushing the scalpel away from you to cut. I don't know why this makes a difference but it does! As i've mentioned in the past the material is black on the outside and a dark grey on the inside. I use the black side as its depicting wet conditions but the grey is good for a nice sunny day layout.
The sheet is then positioned in place, not forgetting to add weight inside the wagon and bulking it up with a bit of tissue first before gluing to the wagon tops in 6 places, about where the ropes are. Use Loctite and start in the middle (it sets very quickly) and remember to pull it taught as you glue the outer sides. This is one of those things were you probably need a bit of variation but you don't want to force it. I find if I try to be as neat as I can, I'm not all that neat really and I get the variation by default.
Next stage is to glue the sides of the sheet to the ropes, again with loctite and again puling the sheet taught. I found holding it in place for 10 seconds was all you need. It pays to glue the sheet the side of the wagon at the ends at this stage
On to the ends. Another drop of super glue on the top and the sheet can be glued in place. The corners can be folded and secured in place and the last set of ropes glued into the sheet itself.
The last ropes tied into place and tidied up.
The final weathering, back to the white ink (sprayed this time) with some additional grease stains on the underframe.
To break up the rake a bit I added a few 10ft wheelbase opens too. These are actually way more typical of the actual wagons used in the clayliners. The ex LMS Diagram 2150 I've featured before a few posts ago (remember Noel getting excited by the axleboxes?).
Likewise the ex LNE diagram 210 (although not this specific model)
A new wagon type for me is the ex LNE diagram 185. This was constructed from the body of the Cambrian kit C81 for the LNER 12ton 6 plank Open Wagon, With a Parkside 10ft underframe. Theres a few tweaks needed to the body as can be seen and theres an additional top support across the top of the door which is worth adding assuming you aren't going to cover it over with a sheet that is!
Just need an enterprising transfer manufacturer to produce some sheet markings now.
-
Noel
- Posts: 1984
- Joined: Wed Jun 23, 2010 1:04 pm
Re: Brettell Road - Clay and Sheets
jim s-w wrote:A little bit of rewriting of history is needed though as they tended to stay in Cornwall and not venture out to the Midlands
I don't have it to hand, but I have seen a photo, taken from ahead and above [from the South Devon up homes bracket, I imagine], of a train of empties passing Exeter St. Davids behind a class 37. Most were Highfits, but there were at least a couple of end door hinge bars visible, so some clayfits did wander. The side doors meant they were designed for more than just end tipping.
In case it's of interest, the empties were not sheeted. So far as I know, the sheets used were not dedicated for clay traffic, just part of the general population, although sheets for those unfitted wagons with sheet bars may have been, and the blue hoods were. BR Clayfits had hooks under the body sides, and the later circular securing points on the ends.
jim s-w wrote:(remember Noel getting excited by the axleboxes
Well, interested, anyway
jim s-w wrote:Just need an enterprising transfer manufacturer to produce some sheet markings now.
Sadly, I doubt that this is at all likely. The commercially available printed ones are less than wholly accurate, as I'm sure you know, so I ended up printing my own on paper.
Regards
Noel
Noel
-
Terry Bendall
- Forum Team
- Posts: 2428
- Joined: Sun Jul 27, 2008 7:46 am
Re: Brettell Road - Clay and Sheets
As always looking very nice Jim. What type of loctite did you use please?
Terry Bendall
Terry Bendall
-
jim s-w
- Posts: 2192
- Joined: Wed Jul 30, 2008 5:56 pm
Re: Brettell Road - Clay and Sheets
Noel wrote:jim s-w wrote:Just need an enterprising transfer manufacturer to produce some sheet markings now.
Sadly, I doubt that this is at all likely. The commercially available printed ones are less than wholly accurate, as I'm sure you know, so I ended up printing my own on paper.
You are right Noel. So far requests have drawn a blank (all with good commercial reason I must add)
Wonder if I can persuade the society to purchase a white ink printer?
Cheers
Jim
-
jim s-w
- Posts: 2192
- Joined: Wed Jul 30, 2008 5:56 pm
Re: Brettell Road - Clay and Sheets
Terry Bendall wrote:As always looking very nice Jim. What type of loctite did you use please?
Terry Bendall
Just the regular stuff for this one Terry. I'm a fan of their applicator bottles.
You do not have the required permissions to view the files attached to this post.
-
zebedeesknees

- Posts: 334
- Joined: Mon Jul 12, 2010 5:15 pm
Re: Brettell Road - Clay and Sheets
jim s-w wrote:Terry Bendall wrote:As always looking very nice Jim. What type of loctite did you use please?
Terry Bendall
Just the regular stuff for this one Terry. I'm a fan of their applicator bottles.
Me too! Especially the 'Power Gel' type which gives more time and some slide-ability before fixing.
Ted.
(A purists' purist)
-
jim s-w
- Posts: 2192
- Joined: Wed Jul 30, 2008 5:56 pm
Re: Brettell Road - Clay and Sheets
Absolutely Ted. The gel is my default one - Just needed something a bit quicker this time and the gel seems to behave a little weirdly on the glove material for some reason.
-
Terry Bendall
- Forum Team
- Posts: 2428
- Joined: Sun Jul 27, 2008 7:46 am
Re: Brettell Road - Clay and Sheets
jim s-w wrote:Just the regular stuff for this one Terry. I'm a fan of their applicator bottles.
Thanks Jim. I have not used that type of bottle before so will give it a go.
Terry Bendall
-
jim s-w
- Posts: 2192
- Joined: Wed Jul 30, 2008 5:56 pm
Re: Brettell Road - Clay and Sheets
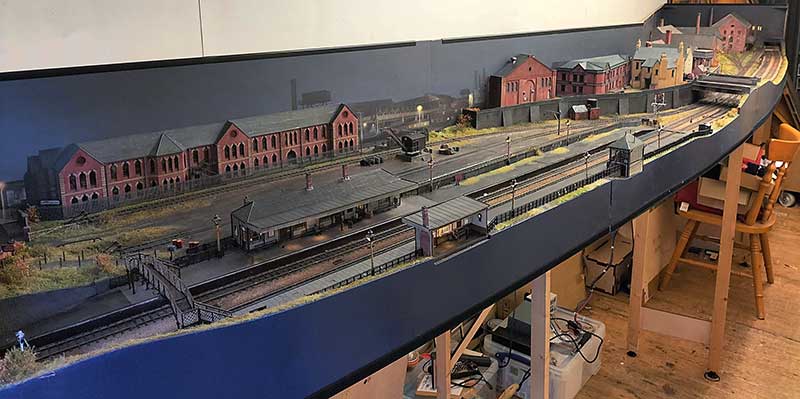
A bit of re-jigging of the shed means I have been able to put all of the scenic boards for Brettell Road up together. Its 5 months since the Cradley show - Time flies doesn't it?
Theres a few things to fix after the show. A couple of the points needed a check over as they weren't totally reliable. I also found 2 dead sections that hadn't shown up during the show so I fixed those too.
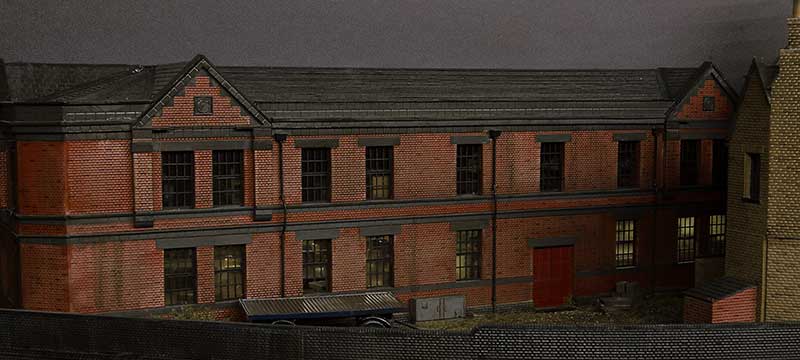
The lights on the upper floor of this building failed before the show but after the building had been planted onto the layout. It was too close to the show to fix it before so this is something to look at now I have time. I also want to add a few yard lights and sort out the telegraph poles on the layout because as they stand now they don't make a huge amount of sense.
The other thing to fix was the route setting on the main lines. Signalling purists are advised to look away now! Before the track and signals were all operated separately via the throttles with only the yard set up as a route. (My Digitrax system allows me to program routes into it.) So thats been changed for operator convenience so that throwing a signal sets the route as well. I know the route should be set then the signal pulled rather than this way round. You can set the signals to danger on their own but in case you forget the routes will set all the other signals to danger for you anyway. I hoping this will be pretty simple to use.
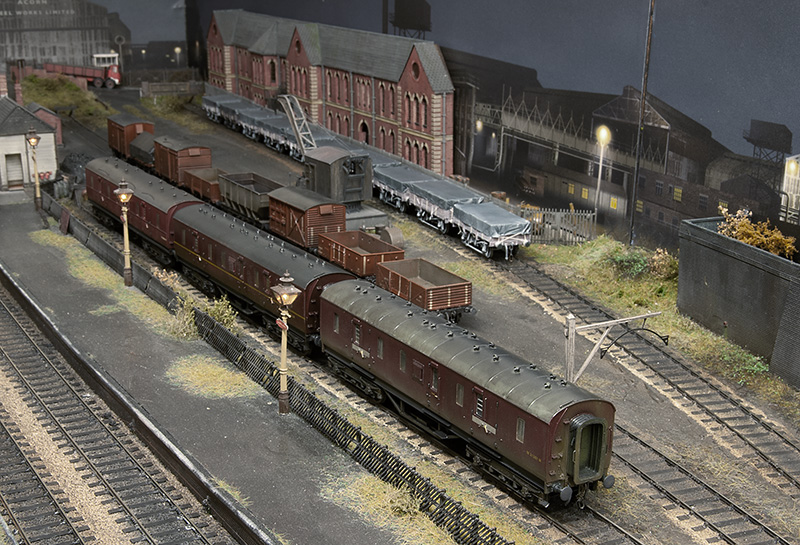
Since the show I have a small stockpile of new rolling stock to be tested. The rule is all stock must go everywhere without falling off, even though in this image only the middle road of wagons will go into the yard at shows. Of this little lot only 4 wagons were rejected and returned to 'works' for some fettling. These 4 have now been passed too.
Below, just some more traditional layout style pictures.
-
Serjt-Dave

- Posts: 643
- Joined: Tue Oct 02, 2012 3:31 pm
Re: Brettell Road - Shuffling and testing
A lovely layout Jim, very impressive.
Like yourself, When I introduce a new piece of stock on my layout it has to go all over the layout, including all siding through every bit of point work and operate all the automatic couplings three times. It's usually on the third time the shenanigans kick in.
All Best
Dave
Like yourself, When I introduce a new piece of stock on my layout it has to go all over the layout, including all siding through every bit of point work and operate all the automatic couplings three times. It's usually on the third time the shenanigans kick in.
All Best
Dave
-
steve howe

- Posts: 912
- Joined: Sun Feb 01, 2009 10:16 pm
Re: Brettell Road - Shuffling and testing
What sort of auto-couplings do you use Dave?
Steve
Steve
-
jim s-w
- Posts: 2192
- Joined: Wed Jul 30, 2008 5:56 pm
Re: Brettell Road - Back to wagons - and a correction.
A while ago I did a batch of shock opens including an attempt at an ex-LMS diagram 1983 variant. Justin of Rumney Models noticed that I had used the same ends as the BR version with inset corrugations while the LMS wagon has corrugations that stick out. Something I had completely failed to notice myself. So that wagon had its top lip removed and renumbered back to a BR one. A new kit was brought (well a few actually - saves on postage!) and a second attempt made using cut down spare ends from a Parkside 12t van kit. The BR version is at the back. Theres a few other differences too like the bang plates for the doors, the shape of the panelling on the ends and the braces under the door.

The finished wagon in the company of yet another D2150 13t open.
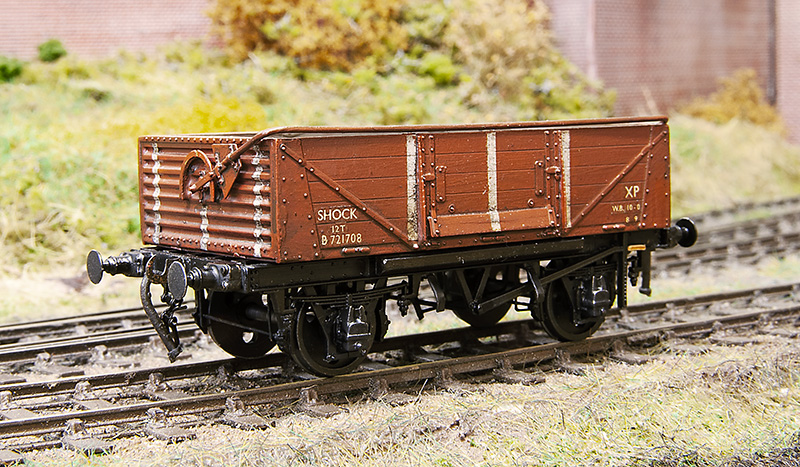
The BR wagon has had a Rumney models sheet rail added and been mated with a clasp brake chassis to produce a D1/040 variant. Buffers are from Lanarkshire Models.
Moving on to a couple of hoppers.
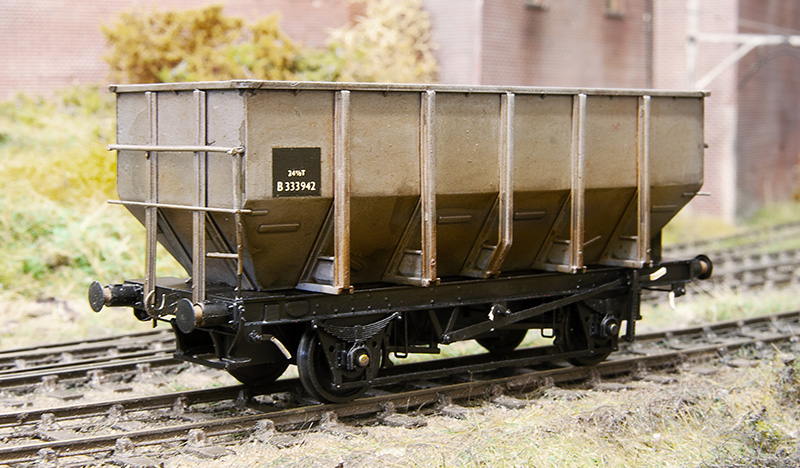
First up the Accurascale 24.5t hopper which i picked up cheaply from a private sale on Western Thunder. It came in brown livery and with a certificate saying it was a limited edition number 061 of 500. If this sort of thing matters to you and you have one you will be pleased to know that your model is now even more limited being 1 of 499 (You're welcome!). It was separated into its component parts (a process that had already started in the box) and the body resprayed. These are not a straight drop in wheels job as the axles used are a little short and theres a boss on the back of the W-iron, much like Lima was doing 40+ years ago. Its not a huge problem though as a few turns of a bearing cutter (I use Ed's tool) and a little bit of thinning the boss down and off you go. I also cut off the NM pockets.
What is a little bit more of an issue is it doesn't weigh anything, just 21 grammes out of the box. Obviously if you plan to run your wagons loaded no problem but if you want them empty (as did ) then a little bit of trickery is required.
My solution was to make new lower sides from 1mm lead. This brings the wagon up to 50 grammes. If you would like to follow suit I drew up a little cutting template which you can download from here https://p4newstreet.com/wp-content/uploads/accurascale-24.5t-hopper-weight-drawing.pdf
Another parkside 21 tonner based on a picture that came up on my facebook feed. (some of the wagons in the post are waiting a delivery of couplings you may notice). Theres often a discussion when these kits crop up that they are difficult to build but they really aren't. The trick is to assemble a side and end as 2 pairs on a piece of glass with a cutting matt to ensure they are square, let these set fully before assembling the rest of the wagon and theres no problems Any slight gaps between the panels can be filled from the inside using Mr Surfacer 1000 liquid filler.
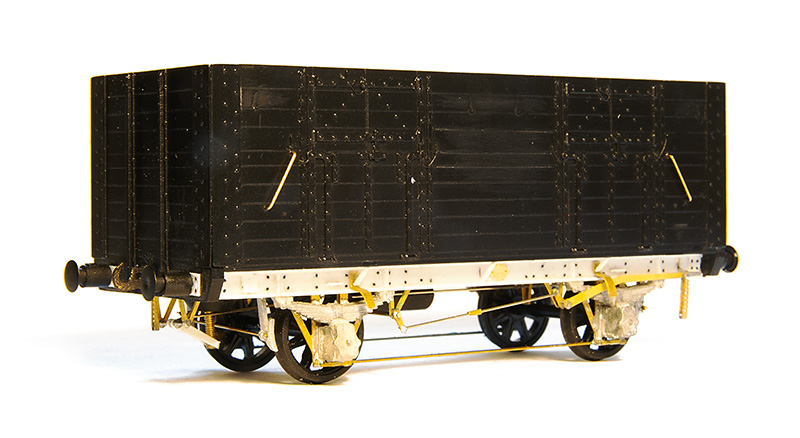
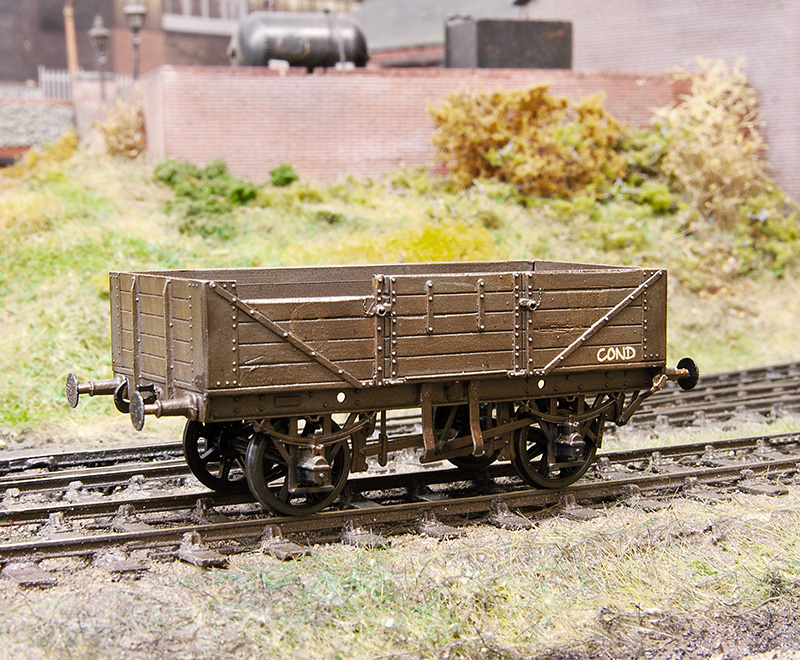
Now a few oddballs - this is an ex L&Y diagram 81 loco coal wagon from the old MAJ models kit. The kit is supplied with a wooden chassis which is correct for the earlier wagons but i wanted the later one so only used the body. The brake gear on these were a little weird to say the least. Just a note of thanks to Steve Carter for his assistance on this one.
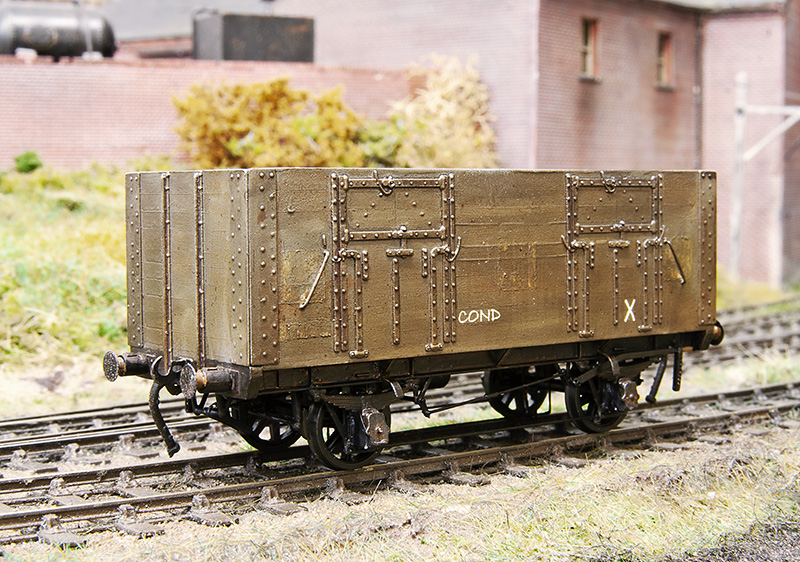
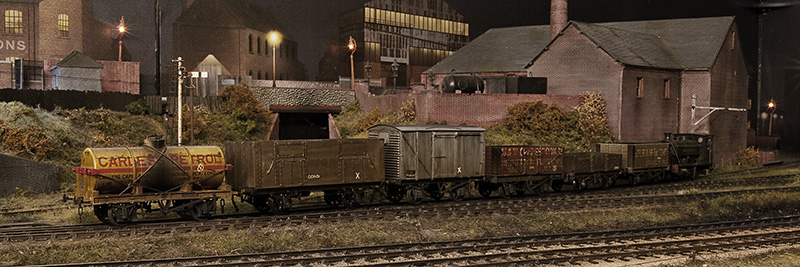
The plan is to have a short train of condemned wagons that is delivered to the yard as a trip working from Bescot. These are then to be collected by one of the Round Oak locos to be taken away for scrapping and the metal bits melted down in the furnaces. This is basically what happened and quite a few locos met their fate this way in real life. Unlike some of the more famous railway scrap yards stuff didn't hand around for long so nothing from my scrap train will have any hope of reprieve sadly. The condemned markings are from Railtec,
Another victim this time a GWR diagram 04 open from the cooper craft kit. Like another Coopercraft kit I've built this has the bearing holes mounted too low meaning that the wagon looked like it was on stilts. This one has slightly odd brake gear as well. You can just make out the old GW branding.
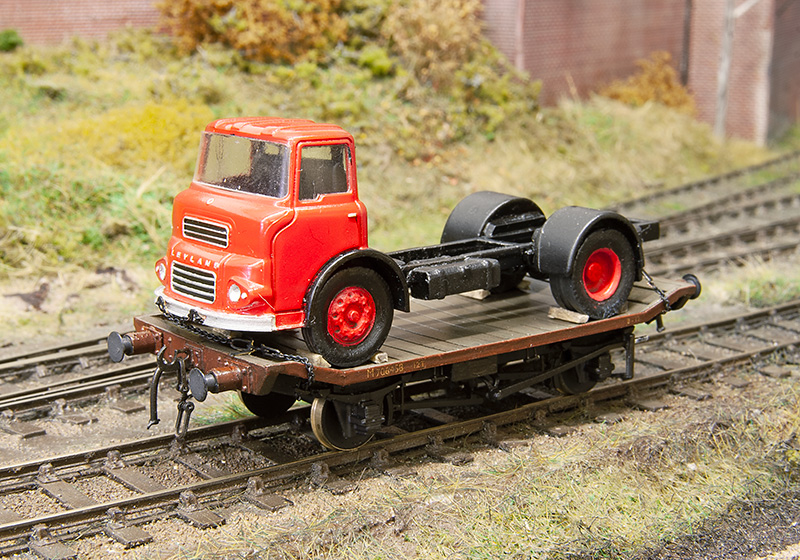
The LMS traction truck has finally been mated with its load.
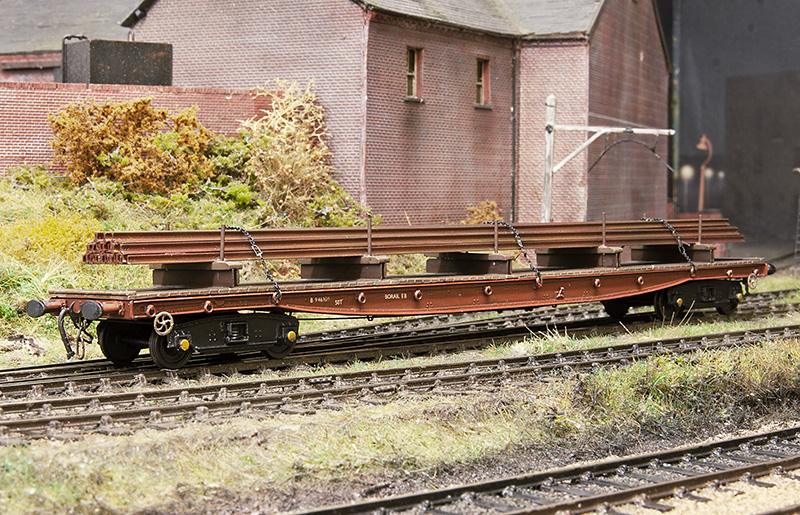
Also based on a picture that cropped upon my facebook feed is this Borail from the Cambrian kit. Making the load was far from the most interesting task I've ever done I can tell you and despite it being essentially hollow this wagon still hovered up 5 meters of rail!
Last edited by jim s-w on Mon Apr 08, 2024 6:33 am, edited 1 time in total.
-
Serjt-Dave
- Posts: 643
- Joined: Tue Oct 02, 2012 3:31 pm
Re: Brettell Road - Back to wagons - and a correction.
Hi Steve. I'm very sorry I've just seen you asked me a question in your thread back in March. To answer your question I use S&W couplings.
Excellent job there with your new batch of wagons.
All Best
Dave
Excellent job there with your new batch of wagons.
All Best
Dave
-
Worzels Works
- Posts: 74
- Joined: Tue Jun 20, 2023 4:04 am
Re: Brettell Road - Back to wagons - and a correction.
Jim those condemned wagons are brilliant, not something you see too often, bravo on the very subtle GW lettering below the weathering, I'd be really interested in a quick run down of how you achieved that 
Yours aye,
James
James
-
jim s-w
- Posts: 2192
- Joined: Wed Jul 30, 2008 5:56 pm
Re: Brettell Road - Back to wagons - and a correction.
Thanks James
It's nothing more complicated than dry brushing the transfers, vertically, with the same colour that the wagon is painted in. The whole wagon was also dry brushed, horizontally, in an old wood colour (mostly light grey but a touch of light brown) before my normal (but slightly heavier than usual) weathering. Final stage was too add the condemned markings and lightly weather again.
The ex L&Y wagon also has very faded LMS markings
-
jim s-w
- Posts: 2192
- Joined: Wed Jul 30, 2008 5:56 pm
Re: Brettell Road - Going over old ground
Ive recently been doing a few revisions on the layout.
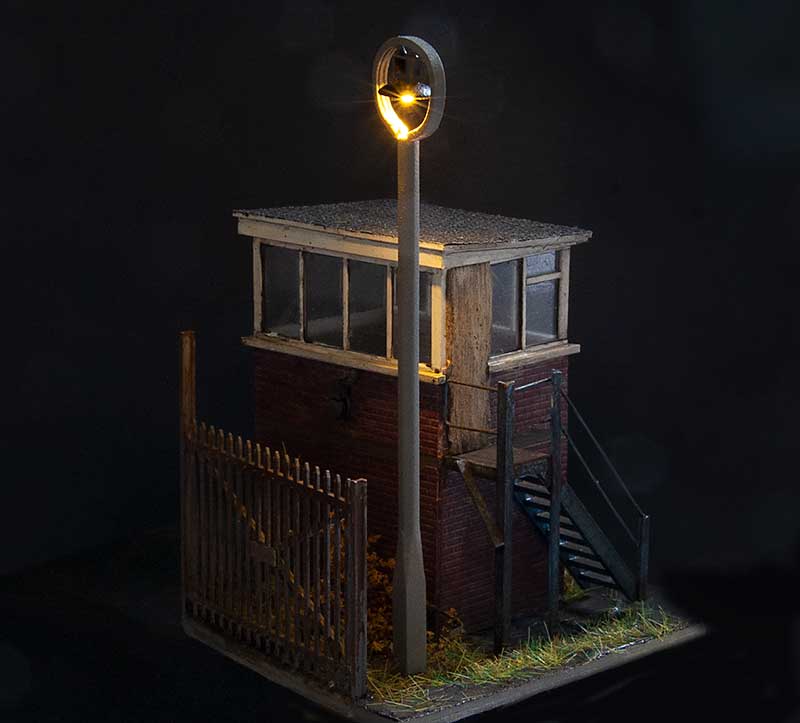
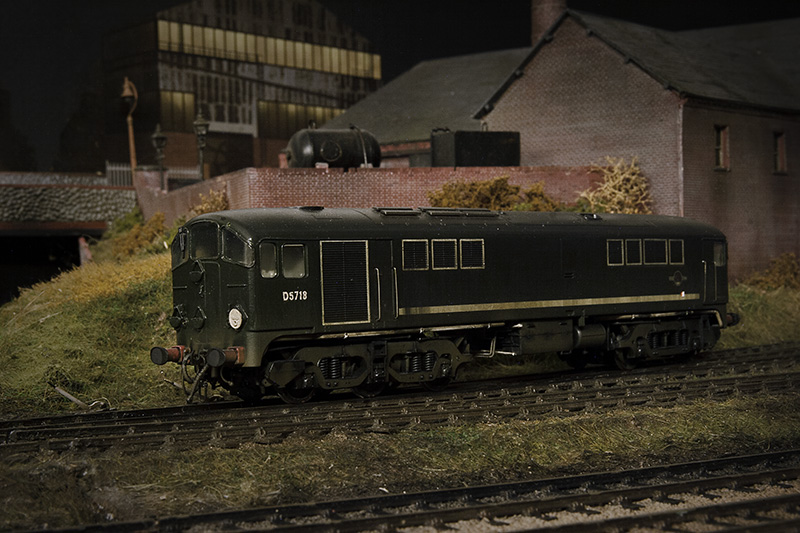
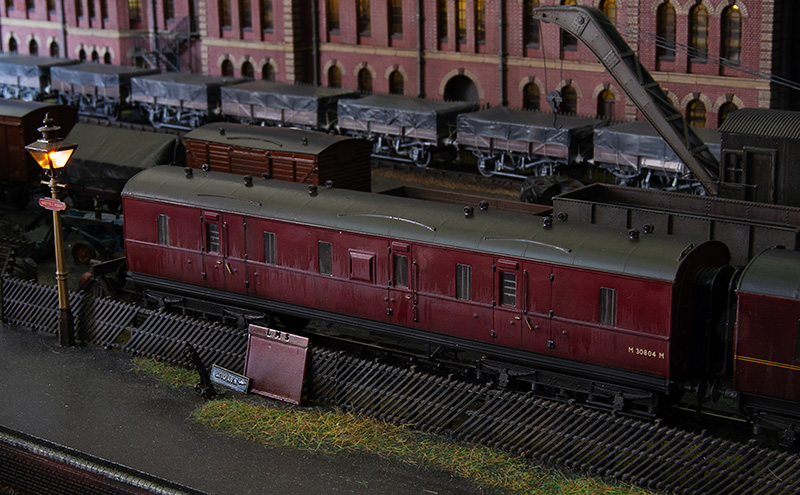
The first was prompted by a failure. It had always irked me a little that the above lamp was a little bit crude and the top wasn't really the distinctive shape the lights at Round Oak had. Being at the back in a dark corner it wasn't noticeable enough to invest any time into. However when it recently failed why not kill two birds with one stone?
So after a bit of tweaking I'm much happier with it now.
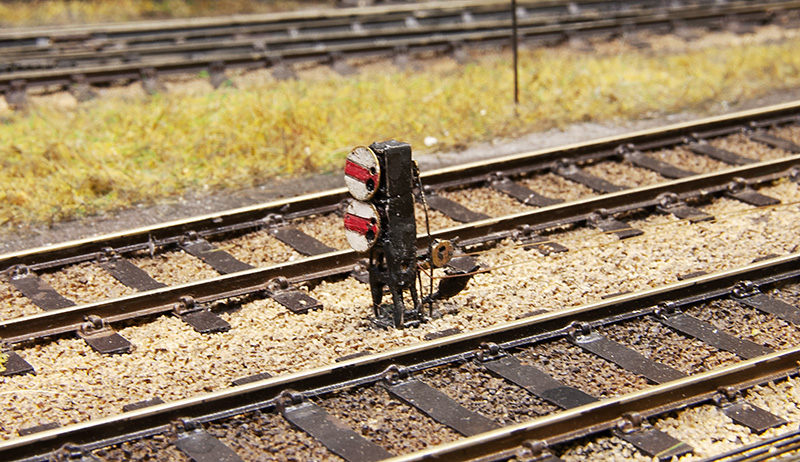
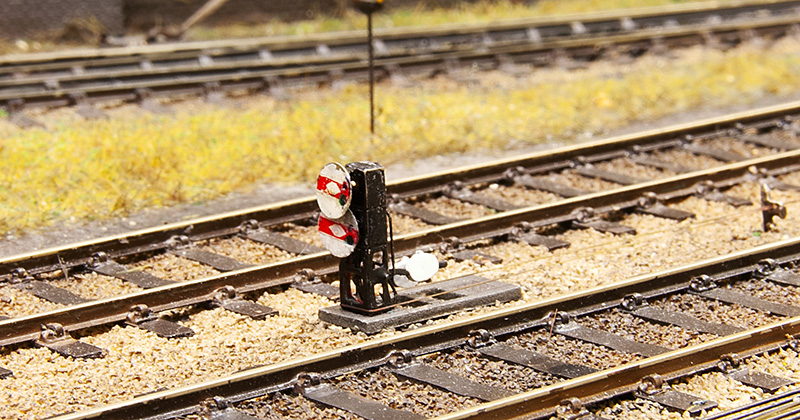
Ground Signals. I originally used the MSE kits but I had found a few drawbacks. First thing was A few had took some knocks while cleaning the track. As they use a whitemetal casting for the main body and legs they really didn't like this at all and were starting to look a bit bent and battered. Secondly as I had fitted lights there wasn't a lot of room to work and I had just drilled out the lamp housing and shoved a nano LED in there with slightly mixed results.
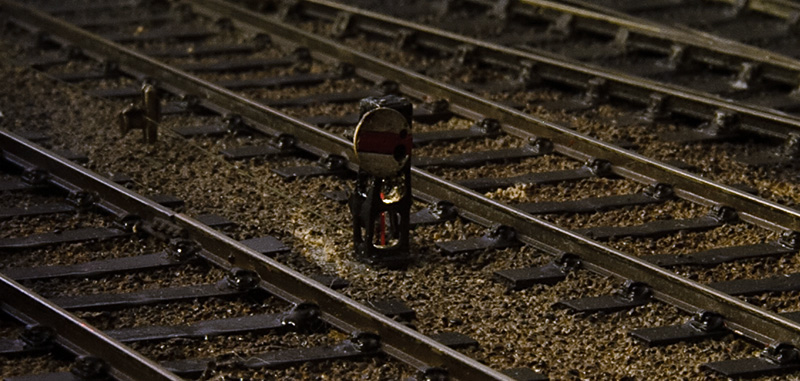
One consequence of this was more light bled out of the bottom than through the signal despite various attempts to fill the hole
So step in the Palatine models etched kits as a replacement https://www.checksystems.com/palatinemodels/4mmproducts.html . These are hopefully stronger and being an etch theres more room to position the LED in a better controlled way. I say more room but in 4mm scale ground signals are tiny but because of that even a slight gain is a big help. I modified the kits a little to make them work and drilled a couple of holes for the lights. Results are below
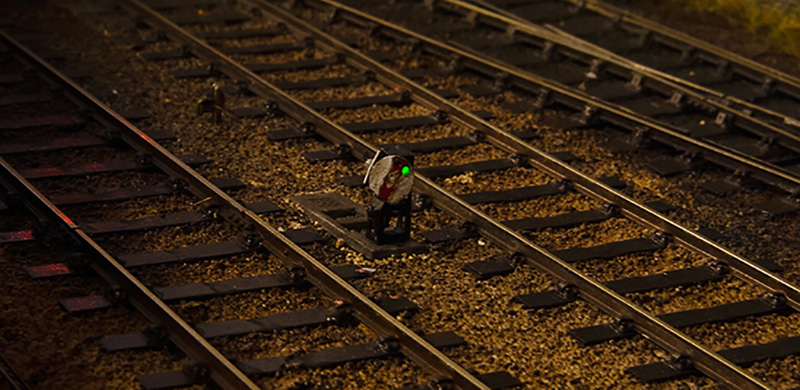
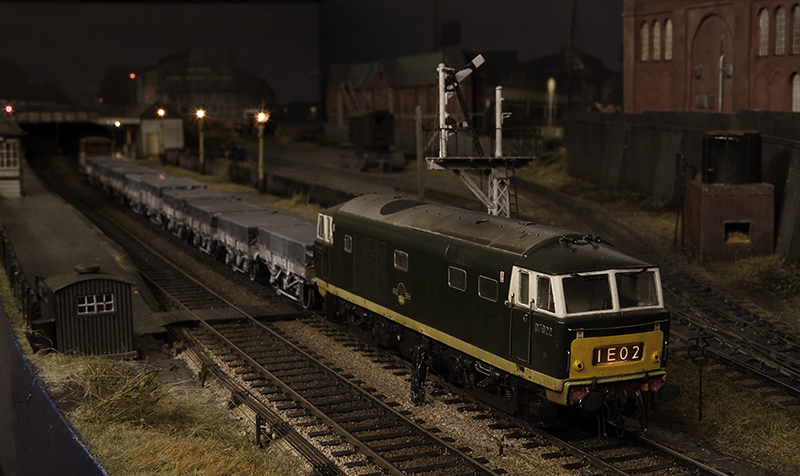
On the subject of signals Ive been playing around with resistors again to try to get the lamps a bit closer to how the real thing looked and less like a modern colour light. I think I'm there now.
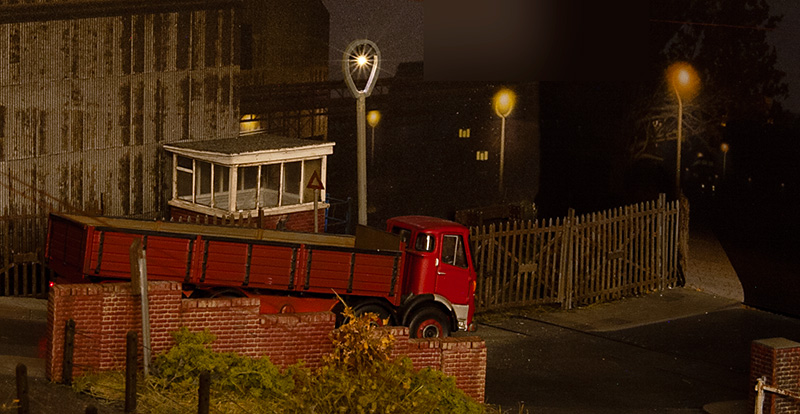
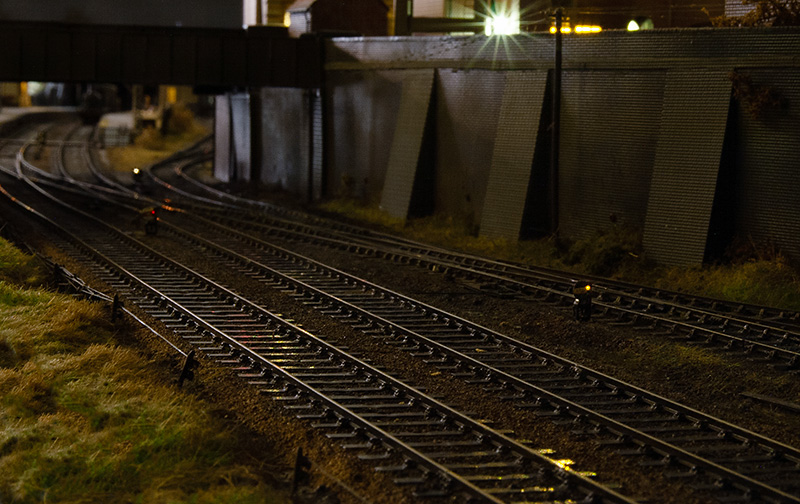
Up on the road Ive added a few telegraph poles meaning I think I can call this area finished now.
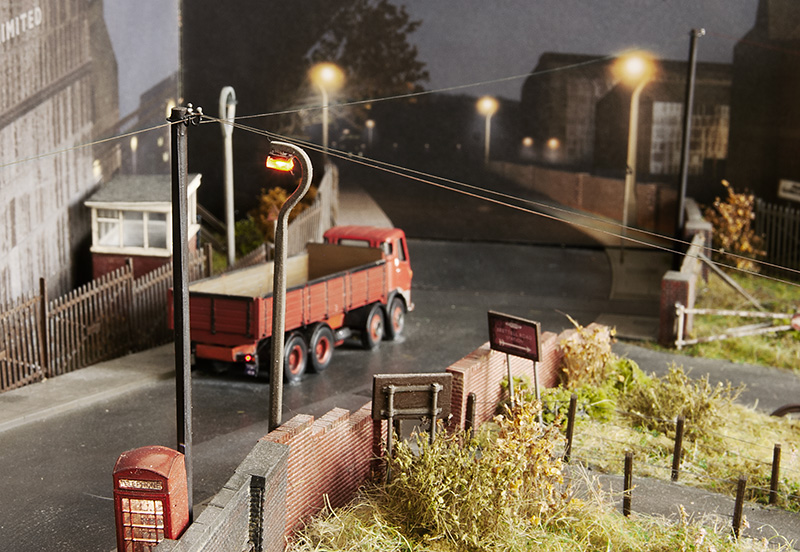
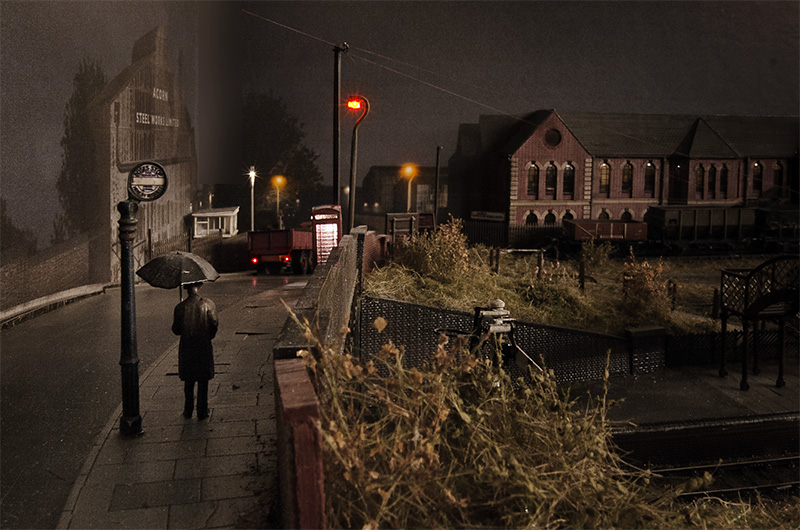
A revisit to my classic (or is that cliché?) scene. This time a wider version.
The first was prompted by a failure. It had always irked me a little that the above lamp was a little bit crude and the top wasn't really the distinctive shape the lights at Round Oak had. Being at the back in a dark corner it wasn't noticeable enough to invest any time into. However when it recently failed why not kill two birds with one stone?
So after a bit of tweaking I'm much happier with it now.
Ground Signals. I originally used the MSE kits but I had found a few drawbacks. First thing was A few had took some knocks while cleaning the track. As they use a whitemetal casting for the main body and legs they really didn't like this at all and were starting to look a bit bent and battered. Secondly as I had fitted lights there wasn't a lot of room to work and I had just drilled out the lamp housing and shoved a nano LED in there with slightly mixed results.
One consequence of this was more light bled out of the bottom than through the signal despite various attempts to fill the hole
So step in the Palatine models etched kits as a replacement https://www.checksystems.com/palatinemodels/4mmproducts.html . These are hopefully stronger and being an etch theres more room to position the LED in a better controlled way. I say more room but in 4mm scale ground signals are tiny but because of that even a slight gain is a big help. I modified the kits a little to make them work and drilled a couple of holes for the lights. Results are below
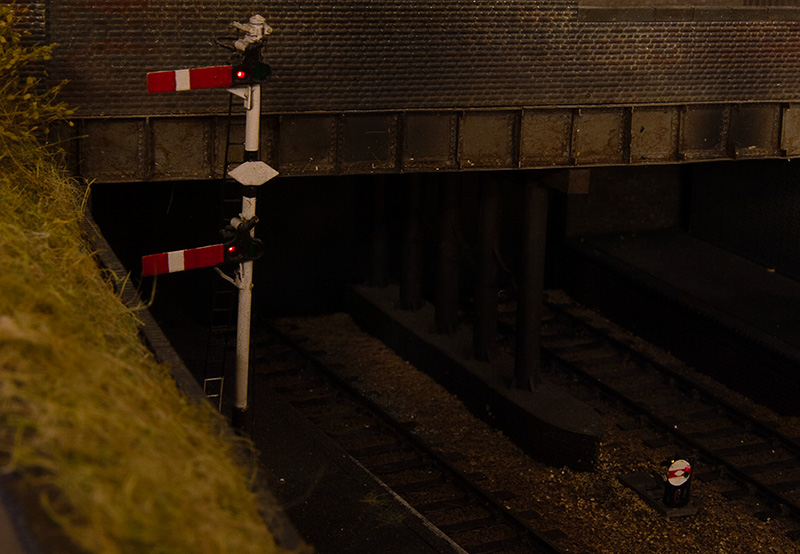
On the subject of signals Ive been playing around with resistors again to try to get the lamps a bit closer to how the real thing looked and less like a modern colour light. I think I'm there now.
Up on the road Ive added a few telegraph poles meaning I think I can call this area finished now.
A revisit to my classic (or is that cliché?) scene. This time a wider version.
Who is online
Users browsing this forum: ClaudeBot and 2 guests